Nomarski imaging interferometry to measure the displacement field of MEMS
Abstract
We propose to use a Nomarski imaging interferometer to measure the out-of-plane displacement field of MEMS. It is shown that the measured optical phase arises both from height and slope gradients. Using four integrating buckets a more efficient approach to unwrap the measured phase is presented, thus making the method well suited for highly curved objects. Slope and height effects are then decoupled by expanding the displacement field on a functions basis, and the inverse transformation is applied to get a displacement field from a measure of the optical phase map change with a mechanical loading. A measurement reproducibility of about 10 pm is achieved, and typical results are shown on a microcantilever under thermal actuation, thereby proving the ability of such a set-up to provide a reliable full-field kinematic measurement without surface modification.
1 Introduction
The increasing interest for micro-electro-mechanical systems (MEMS), especially when they are used as micro-mechanical sensors [1], leads one to focus on the mechanical behavior of micro-objects. First, the standardized mechanical tests at the macro scale have been adapted to the micro one, assuming an homogeneous stress or strain state. Bending [2] and tensile tests [3, 4], as well as fatigue or creep tests [5] are performed since years, providing a global kinematic response of the tested object.
However, classical photolithography processes use visible light to transfer a mask onto a wafer surface. Then, light diffraction limits the achievable accuracy of the geometric shape of the resulting micro-objects, and the dimensions margins tends to increase compared to the dimensions themselves as the object’s size decreases. The homogeneous stress (or strain) assumption usually satisfied when performing mechanical tests at the macro-scale is no longer reasonable, and one has to deal with heterogeneous mechanical tests. As a consequence, one has to perform a spatially resolved kinematic measurement instead of a global one.
Moreover, as their size decreases, the surface on volume ratio significantly increases, and the behavior of micro-objects tends to be dominated by surface effects instead of volume ones. As a consequence, measuring the displacement field should avoid any surface modification or any contact. In addition, the surface roughness of MEMS is usually very low, so that measurement techniques involving surface-generated speckle [6] may be difficult to implement [7].
An optical interferometric imaging set-up is then well suited to measure displacement fields. The polarization interferometer [8] proposed herein is derived from the one initially proposed by Nomarski [9]. Dealing with surface topographies, it has been previously used to determine the mean slope of tilted samples [10] or to get an image of the roughness of polished surfaces using a multichannel Nomarski microscope [11, 12, 13].
After recalling the relation between the optical phase induced by the sample-Wollaston prism group and the measured intensity, the twofold origin of the optical phase is detailed. A shot-noise limited detection is described, and the inversion method developed to convert an optical phase change into an out-of-plane displacement is presented. An example is finally provided on the measurement of the displacement field of a thermally loaded micro-cantilever.
2 Measuring a differential topography
2.1 Experimental set-up
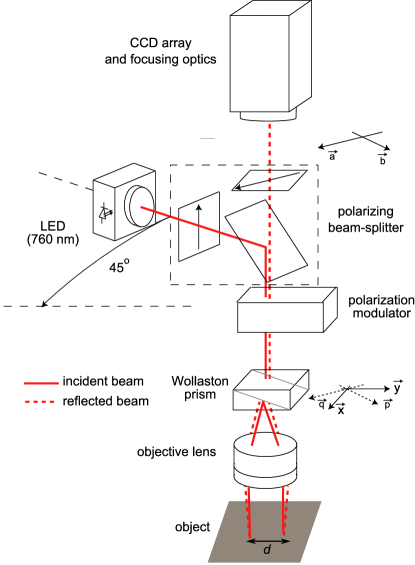
The basic interferential microscopy imaging set-up is shown in Fig. 1. A spatially incoherent light source (LED, nm) illuminates a polarization beam-splitter. The beam reflected by the beam-splitter goes through a polarization modulator and is initially polarized at of the axes of a Wollaston prism. This splits the beam into two orthogonally polarized beams at a small angle between each other. These beams are focused upon the sample by an objective lens. After reflection and recombination by the Wollaston prism, the beam goes through the polarization modulator and the polarization beam-splitter. The transmitted beam is finally focused on a CCD array. The polarization beam-splitter behaves as crossed linear polarizers mounted at of the axes of the Wollaston prism and of the polarization modulator. One finally gets the interference between two images of the sample, shifted by the Wollaston prism of the distance . The resulting interference pattern is recorded on a CCD array (DALSA CA-D1, pixels, 8 bits).
2.2 Interference pattern obtained with a Nomarski imaging interferometer
Let us denote (Fig.1) the polarisation direction of the beam incident on the Wollaston prism. The Wollaston prism shear-direction is denoted . The vector denotes the polarisation direction of the beam impinging on the CCD array. The orthogonal directions, in the prism’s plane, are denoted , , , respectively. One uses a light emitting diode, so that we denote the amplitude of the non polarized wave impinging on the polarizing beam-splitter. If is its amplitude transmission factor, and the attenuation factor for the (ideally) suppressed component, the Wollaston prism is illuminated by two orthogonally polarized beams, which electric fields are and , with
| (1) | |||
| (2) |
For a non polarized light source (LED), these two beams are incoherent, and should be treated separately. is the transmission factor in the stop direction, so that is the perfect polarizer case. For each beam, the Wollaston prism splits the beam into two orthogonally polarized beams (i.e., a and a component), and the light goes through the path (objective - sample - objective - Wollaston prism). Let us consider that this results in a phase shift between the and the components. Let us denote the transmission factor of the path (Wollaston prism - objective - sample - objective - Wollaston prism), the analyser’s transmission factor, and its further attenuation factor in the stop direction. The total intensity impinging locally on the CCD array is the sum of the intensity arising from the two incoherent beams
| (3) |
Assuming that , one obtains [10]
| (4) | |||||
| (5) | |||||
| (6) |
The contrast of the interference pattern
| (7) |
equals for perfect polarizers (), and decreases when or increase. Adding an error on the orientation of the polarization beam-splitter leads to the same expression, so that the equation (4) is considered general enough to describe real interference patterns.
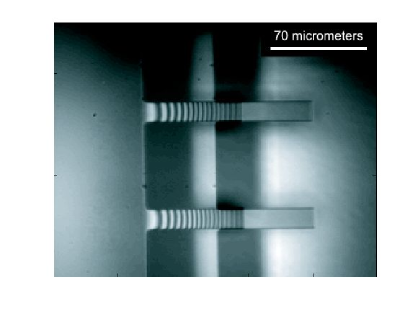
A typical interference pattern obtained in water with two 70 micrometers long micro-cantilevers and a shear distance is shown on figure 2. The two sheared images are clearly distinguishable. The optical phase range covers almost 15 interference fringes. The closely packed interference fringes, as well as the quite short correlation length of the used light source (almost ) reduce the contrast of the interference pattern, thereby limiting the quantitative use of obtained phase map. Let us assume that the optical phase introduced by the path (Wollaston prism - objective - sample - objective - Wollaston prism) may be decomposed in a term arising from the Wollaston prism and a contribution arising from the object
| (8) |
The section 2.3 exhibits the phase directly arising from the Wollaston prism, whereas the section 2.4 exhibits the phase arising from the topography of the sample.
2.3 Optical phase arising from the Wollaston prism
2.3.1 Optical path functions
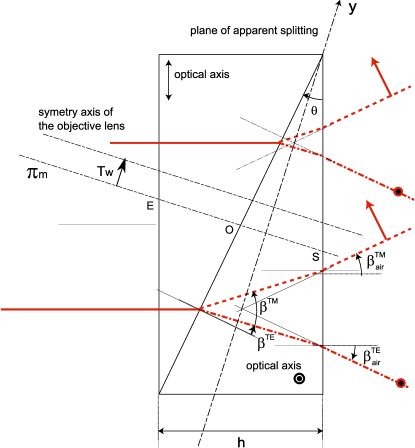
Let us consider for simplicity an “ideal” Wollaston prism, which geometry is described in the plane defined by both the optical axis of the system and the direction on figure 3. Fig. 3 shows the decomposition of a ray impinging orthogonally on the prism into two emerging rays and the angles definition. Snell-Descartes’ laws at the interface between the two half-prisms read
| (9) | |||||
| (10) |
where is the ordinary refractive index of the used birefringent material, and is the extraordinary one. Assuming an ambiant media with a refractive index equals to 1, Snell-Descartes’ laws for the exit face of the prism read
| (11) | |||||
| (12) |
If all the angles are small
| (13) |
The emerging rays appear to split on a plane, called plane of apparent splitting (PAS), which is here located inside the prism. The use of a modified Wollaston prism [14] allows one to move the PAS outside the prism. This plane is considered to be perpendicular to the figure’s plane. Its position is one of the fundamental characteristics of the prism. Investigating the imaging properties of the system, let us denote the angle of an impinging ray with respect to the normal of the entrance interface in the figure’s plane. Considering any dependance on is then moving in the field of view along the shear direction. The optical path travelled by the (resp. ) polarized ray through the prism (resp. ) when the apparent splitting occurs at position on the PAS (the origin will be defined later) depends on . Assuming that all the angles are small,
| (14) |
These two functions will be referred as optical path functions.
2.3.2 Optical phase when the PAS matches the objective rear focal plane
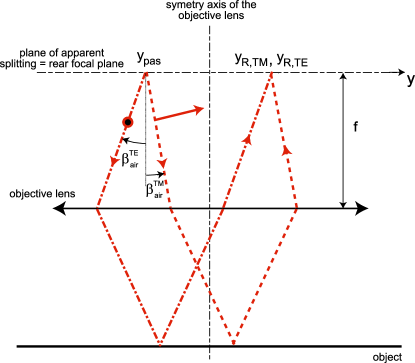
Assuming that the PAS of the prism matches the objective rear focal plane, Fig. 4 presents the ray tracing for the two emerging rays of Fig. 3. These two emerging rays intersecting the PAS at the cross the PAS, after reflection on a plane object, at the the same point when the object is orthogonal to the lens axis. This last point is symmetric of the first with respect to the lens axis. Let us thus define the median plane of the prism as orthogonal to both the figure’s plane and the PAS, passing by the point (see Fig. 3). This point is defined to satisfy the condition . Let us then consider that the distance between the plane and the symmetry axis of the lens is . Any point of the PAS may be described either by the abscissa in the prism’s frame (the origin is at the intersection with ) or by the abscissa (relative to the symmetry axis of the lens). In the prism’s frame, the rays emerge from the PAS at , and the reflected rays go through the PAS at . The optical paths and travelled to the sample and back are deduced from and and allow one to compute the optical phase
| (15) |
The first term in (15) no longer depends on but on the position of the prism with respect to the symmetry axis of the lens , and is homogeneous in the field of view. If the birefringence of the used material is denoted , the additional optical phase difference (second term) proportional to the incidence angle is shown to grow as whereas the first term scales as , so that the added optical phase may be considered homogeneous in the field of view. For a quartz-made Wollaston, so that the added optical phase may be considered homogeneous in the field of view. This is no longer true when the PAS doesn’t match the rear focal plane of the objective, because the reflected rays no longer cross the PAS at the same point (see Fig. 4). Assuming that the PAS remains parallel to the rear focal plane, at a distance and using the same method, the additional optical phase difference is
| (16) |
thus introducing a linear phase along the Wollaston shear direction.
2.4 Optical phase arising from the object topography
2.4.1 Optical phase arising from height variations
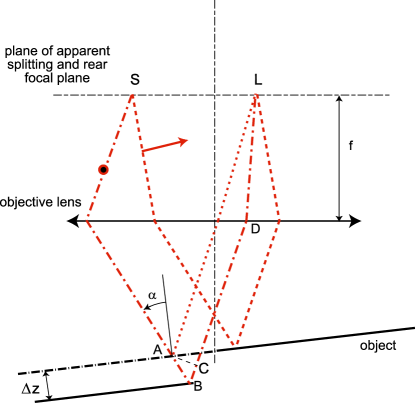
The previous ray tracing is shown in the case of a stepped sample (height ) in Fig. 5. Thanks to the Fermat’s principle, tilting the sample doesn’t induce an extra phase shift in the objective-sample path (i.e., regardless of the phase shift induced by the Wollaston prism). The dot line is for the ray reflected under the previous conditions. The optical phase difference arising from the step corresponds to a travel along and , where is the orthogonal projection of on . In a medium which refractive index is , this optical phase difference reads
| (17) |
where is the incidence angle on the object. If the numerical aperture of the objective is low enough, remains small and the above expression expands
| (18) |
As the numerical aperture of the objective increases, the previous expansion is no longer valid and the equation (18) is replaced, for numerical apertures less than , by
| (19) |
where is a scale parameter depending on the numerical aperture (see appendix A).
2.4.2 Optical phase arising from the local surface orientation
In section D2.4.1, the two orthogonally polarized rays cross on the PAS. This is no longer true if the two rays experience a different surface orientation.
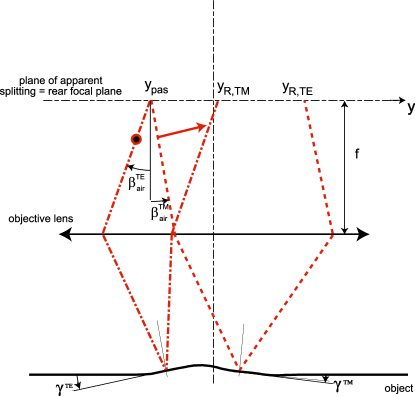
Let us denote by (resp. ) the local surface orientation experienced by the (resp. ) ray. For a ray emerging from the PAS at the position (in the prism’s frame), the reflected rays cross the PAS at the abscissa (figure 6)
| (20) | |||
| (21) |
Where is the focal length of the objective lens. The optical path travelled by the two rays reads (with )
| (22) | |||||
| (23) |
and the optical phase difference reads (to the first order with respect to the surface orientation)
| (24) |
One should highlight that this optical phase difference doesn’t arise from the sample itself, but from the optical phase imbalance it introduces when the rays travel back through the Wollaston prism. Moreover, this phase difference depends on the abscissa , and then on the angle . It’s also worth noting that a global tilt of the specimen (i.e., ) induces an extra optical phase. It arises from the previous remarks that the relation between the local surface orientations and the induced optical phase depends on the prism-objective group. This relation may be rewritten
| (25) |
with
| (26) |
The scalar then describes the prism-objective group. It may be obtained when measuring the optical phase when tilting a reasonably flat mirror.
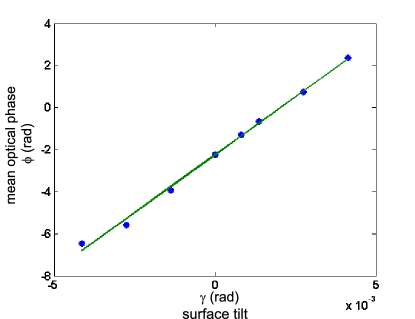
The figure 7 shows the result of such a calibration for a quartz Wollaston prism () and a water immersion objective lens (focal length , NA , used to obtain the interference pattern in Fig.2). The relation is linear, and the fitted slope is
| (27) |
This simple experiment allows one to obtain the sensibility to a local orientation gap by tilting the whole sample.
Finally, the total measured optical phase difference may be written as the following sum
| (28) |
where the two first terms (related to ) account for the path difference introduced by the Wollaston prism itself : an homogeneous term and a linear term along the shear direction which vanishes when the PAS matches the rear focal plane of the objective lens. The two last field terms (related to ) originate from the surface topography : height variations and slope field, including the contribution of the mean tilt of the sample as well as slope variations .
3 Phase integration, retrieval and unwrapping
3.1 Principle
The optical flux collected by the pixel indexed by on the CCD matrix can be formally written according to (4) as
| (29) |
where , which is to be determined, is the optical phase introduced by the sample and the Wollaston prism. The phase modulation introduced by the photoelastic modulator reads
| (30) |
The angles et are two parameters that can be chosen among many couples. The algorithm to obtain uses four integrating buckets [15]: if is the modulation period, four images of the interference pattern can be captured during the period , so that each image results from the integration of the optical flux during a quarter of one period. One obtains four images , for
| (31) |
Combining with Eq. (29) allows one to obtain
| (32) | |||||
where is the first kind Bessel function of order. The images depend on , and , so that using four independent images provides enough information to recover . Classical algorithms [15] use particular linear combinations
| (33) |
with
| (34) |
The optical phase is then usually recovered by using an “atan2” function with the arguments provided by the equations (33) with a couple satisfying . The indicator
| (35) |
is then independent of the phase and defines the intensity of the signal experiencing the phase . As a consequence, the phase obtained from the previous algorithm is reliable provided that is high enough, i.e., if the fringe contrast is sufficient. This condition may be difficult to satisfy when the topography is described by a large number of closely packed interference fringes (see Fig.2). It’s worth noting that the set of four images provides an over-determinated set of data. This redundancy is then exploited to provide a more reliable phase measurement.
3.2 Least-square phase retrieval
For each pixel of the CCD array, the set of Eq. (32) may we rewritten as a linear system of equations
| (36) |
where the parameters vector reads ( denotes the transpose of )
| (37) |
and the images vector
| (38) |
The matrix is built from the modulation parameters
| (39) |
with
| (40) | |||||
| (41) | |||||
The matrix is then independent of the considered point. For each pixel of the CCD array, the four images describe the vector , and the solution parameters vector is obtained as a minimizer of
| (42) |
and is the solution of the square linear system
| (43) |
The couple is then extracted, and used as the argument of a standard “atan2” function to provide a less corrupted value of the phase.
3.3 Phase unwrapping
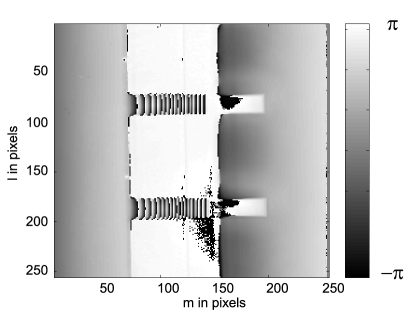
The use of the phase integration technique also allows one to reconsider the phase unwrapping problem. In the previous section, the information derived from the experiments is a couple proportional to
| (44) |
where when the linear combinations (33) are used, and when the least-square algorithm is used. In the first case, the couples and are equal. For a sake of simplicity, let us consider that a wrapped value of the phase is then obtained by using
| (45) |
lies then in . Recovering the unwrapped value of the phase may turn into a brain-racking task when the phase-map is poorly discretized and the phase jumps are densely packed. Numerous algorithms are available in the literature, based either on local phase unwrapping [16] or on global phase unwrapping [17]. Contrary to most of these algorithms, which use a wrapped phase map as an input, we propose here to use the two fields and .

The figure 9 shows a typical case of phase jump between two adjacent points 1 and 2. Their true phase and is under scrutiny. As and , using the “atan2” function induces a phase jump when moving from 1 () to 2 (). Let us then define the frame , obtained by rotating the frame until the point 1 belongs to the axis. The phase of the point 2 in the frame is then obtained according to
| (46) |
providing the gap between the true phase values and , thus defining (if 1 and 2 are for adjacent pixels), the true phase gradient, modulo . The couple is obtained of the four images using one of the two algorithms previously described. and are deduced from the wrapped value . The phase gradient may then be integrated to provide a true phase map.
3.4 Reproducibility of the phase measurement
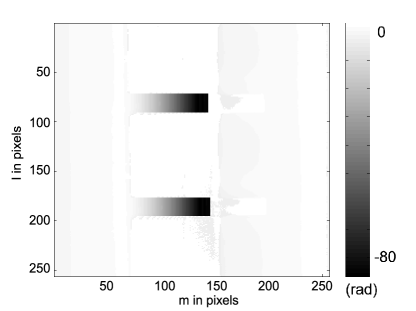
The phase measurement reproducibility is assessed by measuring twice the phase map arising from the same differential topography of a reflective object. One gets two phase fields and . Assuming that each of these fields is the sum of deterministic part and of a random part
| (47) | |||
| (48) |
the difference between the two phase fields provides then a realization of the difference between two realizations of the noise
| (49) |
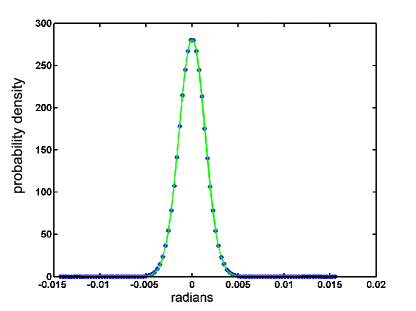
The figure 11 shows a typical probability density of the variable obtained with the set-up described in Section 2.1. The dots are the experimental distribution, whereas the solid line is a least-square fit using a Gaussian, zero-mean, distribution. The agreement is excellent, and allow us to consider as a random real number of variance , if is a random variable which variance is .
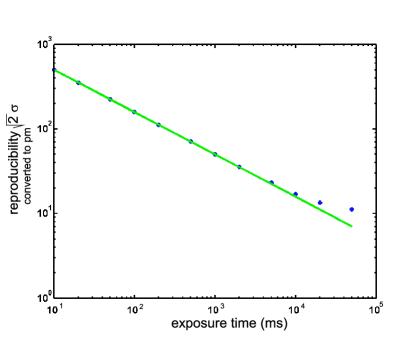
The figure 12 shows the evolution of (converted to heights variation assuming (18)) as a function of the exposure time used to form each intensity image. The experimental variance grows as , until the exposure time reaches several tens of seconds. The reproducibility is therefore controlled by the exposure time, and the achieved level is (converted to height variations) close to 10 pm.
4 Recovering the displacement field
4.1 Principle
The calculations presented in sections 22.3 and 22.4 allow one to derive an expression for the measured phase as a function of the surface topography. Assuming that the pixel size (in the object plane) is small enough comparing to the object’s size, one proposes for a sake of simplicity to formulate the inversion problem in the object’s plane. Inserting Eq. (19) and Eq. (25) into Eq. (28) allows one to write the total measured phase difference at the point
| (50) |
Assuming that the shear direction is parallel to the axis, and that the local surface orientation in Eq. (25) is given by the first derivative of the topography, the relation between the measured information and the topography reads, for a shear distance
| (51) |
where is the topography. To discriminate between the phase arising from the slope variations and those arising from height variations, one proposes to expand the topography on a functions basis
| (52) |
so that the reference (initial) measured phase field reads
| (53) |
One should highlight that the shearing amount is here introduced explicitly to compute the functions basis by inserting Eq.(52) into Eq.(51). If the topography is subjected to an out-of-plane displacement field , is changed into and the new topography is described by
| (54) |
so that the displacement field is also expanded on the same functions basis
| (55) |
The knowledge of the numerical coefficients involved in the definition (51) of combined with the choice of a functions basis allows one to recover the displacement field by computing the coefficients minimizing
| (56) |
that is solving the linear system
| (57) |
with
| (58) | |||||
| (59) |
4.2 Example
The micro-cantilevers shown on Fig.2 are placed into a fluid cell, filled with milliQ water which temperature is controlled thanks to a feedback loop controlled Peltier device. These cantilevers are multi-layer cantilevers, made of a silica layer (770 nm), a titanium layer (20 nm) and a gold layer (50 nm). These cantilevers are then subjected to a bimaterial effect, since the coefficient of thermal expansion of the gold layer is almost ten the one of the silica layer. The optical set-up is also used with the Wollaston prism-objective couple calibrated in Section 2.4.2. A reference phase map of the cantilever is captured at . The temperature is then increased to reach , and a new phase map is captured.
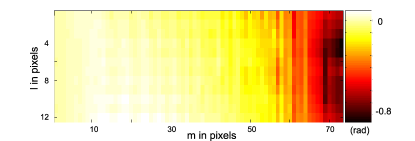
The phase gradients are computed according to the algorithm described in Section 33.3. Recovering the two-dimensional phase map from the phase gradients is an over-constrained problem, so that it is possible to avoid some unreliable data. Reliable data are then located where the indicator defined by Eq.(35) is greater than a user-defined threshold. The figure 13 shows the measured phase map change when the cantilever is submitted to bimaterial effect. One distinguish the substrate, which is not subjected to any modification. One then remark the phase change is not homogeneous across the cantilever.
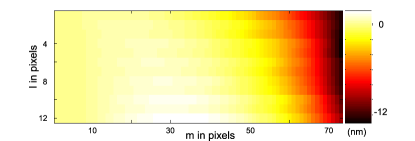
The displacement field is then recovered using the algorithm described in Section 44.1. The function basis is chosen to be able to represent the expected mechanical effects. As a consequence, one chooses cubic hermite polynomials [18] by part along the direction. In the present example, four elements along the cantilever are found to be sufficient to describe heterogeneous effects, and the projection is made independently for each line across the beam. The figure 14 shows the resulting displacement field, which clearly exhibits an heterogeneous behavior across the cantilever. One should emphasize, that the free end of the cantilever experiences a phase change of 0.8 rad (Fig.13). This value is to be compared to the one arising only from a 12 nm height modification (Fig. 14), which is 0.18 rad (first term in Eq.(51)) ; thus demonstrating the necessity of taking both height and slope changes into account. Moreover, the displacement field shows the cantilever part close to the anchoring rises up as the temperature increases, whereas the cantilever as a whole bends down. This is thought to be the signature of an under-etched cantilever, as the remaining silica pedestal dilates and pushes the surface up. This example typically illustrates the extensive amount of informations provided by full-field measurement compared to pointwise ones.
5 Conclusions
A Nomarski imaging interferometer is used to measure the differential topography of reflective objects. A phase modulation is introduced to measure the phase map arising from the object with a sensitivity independent on the actual phase value. The phase measurement is shown to be shot-noise limited, and a measurement reproducibility of almost 10 pm is achieved. The use of four integrating buckets with a least-square algorithm is shown to improve the phase retrieval in case of low fringe constrast. Moreover, this allows to reconsider the phase unwrapping problem, so that it is easy to deal with highly curved objects.
The physical origin of the measured optical phase is calculated, and exhibits that the phase difference is due to both height and slope variations. A simple calibration procedure allows one to check for the phase sensitivity to slope variations. These two effects are then decoupled expanding the displacement field onto a chosen functions basis.
The out-of-plane displacement field of a MEMS cantilever subjected to bimaterial effect is then recovered thereby proving the ability of such a set-up to provide a reliable full-field kinematic measurement without surface modification. This tool provides then a full displacement field using a common-path interferometer. Moreover, its stability, as well as its ability to operate through a wide range of media make this set-up a very powerful tool for the study of the mechanical behavior of micro-electro-mechanical systems, providing an extensive amount of reliable information.
Appendix A Appendix : Effect of the numerical aperture
The section 22.4 is devoted to the calculation of the optical phase difference arising from the topography of the object under scope. This difference depends on the incidence of the ray on the surface. When using an imaging system, this difference depends therefore on the numerical aperture of the objective lens. The expression (18) was obtained under the assumption that the incidence angle is low enough. To assess this assumption’s validity, let us consider the contribution of each incidence in the figure’s plane to the total intensity in Eq.4
| (60) |
where stands for the optical phase independent from the topography. As the fringe spacing depends on the angle between the ray and the optic axis, the optical phase arising from the step in Fig. 5 is obtained by weighting and summing the contributions of each rays impinging on the sample at a point of the field of view
| (61) |
is related to the numerical aperture of the objective lens
| (62) |
and to the apodization function . The choice of this function has been widely discussed [19, 20, 21] and let us the assume
| (63) |
where is a parameter used to describe the apodization effect. The equation (4) turns into
| (64) |
for (Herschel condition),
| (65) |
where . If , one can derive the Taylor expansion of (64) with respect to
| (66) | |||||
Let us define the fringe spacing , as the value of where the intensity (64) reaches its first local maximum. As the numerical aperture increases, . Let us thus define the gap
| (67) |
Computing , when the numerical aperture ranges from to , and ranges from to shows that so that the fringe spacing increases with the numerical aperture (see equation (67)). if the numerical aperture is less than , no longer depends significantly on , so that the numerical aperture value is sufficient to retrieve from the intensity value. The above correction of the equation (18) is easy as long as is pseudo-periodic in a range sufficient to describe the topography. This is assessed by defining the ratio
| (68) |
where is the value for which reaches its tenth local maximum If the numerical aperture is less than , is , thereby proving that is pseudo-periodic on the defined range. The correction of Eq. (18) then reads
| (69) |
where depends on the numerical aperture and the apodization function.
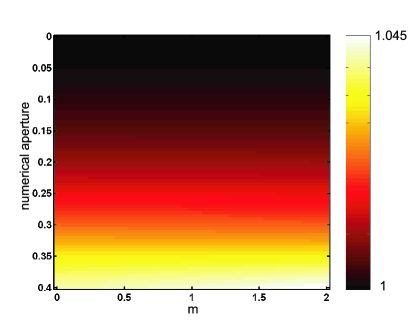
The figure 15 shows the value of as a function of both the numerical aperture and . If the numerical aperture is less than , no longer depends on , and therefore allows for a direct retrieval of the phase .
References
-
[1]
N.V. Lavrik, M.J. Sepaniak and P.G. Datskos, “Cantilever
transducers as a platform for chemical and biological sensors,”
Rev. Sci. Instrum. 75, 2229-2253 (2004).
-
[2]
T.P. Weihs, S. Hong, J.C. Bravman and W.D. Nix, “Mechanical
deflection of cantilever micro-beams: a new technique for testing
the mechanical properties of thin films,”
J. Mater. Res. 3, 931–942 (1988).
-
[3]
D.T. Read and J.W. Dally, “A new method for measuring the
strength and ductility of thin films,”
J. Mater. Res. 8, 1542–1549 (1993).
-
[4]
M.A. Haque and M.T.A. Saif, “A review of MEMS-Based microscale
and nanoscale tensile and bending testing,”
Exp. Mech. 43, 248–255 (2003).
-
[5]
M. Gad-El-Hak, The MEMS Handbook,
(CRC Press, 2002).
-
[6]
Y.Y. Hung and C.Y. Liang, “Image-shearing camera for direct
measurement of surface strains,”
Appl. Opt. 18, 1046–1051 (1979).
-
[7]
P. Aswendt, C.-D. Schmidt, D. Zielke and S. Schubert, “ESPI
solution for non-contacting MEMS-on-wafer testing,”
Optics and Lasers in Engineering 40, 501–515 (2003).
-
[8]
M. Françon, “Polarization interference microscopes,”
Appl. Optics 3, 1033-1036 (1964).
-
[9]
G. Nomarski, “Microinterféromètre différentiel à
ondes polarisées,”
J. Phys. Radium 16, 9S–11S (1955).
-
[10]
D.L. Lessor, J.S. Hartman and R.L. Gordon, “Quantitative surface
topography determination by Nomarski reflection microscopy. I.
Theory,”
J. Opt. Soc. Am. 69, 357–365 (1979).
-
[11]
P. Gleyzes and A.C. Boccara,“ Profilométrie picométrique
par interférométrie de polarisation. I. L’approche
monodétecteur,”
J. Optics (Paris) 25, 207–224 (1994).
-
[12]
P. Gleyzes, F. Guernet and A.C. Boccara, “Profilométrie
picométrique. II L’approche multi-détecteur et la
détection synchrone multiplexée.,”
J. Optics (Paris) 26, 251–265 (1995).
-
[13]
P. Gleyzes, A.C. Boccara and H. Saint-Jalmes, “Multichannel
Nomarski microscope with polarization modulation: performance and
applications”,
Optics Letters 22, 1529–1531 (1997).
-
[14]
C. Montarou and T.K. Gaylord, “Analysis and design of modified
Wollaston prisms”,
Appl. Opt. 38, 6604–6616 (1999).
-
[15]
A. Dubois, “Phase-map measurements by interferometry with
sinuoidal phase modulation and four integrating buckets,”
J. Opt. Soc. Am. A 18, 1972-1979 (2001).
-
[16]
R. Cusack, J.M. Huntley and H.T. Goldrein, “Improved noise-immune
phase-unwrapping algorithm,”
Appl. Opt. 34, 781-789 (1995).
-
[17]
X.Y. He, X. Kang, C.J. Tay, C. Quan and H.M. Shang, “Proposed
algorithm for phase unwrapping,”
Appl. Opt. 41, 7422-7428 (2002).
-
[18]
S.P. Timoshenko and J.N. Goodier, Theory of Elasticity,
(McGraw-Hill (3rd edition), New York (USA), 1970).
-
[19]
A. Dubois, J. Selb, L. Vabre and A.C. Boccara, “Phase
measurements with wide-aperture interferometers,”
Appl. Opt. 39, 2326-2331 (2000).
-
[20]
C.R.J. Sheppard and K.G. Larkin, “Effect of numerical aperture on
interference fringe spacing,”
Appl. Opt. 34, 4731-4734 (1995).
-
[21]
G. Schulz and K.-E. Elssner, “Errors in phase-measurement
interferometry with high numerical apertures,”
Appl. Opt. 30, 4500-4506 (1991).