.

Large-Parameter Asymptotics of
Generalized Hasting-McLeod Functions

Kurt Schmidt K. SchmidtDepartment of Mathematical Sciences
University of Cincinnati
PO Box 210025
Cincinnati, OH 45221.
Email address: schmidku@mail.uc.edu
and Robert Buckingham R. BuckinghamDepartment of Mathematical Sciences
University of Cincinnati
PO Box 210025
Cincinnati, OH 45221.
Email address: buckinrt@uc.edu
Abstract.

The generalized Hastings-McLeod solutions to the inhomogeneous Painlevé-II equation arise in multi-critical unitary random matrix ensembles, the chiral two-matrix model for rectangular matrices, non-intersecting squared Bessel paths, and non-intersecting Brownian motions on the circle. We establish the leading-order asymptotic behavior of the generalized Hastings-McLeod functions as the inhomogeneous parameter approaches infinity using the Deift-Zhou nonlinear steepest-descent method for Riemann-Hilbert problems. This analysis is done in both the pole-free region and pole region. The asymptotic formulae show excellent agreement with numerically computed solutions in both regions.

1. Introduction

1.1. Background

We consider the inhomogeneous Painlevé-II equation

(1) u′′(y)=2u(y)3+yu(y)α,u^{\prime\prime}(y)=2u(y)^{3}+yu(y)-\alpha,

where α\alpha is the inhomogeneity parameter. The well-known Hastings-McLeod function, uHMu_{\text{HM}}, solves (1) when α=0\alpha=0 with boundary conditions uHM(y)y/2u_{\text{HM}}(y)\sim\sqrt{-y/2} as yy\to-\infty and uHM(y)Ai(y)u_{\text{HM}}(y)\sim\Ai(y) as y+y\to+\infty (where Ai\Ai is the Airy function) [17]. It arises in the Tracy-Widom distribution describing a wide range of random phenomena, including, but not limited to, the largest eigenvalue of a Gaussian Unitary Ensemble random matrix [20] and the longest increasing subsequence of a permutation [1].

In 2008, Claeys, Kuijlaars, and Vanlessen found that if one perturbs the Gaussian Unitary Ensemble so that the limiting mean density function of eigenvalues vanishes quadratically at the origin, then perturbations of the Hastings-McLeod function arise in a double-scaling limit [10]. These perturbations solve (1) for α>1/2\alpha>-1/2 with boundary conditions

(2) {uHM(α)(y)=y2(1+𝒪(1/(y)3/2)) as yuHM(α)(y)=αy(1+𝒪(1/y3)) as y+(α0).\begin{cases}\displaystyle u_{\text{HM}}^{(\alpha)}(y)=\sqrt{-\frac{y}{2}}\left(1+\mathcal{O}\left(1/(-y)^{3/2}\right)\right)&\text{ as }y\to-\infty\\[10.0pt] \displaystyle u_{\text{HM}}^{(\alpha)}(y)=\frac{\alpha}{y}\left(1+\mathcal{O}\left(1/y^{3}\right)\right)&\text{ as }y\to+\infty\hskip 14.22636pt(\alpha\not=0).\end{cases}

This family of solutions to (2) is named the generalized Hastings-McLeod functions. Recently, these functions have been observed in interacting particle systems [5, 12] and in a different random matrix model [13]. We establish asymptotic formulae for generalized Hastings-McLeod functions, uHM(α)u_{\text{HM}}^{(\alpha)}, for large, positive half-integers α\alpha.

The starting point of our analysis is a Riemann-Hilbert representation for generalized Hastings-McLeod functions discovered by Buckingham and Liechty in 2018 while investigating Dyson Brownian bridges [5]. We apply the Deift-Zhou method of nonlinear steepest descent developed in [11]. This involves nontrivial transformations that force the jump discontinuities to be exponentially small as α\alpha\to\infty except at certain points or arcs. Ignoring these small jumps results in a Riemann-Hilbert problem that is explicitly solvable and is called a model problem. This provides a rigorous approximation, with controlled error, to the solution of the original Riemann-Hilbert problem for the generalized Hastings-McLeod functions.

For large α\alpha, under the scaling

(3) x:=21/3(α12)2/3y,x:=-\frac{2^{1/3}}{\left(\alpha-\frac{1}{2}\right)^{2/3}}y,

uHM(α)u^{(\alpha)}_{\text{HM}} has two distinct behaviors in the xx-plane. On one hand, the leading-order asymptotic formula is an analytic function in a certain region. We call this section of the xx-plane the pole-free region. On the other hand, in the complement of the closure of the pole-free region, the leading-order asymptotic formula is not analytic and has poles at specific points (depending on α\alpha). We call this section of the xx-plane the pole region. (See Proposition 3.3 for a precise description of the pole-free region.) Notice, for α\alpha large enough the scaled generalized Hastings-McLeod functions are analytic in the pole-free region and meromorphic in the pole region. Our Riemann-Hilbert analysis detects this bifurcation. Indeed, in the pole-free region the model problem is solved in terms of elementary functions, while in the pole region, it is solved in terms of Riemann Θ\Theta-functions.

1.1.1. Notation

Throughout the paper all matrices are denoted by a bold, uppercase letter with the exception of the Pauli matrix

(4) σ3:=[1001].\sigma_{3}:=\begin{bmatrix}1&0\\ 0&-1\end{bmatrix}.

We also use the following short hand:

(5) 𝑼k(f):=[1ekf01],𝑳k(f):=[10ekf1],𝑻(a):=[0a1a0].\boldsymbol{U}_{k}(f):=\begin{bmatrix}1&e^{kf}\\ 0&1\end{bmatrix},\hskip 28.45274pt\boldsymbol{L}_{k}(f):=\begin{bmatrix}1&0\\ e^{kf}&1\end{bmatrix},\hskip 28.45274pt\boldsymbol{T}(a):=\begin{bmatrix}0&-a^{-1}\\ a&0\end{bmatrix}.

Finally, given a smooth, oriented curve Σ\Sigma and a function ff that can be continuously extended to z0Σz_{0}\in\Sigma, we let f+(z0)f_{+}(z_{0}) denote the non-tangential limit of f(z)f(z) as zz approaches z0z_{0} from the left of Σ\Sigma. Similarly, f(z0)f_{-}(z_{0}) denotes the non-tangential limit as zz approaches z0z_{0} from the right of Σ\Sigma.

1.1.2. Outline of the Paper

First, we state our main results in Theorem 1.1 and Theorem 1.2 and verify these results by comparing our asymptotic formulae to numerics. Second, in Section 2 we state the Riemann-Hilbert representation (and its scaled version) of the generalized Hastings-McLeod functions. Next, in Section 3, we give an explicit and precise definition for the pole-free region of the xx-plane. Then, we proceed to apply the Deift-Zhou steepest-decent method in the pole-free region, leading to a proof of Theorem 1.1. In Section 4, we carry out similar analysis in the pole region to prove Theorem (1.2). Finally, in Section 5, we review the numerical methods we implemented to verify our asymptotic formulae.

1.2. Acknowledgments

The first author was supported by the Charles Phelps Taft Research Center by a Dissertation Fellowship. The second author was supported by the National Science Foundation via grant DMS–2108019. The authors also thank Deniz Bilman, Karl Liechty, Peter Miller, and Andrei Prokhorov for useful discussions.

1.3. Results

It is convenient to state our results in terms of the large parameter kk, where

(6) k:=α12.k:=\alpha-\frac{1}{2}.
Theorem 1.1.

Let xx be in the pole-free region of the xx-plane, as defined in Section 3.2. Set ΣS\Sigma_{S} to be the union of the closed rays emanating from the points x=3e2πi3x=3e^{\frac{2\pi i}{3}} and x=3e2πi3x=3e^{-\frac{2\pi i}{3}} with arguments 2π/32\pi/3 and 2π/3-2\pi/3 respectively. Let S(x)SS(x)\equiv S denote the solution to the cubic equation

(7) S3+xS2i=0S^{3}+xS-2i=0

cut on ΣS\Sigma_{S} which has asymptotic behavior S(x)=ix+𝒪(1/x)S(x)=-i\sqrt{x}+\mathcal{O}(1/x) as x+x\to+\infty along the positive real line and S(x)=2i/x+𝒪(1/x2)S(x)=2i/x+\mathcal{O}\left(1/x^{2}\right) as xx\to-\infty along the negative real line. Then, for large kk\in\mathbb{N},

(8) (2k)1/3uHM(k+1/2)(k2/321/3x)=iS(x)2+𝒪(1/k).-(2k)^{-1/3}u^{(k+1/2)}_{\text{HM}}\left(-\frac{k^{2/3}}{2^{1/3}}x\right)=-i\frac{S(x)}{2}+\mathcal{O}\left(1/k\right).
Theorem 1.2.

Let xx be in the pole region of the xx-plane, i.e. the complement of the closure of the pole-free region. Suppose A,B,C,DA,B,C,D\in\mathbb{C} satisfy the moment conditions (78) and the Boutroux conditions (81). For large integers kk, if x𝒮kx\in\mathscr{S}_{k} (see (133)), then

(9) (2k)1/3uHM(α)(k2/321/3x)=i([𝑸˙2]12+[𝑸˙1]22[𝑸˙1]12+𝒪(1/k)[𝑸˙1]12+𝒪(1/k)),-(2k)^{-1/3}u^{(\alpha)}_{\text{HM}}\left(-\frac{k^{2/3}}{2^{1/3}}x\right)=i\left(\frac{-[\dot{\boldsymbol{Q}}_{-2}]_{12}+[\dot{\boldsymbol{Q}}_{-1}]_{22}[\dot{\boldsymbol{Q}}_{-1}]_{12}+\mathcal{O}(1/k)}{[\dot{\boldsymbol{Q}}_{-1}]_{12}+\mathcal{O}(1/k)}\right),

where the quantities [𝐐˙2]12[\dot{\boldsymbol{Q}}_{-2}]_{12}, [𝐐˙1]12[\dot{\boldsymbol{Q}}_{-1}]_{12}, and [𝐐˙1]22[\dot{\boldsymbol{Q}}_{-1}]_{22} are defined in (160), (161), and (157). Further, if [𝐐˙1]120[\dot{\boldsymbol{Q}}_{-1}]_{12}\neq 0, then the left-hand side of (9) can be expressed in terms of Riemann Θ\Theta-functions. That is,

(10) (2k)1/3uHM(α)(k2/321/3x)=i(𝒜1(𝔏22𝔏12)B2+D2A2C22(B+DAC))+𝒪(1/k),-(2k)^{-1/3}u^{(\alpha)}_{\text{HM}}\left(-\frac{k^{2/3}}{2^{1/3}}x\right)=i\left(\mathcal{A}_{-1}\cdot(\mathfrak{L}_{22}-\mathfrak{L}_{12})-\frac{B^{2}+D^{2}-A^{2}-C^{2}}{2(B+D-A-C)}\right)+\mathcal{O}(1/k),

where

(11) 𝔏22=Θ(𝒜()+𝒜(Q)+𝒦+kF1U,)Θ(𝒜()+𝒜(Q)+𝒦+kF1U,)Θ(𝒜()+𝒜(Q)+𝒦,)Θ(𝒜()+𝒜(Q)+𝒦,),\mathfrak{L}_{22}=\frac{\Theta^{\prime}(\mathcal{A}(\infty)+\mathcal{A}(Q)+\mathcal{K}+kF_{1}U;\mathcal{B})}{\Theta(\mathcal{A}(\infty)+\mathcal{A}(Q)+\mathcal{K}+kF_{1}U;\mathcal{B})}-\frac{\Theta^{\prime}(\mathcal{A}(\infty)+\mathcal{A}(Q)+\mathcal{K};\mathcal{B})}{\Theta(\mathcal{A}(\infty)+\mathcal{A}(Q)+\mathcal{K};\mathcal{B})},
(12) 𝔏12=Θ(𝒜()𝒜(Q)𝒦+kF1U,)Θ(𝒜()𝒜(Q)𝒦+kF1U,)Θ(𝒜()𝒜(Q)𝒦,)Θ(𝒜()𝒜(Q)𝒦,),\mathfrak{L}_{12}=\frac{\Theta^{\prime}(\mathcal{A}(\infty)-\mathcal{A}(Q)-\mathcal{K}+kF_{1}U;\mathcal{B})}{\Theta(\mathcal{A}(\infty)-\mathcal{A}(Q)-\mathcal{K}+kF_{1}U;\mathcal{B})}-\frac{\Theta^{\prime}(\mathcal{A}(\infty)-\mathcal{A}(Q)-\mathcal{K};\mathcal{B})}{\Theta(\mathcal{A}(\infty)-\mathcal{A}(Q)-\mathcal{K};\mathcal{B})},

and Θ()\Theta(\cdot), \mathcal{B}, 𝒜1\mathcal{A}_{-1}, 𝒜()\mathcal{A}(\infty), 𝒜()\mathcal{A}(\cdot), QQ, 𝒦\mathcal{K}, F1F_{1}, and UU are defined in (110), (105), (109), (103), (128), (120), (99), and (114).

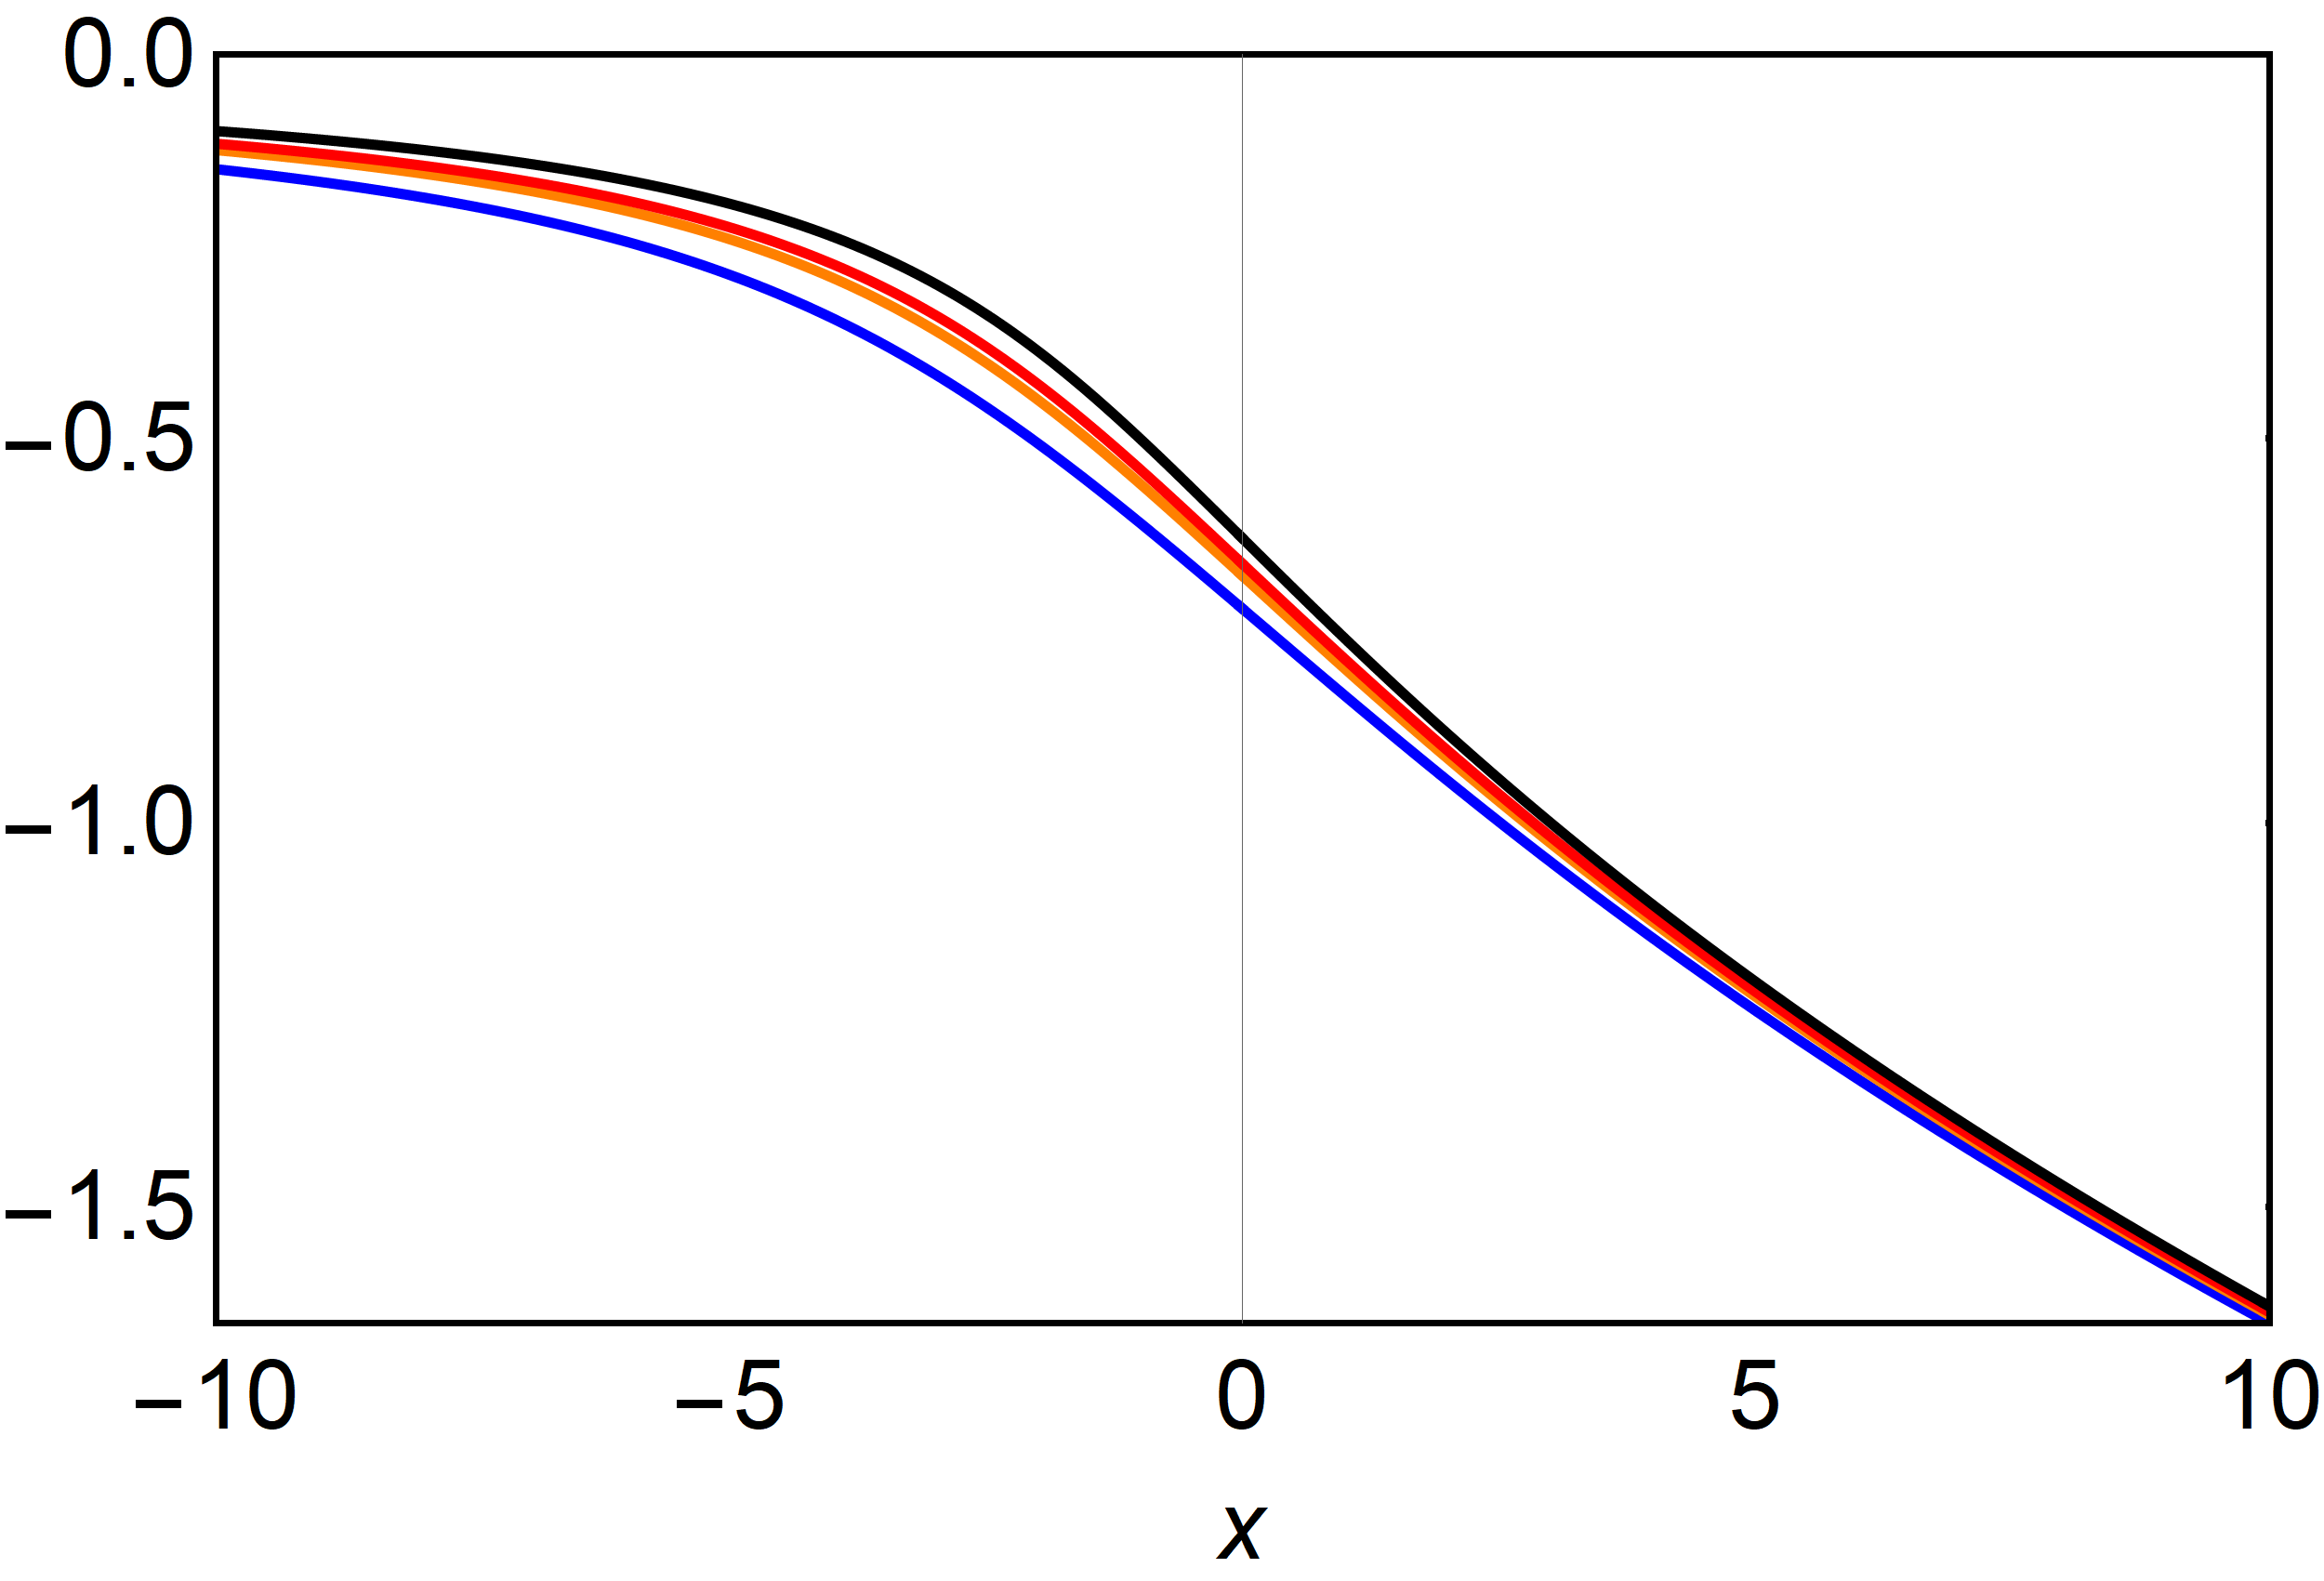
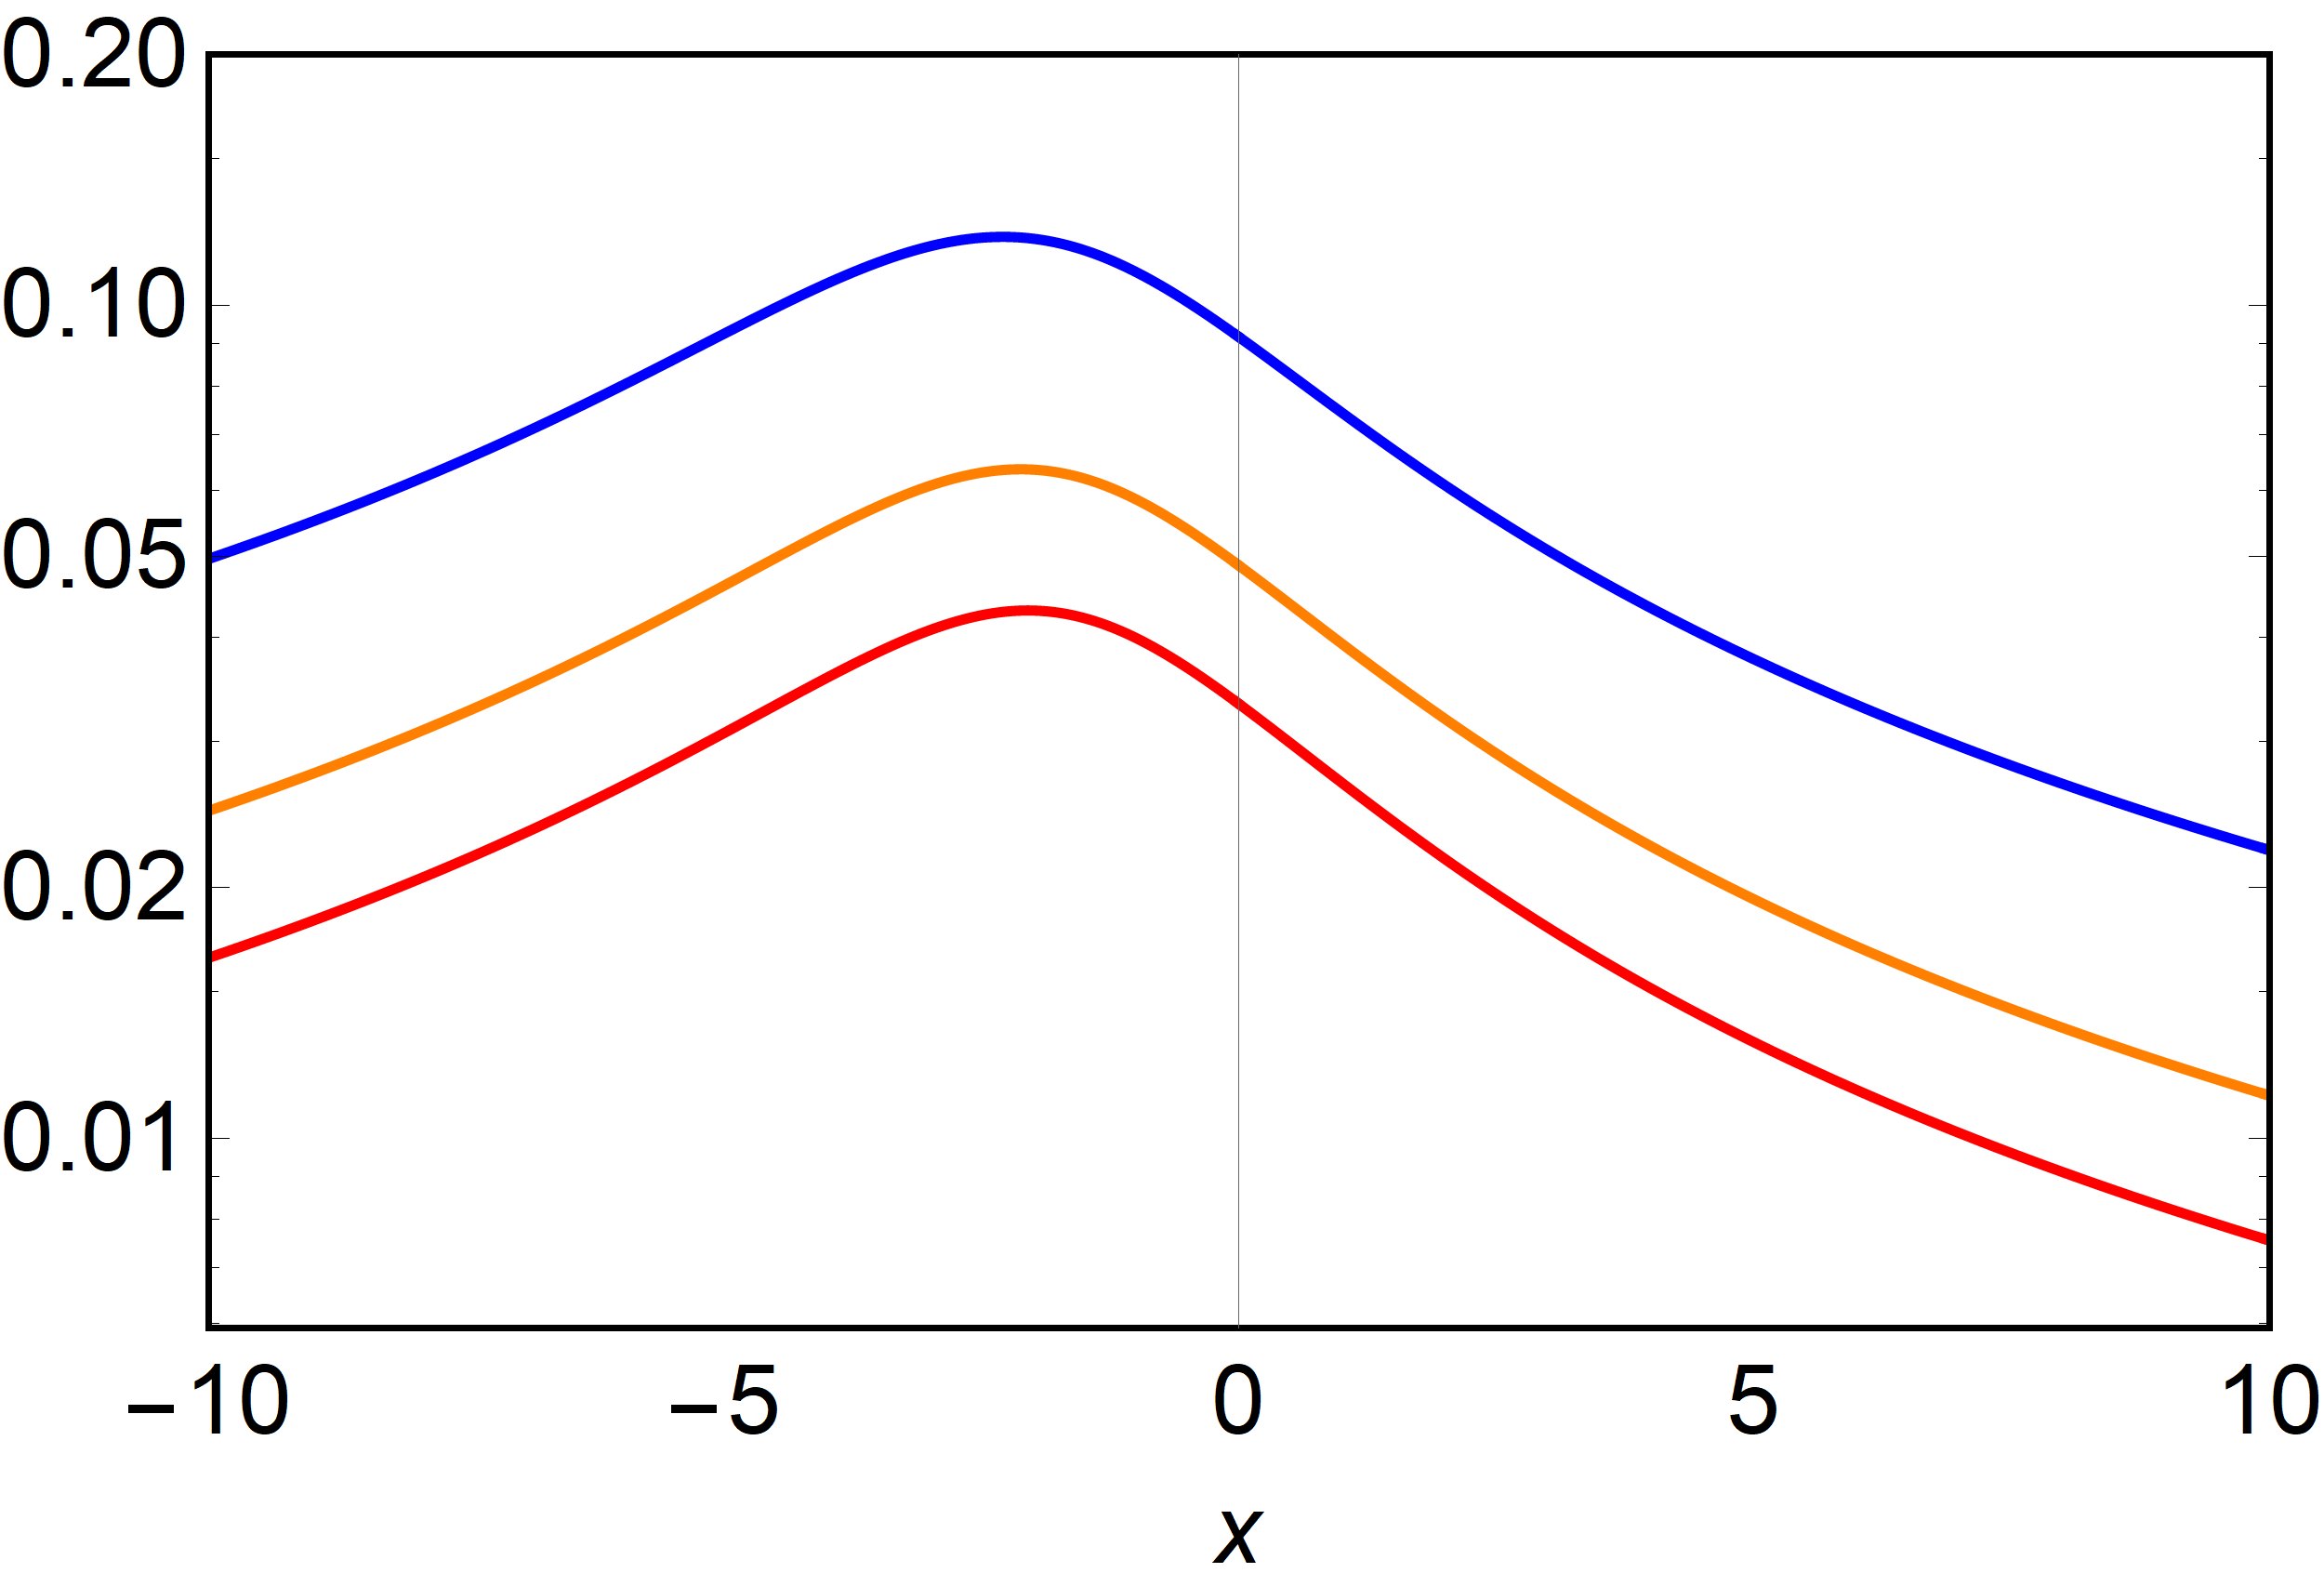
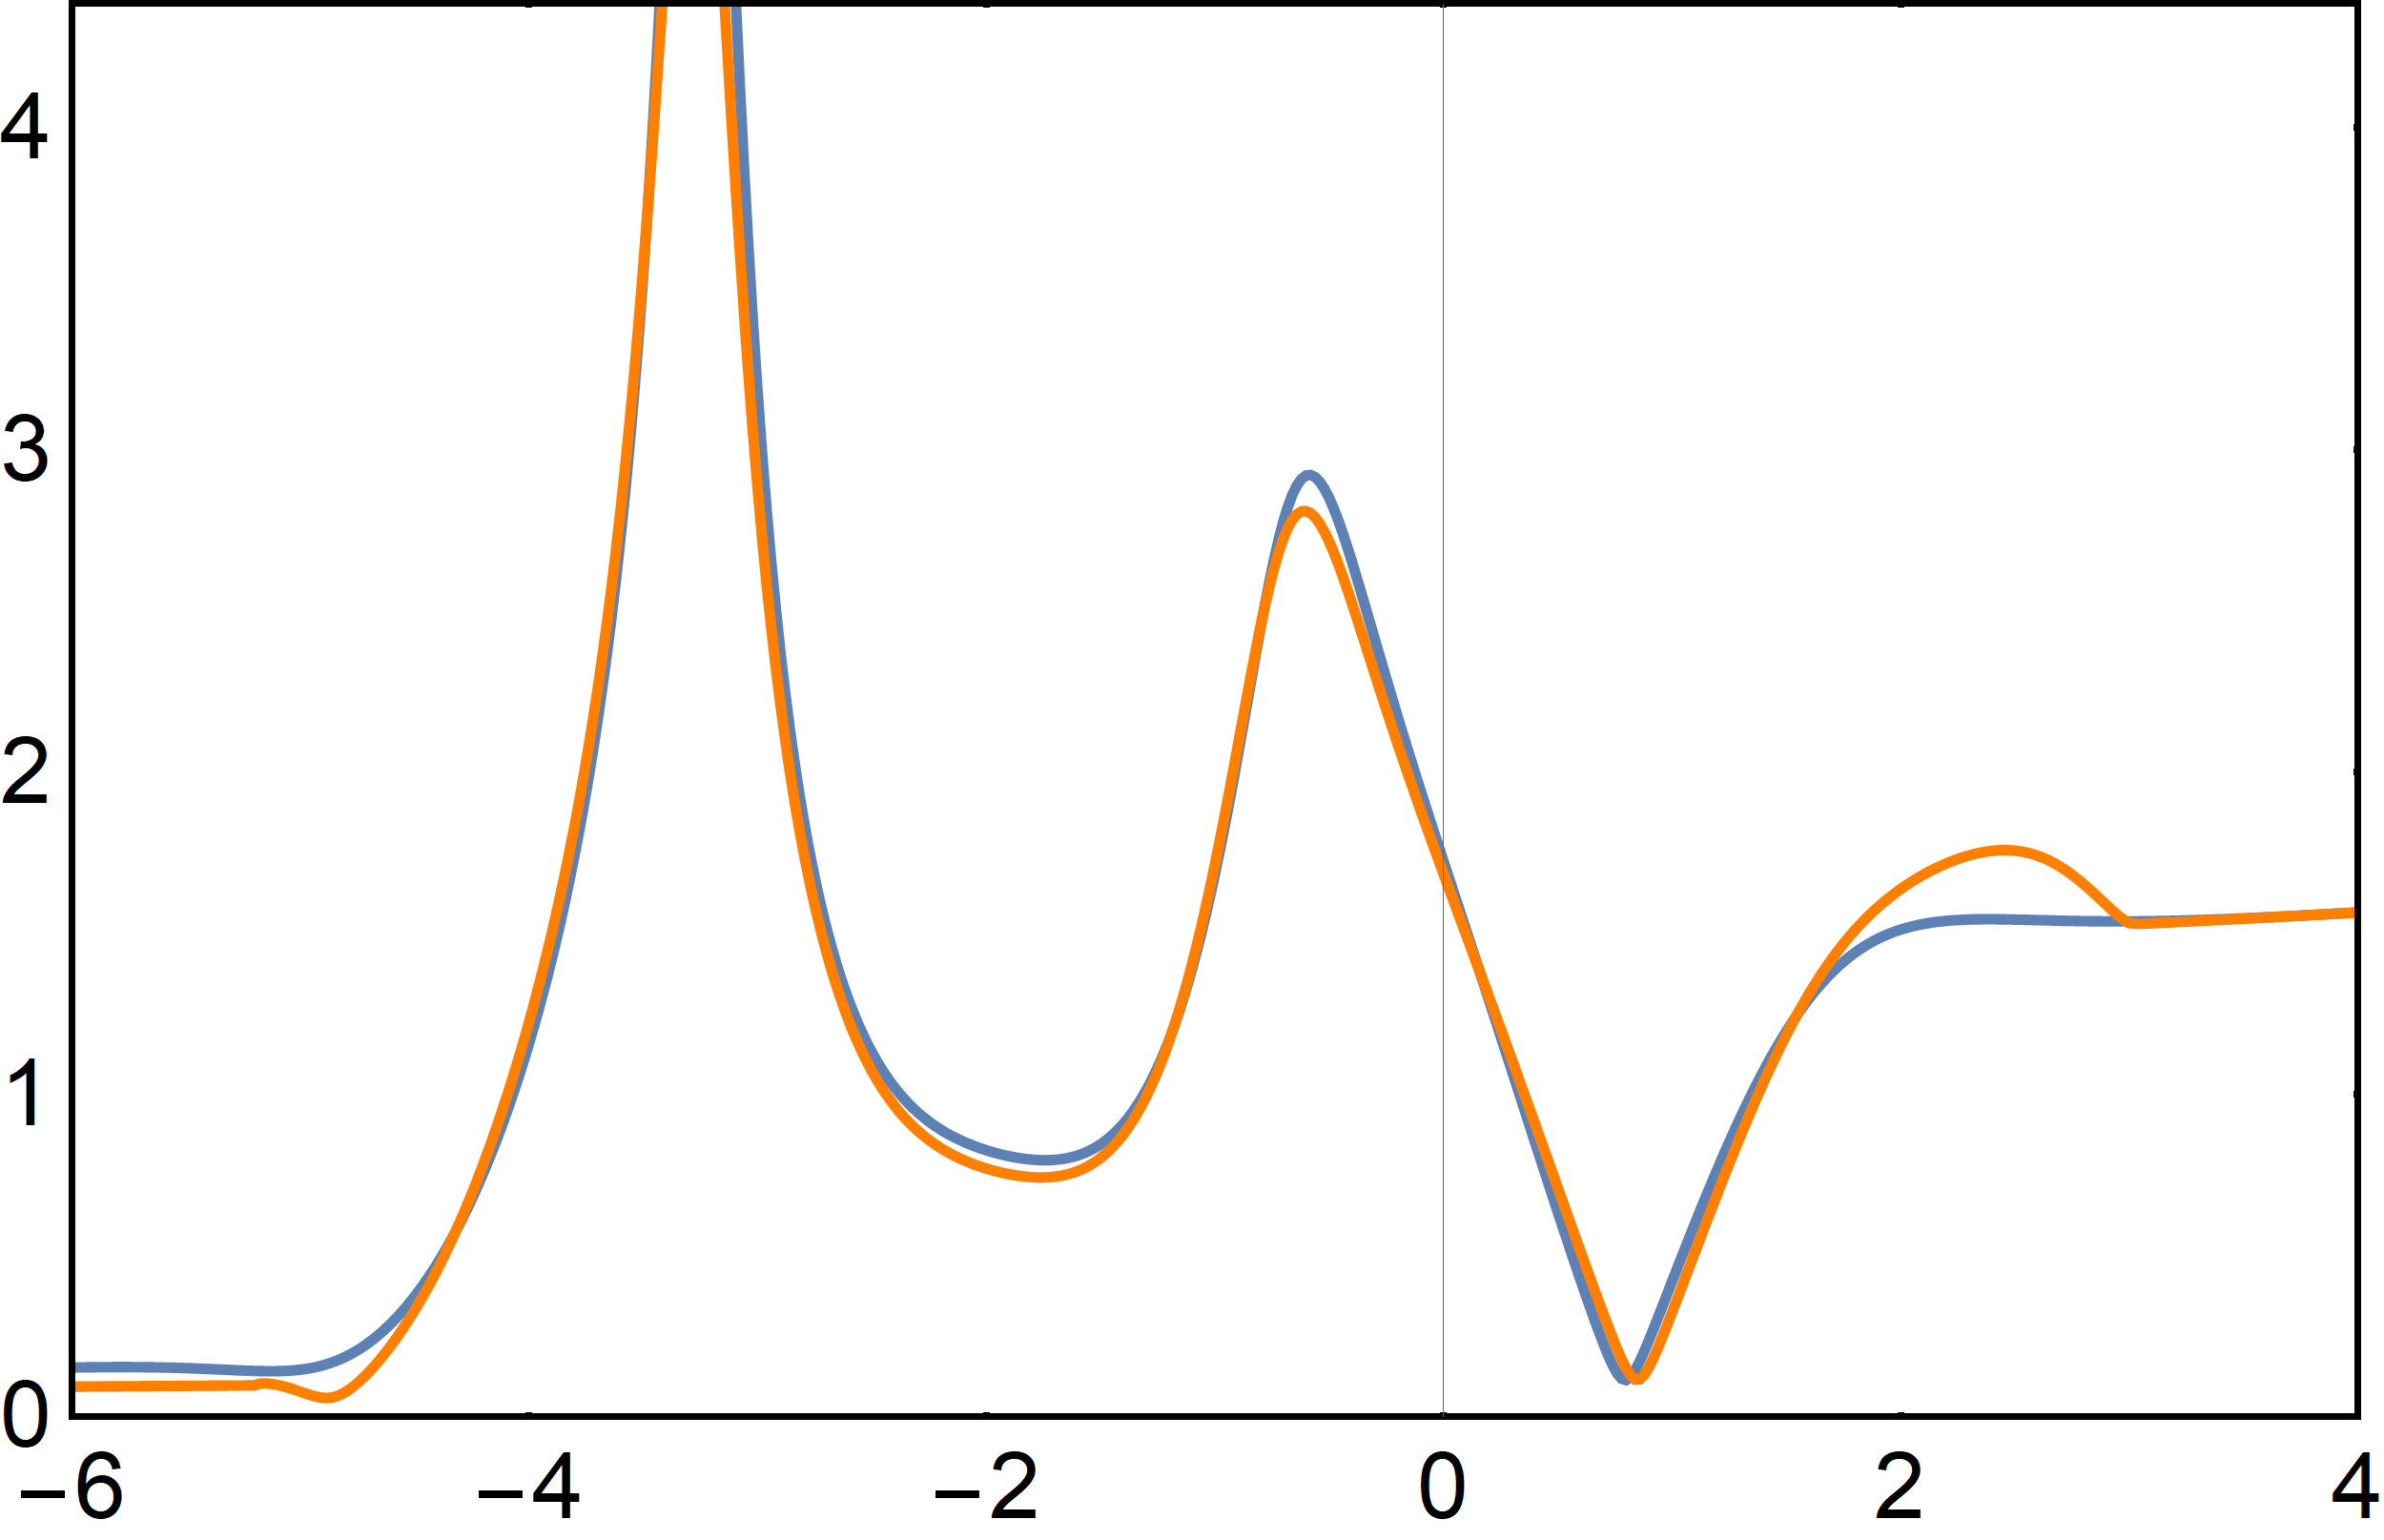
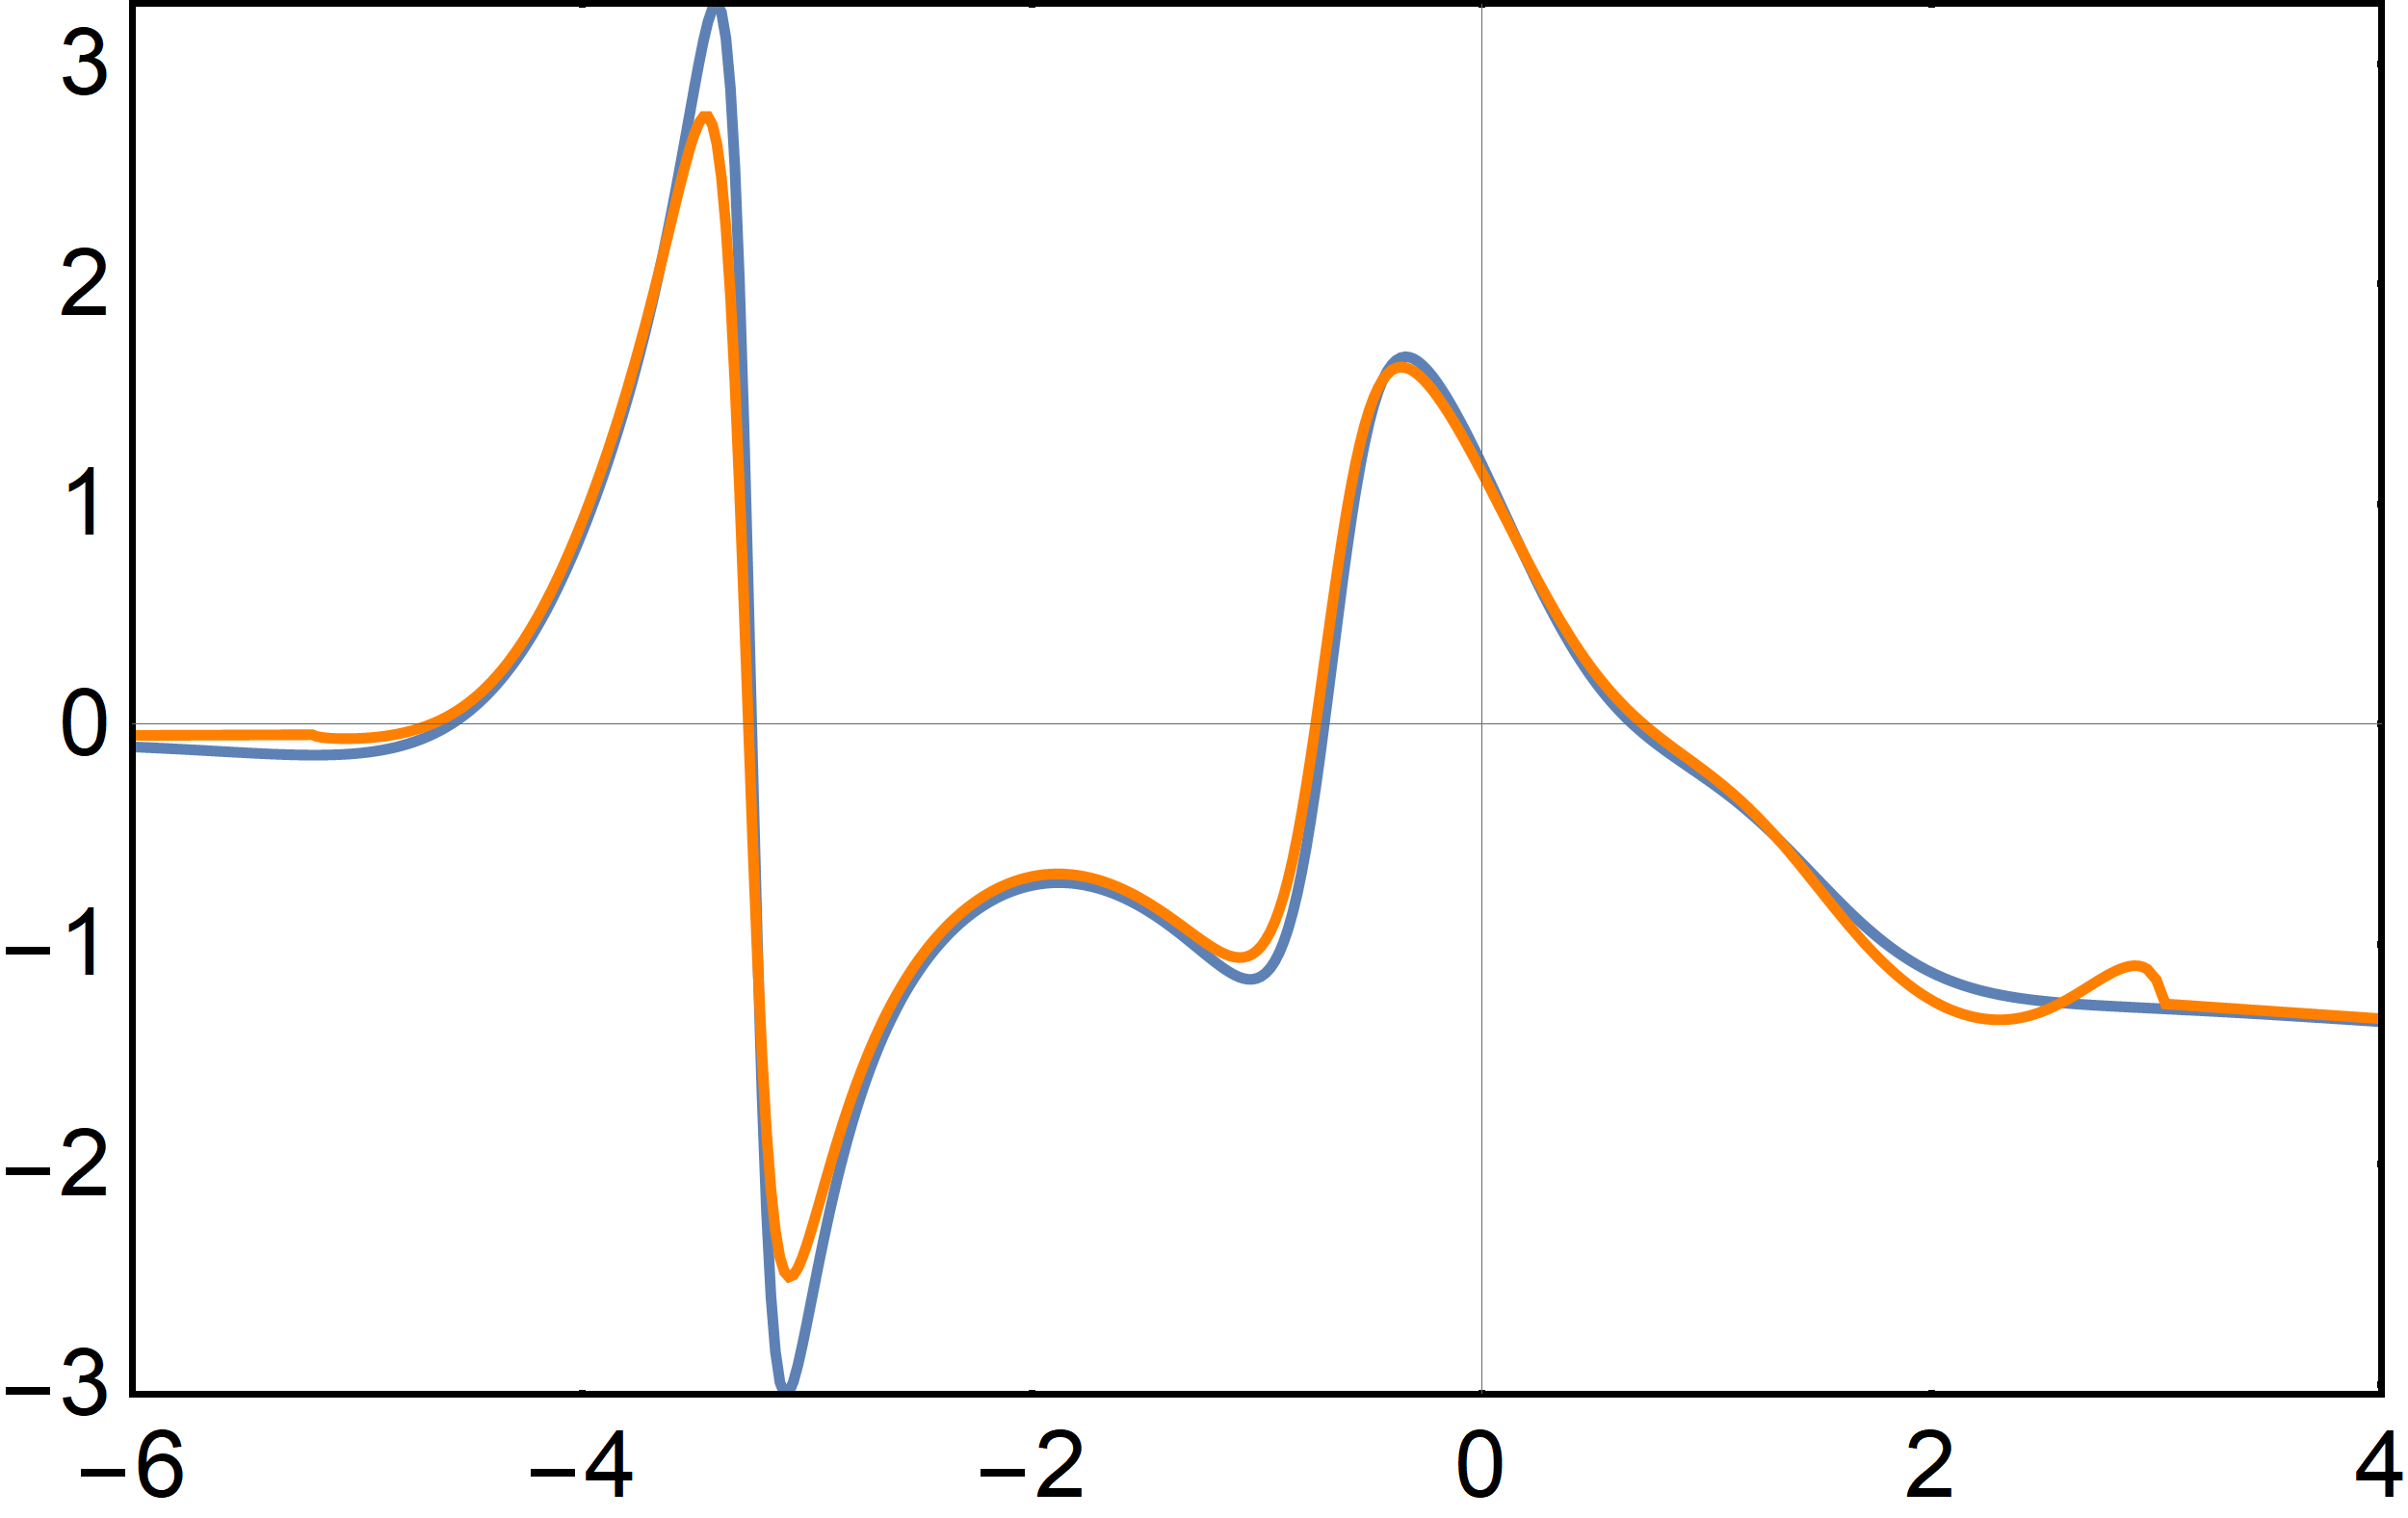
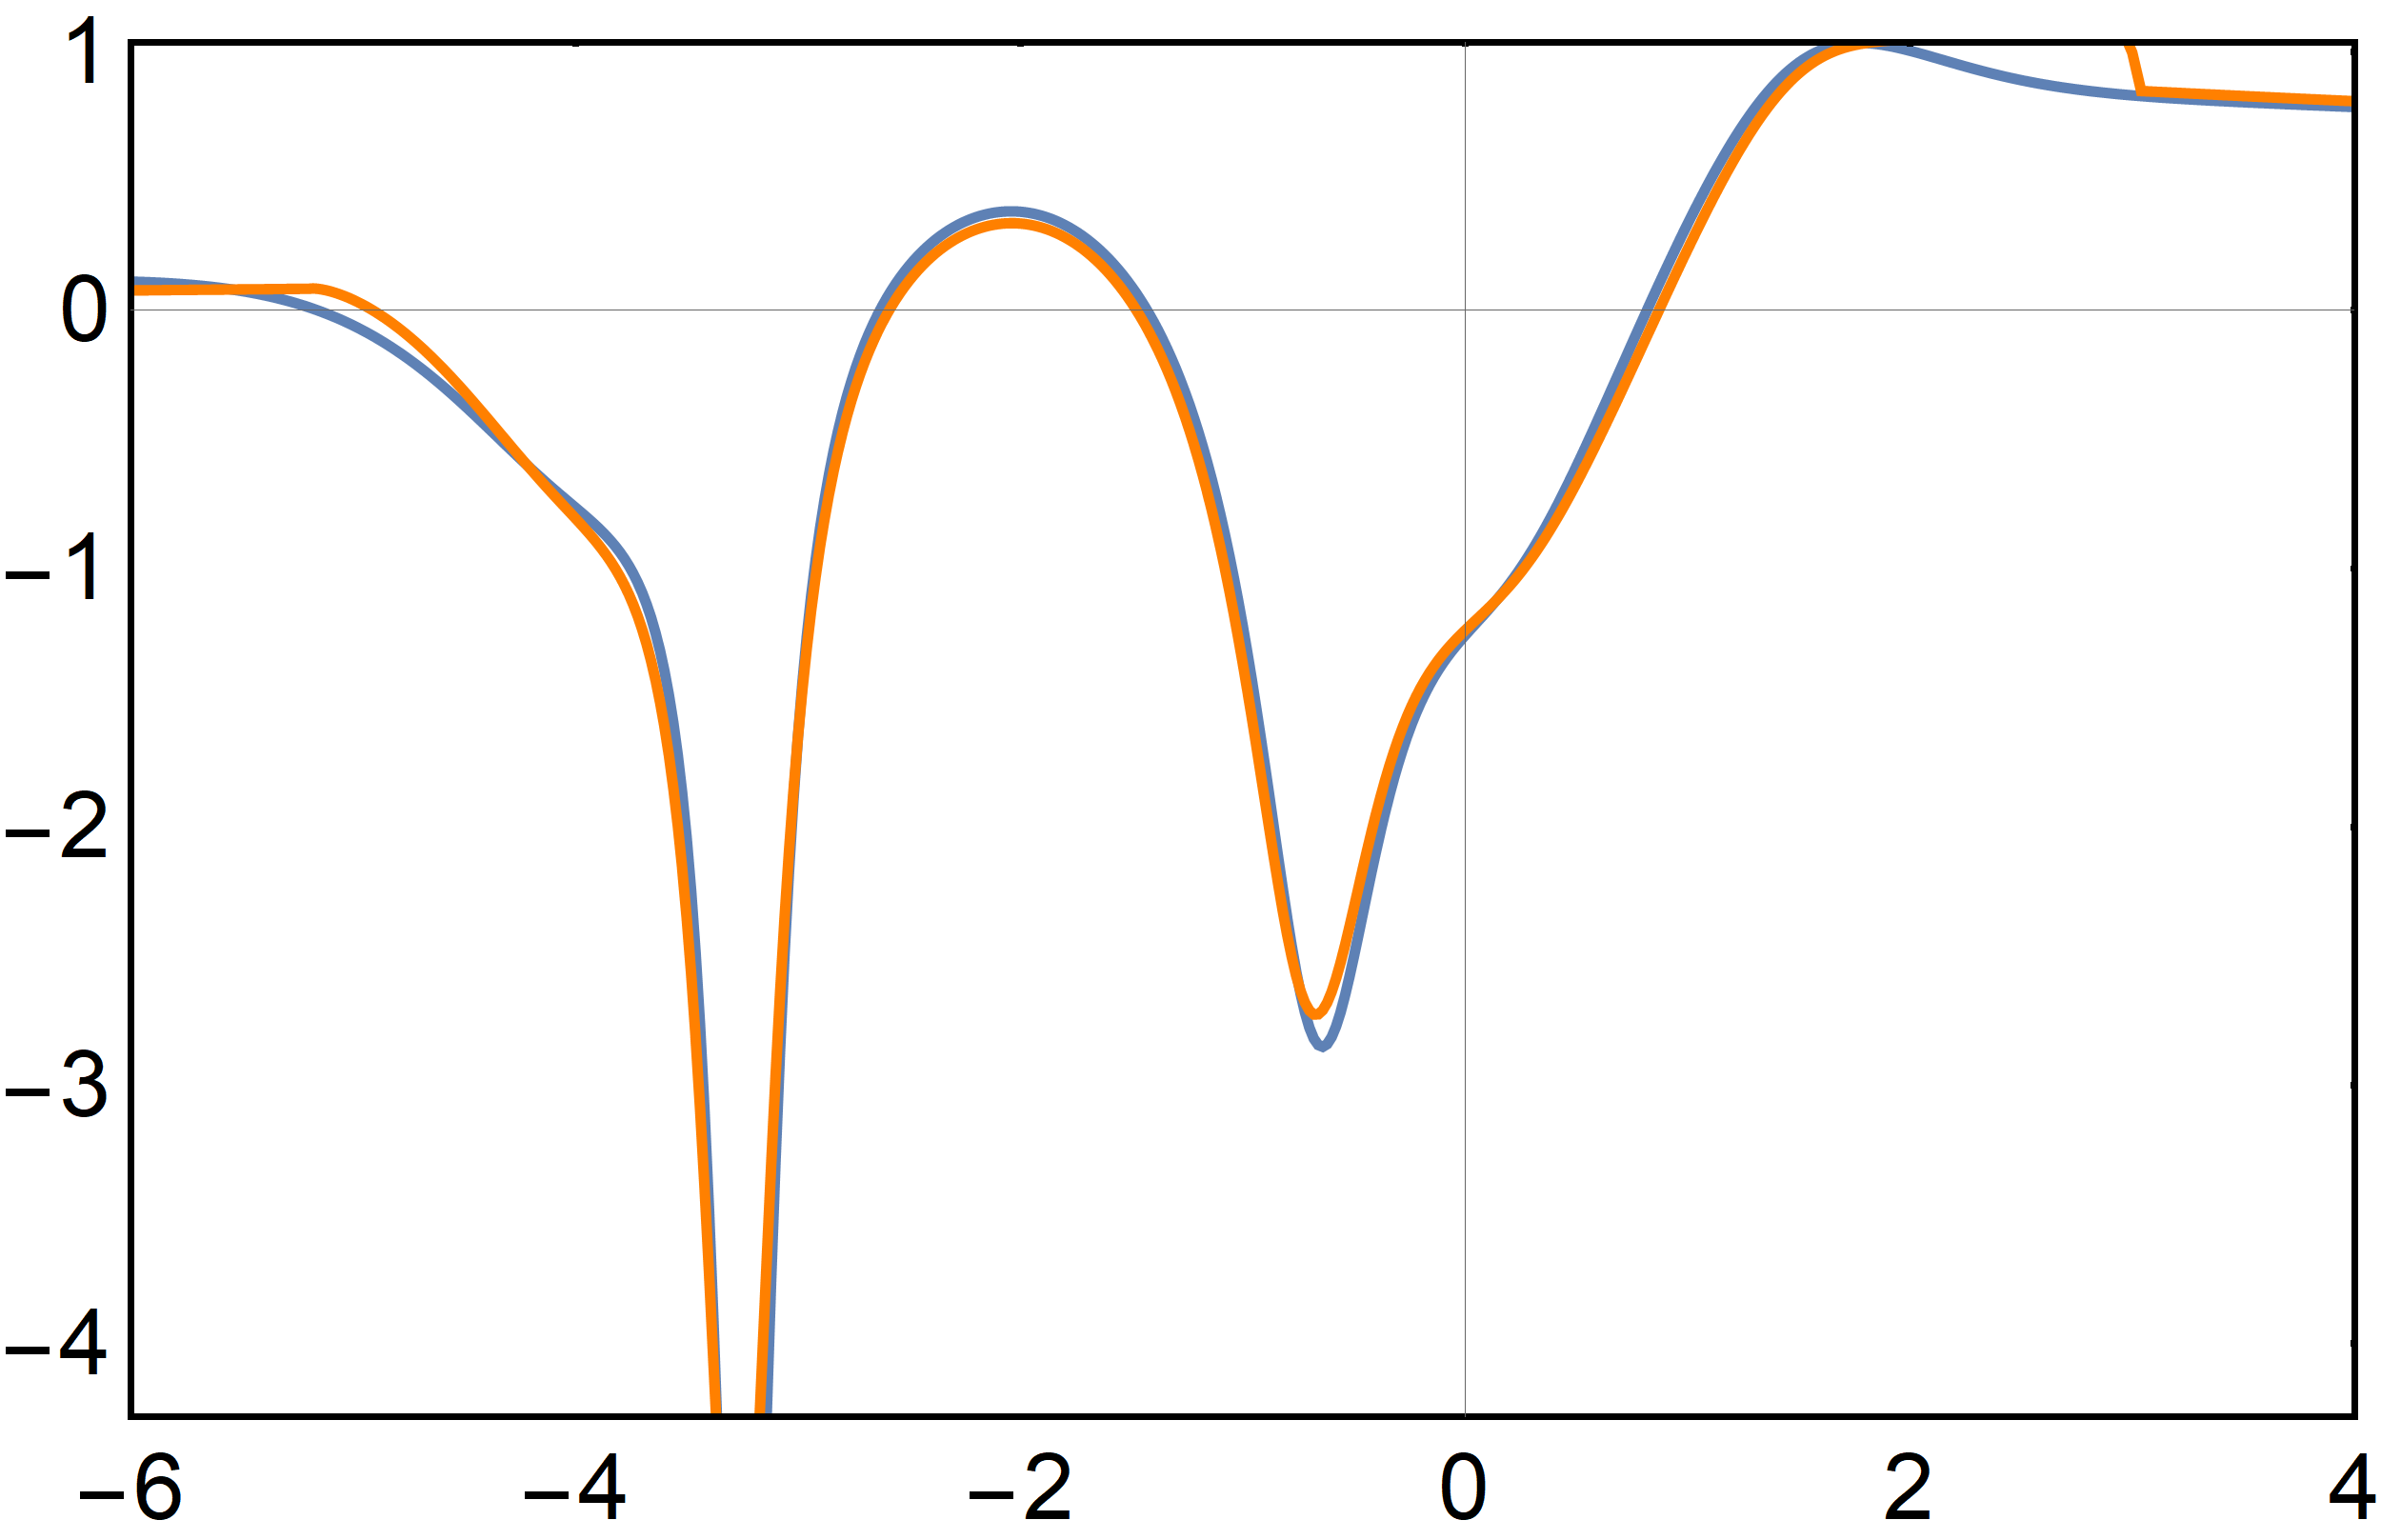
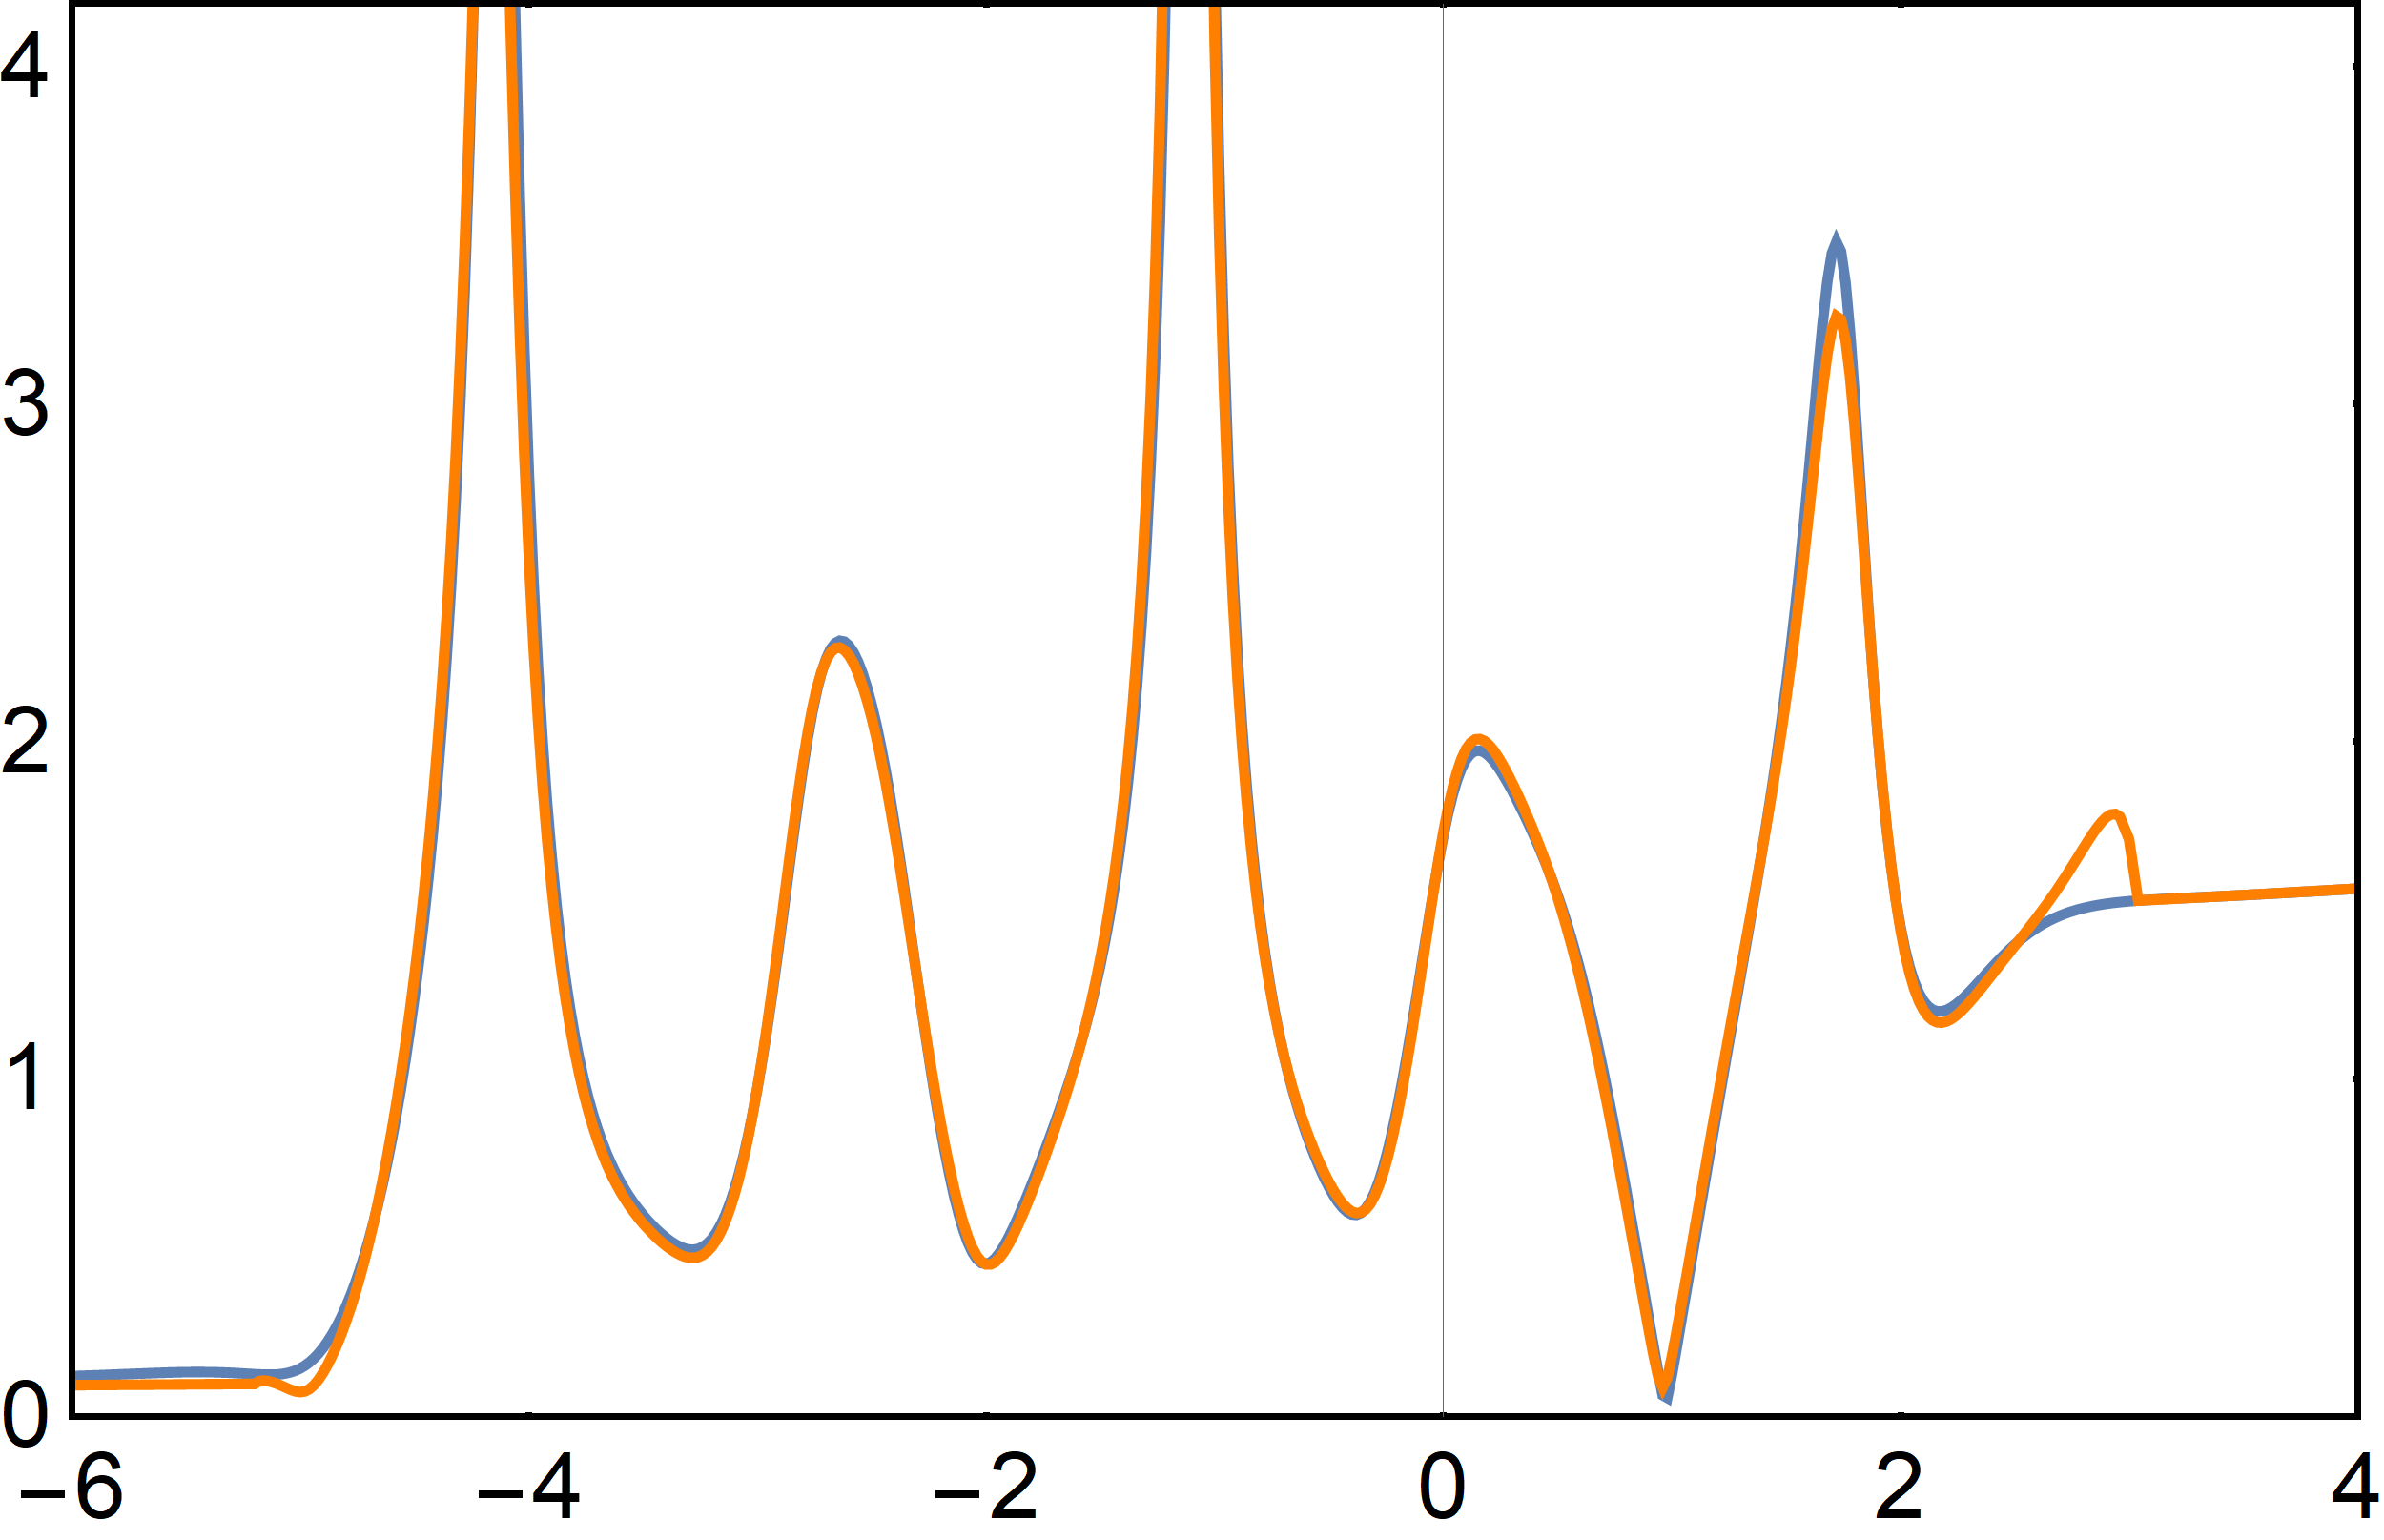
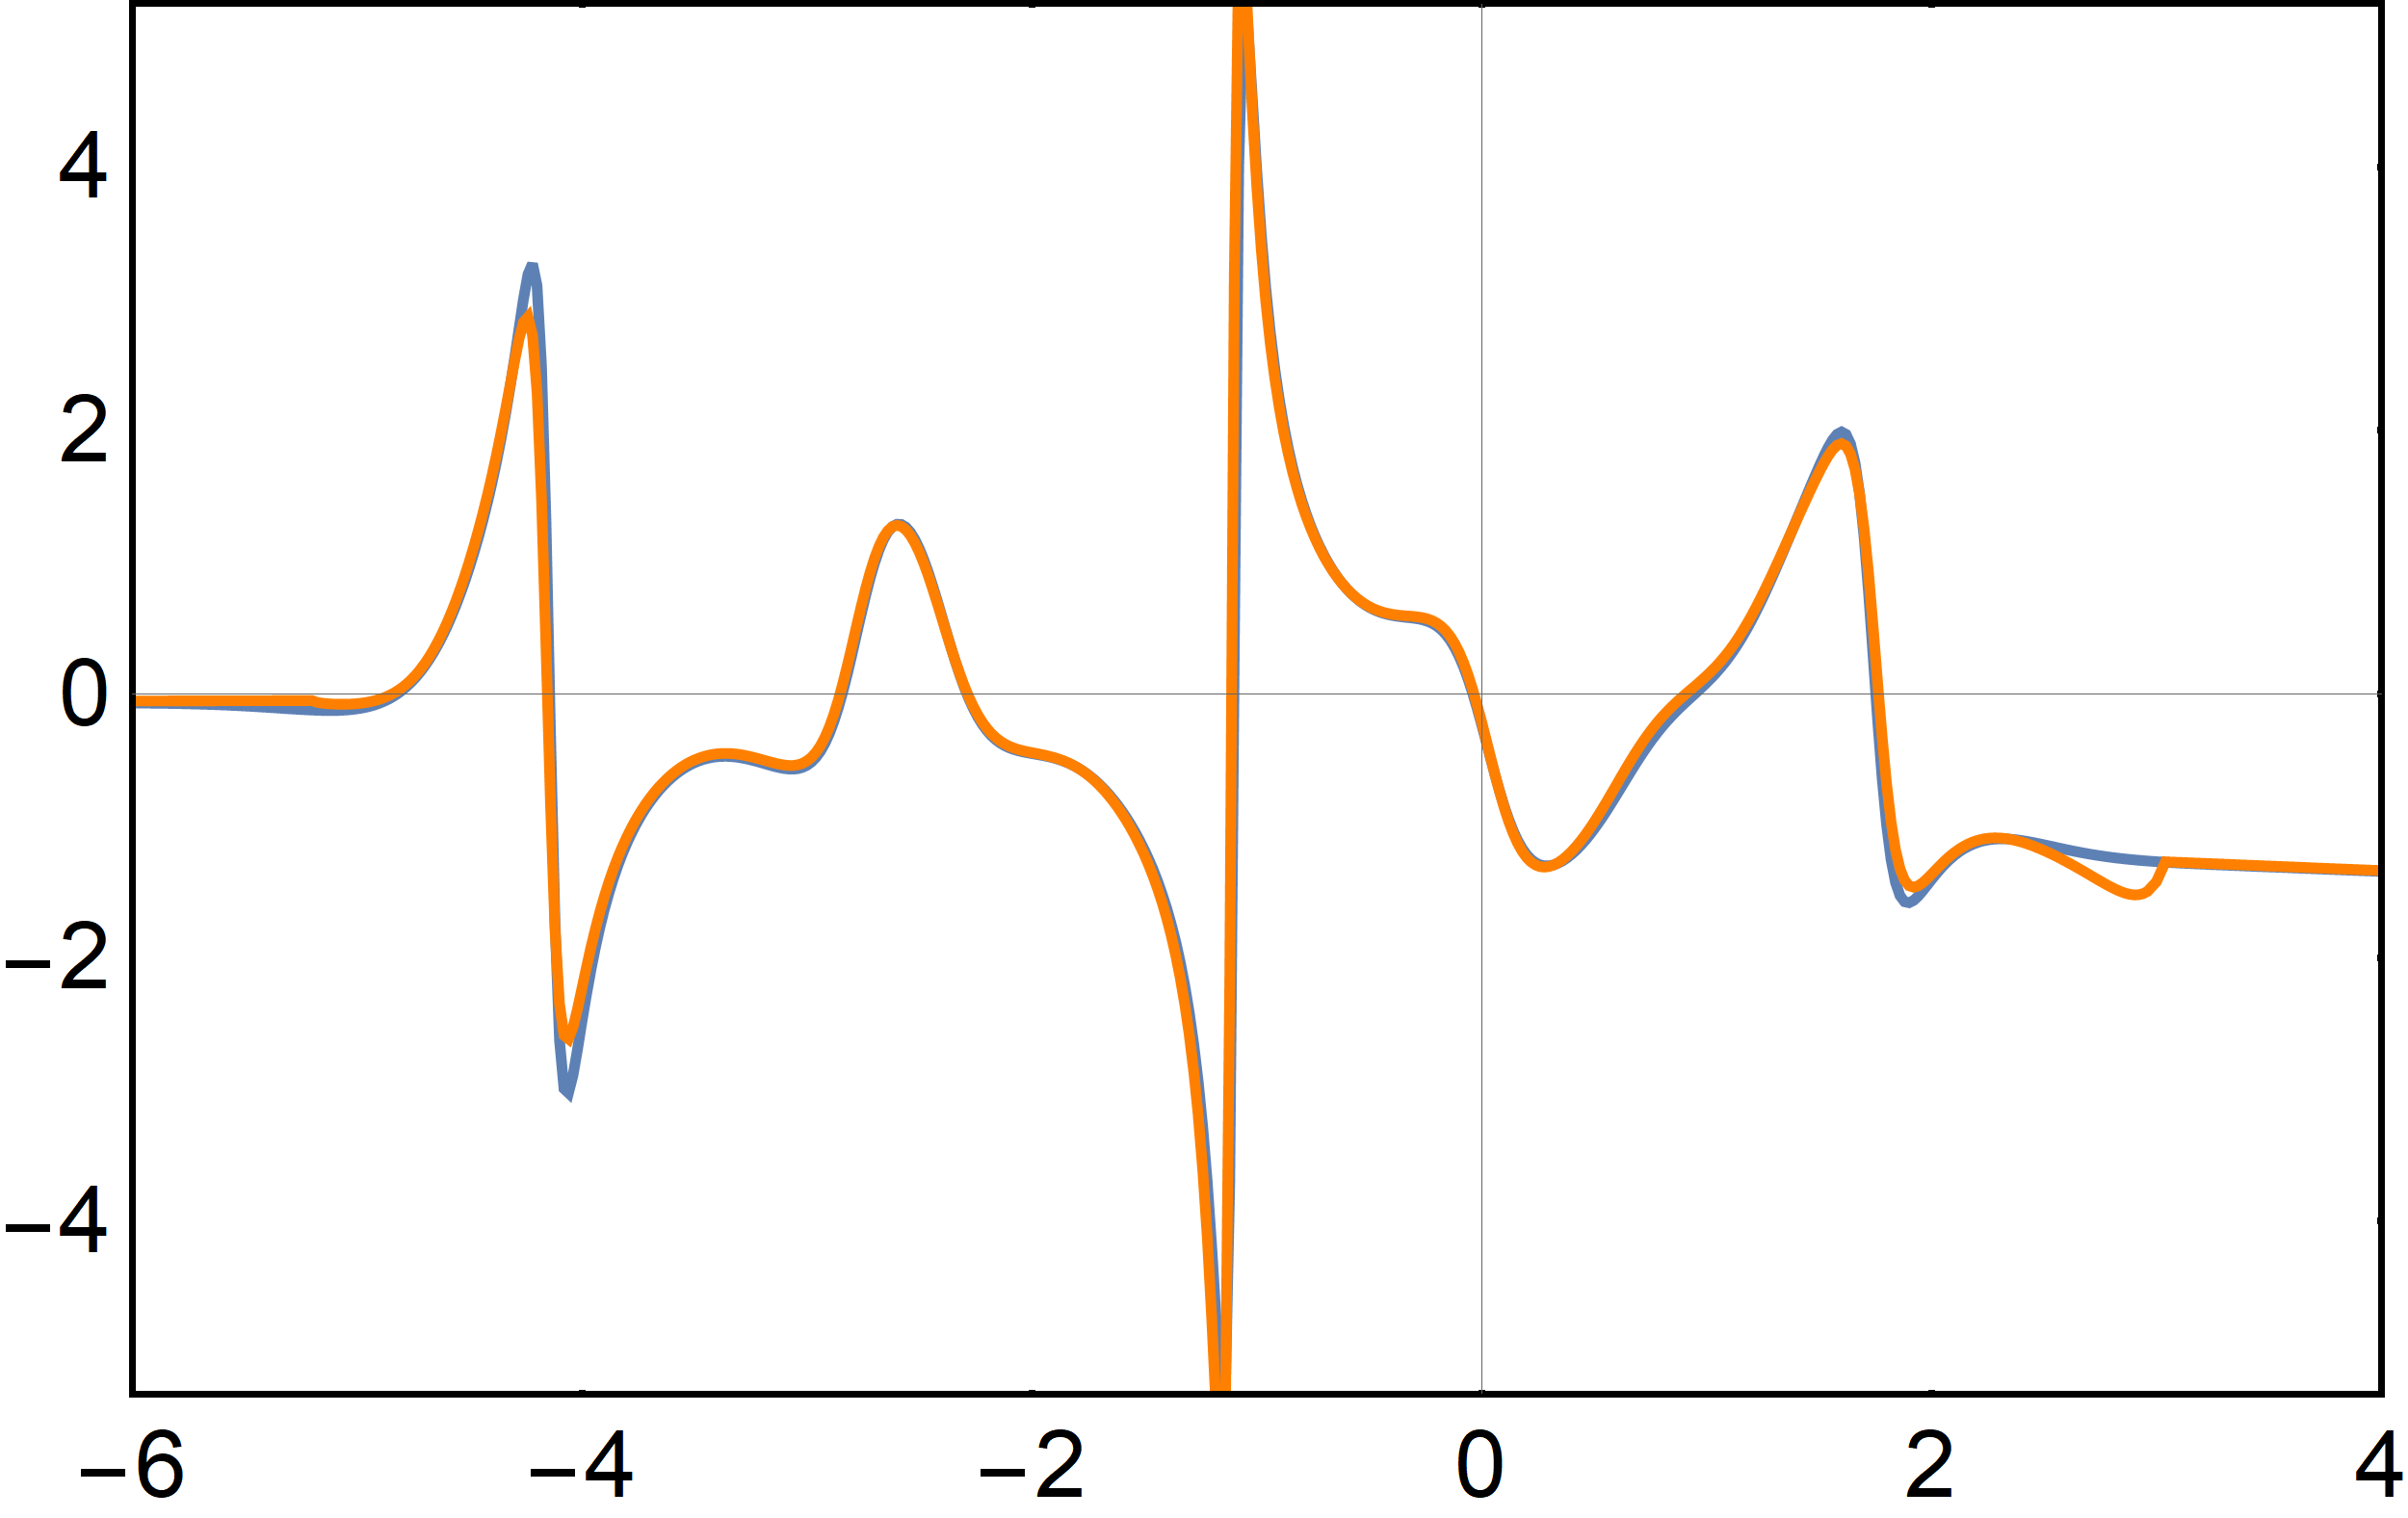
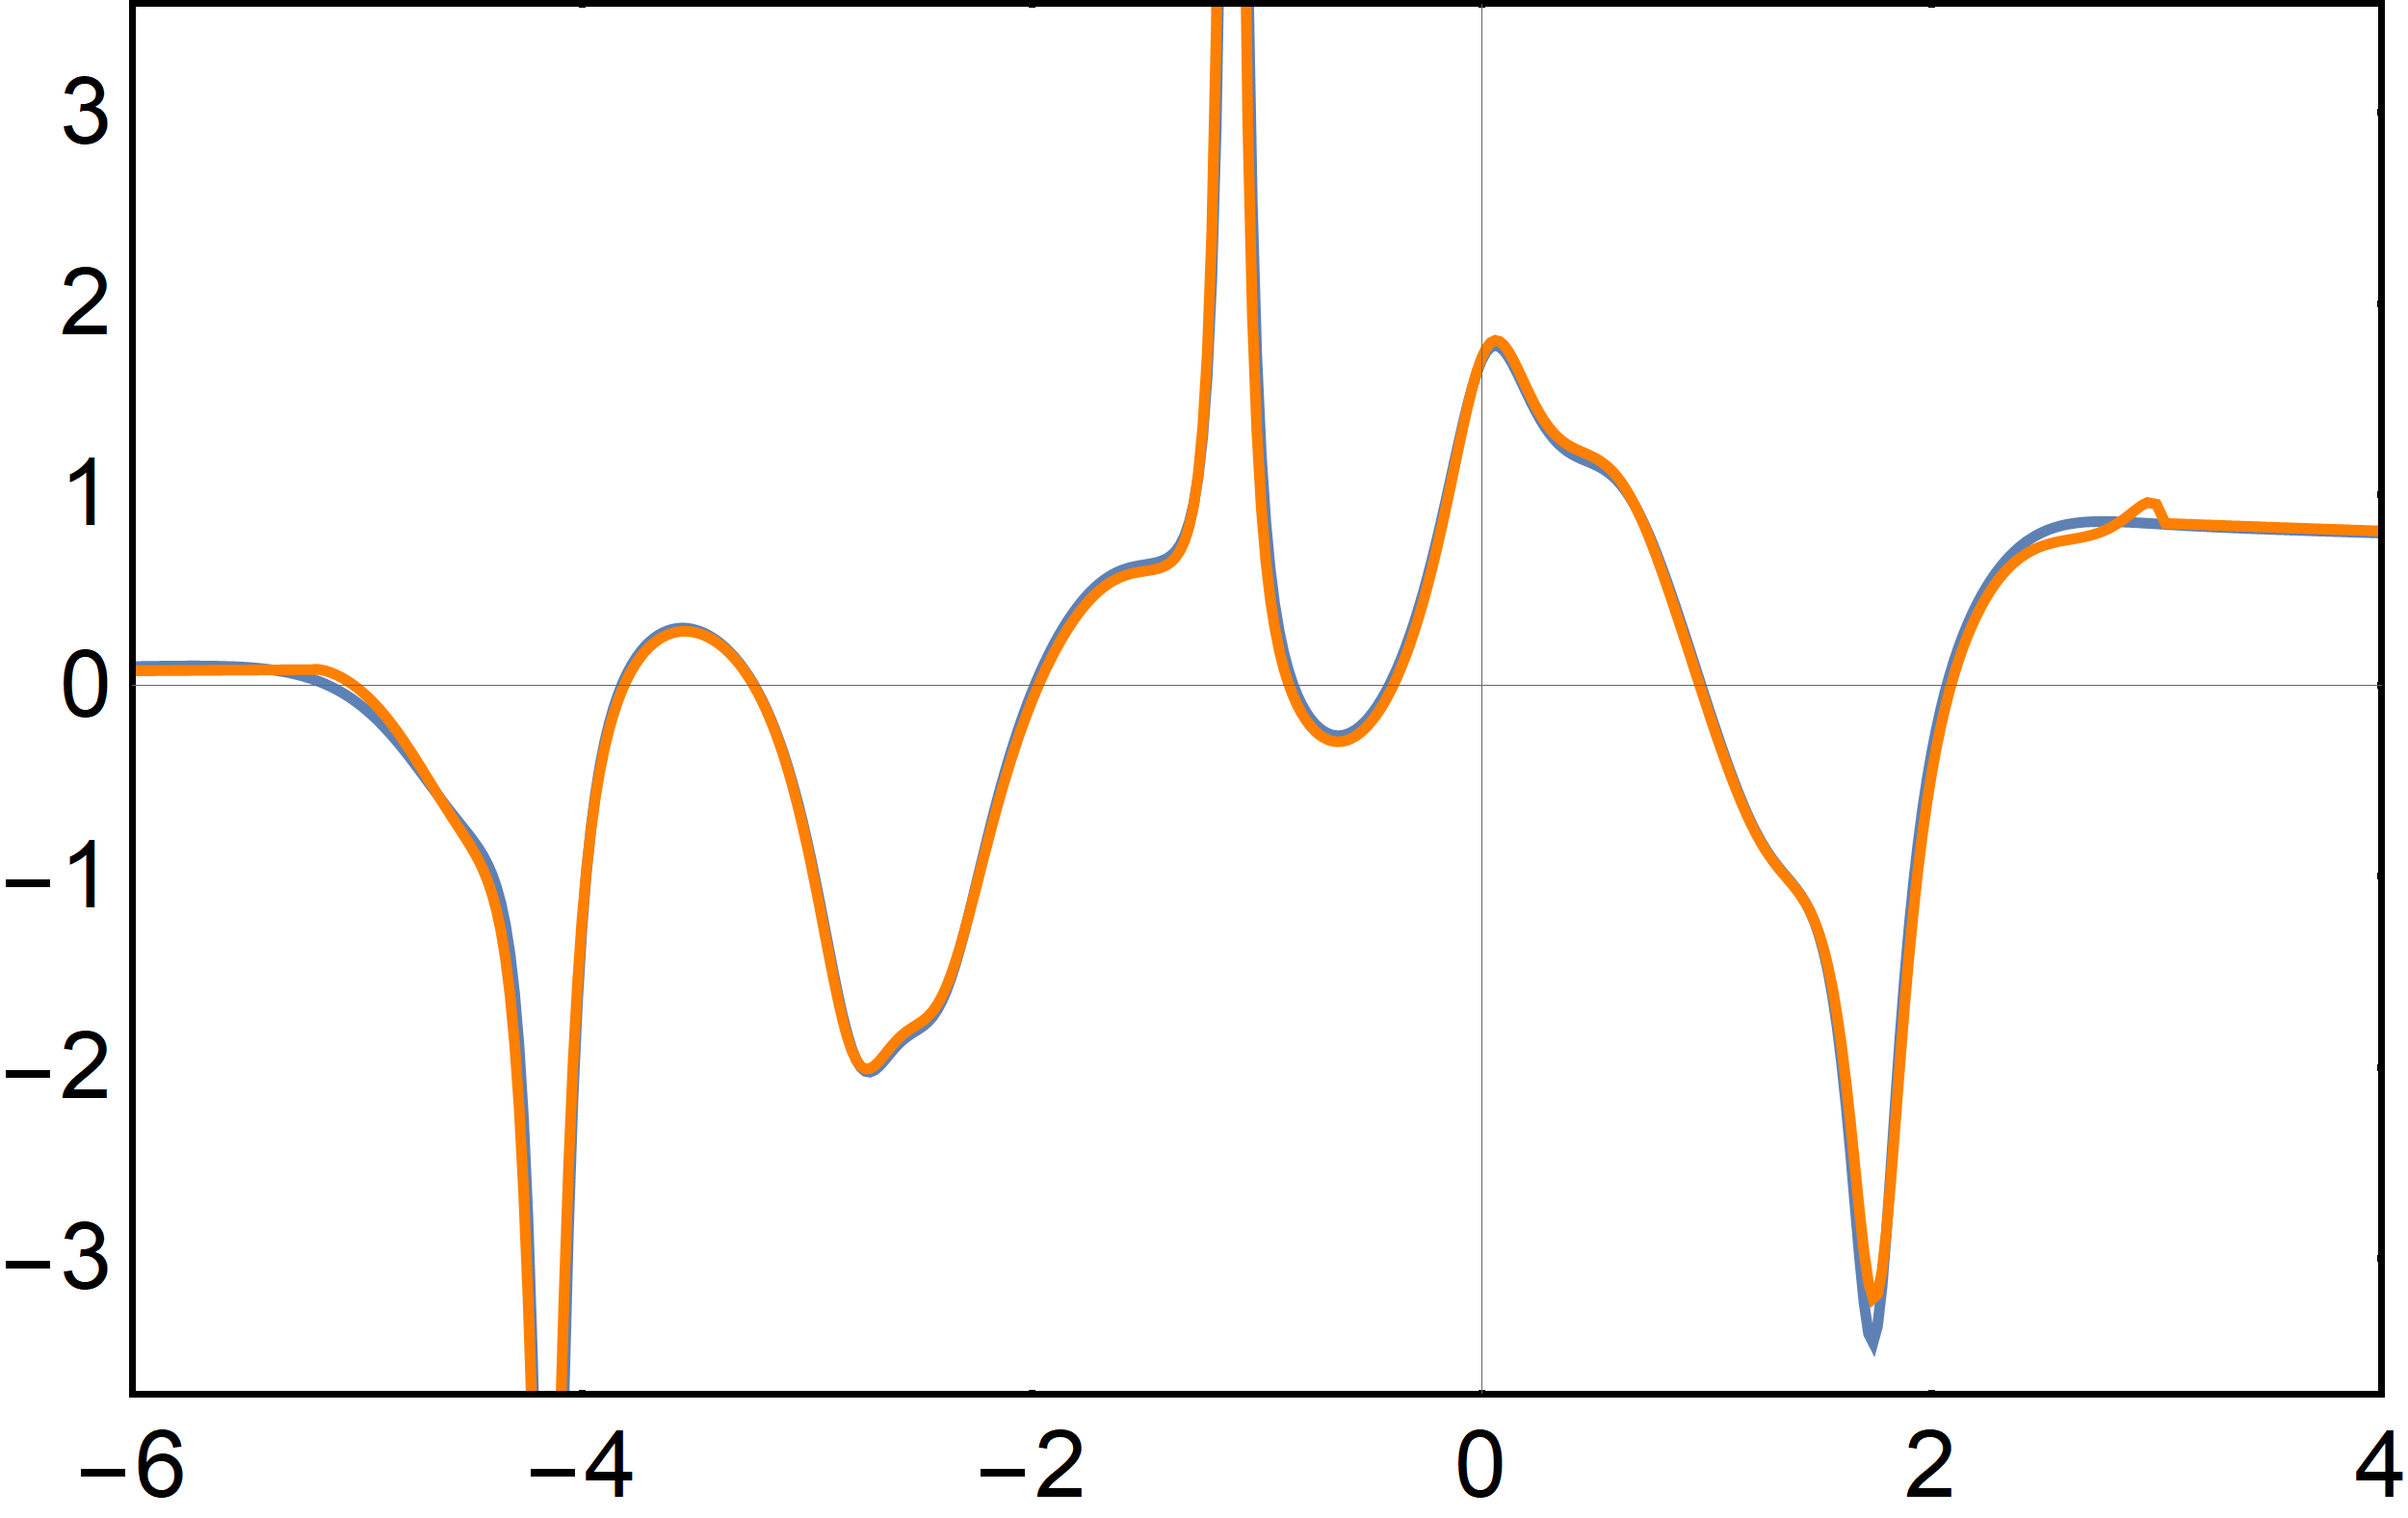
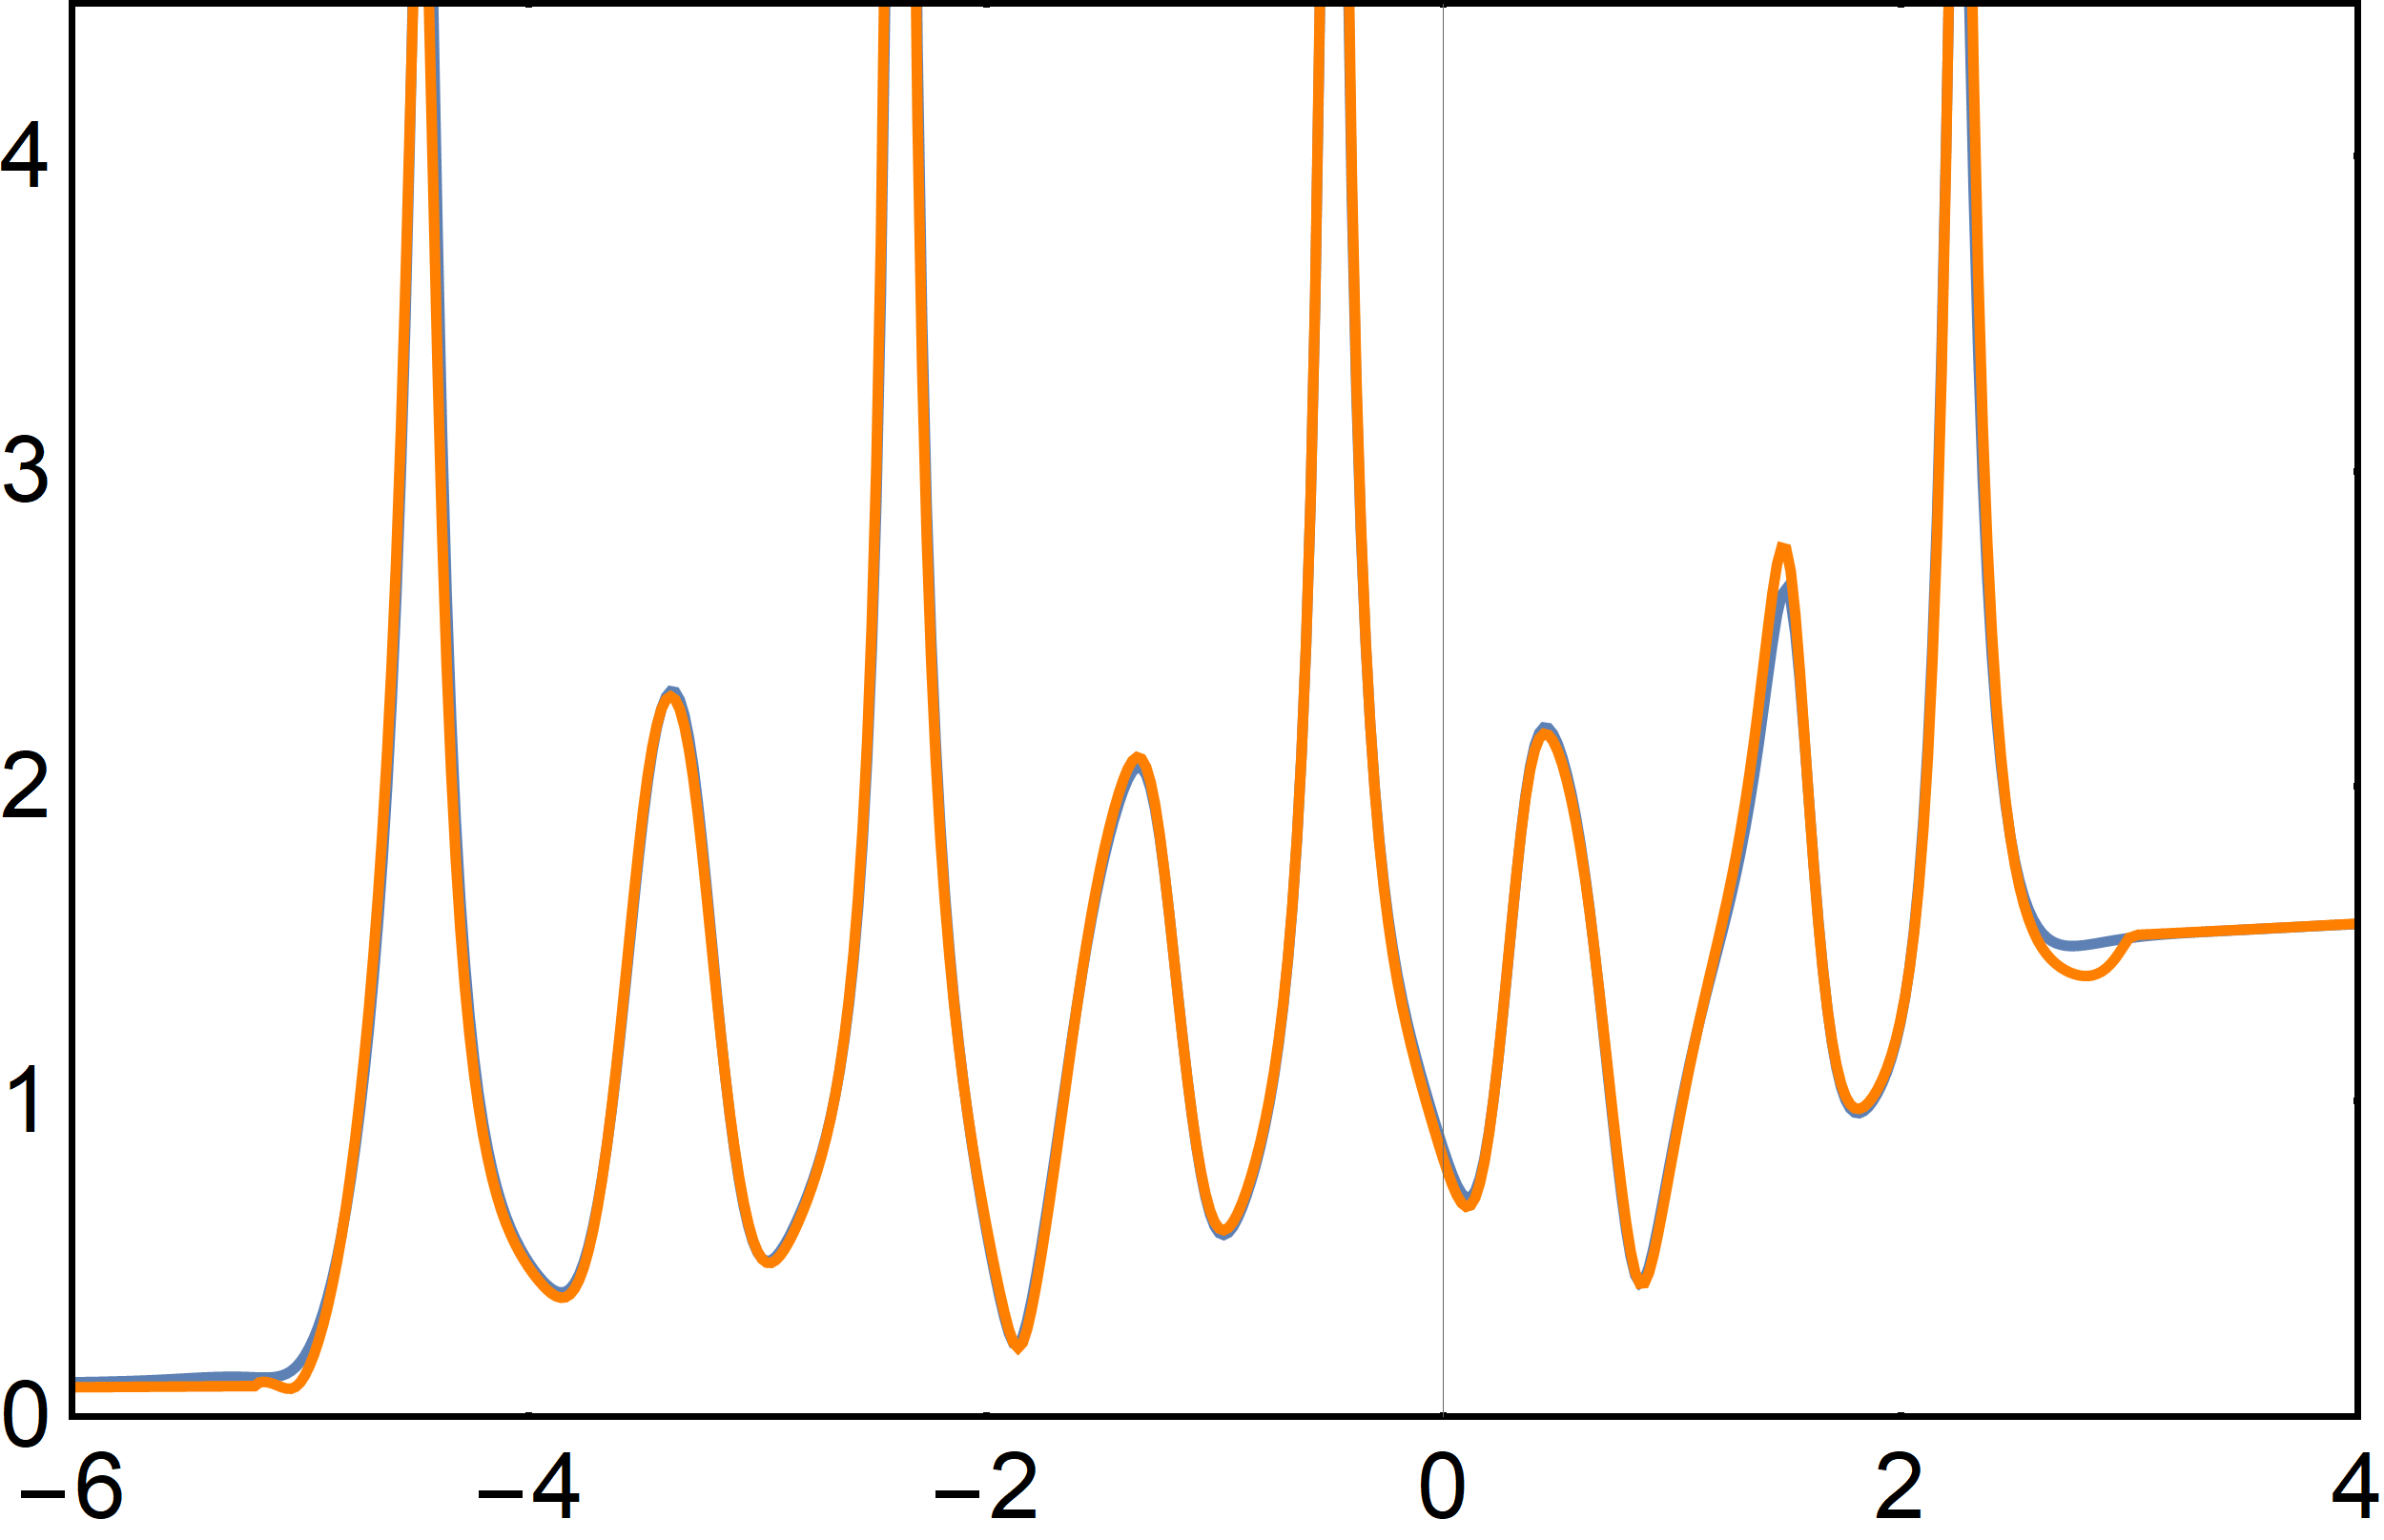
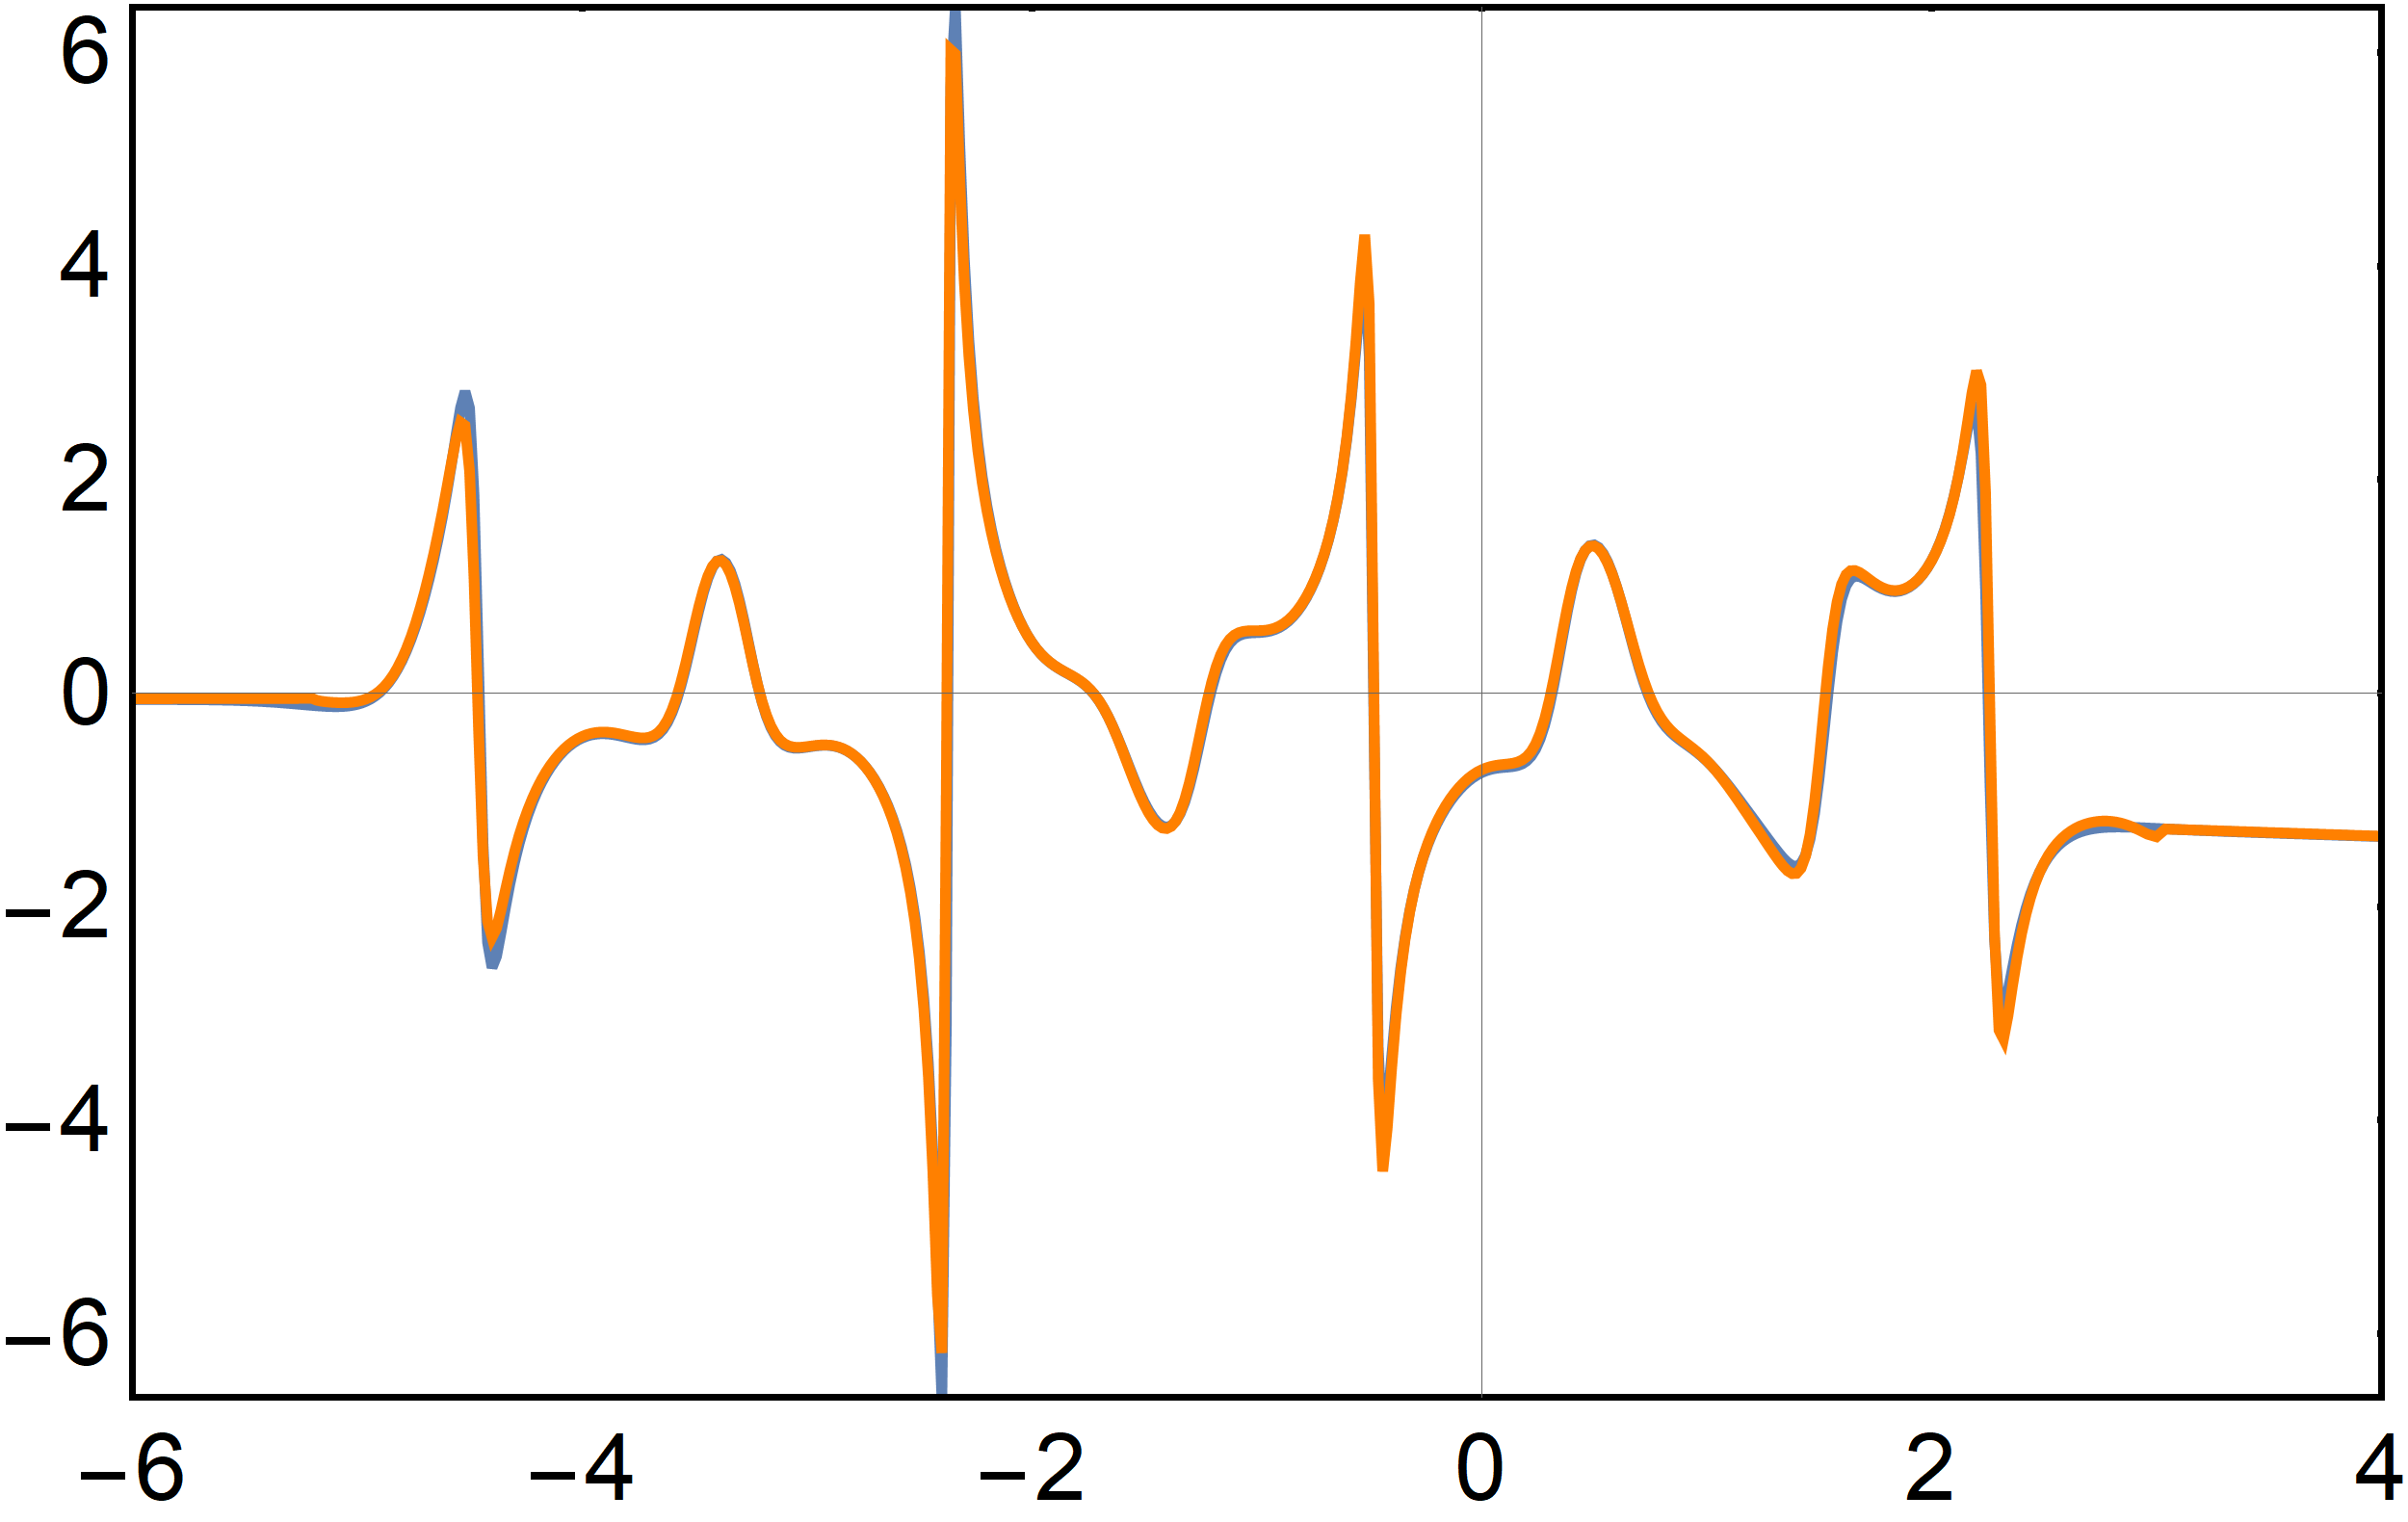
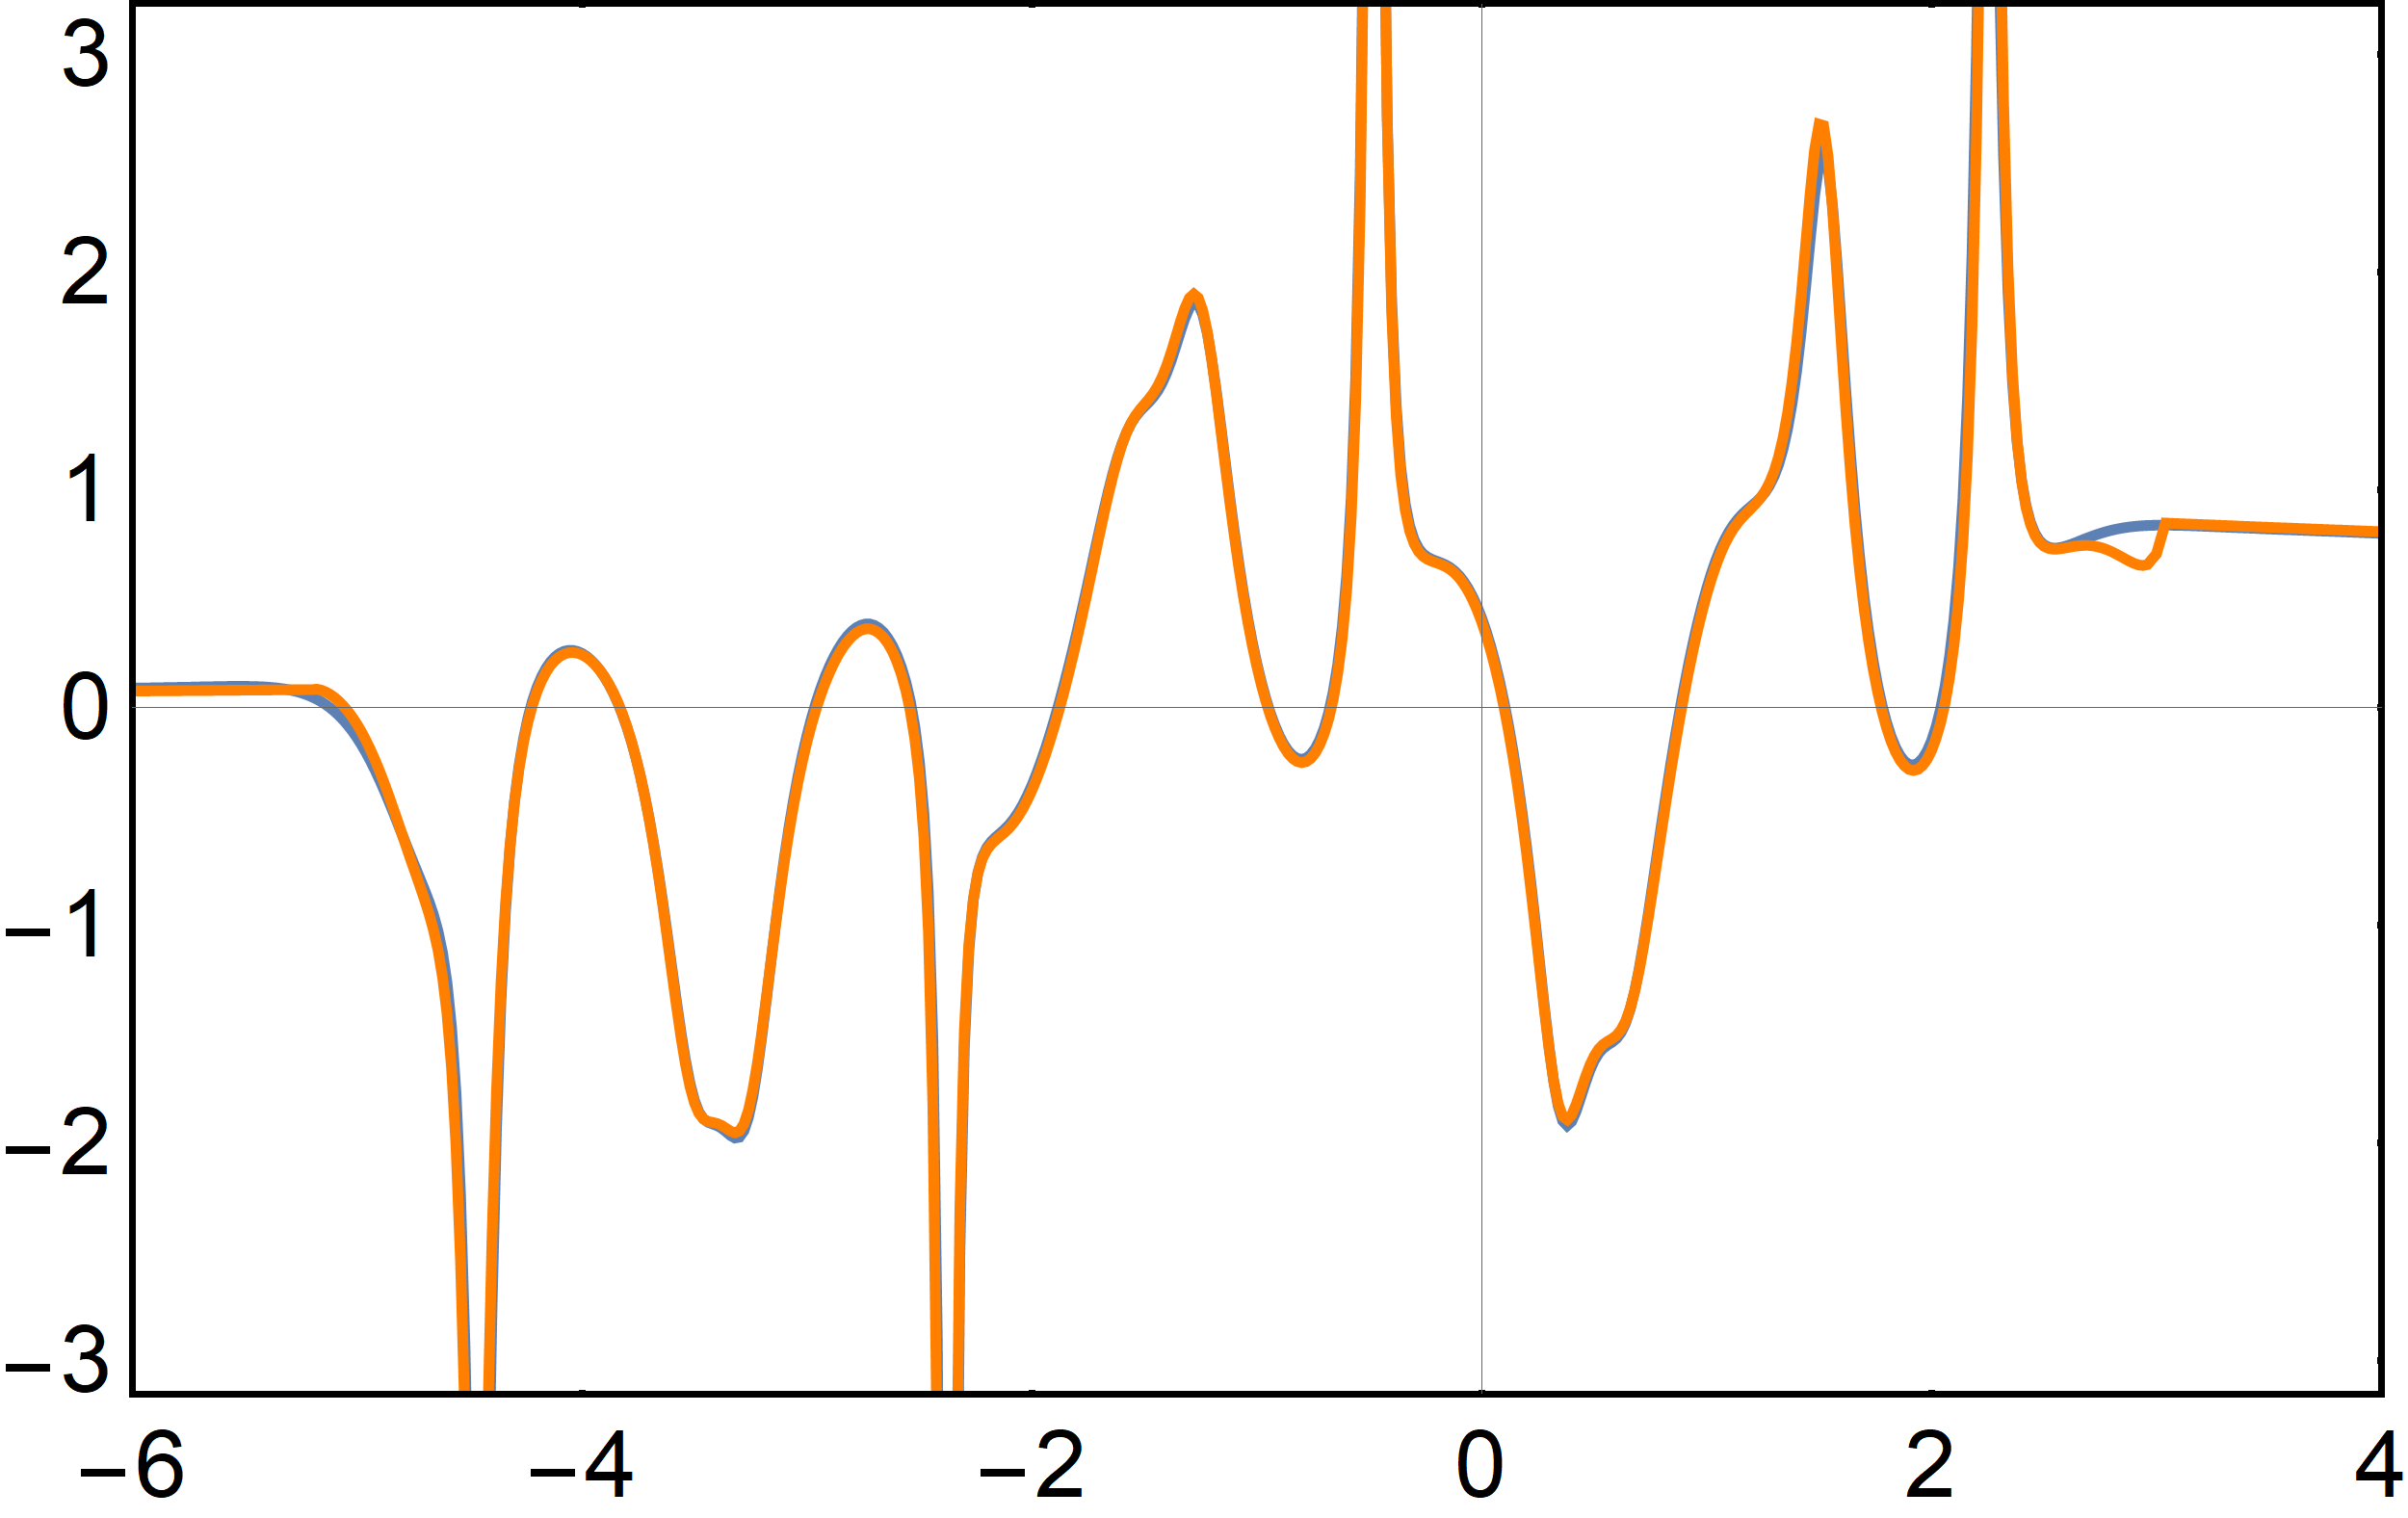
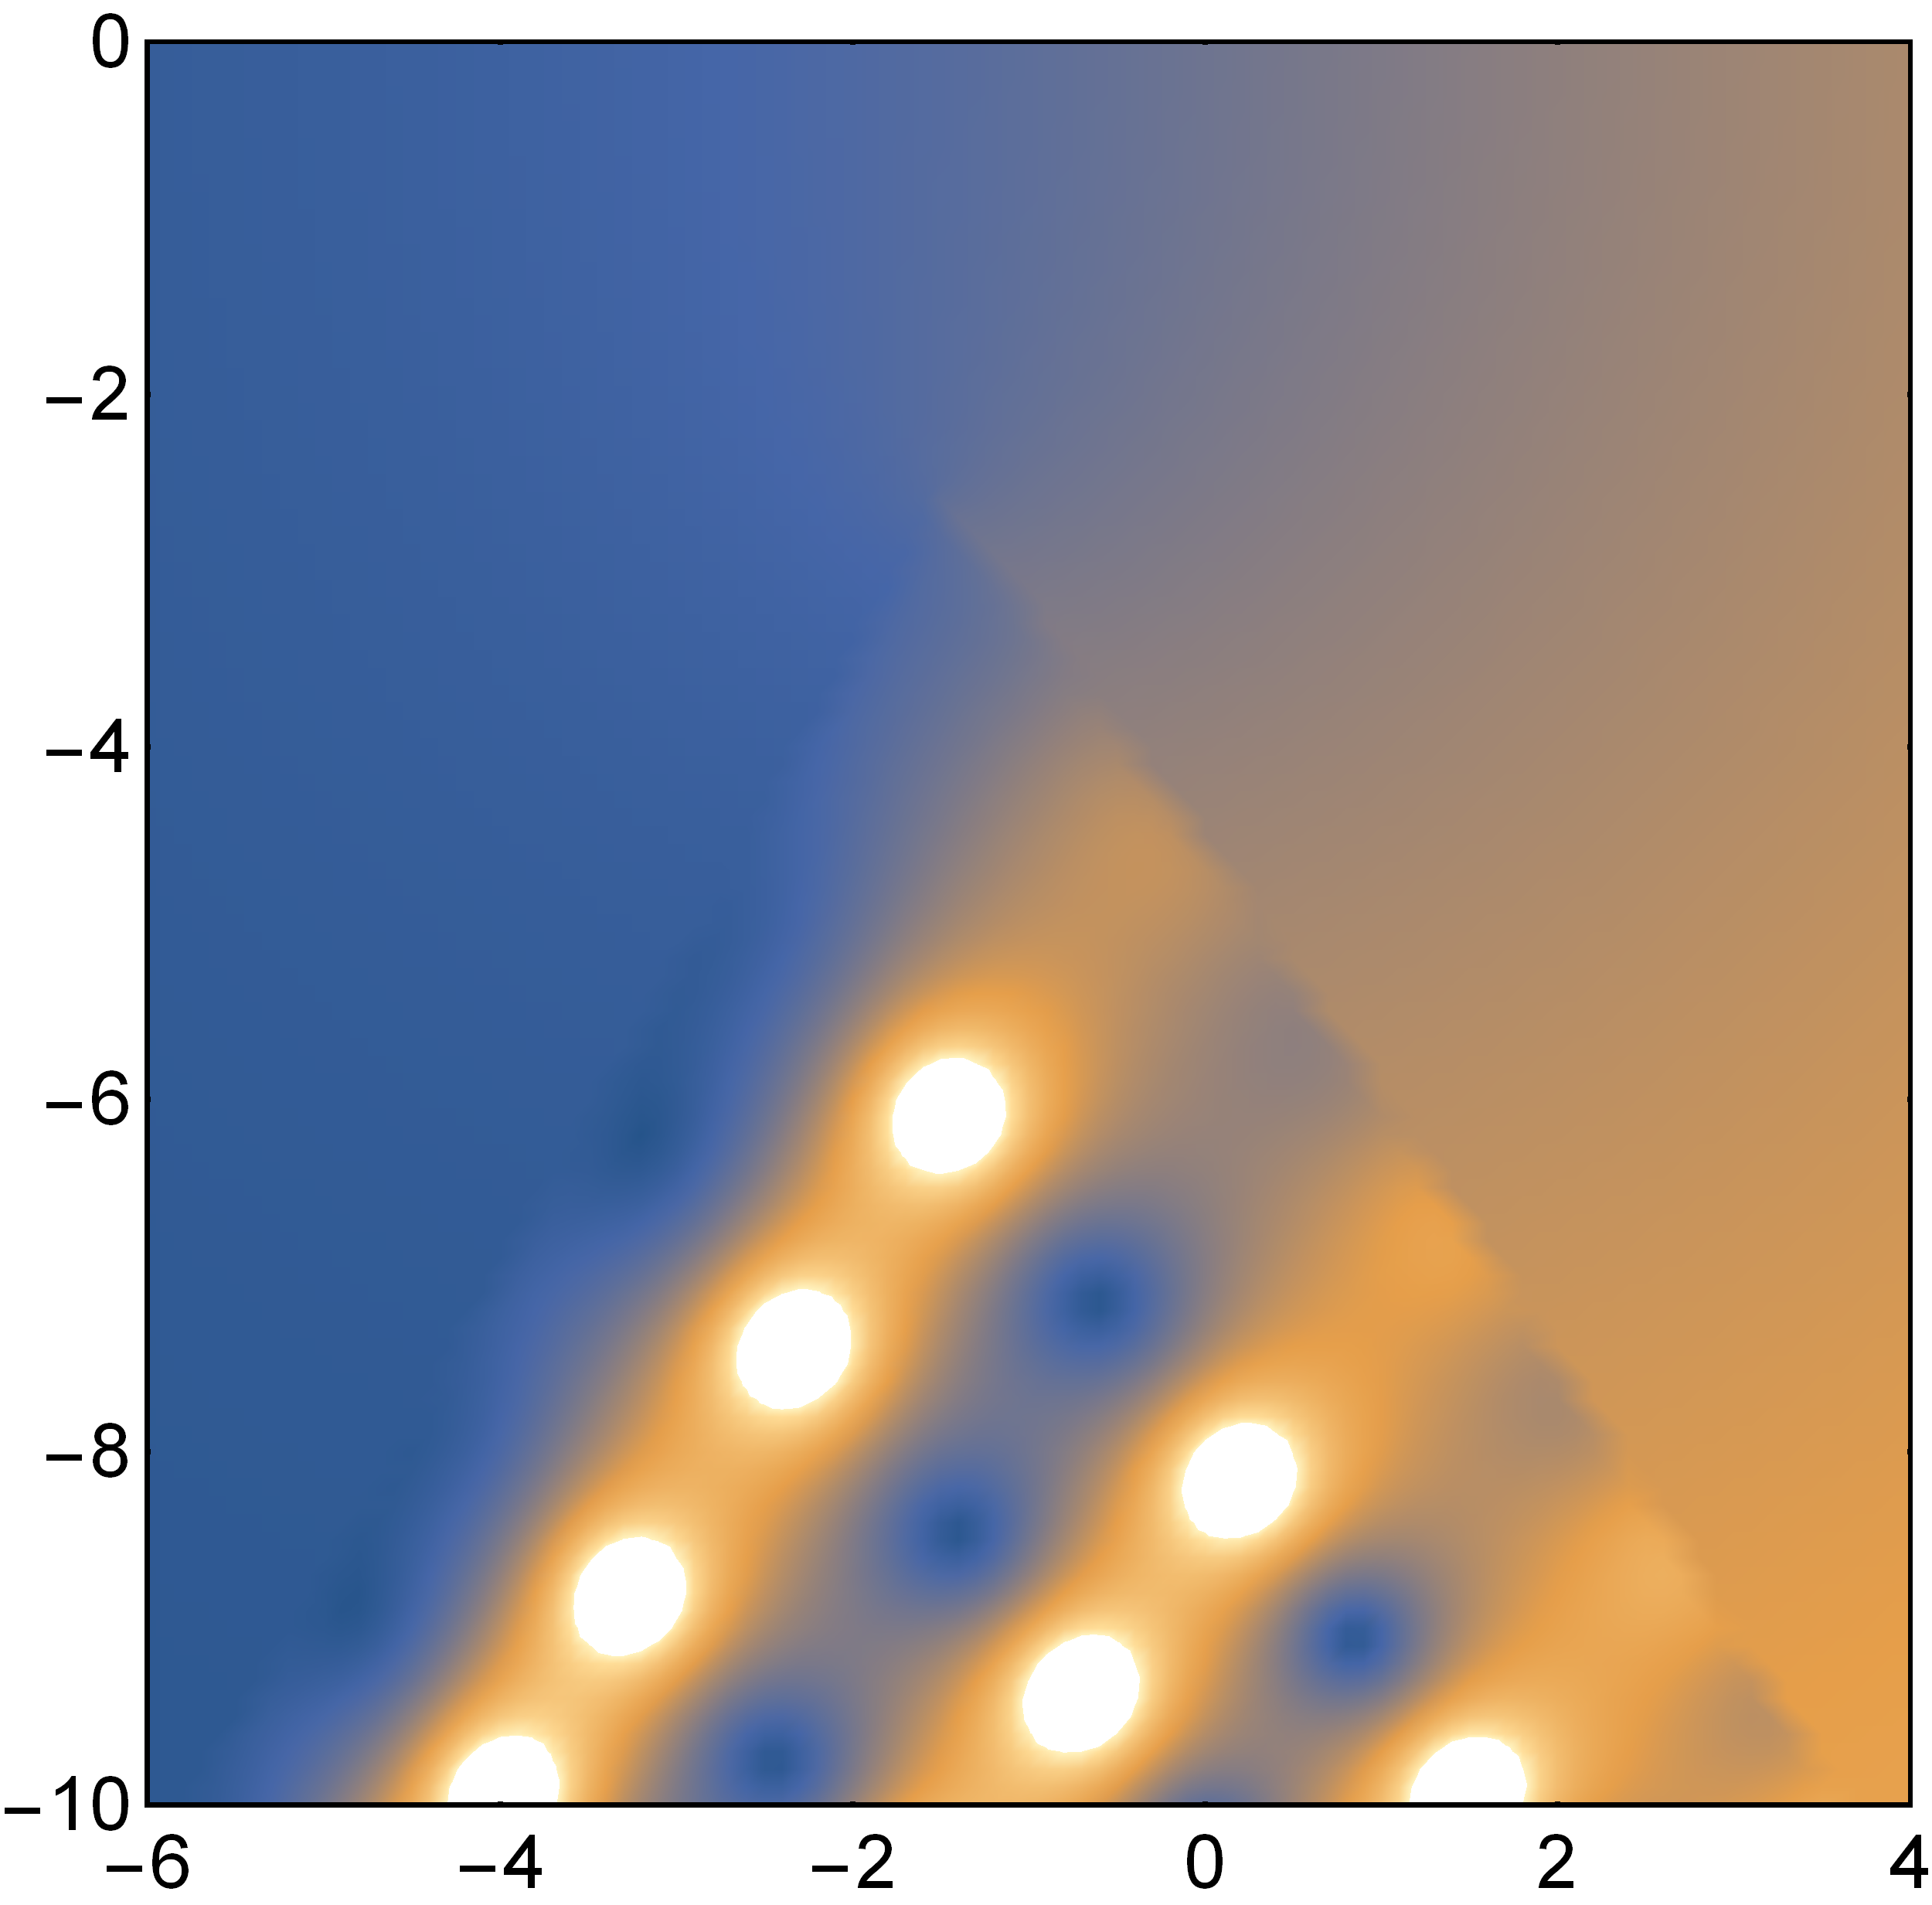
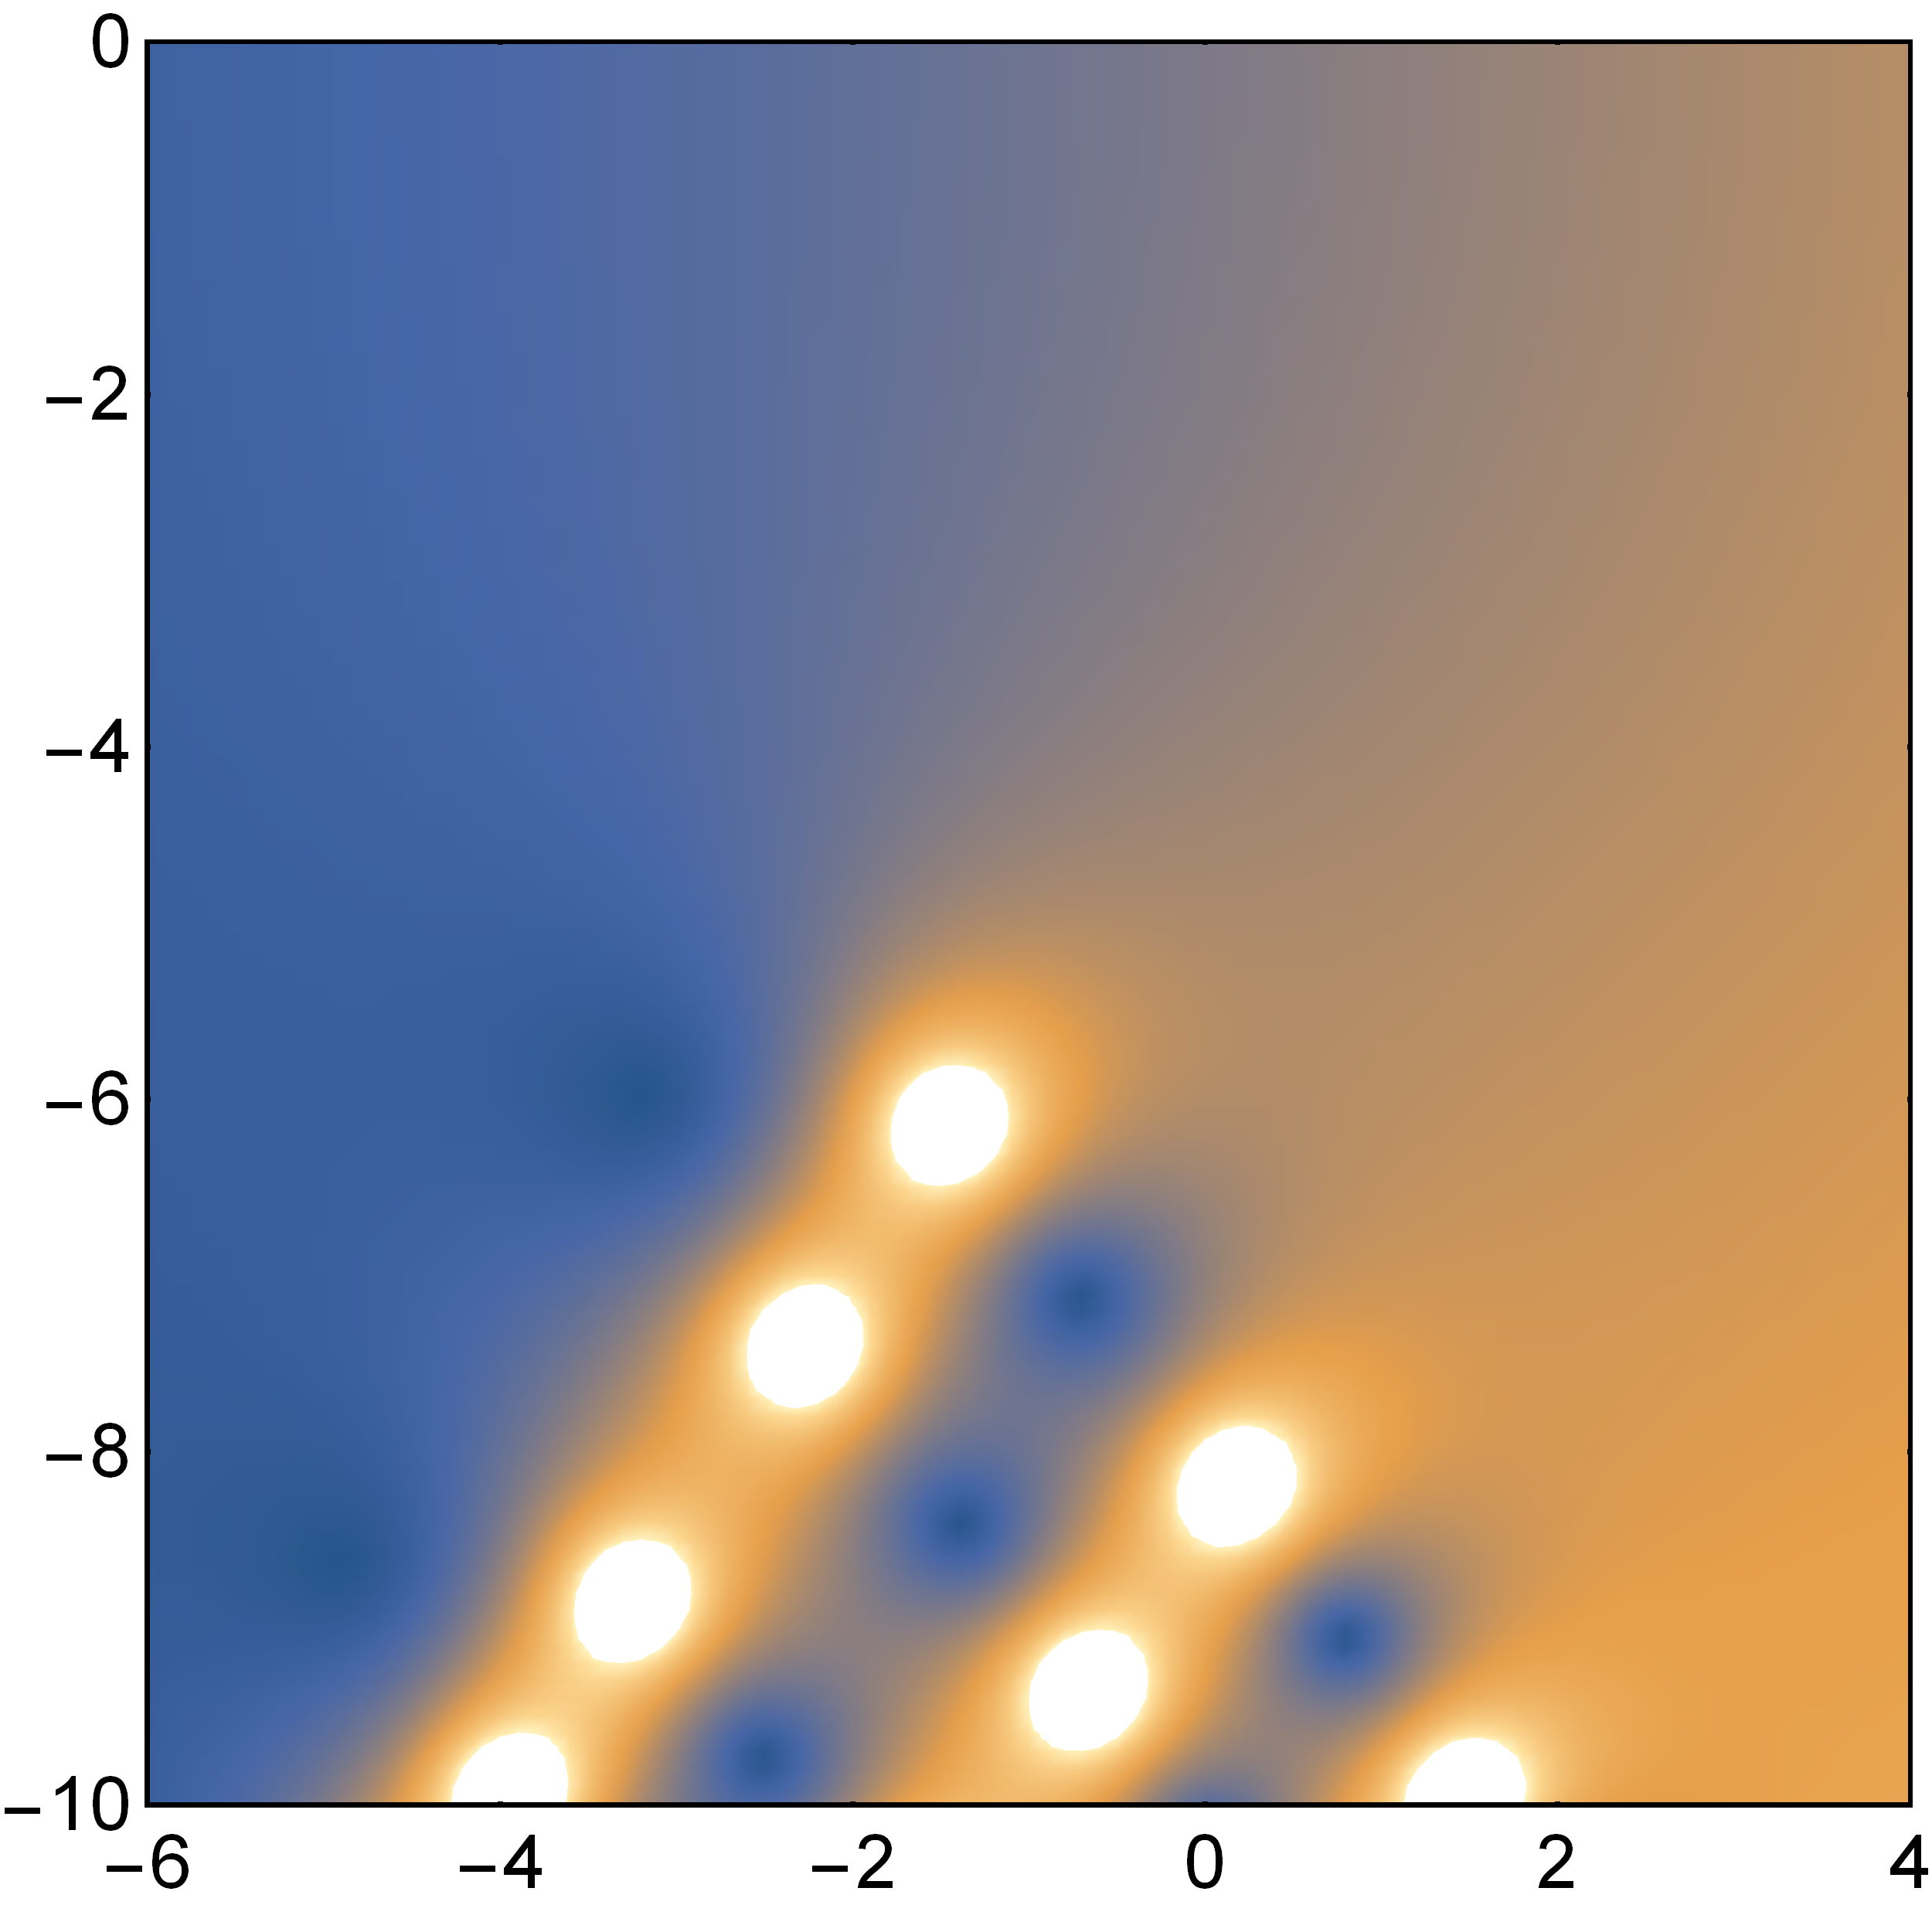
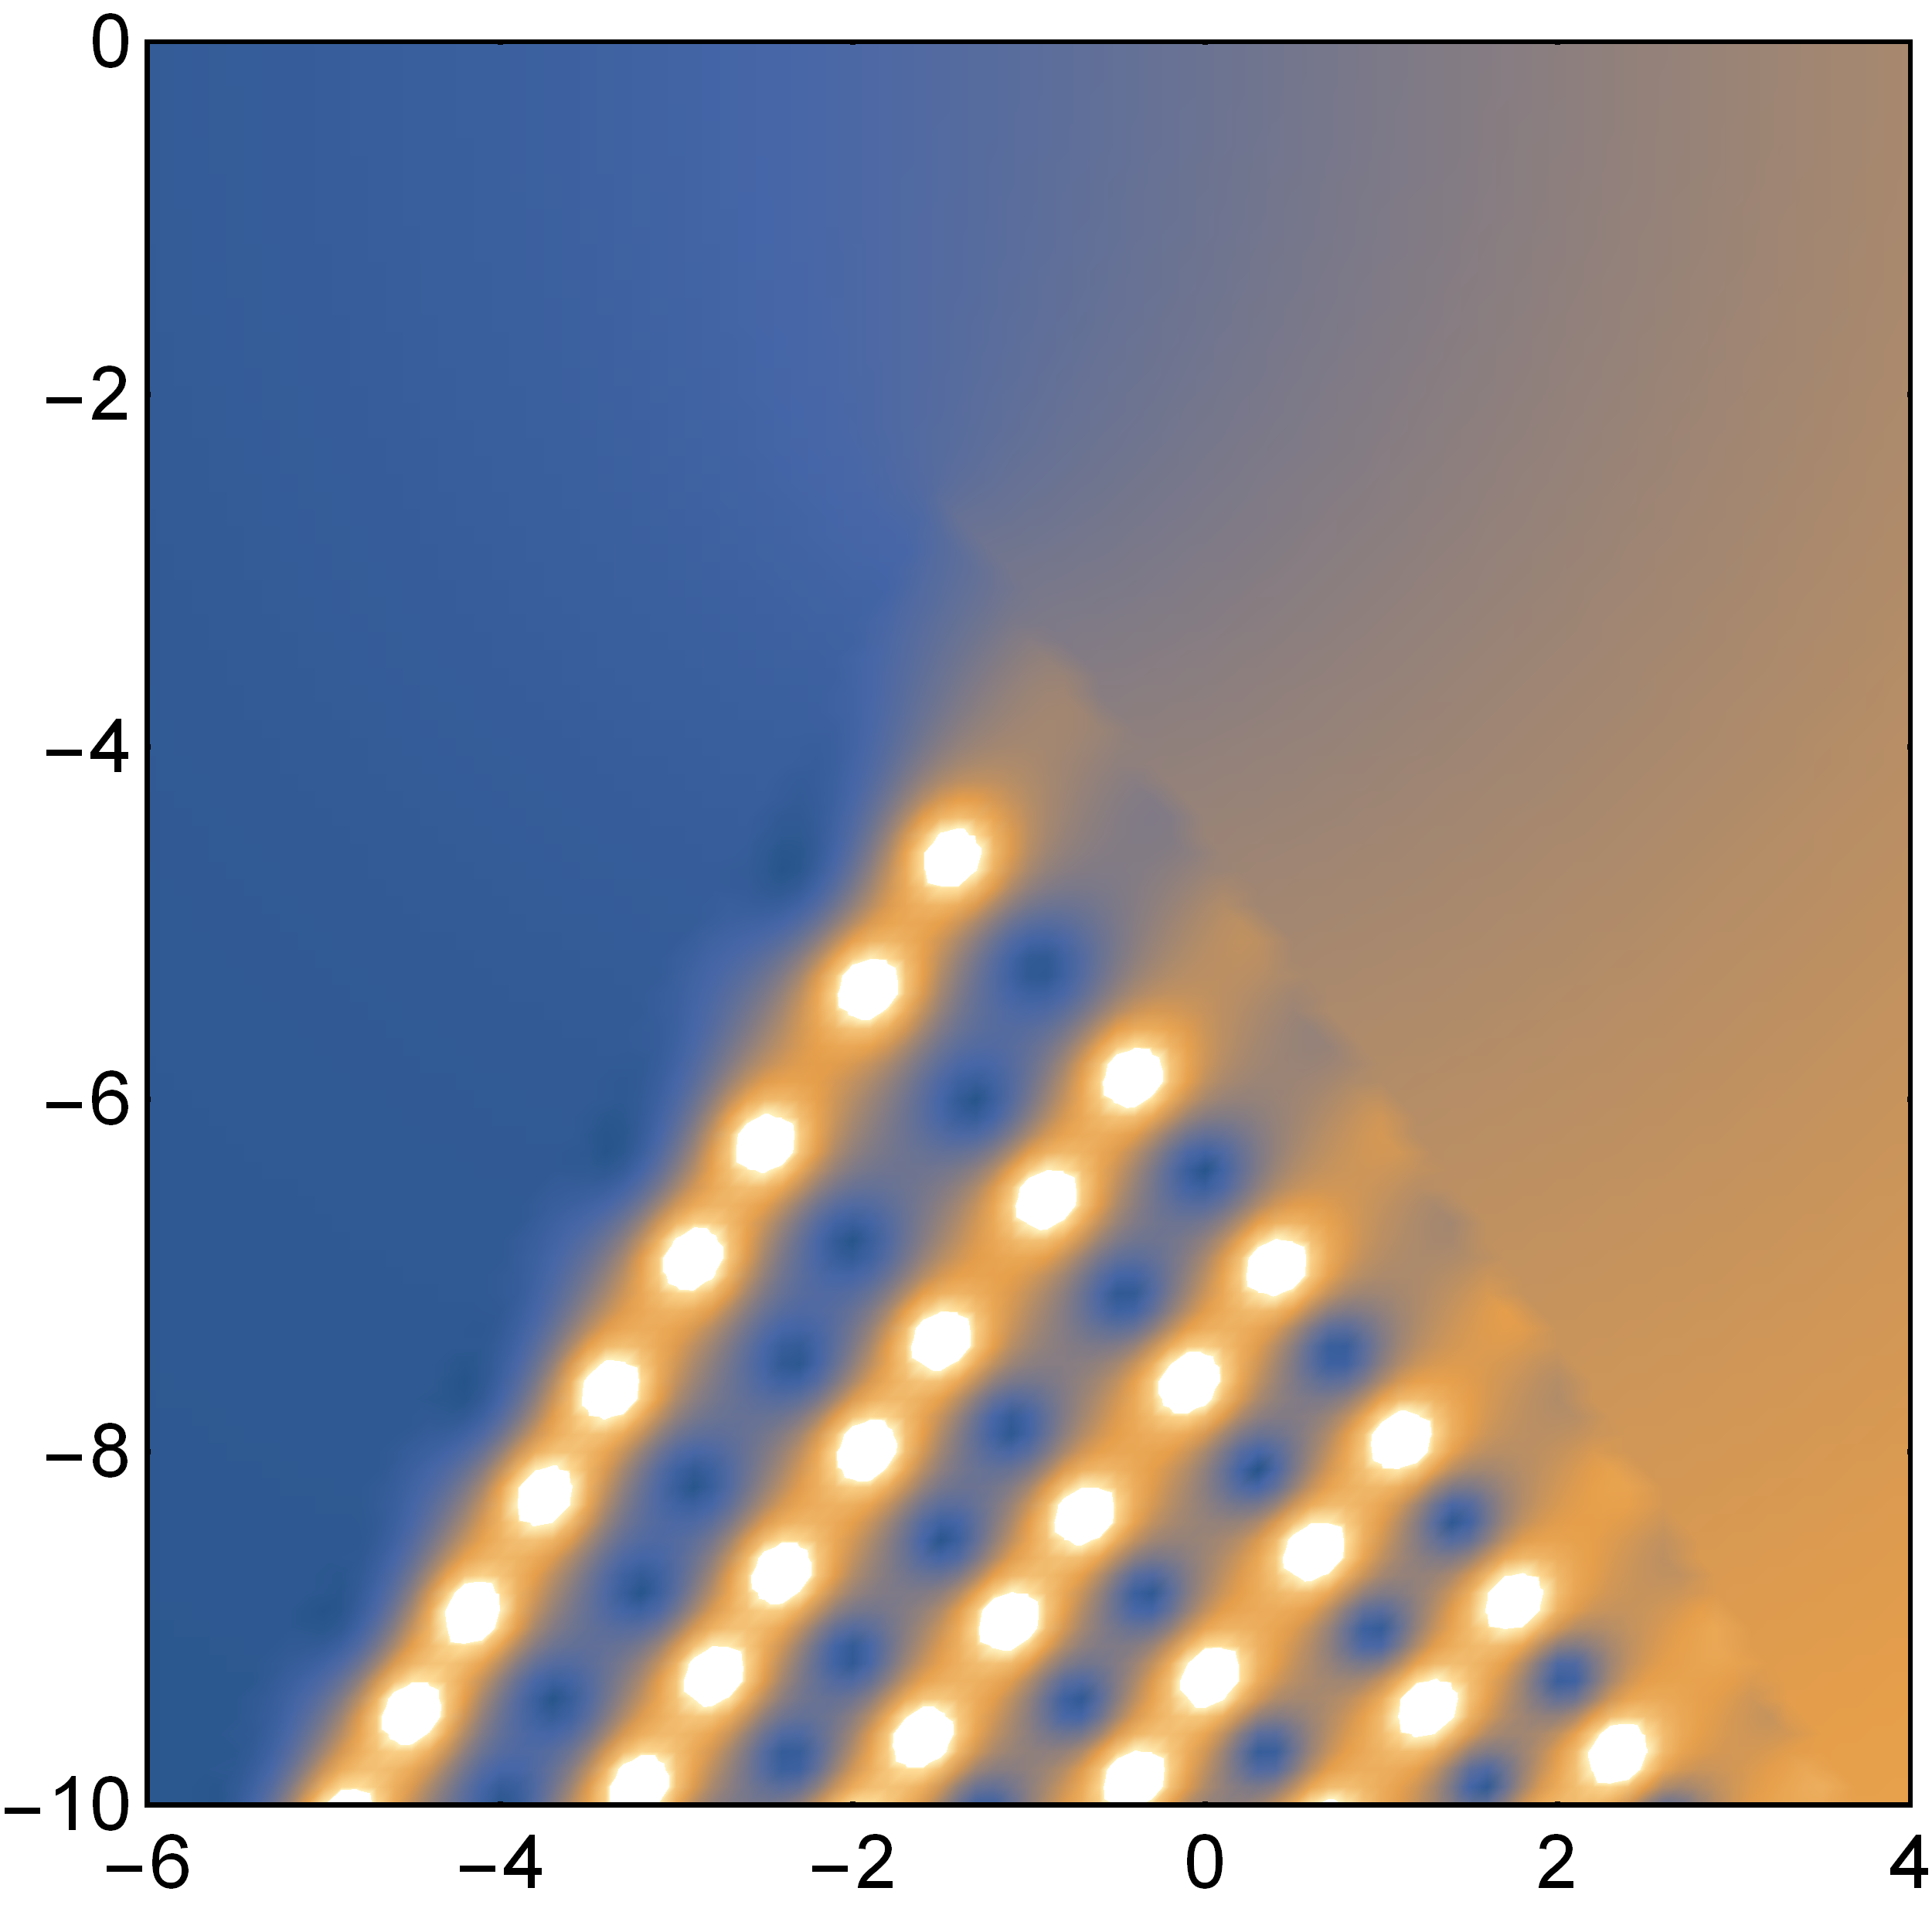
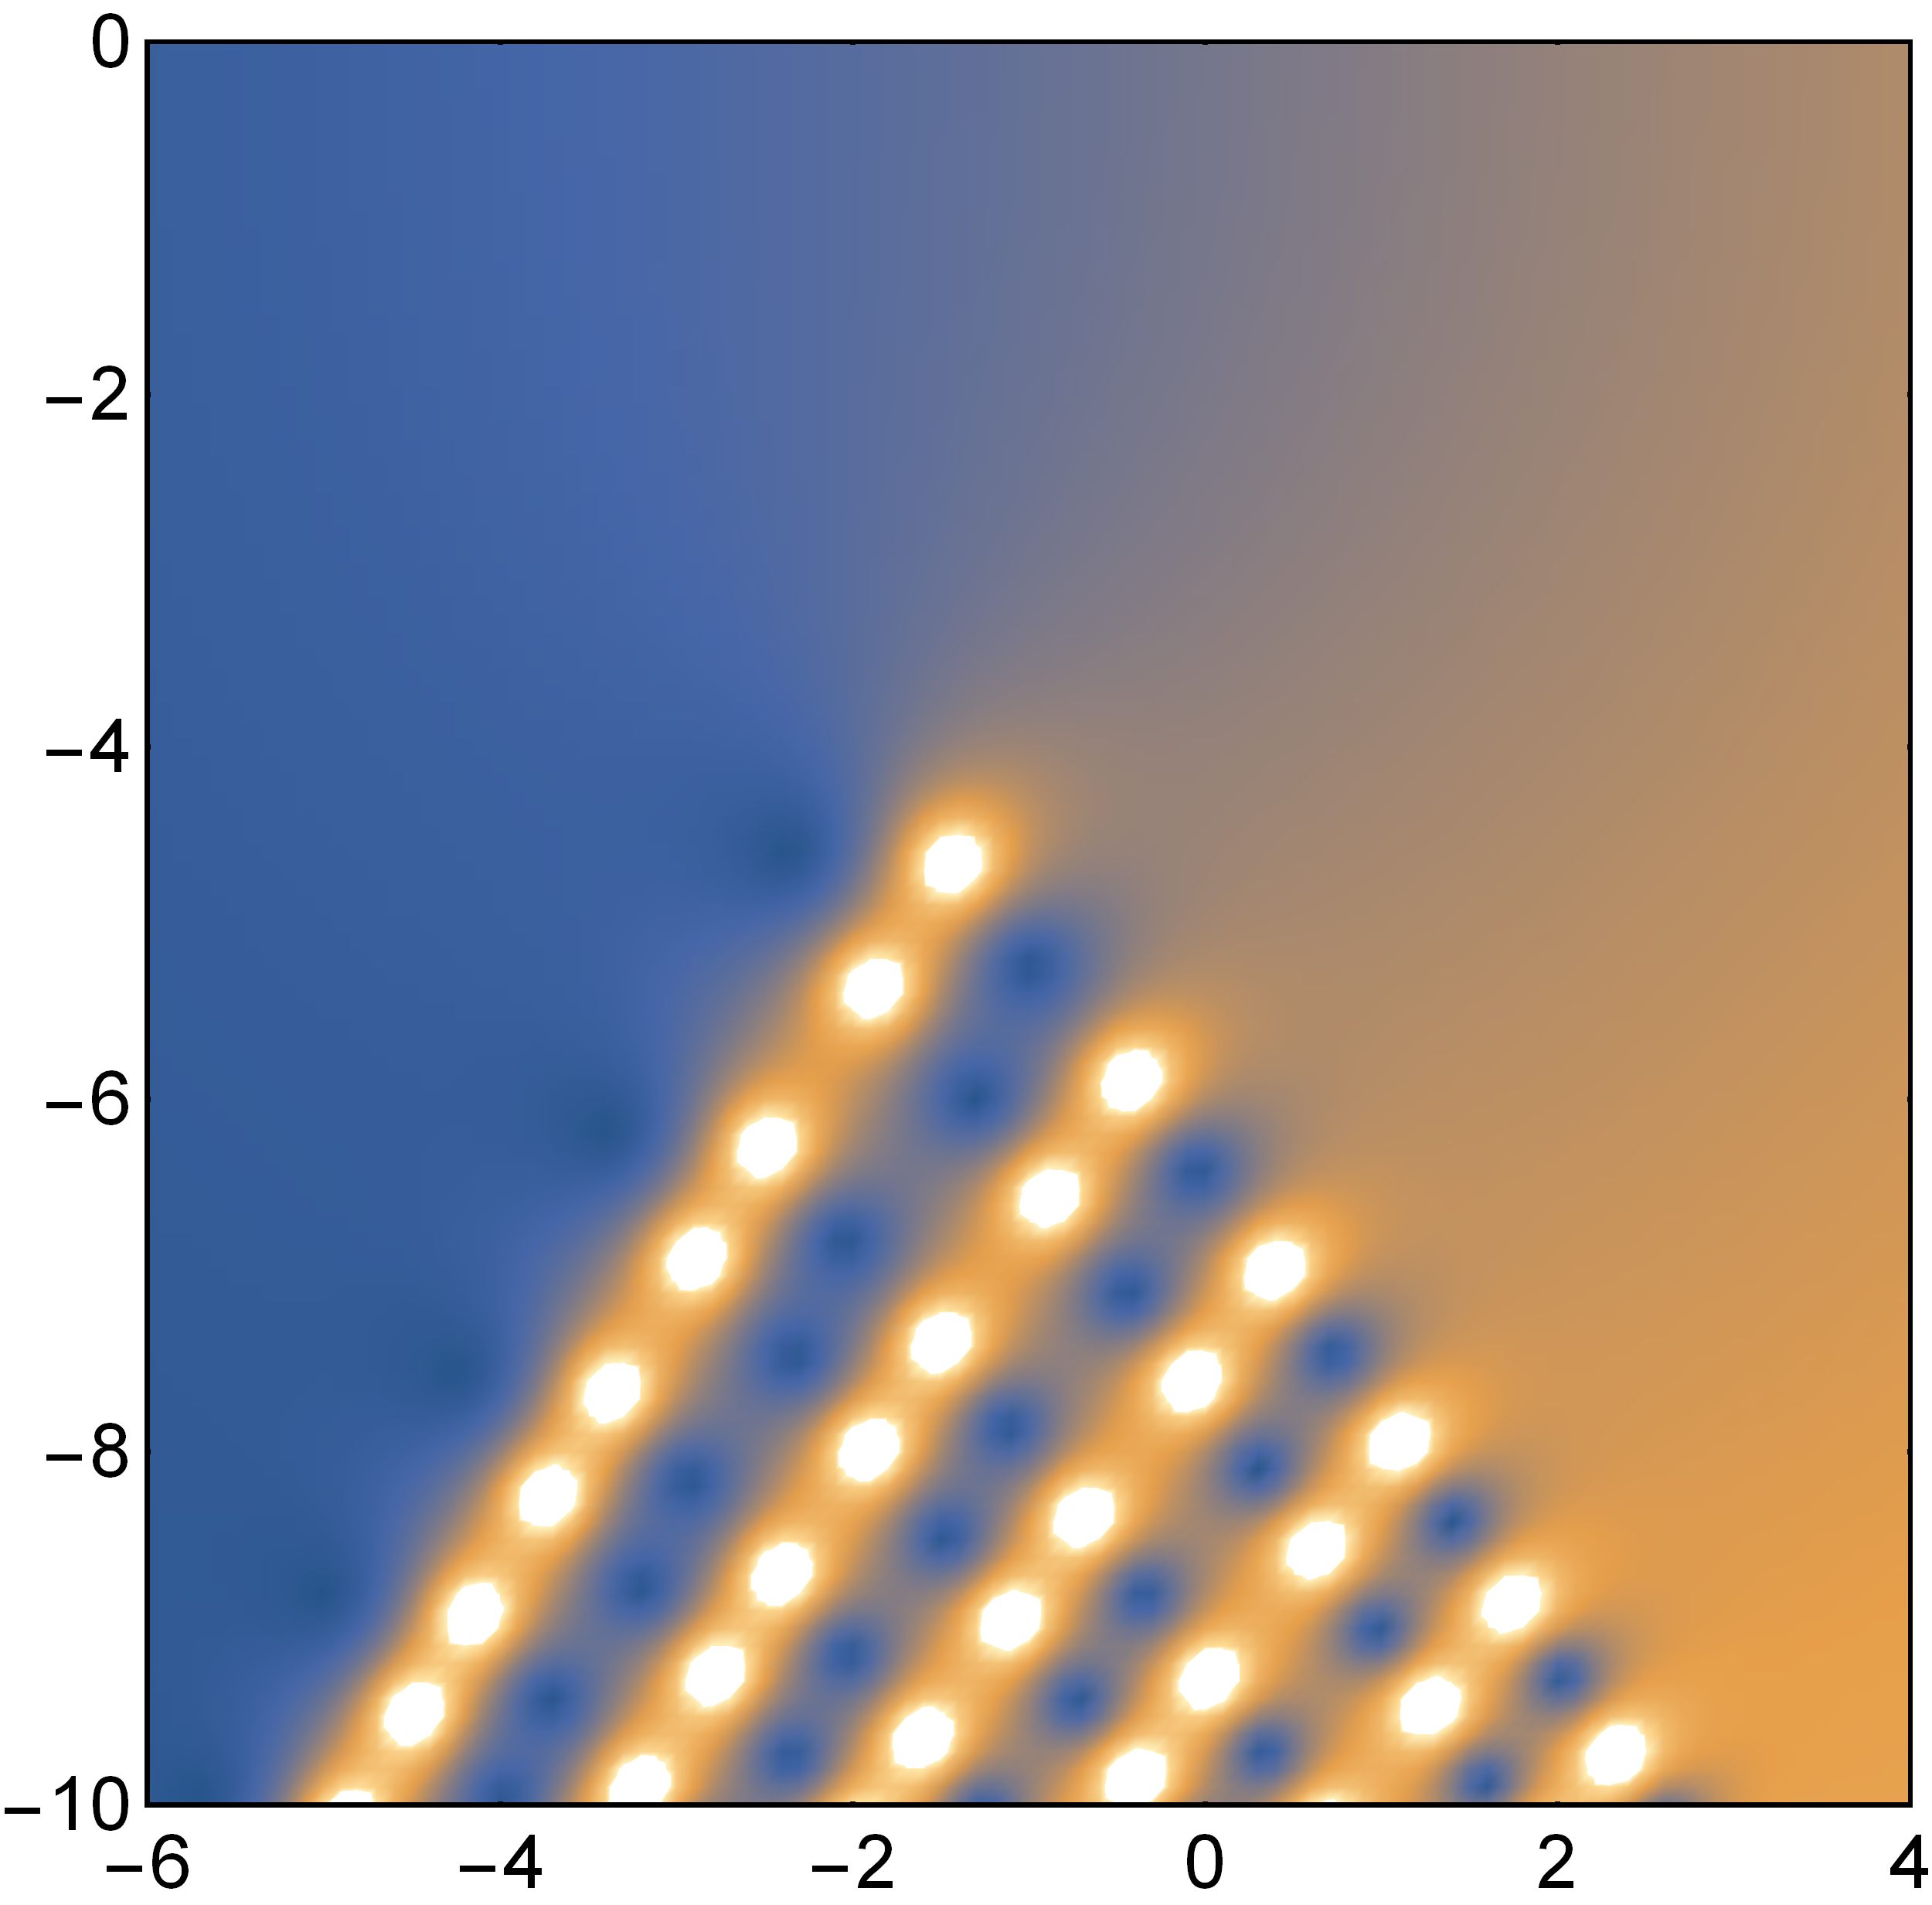
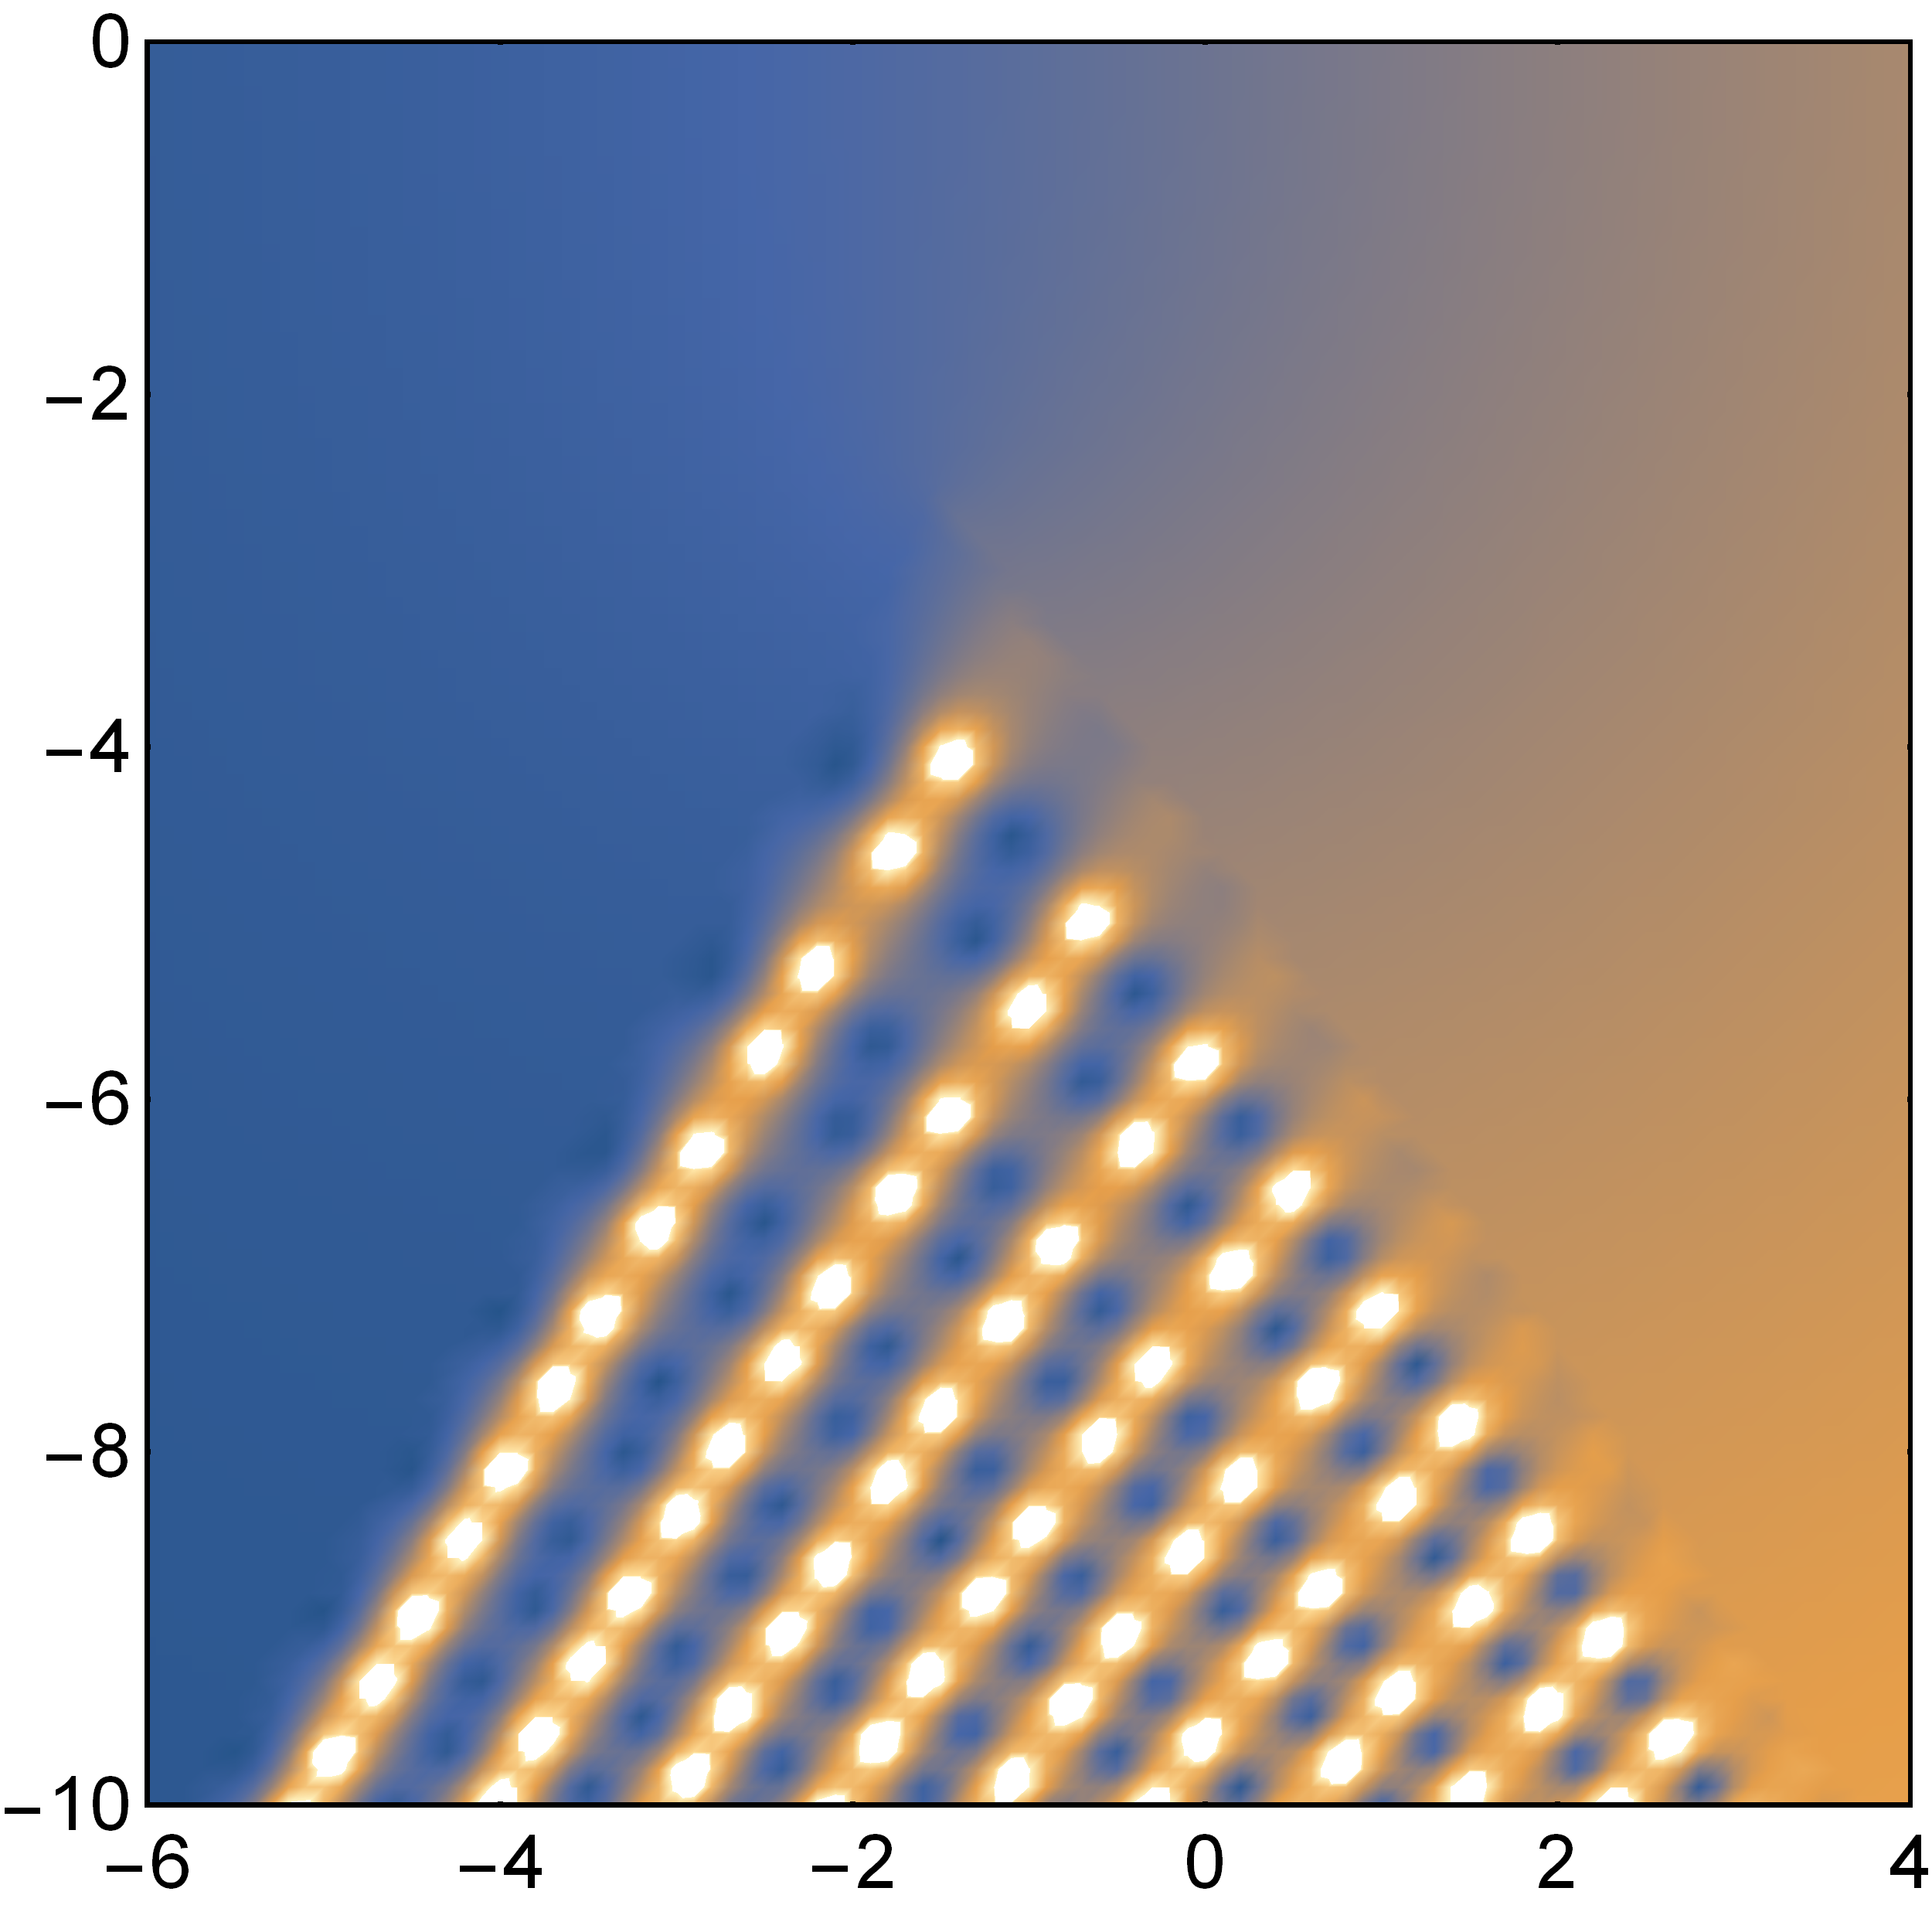
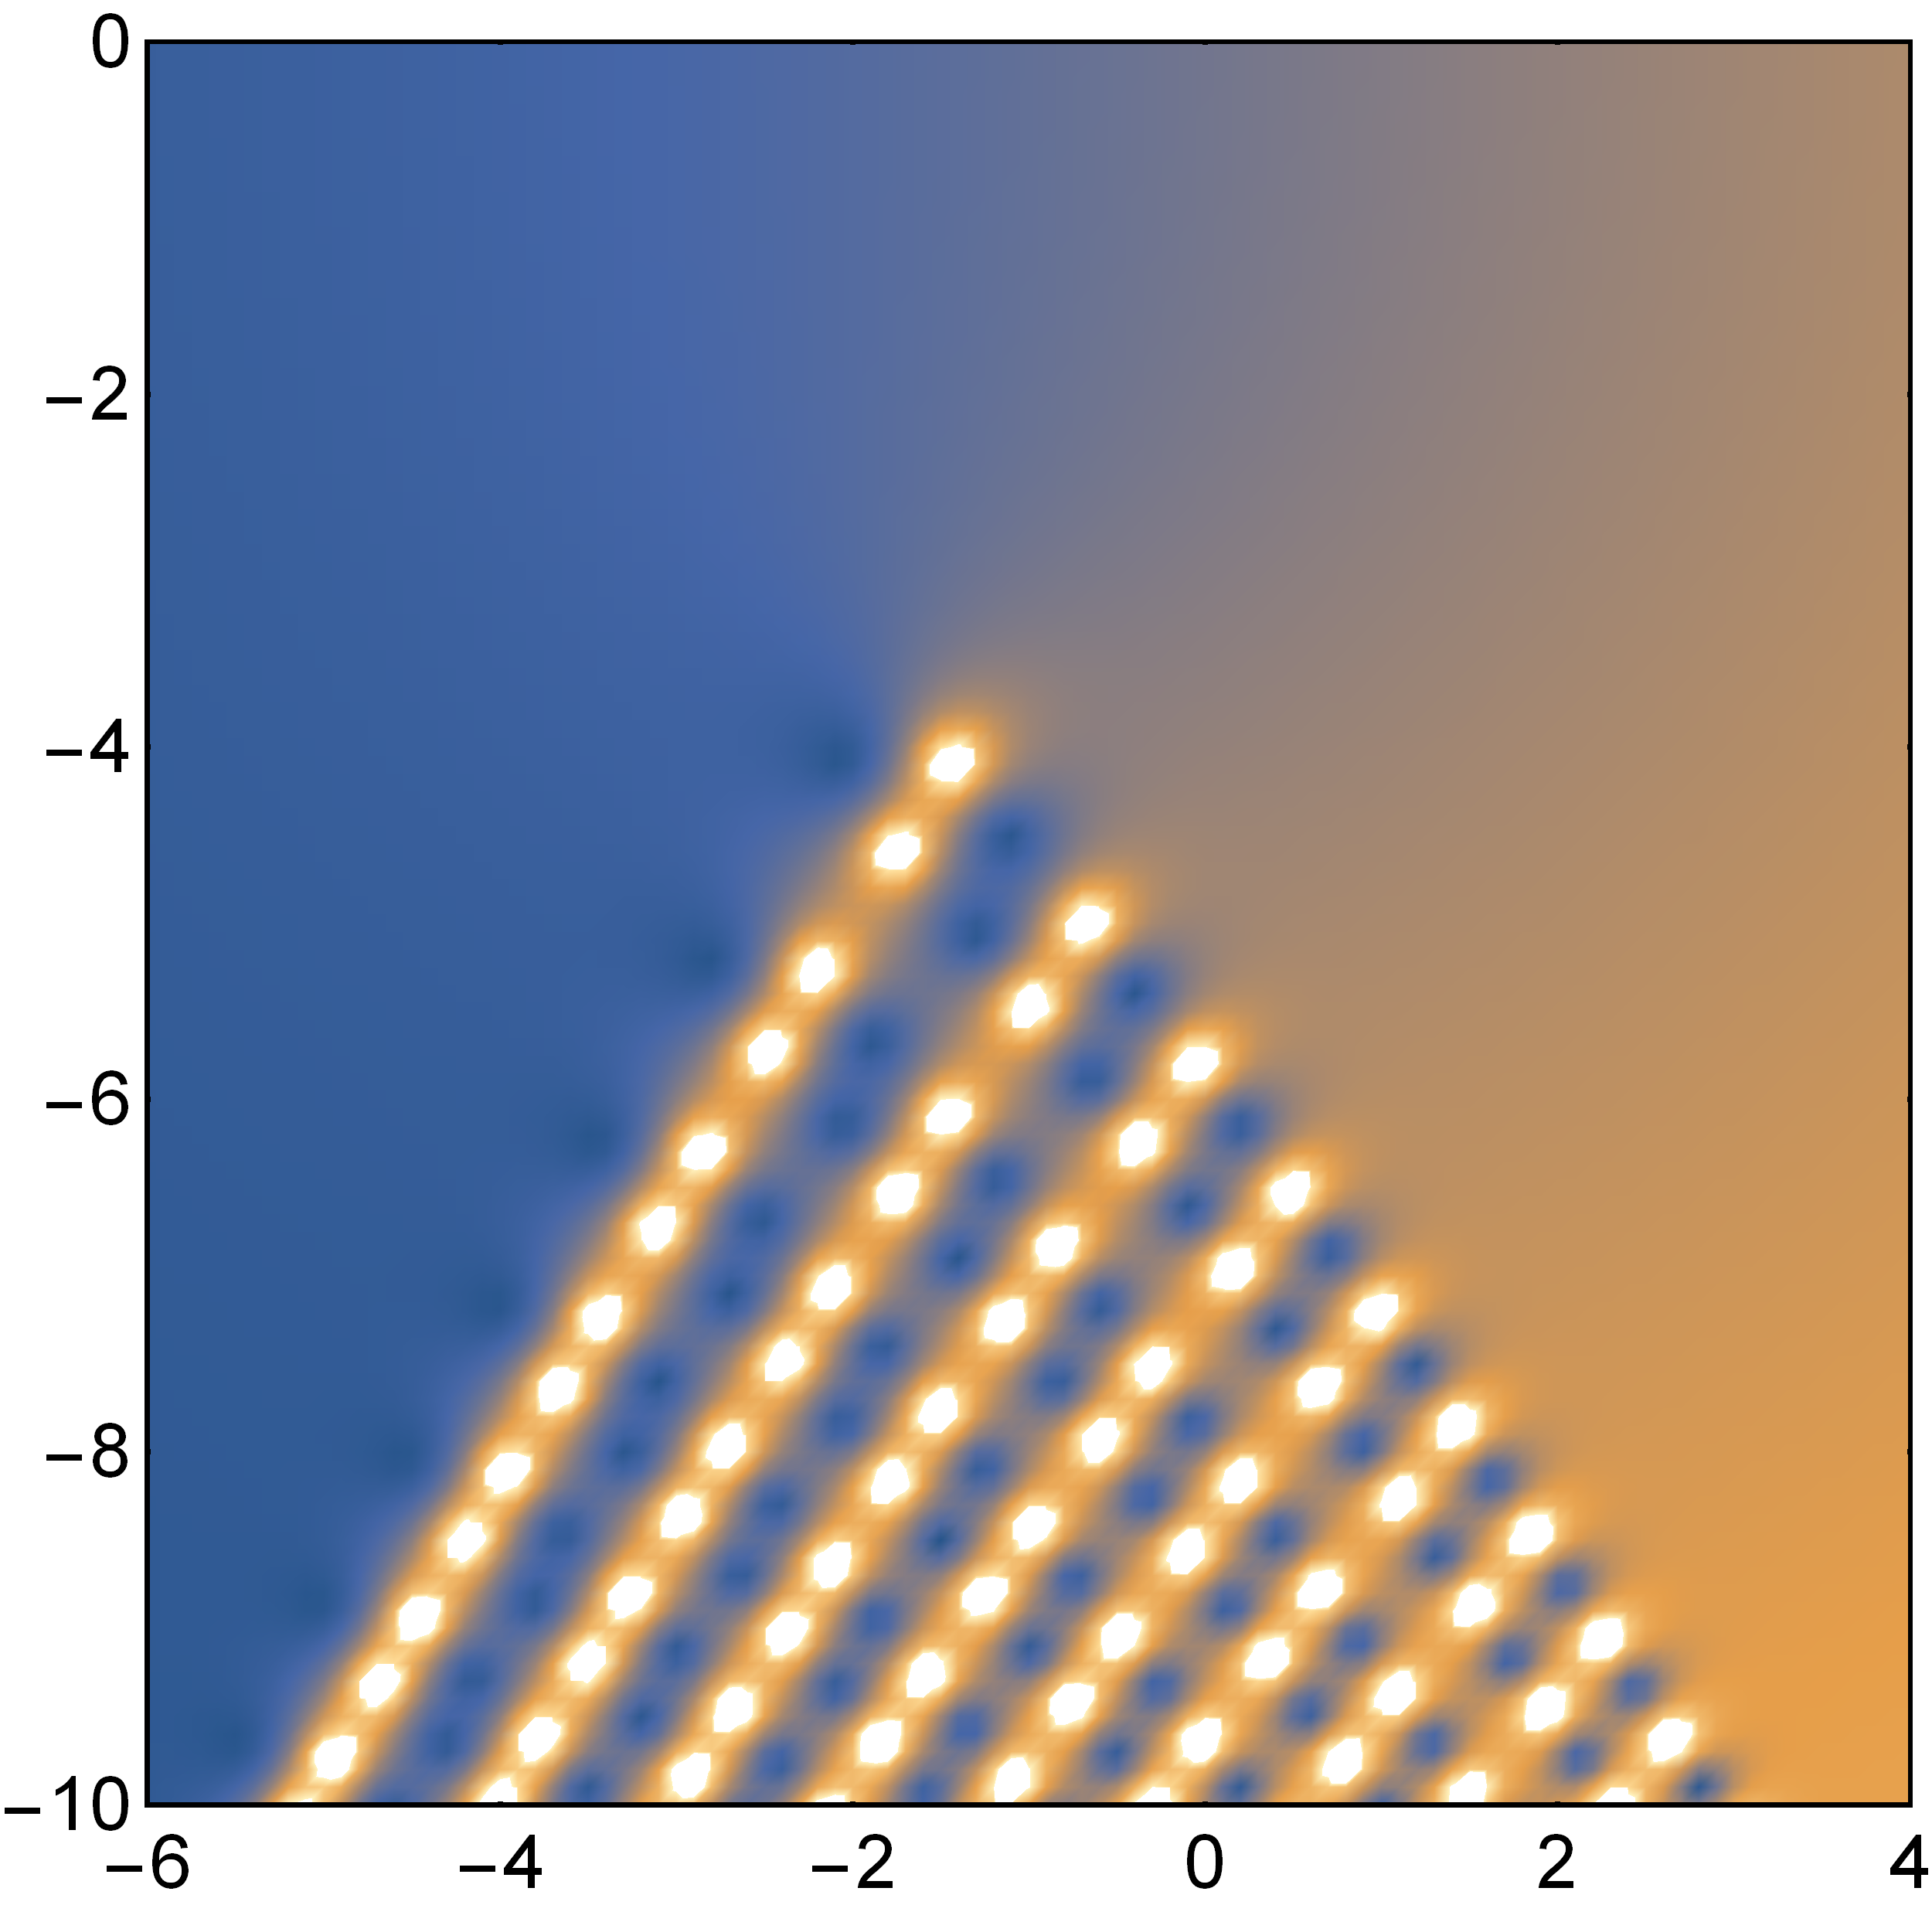
Here, we compare the results between the asymptotic formulae derived via the steepest-decent method and the numerical methods discussed in Section 5. In Figure 1 we take a slice on the real xx-line. Since the real line is contained in the pole-free region, the asymptotic formula does not depend on kk. So, as kk\to\infty, uHM(k+12)u^{(k+\frac{1}{2})}_{\text{HM}} converges (under the appropriate scaling) to the right-hand side of (8). Notice, we can observe this convergence even with small values of kk. In Figure 2 we take a horizontal slice (namely the slice Im(x)=9i\Imag(x)=-9i) through the pole region of the xx-plane. For xx not in a neighborhood of a pole, we again note an excellent match between the asymptotics and numerics even for small kk.

Refer to caption
Refer to caption
Figure 1. The left panel is a plot of the left-hand side of (8) evaluated on the real line for k=1k=1 (blue), 22 (orange), 33 (red) compared to the black curve that is the right-hand side of (8). The right panel is a logarithmic plot of the errors.
|||\cdot| Re()\Real(\cdot) Im()\Imag(\cdot)
Refer to caption
Refer to caption
Refer to caption
Refer to caption
Refer to caption
Refer to caption
Refer to caption
Refer to caption
Refer to caption
Figure 2. Plots of the left-hand side of (9) evaluated on the slice Im(x)=9\Imag(x)=-9 in the xx-plane for k=1k=1 (top), 22 (middle), 33 (bottom). The orange curves show the asymptotic formulae described in Theorems 1.1 and 1.2, while the blue curves are the result of the numerical methods discussed in Section 5.
Asymptotic Formula Numerical Plot
Refer to caption
Refer to caption
Refer to caption
Refer to caption
Refer to caption
Refer to caption
Figure 3. Density plots in the xx-plane of the scaled generalized Hastings-McLeod functions for k=1,2,3k=1,2,3. The left column uses the asymptotic formulae described in Theorems 1.1 and 1.2, while the right column uses the numerical methods discussed in Section 5.

2. The Initial Riemann-Hilbert Problem

The Painlevé-II equation (1) is equivalent to

(13) 12p′′(s)=p(s)3sp(s)+12+k.\frac{1}{2}p^{\prime\prime}(s)=p(s)^{3}-sp(s)+\frac{1}{2}+k.

Indeed, since uHM(α)(y)u_{\text{HM}}^{(\alpha)}(y) satisfies (1) it follows

(14) pk(s):=21/3uHM(k+1/2)(21/3s)p_{k}(s):=-2^{1/3}u_{\text{HM}}^{(k+1/2)}\left(-2^{1/3}s\right)

satisfies (13) (recall, k=α+1/2k=\alpha+1/2).

In 2018, Buckingham and Liechty discovered pk(s)p_{k}(s) can be extracted from the following 2×22\times 2 Riemann-Hilbert problem [5].

Riemann-Hilbert Problem 1: For each kk\in\mathbb{N} and ss\in\mathbb{C}, find a 2×22\times 2 matrix-valued function 𝒁(ζ,s,k)𝒁(ζ)\boldsymbol{Z}\left(\zeta;s,k\right)\equiv\boldsymbol{Z}(\zeta) so that

  1. (1)

    Analyticity: The matrix-valued function 𝒁(ζ)\boldsymbol{Z}(\zeta) is analytic in ζ\zeta except on the four rays arg(ζ){±π6,±5π6}\arg(\zeta)\in\left\{\pm\frac{\pi}{6},\pm\frac{5\pi}{6}\right\} and is Hölder continuous up to the boundary in a neighborhood of ζ=0\zeta=0.

  2. (2)

    Jump Condition: 𝒁(ζ)\boldsymbol{Z}(\zeta) can be continuously extended to the boundary and the values taken by 𝒁(ζ)\boldsymbol{Z}(\zeta) on the four rays of discontinuity are related by the jump condition 𝒁+(ζ)=𝒁(ζ)𝑽(𝒁)(ζ)\boldsymbol{Z}_{+}(\zeta)=\boldsymbol{Z}_{-}(\zeta)\boldsymbol{V}^{(\boldsymbol{Z})}(\zeta), where the jump matrix 𝑽(𝒁)(ζ)\boldsymbol{V}^{(\boldsymbol{Z})}(\zeta) is as shown in Figure 4 and all rays are oriented towards infinity.

    [10e2i(43ζ3+sζ)1]\begin{bmatrix}1&0\\ e^{2i\left(\frac{4}{3}\zeta^{3}+s\zeta\right)}&1\end{bmatrix}[10e2i(43ζ3+sζ)1]\begin{bmatrix}1&0\\ -e^{2i\left(\frac{4}{3}\zeta^{3}+s\zeta\right)}&1\end{bmatrix}[1e2i(43ζ3+sζ)01]\begin{bmatrix}1&e^{-2i\left(\frac{4}{3}\zeta^{3}+s\zeta\right)}\\ 0&1\end{bmatrix}[1e2i(43ζ3+sζ)01]\begin{bmatrix}1&-e^{-2i\left(\frac{4}{3}\zeta^{3}+s\zeta\right)}\\ 0&1\end{bmatrix}00
    Figure 4. The jumps of 𝒁(ζ,s,k)\boldsymbol{Z}(\zeta;s,k).
  3. (3)

    Normalization: There exist constant (in ζ\zeta) matrices 𝒁1(s,k)𝒁1\boldsymbol{Z}_{-1}(s;k)\equiv\boldsymbol{Z}_{-1} and 𝒁2(s,k)𝒁2\boldsymbol{Z}_{-2}(s;k)\equiv\boldsymbol{Z}_{-2} such that, for large ζ\zeta,

    (15) 𝒁(ζ)ζkσ3=𝕀+𝒁1ζ+𝒁2ζ2+𝒪(1/ζ3).\boldsymbol{Z}(\zeta)\zeta^{-k\sigma_{3}}=\mathbb{I}+\frac{\boldsymbol{Z}_{-1}}{\zeta}+\frac{\boldsymbol{Z}_{-2}}{\zeta^{2}}+\mathcal{O}(1/\zeta^{3}).

In particular, the extraction formula is

(16) pk(s)=2i([𝒁1(s,k)]22[𝒁2(s,k)]12[𝒁1(s,k)]12).p_{k}(s)=2i\left([\boldsymbol{Z}_{-1}(s;k)]_{22}-\frac{[\boldsymbol{Z}_{-2}(s;k)]_{12}}{[\boldsymbol{Z}_{-1}(s;k)]_{12}}\right).

We introduce the scalings

(17) z:=(2k)1/3ζandx:=(2k)2/3sz:=\left(\frac{2}{k}\right)^{1/3}\zeta\hskip 14.22636pt\text{and}\hskip 14.22636ptx:=\left(\frac{2}{k}\right)^{2/3}s

and define

(18) 𝑴(z,x,k)𝑴(z):=(k2)k3σ3𝒁((k2)1/3z,(k2)2/3x,k).\boldsymbol{M}(z;x,k)\equiv\boldsymbol{M}(z):=\left(\frac{k}{2}\right)^{-\frac{k}{3}\sigma_{3}}\boldsymbol{Z}\left(\left(\frac{k}{2}\right)^{1/3}z;\left(\frac{k}{2}\right)^{2/3}x,k\right).

𝑴(z)\boldsymbol{M}(z) solves the following Riemann-Hilbert problem:

Riemann-Hilbert Problem 2: For each positive integer kk, find 𝑴(z,x,k)𝑴(z)\boldsymbol{M}\left(z;x,k\right)\equiv\boldsymbol{M}(z) so that

  1. (1)

    Analyticity: 𝑴(z)\boldsymbol{M}(z) is analytic in zz off the jumps contours shown in Figure 5.

  2. (2)

    Jump Condition: 𝑴(z)\boldsymbol{M}(z) can be continuously extended to the boundary and the boundary values taken by 𝑴(z)\boldsymbol{M}(z) are related by the jump condition 𝑴+(z)=𝑴(z)𝑽(𝑴)(z)\boldsymbol{M}_{+}(z)=\boldsymbol{M}_{-}(z)\boldsymbol{V}^{(\boldsymbol{M})}(z), where 𝑽(𝑴)(z)\boldsymbol{V}^{(\boldsymbol{M})}(z) is as shown in Figure 5, and

    (19) θ(z:x):=43z3+xz.\theta(z:x):=\frac{4}{3}z^{3}+xz.
    𝑳k(iθ)\boldsymbol{L}_{k}(i\theta)𝑳k1(iθ)\boldsymbol{L}^{-1}_{k}(i\theta)𝑼k(iθ)\boldsymbol{U}_{k}(-i\theta)𝑼k1(iθCLOSE\boldsymbol{U}_{k}^{-1}(-i\theta)00
    Figure 5. The jumps of 𝑴(z)\boldsymbol{M}(z). Recall, 𝑳k\boldsymbol{L}_{k} and 𝑼k\boldsymbol{U}_{k} are defined (5).
  3. (3)

    Normalization: There exist constant (in zz) matrices 𝑴1(x,k)𝑴1\boldsymbol{M}_{-1}(x;k)\equiv\boldsymbol{M}_{-1} and 𝑴2(x,k)𝑴2\boldsymbol{M}_{-2}(x;k)\equiv\boldsymbol{M}_{-2} such that, for large zz

    (20) 𝑴(z)zkσ3=𝕀+𝑴1z+𝑴2z2+𝒪(1/z3).\boldsymbol{M}(z)z^{-k\sigma_{3}}=\mathbb{I}+\frac{\boldsymbol{M}_{-1}}{z}+\frac{\boldsymbol{M}_{-2}}{z^{2}}+\mathcal{O}\left(1/z^{3}\right).

A direct calculation shows that under this scaling the extraction formula (16) becomes

(21) pk((k2)2/3x)=2i(k2)1/3([𝑴1(x,k)]22[𝑴2(x,k)]12[𝑴1(x,k)]12).p_{k}\left(\left(\frac{k}{2}\right)^{2/3}x\right)=2i\left(\frac{k}{2}\right)^{1/3}\left([\boldsymbol{M}_{-1}(x;k)]_{22}-\frac{[\boldsymbol{M}_{-2}(x;k)]_{12}}{[\boldsymbol{M}_{-1}(x;k)]_{12}}\right).

3. Analysis in the Pole-Free Region

In this section we perform the Riemann-Hilbert analysis in the pole-free region. Our approach is modeled from the methodology presented in Section 3 of [6]. In the first part, we introduce a technical but standard tool called the gg-function. Once that is established, we will be able to define the pole-free region of the xx-plane. In the subsequent section, we will use the gg-function to reduce Riemann-Hilbert Problem 2 to an explicitly solvable Riemann-Hilbert problem, thereby giving us a rigorous way to approximate the left-hand side of (16).

3.1. The g-function

We start by constructing the gg-function for the pole-free region. We define the functions

(22) Δ(x)Δ:=(4iS)1/2,a(x)a:=SΔ2,b(x)b:=S+Δ2,c(x)c:=S2.\Delta(x)\equiv\Delta:=\left(-\frac{4i}{S}\right)^{1/2},\hskip 13.00806pta(x)\equiv a:=\frac{S-\Delta}{2},\hskip 13.00806ptb(x)\equiv b:=\frac{S+\Delta}{2},\hskip 13.00806ptc(x)\equiv c:=-\frac{S}{2}.

The square root in (22) is principal. This choice guarantees that Re(a)Re(b)\Real(a)\leq\Real(b). Now, let Σ\Sigma denote a finite, simple, oriented arc that connects aa to bb. (See Remark 3.4 on the exact placement of Σ\Sigma). Given Σ\Sigma, let r(z,x)r(z)r(z;x)\equiv r(z) be the function analytic for zΣz\in\mathbb{C}\setminus\Sigma that satisfies the conditions

(23) r(z)2=(za)(zb)andr(z)=z+𝒪(1) as z.r(z)^{2}=(z-a)(z-b)\hskip 23.84923pt\text{and}\hskip 23.84923ptr(z)=z+\mathcal{O}(1)\text{ as }z\to\infty.

To define the gg-function, we first define its derivative and integrate up. So,

(24) g(z,x)g(z):=iθ(z)2i(S+2z)r(z),g^{\prime}(z;x)\equiv g^{\prime}(z):=\frac{i\theta^{\prime}(z)}{2}-i(S+2z)r(z),

where gg^{\prime} is cut on Σ\Sigma. We find that the large-zz expansion of g(z)g^{\prime}(z) is

(25) g(z)=i2S2+2x+Δ24+iSΔ24z+𝒪(1/z2).g^{\prime}(z)=i\frac{2S^{2}+2x+\Delta^{2}}{4}+i\frac{S\Delta^{2}}{4z}+\mathcal{O}\left(1/z^{2}\right).

An equivalent way to write (7) and Δ2\Delta^{2} is

(26) 2S2+2x+Δ2=0andΔ2=4iS.2S^{2}+2x+\Delta^{2}=0\hskip 18.77892pt\text{and}\hskip 18.77892pt\Delta^{2}=-\frac{4i}{S}.

Plugging (26) into (25), we see that g(z)=1/z+𝒪(1/z2)g^{\prime}(z)=1/z+\mathcal{O}(1/z^{2}) as zz\to\infty. Thus, g(z)1/(za)g^{\prime}(z)-1/(z-a) is integrable at z=z=\infty and we can use the fundamental theorem of calculus to define g(z)g(z) as an antiderivative of g(z)g^{\prime}(z). However, we must introduce a logarithmic cut. Let LL denote an oriented, unbounded arc from z=z=\infty to z=az=a. Further, suppose that LL only intersects Σ\Sigma at z=az=a and that, for large enough zz, LL coincides with the negative real numbers. Now, we define g(z)g(z) as an integral where the path of integration can be any path that does not cross Σ\Sigma. Set

(27) g(z,x)g(z):=log(za)+zg(w)1wadw.g(z;x)\equiv g(z):=\log(z-a)+\int_{\infty}^{z}g^{\prime}(w)-\frac{1}{w-a}\text{d}w.

For notational convenience, we write

(28) h(z,x)h(z):=iθ(z)2g(z),zΣ,xΣS.h(z;x)\equiv h(z):=\frac{i\theta(z)}{2}-g(z),\hskip 14.45377ptz\in\mathbb{C}\setminus\Sigma,\hskip 14.45377ptx\in\mathbb{C}\setminus\Sigma_{S}.

The behavior of h(z)h(z) near the points z=az=a and z=bz=b plays an important role in the Riemann-Hilbert analysis. Let 𝔻a\mathbb{D}_{a} and 𝔻b\mathbb{D}_{b} be sufficiently small disks around z=az=a and z=bz=b, respectively. Notice that LΣL\cup\Sigma divides 𝔻a\mathbb{D}_{a} into two components. Let 𝔻a\mathbb{D}_{a}^{\uparrow} denote the component that is on the plus side (or left side) of LΣL\cup\Sigma, and let 𝔻a\mathbb{D}_{a}^{\downarrow} denote the component that is on the minus side (or right side) of LΣL\cup\Sigma.

We now list some basic properties of gg and hh that we will use throughout the Riemann-Hilbert analysis.

Proposition 3.1.

Given that S,Δ,a,bS,\Delta,a,b are defined, guaranteeing that g(z)g(z) and h(z)h(z) are well-defined by (27) and (28), respectively, then for each xΣSx\in\mathbb{C}\setminus\Sigma_{S} there exists a complex number λ(x)λ\lambda(x)\equiv\lambda such that for all zΣz\in\Sigma we have that

(29) h+(z)+h(z)=iθ(z)g+(z)g(z)=λ.h_{+}(z)+h_{-}(z)=i\theta(z)-g_{+}(z)-g_{-}(z)=-\lambda.

Further, if x3e±2πi/3x\neq 3e^{\pm 2\pi i/3}, then under the right perturbation, 2h+λ2h+\lambda locally behaves like a 3/23/2-root function near the endpoints aa and bb. More precisely, if we consider the functions

(30) Ja(z)={(2h(z)+λ2πi)if z𝔻a(2h(z)+λ+2πi)if z𝔻aJ_{a}(z)=\begin{cases}\left(2h(z)+\lambda-2\pi i\right)&\text{if }z\in\mathbb{D}_{a}^{\uparrow}\\ \left(2h(z)+\lambda+2\pi i\right)&\text{if }z\in\mathbb{D}_{a}^{\downarrow}\end{cases}

and

(31) Jb(z)=2h(z)+λ,J_{b}(z)=2h(z)+\lambda,

then for each endpoint p{a,b}p\in\{a,b\} there exists κp{0}\kappa_{p}\in\mathbb{C}\setminus\{0\} such that

(32) Jp(z)=κp(zp)3/2+𝒪((zp)5/2).J_{p}(z)=\kappa_{p}(z-p)^{3/2}+\mathcal{O}\left((z-p)^{5/2}\right).

Additionally, when xx\in\mathbb{R}, for each z(ΣL)z\in\mathbb{C}\setminus(\Sigma\cup L)

(33) Re(2h(z¯,x)+λ(x))=Re(2h(z,x)+λ(x)).\Real\left(2h\left(-\overline{z};x\right)+\lambda(x)\right)=\Real\left(2h(z;x)+\lambda(x)\right).

Furthermore, for xx\in\mathbb{R},

(34) there are at most two real z-values such that Re(2h(z)+λ)=0.\text{there are at most two real }z\text{-values}\text{ such that }Re\left(2h(z)+\lambda\right)=0.

Also,

(35) g+(z)g(z)=2πi,zL.g_{+}(z)-g_{-}(z)=-2\pi i,\hskip 5.69046ptz\in L.

Finally, as zz\to\infty

(36) g(z)=log(z)+𝒪(1/z).g(z)=\log(z)+\mathcal{O}(1/z).

Most of these statements are standard and follow from direct computation, however we furnish a proof of statements (33) and (34)in Appendix B. The function h(z)h(z), and the constant λ\lambda can both be explicitly expressed in a closed form. Consider

(37) η(z):=((1z)(1+z))1/2=i((z1)(z+1))1/2,\eta(z):=\big((1-z)(1+z)\big)^{1/2}=i\big((z-1)(z+1)\big)^{1/2},

where η\eta is cut on [1,1][-1,1] and as zz\to\infty, η(z)=iz+𝒪(1/z).\eta(z)=iz+\mathcal{O}(1/z). Note that on the cut [1,1][-1,1], both the plus and minus boundary values of η\eta are real valued. Now, we let 𝒰\mathcal{U} denote

(38) 𝒰(z):=ilog(iz+η(z)).\mathcal{U}(z):=-i\log\left(iz+\eta(z)\right).

Then,

(39) h(z)=i6r(z)(4z2+2Sz+2x)2i𝒰((azab)1/2)+ixS6+log(4Δ)+13.h(z)=\frac{i}{6}r(z)\left(4z^{2}+2Sz+2x\right)-2i\mathcal{U}\left(\left(\frac{a-z}{a-b}\right)^{1/2}\right)+\frac{ixS}{6}+\log\left(\frac{-4}{\Delta}\right)+\frac{1}{3}.

Moreover, as λ=(h++h)\lambda=-(h_{+}+h_{-}),

(40) λ=2(ixS6+log(4Δ)+13).\lambda=-2\left(\frac{ixS}{6}+\log\left(\frac{-4}{\Delta}\right)+\frac{1}{3}\right).

3.2. Defining the Pole-Free Region

We now have the necessary objects established to define the pole-free region. In particular, xx-membership of the pole-free region will depend on the topology of the zero-level set of Re(2h+λ)\Real(2h+\lambda) in the zz-plane (for motivation see Figure 12). The following definition is directly adapted from Definition 2 in [6].

Definition 3.2.

We say xx\in\mathbb{C} is in the pole-free region of the complex xx-plane if the following five conditions hold:

  1. (a1)

    There are exactly three arcs of the zero-level set of Re(2h+λ)\Real(2h+\lambda) that terminate at the endpoint z=az=a.

  2. (a2)

    There exist two curves emanating from z=a(x)z=a(x) that never cross the zero-level set of Re(2h+λ)\Real(2h+\lambda) and tend to infinity at distinct angles 5π/65\pi/6 and 5π/6-5\pi/6.

  3. (a3)

    There are exactly three arcs of the zero-level set of Re(2h+λ)\Real(2h+\lambda) that terminate at the endpoint z=bz=b.

  4. (a4)

    There exist two curves emanating from z=bz=b that never cross the zero-level set of Re(2h+λ)\Real(2h+\lambda) and tend to infinity at distinct angles π/6\pi/6 and π/6-\pi/6.

  5. (a5)

    There exists a finite curve that connects z=az=a to z=bz=b that never crosses the zero-level set of Re(2h+λ)\Real(2h+\lambda). We further require that the curve is below Σ\Sigma. That is, except for the endpoints z=az=a and z=bz=b, the curve is entirely to the right side of Σ\Sigma.

As xx varies, for xx to leave or enter the pole-free region it is necessary (but not sufficient) for the zero-level set of Re(2h(z,x)+λ(x))\Real(2h(z;x)+\lambda(x)) to undergo a sudden topological change. That is, the zero-level set must intersect itself. Further, the Cauchy-Riemann equations tell us this can only occur at a point z0z_{0} where h(z0,x)=0h^{\prime}(z_{0};x)=0 (here the derivative is with respect to zz). However, by (24) and (28), for each fixed xΣSx\in\mathbb{C}\setminus\Sigma_{S}, h(z,x)h^{\prime}(z;x) can only vanish at z=a(x)z=a(x), z=b(x)z=b(x), or z=c(x)z=c(x). In fact, since a(x)a(x) and b(x)b(x) will always lie on the zero-level set (by construction) and a(x)b(x)a(x)\neq b(x) (because Δ(x)\Delta(x) never vanishes), our point of interest is z=c(x)z=c(x). Specifically, we want the xx-values where c(x)c(x) collides with the zero-level set and so we consider

(41) 𝔠(x):=Re(2h(c(x),x)+λ(x)).\mathfrak{c}(x):=\Real(2h(c(x);x)+\lambda(x)).

Notice that g(z)g(z) (and hence h(z)h(z)) is continuous at z=bz=b. So, at z=bz=b (29) reads h+(b)+h(b)=2h(b)=λh_{+}(b)+h_{-}(b)=2h(b)=-\lambda. Thus, by the fundamental theorem of calculus we have

(42) 𝔠(x)=2Rebch(w)dw,\mathfrak{c}(x)=2\Real\int_{b}^{c}h^{\prime}(w)\text{d}w,

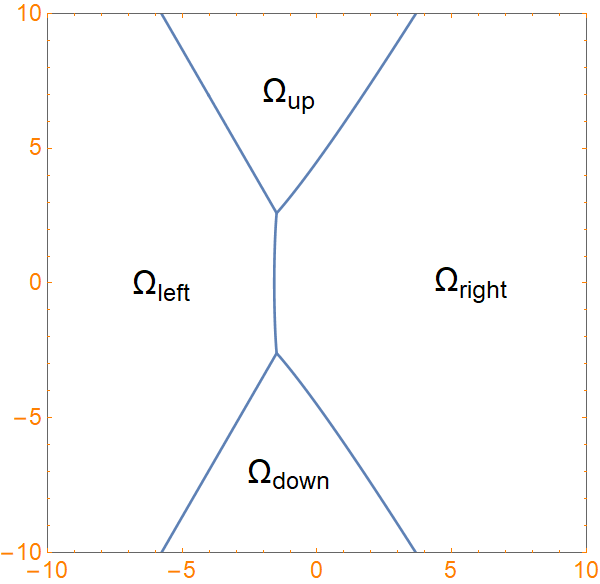
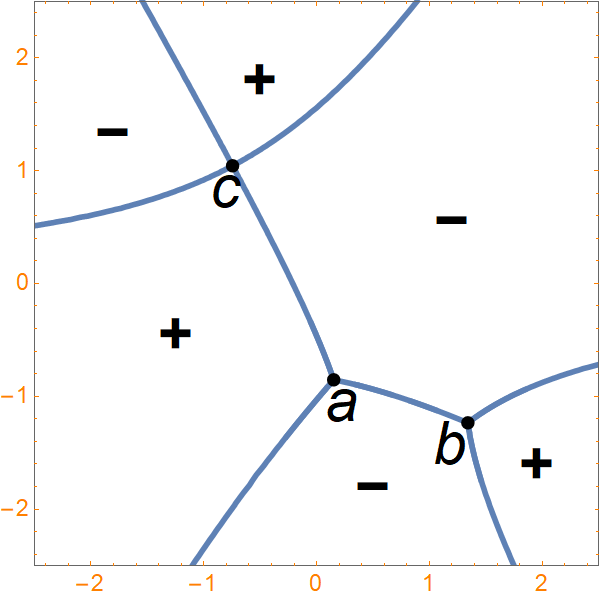
where the path of integration does not cross Σ\Sigma. Notice, this implies that 𝔠(x)\mathfrak{c}(x) is continuous. The zero-level set of 𝔠(x)\mathfrak{c}(x) divides the xx-plane into four connected, open components Ωright\Omega_{\text{right}}, Ωup\Omega_{\text{up}}, Ωleft\Omega_{\text{left}}, and Ωdown\Omega_{\text{down}}; see Figure 6.

Refer to caption
Figure 6. The zero-level set of 𝔠(x)\mathfrak{c}(x) in the xx-plane.
Proposition 3.3.

The pole-free region of the complex xx-plane is exactly the union of Ωleft\Omega_{\text{left}}, Ωright\Omega_{\text{right}}, and their shared boundary minus the apex points x=3e±2πi/3x=3e^{\pm 2\pi i/3}.

Proof.

Notice that conditions (a1)–(a5) are preserved as xx varies continuously as long as xx does not cross the zero-level set of 𝔠(x)\mathfrak{c}(x). So, in order to show that Ωleft\Omega_{\text{left}} (or Ωright\Omega_{\text{right}}) is contained in the pole-free region it suffices to show that at least one of its points is in the pole-free region.

A direct calculation shows that for, xx\in\mathbb{R},

(43) 𝔠(x)={23(x)3/2+𝒪(1)x23x3/2log(x3/2)+𝒪(1)x+.\mathfrak{c}(x)=\begin{cases}\displaystyle\frac{\sqrt{2}}{3}(-x)^{3/2}+\mathcal{O}(1)&x\to-\infty\\[10.0pt] \displaystyle-\frac{2}{3}x^{3/2}-\log\left(x^{3/2}\right)+\mathcal{O}(1)&x\to+\infty.\end{cases}

Given that Ωleft\Omega_{\text{left}} and Ωright\Omega_{\text{right}} are defined by the zero-level set of 𝔠(x)\mathfrak{c}(x), (43) tells us that 𝔠(x)\mathfrak{c}(x) is positive in Ωleft\Omega_{\text{left}} and negative in Ωright\Omega_{\text{right}}.

Now, we show that Ωleft\Omega_{\text{left}} is in the pole-free region. Fix xΩleftx_{\ell}\in\Omega_{\text{left}}\cap\mathbb{R}. Notice, as zz\to\infty the iθ(z)i\theta(z) part of h(z)h(z) dominates because g(z)=log(z)+𝒪(1/z)g(z)=\log(z)+\mathcal{O}(1/z) (see (28) and (36)). Thus, at z=z=\infty we deduce that the zero-level set of Re(2h+λ)\Real(2h+\lambda) will have exactly six arcs at angles 00, π/3\pi/3, 2π/32\pi/3, π\pi, 2π/3-2\pi/3, and π/3-\pi/3. Further, (32) shows that at z=bz=b there are exactly three arcs of the zero-level set of Re(2h+λ)\Real(2h+\lambda) emanating from it at angles separated by 2π/32\pi/3. Similarly, (32) shows that there are exactly three arcs of the zero-level set of Re(2h+λ)\Real(2h+\lambda) emanating from z=az=a at angles separated by 2π/32\pi/3.

As Re(2h(z)+λ)\Real(2h(z)+\lambda) is harmonic in zz in (ΣL)\mathbb{C}\setminus(\Sigma\cup L), the aforementioned arcs must connect pairwise to each other. Further, once connected these six arcs comprise the entirety of the zero-level set of Re(2h+λ)\Real(2h+\lambda). In particular, it does not contain a finite arc, nor a closed loop. Indeed, the former case would violate the fact Re(2h+λ)\Real(2h+\lambda) is infinitely differentiable, while the latter case would violate the maximum modulus principle. So, our current task is to determine which configurations of connections are valid (i.e. connections that are consistent with Proposition 3.1).

We start by analyzing 2h(z)2h^{\prime}(z) on the imaginary axis in order to determine how many times the zero-level set intersects the imaginary axis. Towards that goal we consider the function f:f:\mathbb{R}\to\mathbb{C} defined by

(44) f(v,x)f(v):=2h(iv)+λ.f(v;x)\equiv f(v):=2h(iv)+\lambda.

A direct calculation shows that when xx is real, a=b¯a=-\overline{b}, cc is purely imaginary, and ff^{\prime} is a real-valued function with the sign chart shown in Figure 7.

ρ\rhoIm(c)\Imag(c)++-++vv
Figure 7. A sign chart for f(v)f^{\prime}(v) (for any xx\in\mathbb{R}), where ρ\rho is the modulus of the intersection point of Σ\Sigma and the imaginary axis, i.e. iρΣi\rho\in\Sigma.

Reading from Figure 7, we see that on the interval (Im(c),)(\Imag(c),\infty) Re(f)\Real(f) has positive slope, while on (ρ,Im(c))(\rho,\Imag(c)) FF has negative slope. Since Re(f(Imc(x)))=𝔠(x)>0\Real(f(\Imag c(x_{\ell})))=\mathfrak{c}(x_{\ell})>0, it follows Re(f)\Real(f) does not vanish on (ρ,)(\rho,\infty) and is positive.

At v=ρv=\rho, ff has a jump discontinuity because iρΣi\rho\in\Sigma and hh has a jump discontinuity on Σ\Sigma. In fact, (29) implies that f+(ρ)=f(ρ)f_{+}(\rho)=-f_{-}(\rho). Thus, Re(f(ρ))<0\Real(f_{-}(\rho))<0. Moreover, the fact ff has positive slope on (,ρ)(-\infty,\rho) implies Re(f)\Real(f) does not vanish on (,ρ)(-\infty,\rho). Therefore, Re(2h+λ)\Real(2h+\lambda) does not vanish on the imaginary axis. This means none of the zero-level arcs of Re(2h+λ)\Real(2h+\lambda) cross the imaginary axis.

Next, since xx_{\ell}\in\mathbb{R}, the real part of h(z)h(z) is symmetric about the imaginary axis, i.e. (33) holds. Hence, we need only to consider the left half of the zz-plane to ascertain how the zero-level arcs of Re(2h+λ)\Real(2h+\lambda) are connected. Now, label the zero-level arcs at \infty with angles 2π/32\pi/3, π\pi, and 2π/3-2\pi/3 as arc1\textsc{arc}_{1}, arc2\textsc{arc}_{2}, and arc3\textsc{arc}_{3}. For the arcs emanating from z=az=a, we label (in a counterclockwise fashion) arcα\textsc{arc}_{\alpha}, arcβ\textsc{arc}_{\beta}, and arcγ\textsc{arc}_{\gamma}. Notice, if one of the arcs at \infty (on the left side of the plane) did not connect to one of the arcs emanating from z=az=a, then two arcs at z=az=a would be forced to connect to each other (because to connect to an arc in the right half of the plane would require it to cross the imaginary axis). However, this is not a valid connection because it forms a closed loop. This means we can assume without loss of generality that arc1\textsc{arc}_{1} is connected to arcα\textsc{arc}_{\alpha} (otherwise relabel the arcs emanating from z=az=a). Further, arc2\textsc{arc}_{2} is forced to connect to arcβ\textsc{arc}_{\beta}. Otherwise, the connection between arc3\textsc{arc}_{3} and arcβ\textsc{arc}_{\beta} would intersect a zero-level arc; see Figure 8. Therefore, we have a complete picture of possible configurations of the zero-level arcs in the left half of the zz-plane. Indeed, arc1\textsc{arc}_{1} is connected to arcα\textsc{arc}_{\alpha}, arc2\textsc{arc}_{2} is connected to arcβ\textsc{arc}_{\beta}, and arc3\textsc{arc}_{3} is connected to arcγ\textsc{arc}_{\gamma}. Moreover, we can complete our picture of the entire zz-plane using the symmetry (33); see Figure 9. Finally, we see that xx_{\ell} satisfies all of the axioms in the definition of the pole-free region and therefore Ωleft\Omega_{\text{left}} is completely contained in the pole-free region.

arcγ\textsc{arc}_{\gamma}arcα\textsc{arc}_{\alpha}arcβ\textsc{arc}_{\beta}aaarc1\textsc{arc}_{1}arc2\textsc{arc}_{2}arc3\textsc{arc}_{3}
fill
fill
Figure 8. Finding all of the possible configurations of the zero-level arcs of Re(2h+λ)\Real(2h+\lambda) in the left half of the zz-plane, when xΩleftx\in\Omega_{\text{left}}. The left diagram shows the starting point, the middle diagram shows a valid configuration, while the right diagram shows an invalid configuration.
aabbcc
Figure 9. Valid connections of the zero-level arcs of Re(2h+λ)\Real(2h+\lambda) for xΩleftx\in\Omega_{\text{left}}.

We now show Ωright\Omega_{\text{right}} is contained in the pole-free region. Fix xrΩrightx_{r}\in\Omega_{\text{right}}\cap\mathbb{R}. The same analysis gives us the same setup as in the previous case. That is, we know that the zero-level set of Re(2h+λ)\Real(2h+\lambda) will have exactly six unbounded arcs that tend to \infty at angles 00, π/3\pi/3, 2π/32\pi/3, π\pi, 2π/3-2\pi/3, and π/3-\pi/3, and there are exactly three arcs of the zero-level set of Re(2h+λ)\Real(2h+\lambda) emanating from the points z=az=a and z=bz=b at angles separated by 2π/32\pi/3. We now need to determine the valid connections between these arcs. Using the same the argument as in the previous case, we can use Figure 7 to find that the zero-level lines of Re(2h(z)+λ)\Real(2h(z)+\lambda) cross the imaginary axis in the zz-plane at two distinct points.

Notice, due to the symmetry condition (33), the topology of the zero-level lines differs from the previous case. Also, since 𝔠(x)\mathfrak{c}(x) is continuous, (43) and the intermediate value theorem imply there exists x0(x,xr)x_{0}\in(x_{\ell},x_{r}) such that Re(2h(c,x0)+λ(x0))=0\Real(2h(c;x_{0})+\lambda(x_{0}))=0. Here, we use the assumption that 𝔠(x)\mathfrak{c}(x) only vanishes once on the real line, as indicated by the numerical plots. Indeed, plots suggest this map is monotone.

To determine the valid connections of the zero-level arcs of Re(2h+λ)\Real(2h+\lambda) at xrx_{r}, we will use the fact that these arcs deform continuously as xx goes from xx_{\ell} to xrx_{r} along the real line. As xx varies, we know that 𝔠(x)\mathfrak{c}(x) vanishes at x0x_{0}. By the symmetry condition (33) there are only two mechanisms for 𝔠(x)\mathfrak{c}(x) to vanish on the real line. Namely, the arc that starts at z=az=a that goes to \infty at an angle of 2π/32\pi/3 can collide with the arc that starts at z=bz=b that goes to \infty at an angle of π/3\pi/3, or the arc that starts at z=az=a that goes to \infty at an angle of 2π/3-2\pi/3 can collide with the arc that starts at z=bz=b that goes to \infty at an angle of π/3-\pi/3. Any other collision would cause 𝔠(x)\mathfrak{c}(x) to vanish at least twice on \mathbb{R}. Further, since Im(c)>0\Imag(c)>0 and the collision must occur at z=cz=c, (34) allows us to rule out the latter case. Therefore, the zero-level arcs of Re(2h+λ)\Real(2h+\lambda) when x=x0x=x_{0} is topologically equivalent to Figure 10.

aabbcc
Figure 10. The zero-level arcs of Re(2h+λ)\Real(2h+\lambda) when x=x0x=x_{0}.

When xx is pushed to the right of x0x_{0} the arcs break apart so that there is a bounded arc that starts at z=az=a and goes to z=bz=b and there is an unbounded arc that tends to \infty in the left half of the zz-plane at an angle of 2π/32\pi/3 and tends to \infty in the right half at an angle of π/3\pi/3. This breaking mechanism is forced because the zero-level set of Re(2h+λ)\Real(2h+\lambda) intersects the imaginary axis twice. So, we see that xrx_{r} satisfies all of the axioms in the definition of the pole-free region; see Figure 11, and therefore Ωright\Omega_{\text{right}} is completely contained in the pole-free region.

aabbcc
Figure 11. The zero-level arcs of Re(2h+λ)\Real(2h+\lambda) when xΩrightx\in\Omega_{\text{right}}.

Remark 3.4.

The zero-level set of Re(2h+λ)\Real(2h+\lambda) is independent of the placement of the band Σ\Sigma. That is, the zero-level set of Re(2h+λ)\Real(2h+\lambda) is invariant with respect to the choice of Σ\Sigma as long as Σ\Sigma is a finite, simple curve that connects aa to bb. Therefore, we are at liberty to pick Σ\Sigma. For the ease of describing other objects in the analysis we choose Σ\Sigma such that

  • When xΩleftx\in\Omega_{\text{left}}, we require that (i) Σ𝔻a\Sigma\cap\mathbb{D}_{a} is contained in the zero-level arc of Re(2h+λ)\Real(2h+\lambda) that emanates from z=az=a and goes to \infty at an angle of 2π/32\pi/3 and (ii) Σ𝔻b\Sigma\cap\mathbb{D}_{b} is contained in the zero-level arc of Re(2h+λ)\Real(2h+\lambda) that emanates from z=bz=b and goes to \infty at an angle of π/3\pi/3.

  • When xΩrightx\in\Omega_{\text{right}}, Σ\Sigma coincides with the zero-level arc of Re(2h+λ)\Real(2h+\lambda) that connects z=az=a to z=bz=b.

Remark 3.5.

The section of the boundary that borders Ωleft\Omega_{\text{left}} is the two straight rays that comprise ΣS\Sigma_{S} (the branch cut of S(x)S(x)). The proof is straightforward and involves evaluating (39) on the boundary.

3.3. Surveying the Pole-Free Region

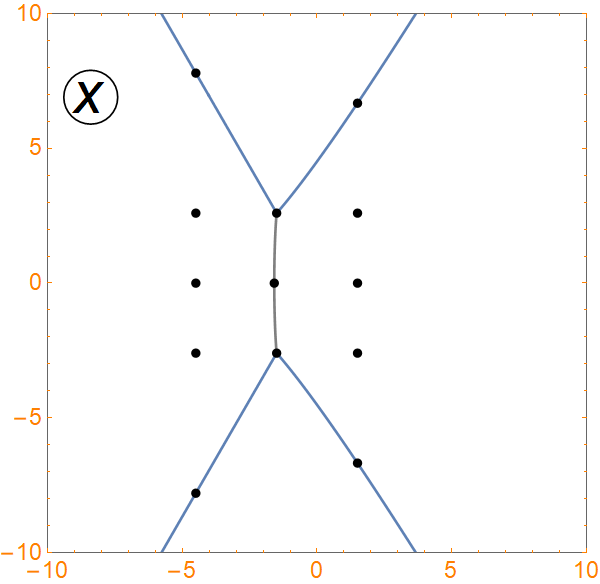
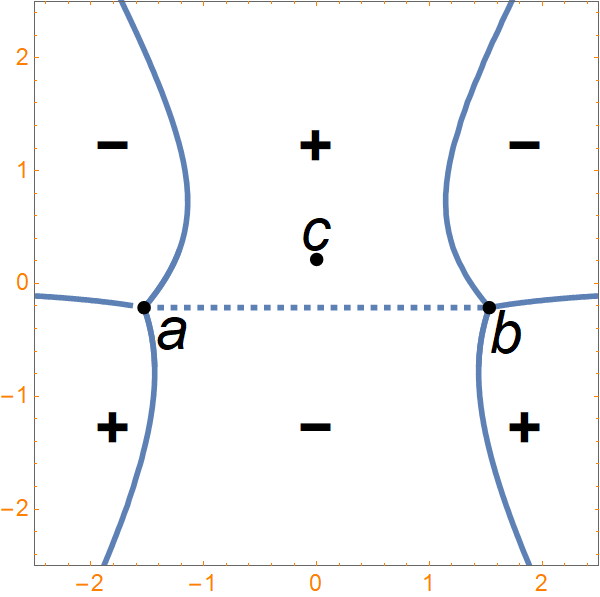
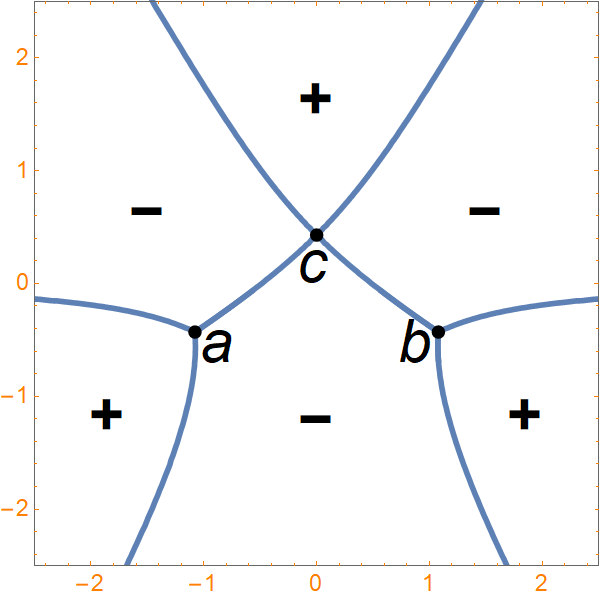
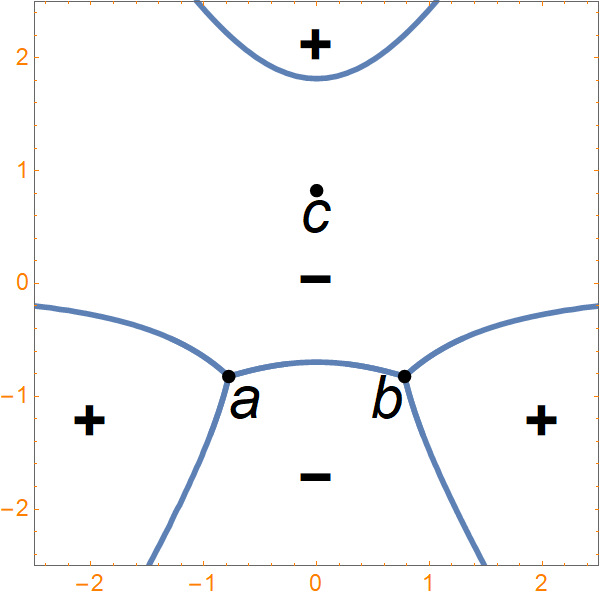
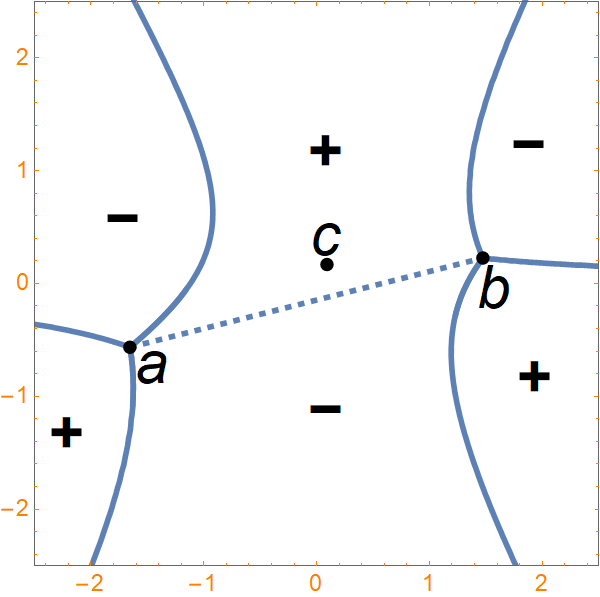
We now survey the pole-free region. See Table 1 for a list of all of the xx-values we use to graph the zero-level lines of Re(2h+λ)\Real(2h+\lambda).

9e2πi/34.5+7.794i9e^{2\pi i/3}\approx-4.5+7.794i 1.5+6.678i\approx 1.5+6.678i
3e2πi/334.5+2.598i3e^{2\pi i/3}-3\approx-4.5+2.598i 3e2πi/31.5+2.5983e^{2\pi i/3}\approx-1.5+2.598 3e2πi/3+31.5+2.598i3e^{2\pi i/3}+3\approx 1.5+2.598i
4.5-4.5 x01.588x_{0}\approx-1.588 1.51.5
3e2πi/334.52.598i3e^{-2\pi i/3}-3\approx-4.5-2.598i 3e2πi/31.52.5983e^{-2\pi i/3}\approx-1.5-2.598 3e2πi/3+31.52.598i3e^{-2\pi i/3}+3\approx 1.5-2.598i
9e2πi/34.57.794i9e^{-2\pi i/3}\approx-4.5-7.794i 1.56.678i\approx 1.5-6.678i
Table 1. xx-values corresponding to Figure 12
Refer to caption
Refer to caption
Refer to caption
Refer to caption
Refer to caption
Refer to caption
Refer to caption
Refer to caption
Refer to caption
Refer to caption
Refer to caption
Refer to caption
Refer to caption
Refer to caption
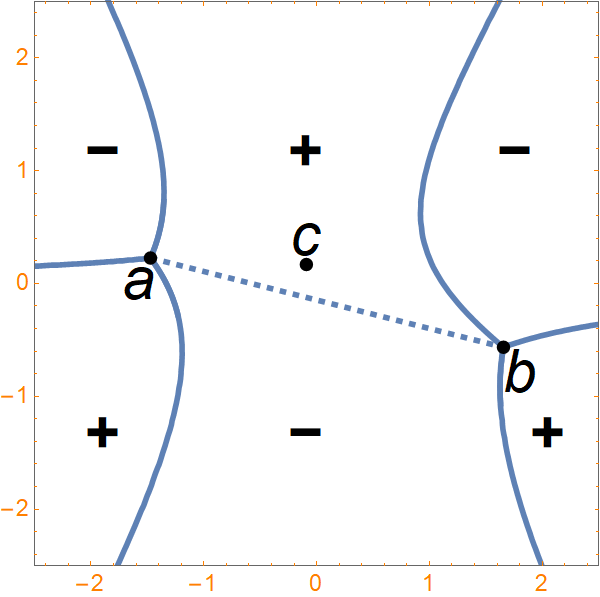
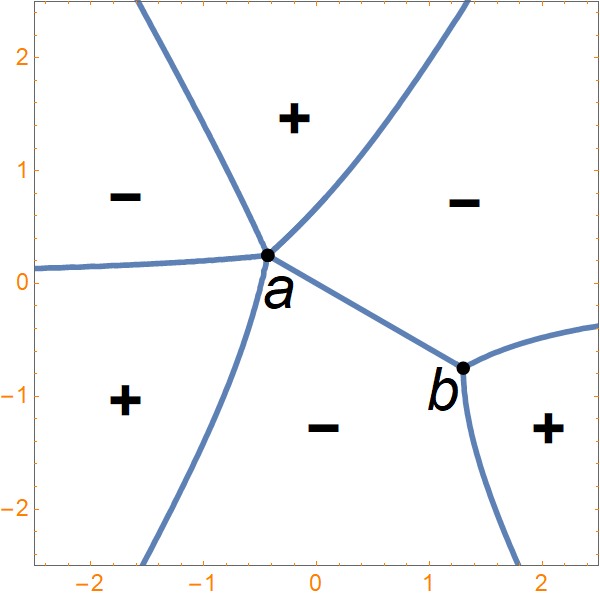
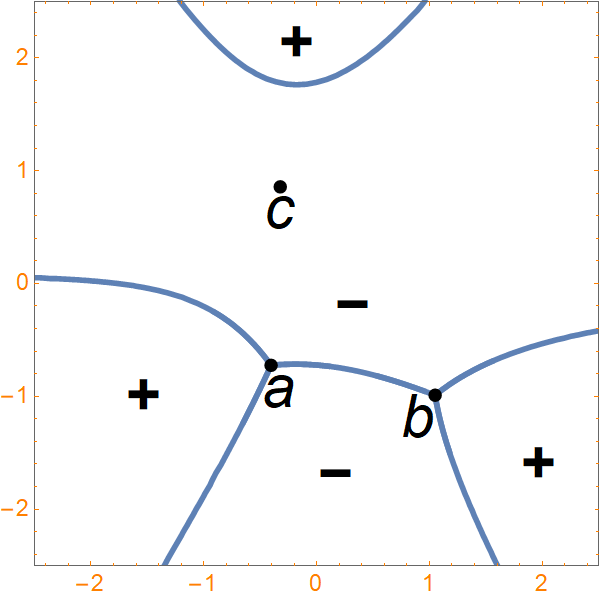
Figure 12. The zero-level arcs of Re(2h+λ)\Real(2h+\lambda) in the zz-plane for various xx-values as shown in Table 1. Here, the dotted lines refers to branch cuts that do not coincide with the zero-level set.

Notice the breaking mechanism differs between the left and right side of the xx-plane. On one hand, when xx leaves the pole-free region to the left of the vertical line Re(x)=1.5\Real(x)=-1.5, two distinct zero-level arcs collide with each other at z=cz=c. In this case, Re(c)\Real(c) will be between Re(a)\Real(a) and Re(b)\Real(b). The resulting configuration has a zero-level arc that separates aa and bb. Thus, such a configuration violates (a5)(\textbf{a5}). In Figure 12 this corresponds to when x=9e2πi/3x=9e^{2\pi i/3} or x=9e2π/3x=9e^{-2\pi/3}. Notice that we have an exact formula for when this phenomenon occurs, x=ρe±2πi/3x=\rho e^{\pm 2\pi i/3} with ρ>3\rho>3. On the other hand, when xx leaves the pole-free region to the right of Re(x)=1.5\Real(x)=-1.5, two distinct zero-level arcs collide with each other at z=cz=c, but Re(c)\Real(c) will not be between Re(a)\Real(a) and Re(b)\Real(b). The resulting configuration violates (a2)(\textbf{a2}) or (a4)(\textbf{a4}) depending on if xx is in the upper or lower half of the plane, respectively. The right boundary curves are defined implicitly by those xx satisfying Re(2h(c(x),x)+λ(x))=0\Real\left(2h(c(x);x)+\lambda(x)\right)=0.

There are two special xx-values, x=3e±2πi/3x=3e^{\pm 2\pi i/3}, when an endpoint collides with z=cz=c. These are the apexes of the boundary. When x=3e2πi/3x=3e^{2\pi i/3}, then a=ca=c or, in other words, 3a+b=03a+b=0. In fact, 2h(a)+λ2h(a)+\lambda has a zero of order 5/25/2. Hence, (a1) is not satisfied. Similarly, when x=3e2πi/3x=3e^{-2\pi i/3}, (a3) is not satisfied. Finally, we can see that a topological change is not a sufficient condition to be on the boundary. Indeed, at x0x_{0} we see that the zero-level lines undergo a sudden topological change but of all the axioms are still satisfied. Notice, this section of the zero-level set of 𝔠(x)\mathfrak{c}(x) is curved and is not contained in the vertical line Re(x)=3/2\Real(x)=-3/2.

3.4. Preliminary Deformations in the Riemann-Hilbert Analysis

For the remainder of Section 3 we fix xx in the pole-free region as we perform the Deift-Zhou nonlinear steepest-descent method. The general line of attack is to apply a sequence of deformations to 𝑴(z)\boldsymbol{M}(z) to obtain a corresponding Riemann-Hilbert problem that can be approximated by a solvable Riemann-Hilbert problem. Our first step is to collapse the corresponding jump contours of 𝑴(z)\boldsymbol{M}(z) in an open bounded set. In order to specify the exact placement of the deformed jump contours, we need to construct two conformal maps τa\tau_{a} and τb\tau_{b}.

3.4.1. Conformal Map Constructions

We start with the simpler case and construct τb\tau_{b}. Recall, 𝔻b\mathbb{D}_{b} is a small disk around z=bz=b. Notice, one can write the jump condition (29) as

(45) 2h+(z)+λ=(2h(z)+λ),zΣ.2h_{+}(z)+\lambda=-(2h_{-}(z)+\lambda),\hskip 9.38945ptz\in\Sigma.

So, (32) and (45) imply that in 𝔻b\mathbb{D}_{b}, the map z(2h(z)+λ)2z\mapsto(2h(z)+\lambda)^{2} is analytic and nonvanishing, except for a third-order zero at z=bz=b. Also, since Σ\Sigma was placed on the zero-level set of Re(2h+λ)\Real(2h+\lambda), we have that for each zΣ𝔻bz\in\Sigma\cap\mathbb{D}_{b}, (2h±(z)+λ)2<0(2h_{\pm}(z)+\lambda)^{2}<0. With these considerations in mind, we see that there exists a conformal map τb\tau_{b} such that

  • For each z𝔻bz\in\mathbb{D}_{b}, τb(z)3=(2h(z)+λ)2\tau_{b}(z)^{3}=(2h(z)+\lambda)^{2},

  • τb\tau_{b} maps 𝔻b\mathbb{D}_{b} to a small neighborhood of the origin,

  • τb\tau_{b} maps 𝔻bΣ\mathbb{D}_{b}\cap\Sigma to the negative real line.

We need to construct a similar conformal mapping of 𝔻a\mathbb{D}_{a}. However, in this case we need to deal with the logarithmic cut LL. Notice, one can write (35) in terms of hh as

(46) 2h+(z)2πi=2h(z)+2πi,zL.2h_{+}(z)-2\pi i=2h_{-}(z)+2\pi i,\hskip 9.38945ptz\in L.

Consider the map

(47) z{(2h(z)+λ2πi)2if z𝔻a,(2h(z)+λ+2πi)2if z𝔻a.z\mapsto\begin{cases}\left(2h(z)+\lambda-2\pi i\right)^{2}&\text{if }z\in\mathbb{D}_{a}^{\uparrow},\\ \left(2h(z)+\lambda+2\pi i\right)^{2}&\text{if }z\in\mathbb{D}_{a}^{\downarrow}.\end{cases}

Notice, (45) and (46) imply that both the upper and lower functions of the above map have the same continuous extension on (LΣ)𝔻a(L\cup\Sigma)\cap\mathbb{D}_{a}. Therefore, the map (47) is analytic in 𝔻a\mathbb{D}_{a}. Moreover, (32) shows that this map is nonvanishing in 𝔻a\mathbb{D}_{a} except for a third-order zero at z=az=a. Thus, there exists a conformal map τa\tau_{a} that maps 𝔻a\mathbb{D}_{a} to a neighborhood of the origin, that satisfies

(48) (τa(z))3={(2h(z)+λ2πi)2if z𝔻a,(2h(z)+λ+2πi)2if z𝔻a,(\tau_{a}(z))^{3}=\begin{cases}\left(2h(z)+\lambda-2\pi i\right)^{2}&\text{if }z\in\mathbb{D}_{a}^{\uparrow},\\ \left(2h(z)+\lambda+2\pi i\right)^{2}&\text{if }z\in\mathbb{D}_{a}^{\downarrow},\end{cases}

and that maps Σ𝔻a\Sigma\cap\mathbb{D}_{a} to the negative real numbers.

3.4.2. The Collapsing Deformation

We deform jump contours of Riemann-Hilbert problems by the standard sectionally analytic substitution method (for more details see Section 4.3 in [4]). Our first deformation is to collapse the four jump rays of 𝑴(z)\boldsymbol{M}(z) onto the line segment with endpoints z=az=a and z=bz=b. The resulting jump contour will be comprised of four unbounded rays and one line segment from z=az=a to z=bz=b. Two of the unbounded jump rays emanate from z=az=a and approach \infty at angles ±2π/3\pm 2\pi/3, while the other two rays emanate from z=bz=b and approach \infty at angles ±π/3\pm\pi/3. The jump along the deformed rays will be the same jump along the parent ray, while the new jump along the line segment is simply the product

(49) [1eikθ01][10eikθ1]=[0eikθeikθ1].\begin{bmatrix}1&-e^{-ik\theta}\\ 0&1\end{bmatrix}\begin{bmatrix}1&0\\ e^{ik\theta}&1\end{bmatrix}=\begin{bmatrix}0&-e^{-ik\theta}\\ e^{ik\theta}&1\end{bmatrix}.

Since the deformation occurred on a bounded set, the new resulting Riemann-Hilbert problem has the same normalization condition as Riemann-Hilbert 2. In fact, the new Riemann-Hilbert problem is:

Riemann-Hilbert Problem 3: For each kk\in\mathbb{N}, find 𝑵(z,x,k)𝑵(z)\boldsymbol{N}(z;x,k)\equiv\boldsymbol{N}(z) so that

  1. (1)

    Analyticity: 𝑵(z)\boldsymbol{N}(z) is analytic in zz except along the jump contours shown in Figure 13.

  2. (2)

    Jump Condition: 𝑵(z)\boldsymbol{N}(z) can be continuously extended to the boundary and the boundary values taken by 𝑵(z)\boldsymbol{N}(z) are related by the jump condition 𝑵+(z)=𝑵(z)𝑽(𝑵)(z)\boldsymbol{N}_{+}(z)=\boldsymbol{N}_{-}(z)\boldsymbol{V}^{(\boldsymbol{N})}(z) as shown in Figure 13.

    𝑳k(iθ)\boldsymbol{L}_{k}(i\theta)𝑳k1(iθ)\boldsymbol{L}_{k}^{-1}(i\theta)𝑼k(iθ)\boldsymbol{U}_{k}(-i\theta)𝑼k1(iθ)\boldsymbol{U}_{k}^{-1}(-i\theta)[0eikθeikθ1]\begin{bmatrix}0&-e^{-ik\theta}\\ e^{ik\theta}&1\end{bmatrix}aabb
    Figure 13. The jumps of 𝑵(z)\boldsymbol{N}(z).
  3. (3)

    Normalization: As zz\to\infty, the matrix 𝑵(z)zkσ3=𝕀+𝒪(1/z)\boldsymbol{N}(z)z^{-k\sigma_{3}}=\mathbb{I}+\mathcal{O}\left(1/z\right).

Although there is some degree of freedom where we place the deformed jump rays, we require the following criteria:

  • In (𝔻a𝔻b)\mathbb{C}\setminus(\mathbb{D}_{a}\cup\mathbb{D}_{b}), the four unbounded jump contours avoid the zero-level set of Re(2h+λ)\Real(2h+\lambda). Such a deformation is guaranteed to exist by Axioms (a2) and (a4),

  • In 𝔻a\mathbb{D}_{a} the jump contour that has an upper-triangular jump is contained in τa1((0,))\tau_{a}^{-1}\left(\left(0,\infty\right)\right),

  • In 𝔻a\mathbb{D}_{a} the jump contour that has a lower-triangular jump is contained in τa1(ρe2i/3)\tau_{a}^{-1}\left(\rho e^{-2i/3}\right), ρ>0\rho>0,

  • In 𝔻b\mathbb{D}_{b} the jump contour that has an upper-triangular jump is contained τb1((0,))\tau_{b}^{-1}\left(\left(0,\infty\right)\right),

  • In 𝔻b\mathbb{D}_{b} the jump contour that has a lower-triangular jump is contained in τb1(ρe2i/3)\tau_{b}^{-1}\left(\rho e^{2i/3}\right), ρ>0\rho>0.

3.5. Opening of the Lens

The jump on the line segment with endpoints z=az=a and z=bz=b has the following factorization:

(50) [0eikθeikθ1]=[10eikθ1][0eikθeikθ0].\begin{bmatrix}0&-e^{-ik\theta}\\ e^{ik\theta}&1\end{bmatrix}=\begin{bmatrix}1&0\\ -e^{ik\theta}&1\end{bmatrix}\begin{bmatrix}0&-e^{-ik\theta}\\ e^{ik\theta}&0\end{bmatrix}.

As such, we use sectionally analytic substitutions to open a lens. The upper boundary of the lens, i.e. the jump contour with an off-diagonal jump, is placed on Σ\Sigma. For the lower boundary of the lens, near the endpoints z=az=a and z=bz=b we have the following requirements:

  • In 𝔻a\mathbb{D}_{a}, the lower boundary of the lens, i.e. the jump contour with a lower-triangular jump, is contained in τa1(ρe2πi/3)\tau_{a}^{-1}\left(\rho e^{2\pi i/3}\right) for ρ>0\rho>0,

  • In 𝔻b\mathbb{D}_{b}, the lower boundary of the lens is contained in τb1(ρe2πi/3)\tau_{b}^{-1}\left(\rho e^{-2\pi i/3}\right) for ρ>0\rho>0.

Outside of 𝔻a𝔻b\mathbb{D}_{a}\cup\mathbb{D}_{b} we only require the lower boundary of the lens does not intersect the zero-level set of Re(2h+λ)\Real\left(2h+\lambda\right). The existence of such a lens is guaranteed by Axiom (a5). The opening lens deformation results in another matrix-valued function 𝑶(z)\boldsymbol{O}(z). Since this deformation is on a bounded set, 𝑶(z)\boldsymbol{O}(z) and 𝑵(z)\boldsymbol{N}(z) satisfy the same normalization condition. Thus, 𝑶(z)\boldsymbol{O}(z) solves the following Riemann-Hilbert problem:

Riemann-Hilbert Problem 4: For each kk\in\mathbb{N}, find 𝑶(z,x,k)𝑶(z)\boldsymbol{O}(z;x,k)\equiv\boldsymbol{O}(z) so that

  1. (1)

    Analyticity: 𝑶(z)\boldsymbol{O}(z) is analytic in zz except along the jump contours shown in Figure 14.

  2. (2)

    Jump Condition: 𝑶(z)\boldsymbol{O}(z) can be continuously extended to the boundary and the boundary values taken by 𝑶(z)\boldsymbol{O}(z) are related by the jump condition 𝑶+(z)=𝑶(z)𝑽(𝑶)(z)\boldsymbol{O}_{+}(z)=\boldsymbol{O}_{-}(z)\boldsymbol{V}^{(\boldsymbol{O})}(z) as shown in Figure 14.

    𝑳k(iθ)\boldsymbol{L}_{k}(i\theta)𝑳k1(iθ)\boldsymbol{L}_{k}^{-1}(i\theta)𝑼k(iθ)\boldsymbol{U}_{k}(-i\theta)𝑼k1(iθ)\boldsymbol{U}_{k}^{-1}(-i\theta)[0eikθeikθ0]\begin{bmatrix}0&-e^{-ik\theta}\\ e^{ik\theta}&0\end{bmatrix}𝑳k1(iθ)\boldsymbol{L}_{k}^{-1}(i\theta)aabb
    Figure 14. The jumps of 𝑶(z)\boldsymbol{O}(z).
  3. (3)

    Normalization: As zz\to\infty, the matrix 𝑶(z)zkσ3=𝕀+𝒪(1/z)\boldsymbol{O}(z)z^{-k\sigma_{3}}=\mathbb{I}+\mathcal{O}\left(1/z\right).

3.6. Applying the g-function

We now apply the gg-function defined in Section 3.1 (see (27)) to the function 𝑶(z)\boldsymbol{O}(z). We consider

(51) 𝑷(z,x,k)𝑷(z):=ekλ2σ3𝑶(z)ekg(z)σ3ekλ2σ3,\boldsymbol{P}(z;x,k)\equiv\boldsymbol{P}(z):=e^{-\frac{k\lambda}{2}\sigma_{3}}\boldsymbol{O}(z)e^{-kg(z)\sigma_{3}}e^{\frac{k\lambda}{2}\sigma_{3}},

where λ\lambda is defined in (40). Introducing the gg-function simplifies both the jump and normalization conditions of the corresponding Riemann-Hilbert problem. Since eg(z)e^{g(z)} is analytic everywhere except on Σ\Sigma, the deformation 𝑶(z)𝑷(z)\boldsymbol{O}(z)\to\boldsymbol{P}(z) does not introduce new jump contours or move any. It does, however, simplify the jump matrices. A formula for jump matrices of 𝑷(z)\boldsymbol{P}(z), given the jump matrices of 𝑶(z)\boldsymbol{O}(z), is

(52) 𝑽(𝑶)=[v11(𝑶)v12(𝑶)v21(𝑶)v22(𝑶)]𝑽(𝑷)=[v11(𝑶)ek(g+g)v12(𝑶)ek(g++gλ)v21(𝑶)ek(g++gλ)v22(𝑶)ek(g+g)].\boldsymbol{V}^{(\boldsymbol{O})}=\begin{bmatrix}v_{11}^{(\boldsymbol{O})}&v_{12}^{(\boldsymbol{O})}\\ v_{21}^{(\boldsymbol{O})}&v_{22}^{(\boldsymbol{O})}\end{bmatrix}\Longrightarrow\boldsymbol{V}^{(\boldsymbol{P})}=\begin{bmatrix}v_{11}^{(\boldsymbol{O})}e^{-k(g_{+}-g_{-})}&v_{12}^{(\boldsymbol{O})}e^{k(g_{+}+g_{-}-\lambda)}\\ v_{21}^{(\boldsymbol{O})}e^{-k(g_{+}+g_{-}-\lambda)}&v_{22}^{(\boldsymbol{O})}e^{k(g_{+}-g_{-})}\end{bmatrix}.

On one hand, 𝑽(𝑶)\boldsymbol{V}^{(\boldsymbol{O})} is highly oscillatory along Σ\Sigma. On the other hand, due to the jump of gg on Σ\Sigma (see (29)) we see that 𝑽(𝑷)\boldsymbol{V}^{(\boldsymbol{P})} is a constant off-diagonal matrix. For all of the other jump matrices, their corresponding jump contour is placed so that 𝑽(𝑷)\boldsymbol{V}^{(\boldsymbol{P})} decays to the identity matrix as kk\to\infty. Indeed, if 𝑽(𝑷)\boldsymbol{V}^{(\boldsymbol{P})} is an upper-triangular matrix, then the exponent of its 1212-entry is (2h+λ)-(2h+\lambda) and its jump contour is completely contained in a region of the zz-plane where Re(2h+λ)>0\Real(2h+\lambda)>0. Likewise, if 𝑽(𝑷)\boldsymbol{V}^{(\boldsymbol{P})} is a lower-triangular matrix, then the exponent of its 2121-entry is 2h+λ2h+\lambda and its jump contour is completely contained in a region of the zz-plane where Re(2h+λ)<0\Real(2h+\lambda)<0 (see Figure (12) and (15)). Finally, the normalization (36) of g(z)g(z) simplifies the large-zz behavior of 𝑷(z)\boldsymbol{P}(z). Therefore, 𝑷(z)\boldsymbol{P}(z) is the solution to the following Riemann-Hilbert problem:

Riemann-Hilbert Problem 5: For each positive integer kk, find 𝑷(z,x,k)𝑷(z)\boldsymbol{P}\left(z;x,k\right)\equiv\boldsymbol{P}(z) so that

  1. (1)

    Analyticity: 𝑷(z)\boldsymbol{P}(z) is analytic in zz off the jumps contours shown in Figure 15.

  2. (2)

    Jump Condition: 𝑷(z)\boldsymbol{P}(z) can be continuously extended to the boundary and the boundary values taken by 𝑷(z)\boldsymbol{P}(z) are related by the jump condition 𝑷+(z)=𝑷(z)𝑽(𝑷)(z)\boldsymbol{P}_{+}(z)=\boldsymbol{P}_{-}(z)\boldsymbol{V}^{(\boldsymbol{P})}(z), where 𝑽(𝑷)(z)\boldsymbol{V}^{(\boldsymbol{P})}(z) is as shown in Figure 15.

    𝑳k(2h+λ)\boldsymbol{L}_{k}(2h+\lambda)𝑳k1(2h+λ)\boldsymbol{L}_{k}^{-1}(2h+\lambda)𝑼k((2h+λ))\boldsymbol{U}_{k}(-(2h+\lambda))𝑼k1((2h+λ))\boldsymbol{U}_{k}^{-1}(-(2h+\lambda))[0110]\begin{bmatrix}0&-1\\ 1&0\end{bmatrix}𝑳k1(2h+λ)\boldsymbol{L}_{k}^{-1}(2h+\lambda)aabb
    Figure 15. Jumps for 𝑷(z)\boldsymbol{P}(z).
  3. (3)

    Normalization: As zz\to\infty, the matrix 𝑷(z)=𝕀+𝒪(1/z)\boldsymbol{P}(z)=\mathbb{I}+\mathcal{O}\left(1/z\right).

3.7. The Outer Parametrix

The phase function was constructed so that if kk is large, all of the the jump matrices (except for the one along Σ\Sigma) of 𝑷(z)\boldsymbol{P}(z) are close to the identity matrix. Ignoring these jumps we are led to the following Riemann-Hilbert problem:

Riemann-Hilbert Problem 6: Determine the matrix-valued function 𝑷˙(out)(z,x)𝑷˙(out)(z)\dot{\boldsymbol{P}}^{\text{(out)}}(z;x)\equiv\dot{\boldsymbol{P}}^{\text{(out)}}(z) with the following properties:

  1. (1)

    Analyticity: 𝑷˙(out)(z)\dot{\boldsymbol{P}}^{\text{(out)}}(z) is analytic in zz except on Σ\Sigma. At the endpoints aa and bb, negative one-fourth power singularities are allowed.

  2. (2)

    Jump Condition: 𝑷˙(out)(z)\dot{\boldsymbol{P}}^{\text{(out)}}(z) can be continuously extended to the interior of Σ\Sigma and the boundary values taken by 𝑷˙(out)(z)\dot{\boldsymbol{P}}^{\text{(out)}}(z) are related by the jump condition

    (53) 𝑷˙+(out)(z)=𝑷˙(out)(z)[0110].\dot{\boldsymbol{P}}^{\text{(out)}}_{+}(z)=\dot{\boldsymbol{P}}^{\text{(out)}}_{-}(z)\begin{bmatrix}0&-1\\ 1&0\end{bmatrix}.
  3. (3)

    Normalization: As zz\to\infty, the matrix 𝑷˙(out)(z)=𝕀+𝒪(1/z)\dot{\boldsymbol{P}}^{\text{(out)}}(z)=\mathbb{I}+\mathcal{O}\left(1/z\right).

.

It is well known that the unique solution to this Riemann-Hilbert problem is

(54) 𝑷˙(out)(z)=[12(β(z)+1β(z))i2(β(z)1β(z))i2(β(z)1β(z))12(β(z)+1β(z))],\dot{\boldsymbol{P}}^{\text{(out)}}(z)=\begin{bmatrix}\frac{1}{2}\Big(\beta(z)+\frac{1}{\beta(z)}\Big)&\frac{i}{2}\Big(\beta(z)-\frac{1}{\beta(z)}\Big)\\ -\frac{i}{2}\Big(\beta(z)-\frac{1}{\beta(z)}\Big)&\frac{1}{2}\Big(\beta(z)+\frac{1}{\beta(z)}\Big)\end{bmatrix},

where β(z,x)β(z)\beta(z;x)\equiv\beta(z) denotes the function analytic for zΣz\in\mathbb{C}\setminus\Sigma that satisfies the conditions

(55) β(z)4=(zbza)andβ(z)=1+𝒪(1/z) as z.\beta(z)^{4}=\left(\frac{z-b}{z-a}\right)\hskip 14.22636pt\text{and}\hskip 14.22636pt\beta(z)=1+\mathcal{O}(1/z)\text{ as }z\to\infty.

See, for example, Section 3.3 of [7].

3.8. The Inner Parametrices

The deformation 𝑷(z)𝑷˙(out)(z)\boldsymbol{P}(z)\to\dot{\boldsymbol{P}}^{\text{(out)}}(z) was motivated by the fact that the jump contours we ignored decayed to the identity as kk\to\infty. In light of the theory of small-norm Riemann-Hilbert problems, we need this decay to be uniform (with respect to zz). However, near z=az=a and z=bz=b the convergence is not uniform. We also see that 𝑷˙(out)(z)\dot{\boldsymbol{P}}^{\text{(out)}}(z) has quarter-root singularities at aa and bb. Therefore, 𝑷˙(out)(z)\dot{\boldsymbol{P}}^{\text{(out)}}(z) is not a good approximation of 𝑷(z)\boldsymbol{P}(z) near z=az=a and z=bz=b, and so we need to approximate Riemann-Hilbert Problem 3.6 in a different manner. In particular, in 𝔻a\mathbb{D}_{a} and 𝔻b\mathbb{D}_{b} we construct Airy parametrices that satisfy the same jump conditions that 𝑷(z)\boldsymbol{P}(z) satisfies. In Section 4.5 we give a systematic way to construct Airy parametrices and provide full details for one example.

3.8.1. Local Parametrices at the Endpoints z=az=a and z=bz=b.

Set

(56) 𝑯(a)(z):=𝑷˙(out)(z)ek(h(z)+λ/2)σ3ek2τa3/2σ3𝑽1τaσ3/4\boldsymbol{H}^{(a)}(z):=\dot{\boldsymbol{P}}^{\text{(out)}}(z)e^{-k(h(z)+\lambda/2)\sigma_{3}}e^{\frac{k}{2}\tau_{a}^{3/2}\sigma_{3}}\boldsymbol{V}^{-1}\tau_{a}^{-\sigma_{3}/4}

and

(57) 𝑷˙(a):=𝑯(a)(z)kσ3/6𝑨(k2/3τa(z))ek2τa3/2σ3ek(h(z)+λ/3)σ3,\dot{\boldsymbol{P}}^{(a)}:=\boldsymbol{H}^{(a)}(z)k^{-\sigma_{3}/6}\boldsymbol{A}\left(k^{2/3}\tau_{a}(z)\right)e^{-\frac{k}{2}\tau_{a}^{3/2}\sigma_{3}}e^{k(h(z)+\lambda/3)\sigma_{3}},

where 𝑨()\boldsymbol{A}(\cdot) is the well-known solution to Riemann-Hilbert Problem A in Appendix A and 𝑽\boldsymbol{V} is defined in (184). In 𝔻b\mathbb{D}_{b} set

(58) 𝑯(b)(z):=𝑷˙(out)(z)ek(h(z)+λ/2)σ3eiπ2σ3ek2τb(z)3/2σ3𝑽1τb(z)σ3/4\boldsymbol{H}^{(b)}(z):=\dot{\boldsymbol{P}}^{\text{(out)}}(z)e^{-k(h(z)+\lambda/2)\sigma_{3}}e^{\frac{i\pi}{2}\sigma_{3}}e^{\frac{k}{2}\tau_{b}(z)^{3/2}\sigma_{3}}\boldsymbol{V}^{-1}\tau_{b}(z)^{-\sigma_{3}/4}

and

(59) 𝑷˙(b)(z):=𝑯(b)(z)kσ3/6𝑨(k2/3τb(z))ek2τb(z)3/2σ3eiπ2σ3ek(h(z)+λ/2)σ3.\dot{\boldsymbol{P}}^{(b)}(z):=\boldsymbol{H}^{(b)}(z)k^{-\sigma_{3}/6}\boldsymbol{A}\left(k^{2/3}\tau_{b}(z)\right)e^{-\frac{k}{2}\tau_{b}(z)^{3/2}\sigma_{3}}e^{-\frac{i\pi}{2}\sigma_{3}}e^{k(h(z)+\lambda/2)\sigma_{3}}.

For p{a,b}p\in\left\{a,b\right\}, for each z𝔻pz\in\partial\mathbb{D}_{p} as kk\to\infty the mismatch jumps satisfy

(60) 𝑷˙(p)(z)𝑷˙(out)(z)1=𝕀+[𝒪(k2)𝒪(k1)𝒪(k1)𝒪(k2)].\dot{\boldsymbol{P}}^{(p)}(z)\dot{\boldsymbol{P}}^{\text{(out)}}(z)^{-1}=\mathbb{I}+\begin{bmatrix}\mathcal{O}\left(k^{-2}\right)&\mathcal{O}\left(k^{-1}\right)\\ \mathcal{O}\left(k^{-1}\right)&\mathcal{O}\left(k^{-2}\right)\end{bmatrix}.

3.9. Error Analysis

In this section we will quantify the error introduced by ignoring the jumps of 𝑷(z)\boldsymbol{P}(z) that decayed to the identity as kk\to\infty by analyzing a small-norm Riemann-Hilbert problem. First, we will compose the global parametrix out of the local and outer parametrices. Then, we will set up the Riemann-Hilbert problem that characterizes the error between the global parametrix and 𝑷(z)\boldsymbol{P}(z), the actual solution. Finally, using the theory of small-norm Riemann-Hilbert problems, we will show that our approximation of the right-hand side of (21) is of order 1/k1/k.

3.9.1. The Global Parametrix

Now that we have constructed a parametrix in all parts of the zz-plane, we are ready to define the global parametrix. Naturally, we set

(61) 𝑷˙(z,x,k)𝑷˙(z)={𝑷˙(a)(z)z𝔻a,𝑷˙(b)(z)z𝔻b,𝑷˙(out)(z)z(Σ𝔻a𝔻b¯).\dot{\boldsymbol{P}}(z;x,k)\equiv\dot{\boldsymbol{P}}(z)=\begin{cases}\dot{\boldsymbol{P}}^{(a)}(z)&z\in\mathbb{D}_{a},\\ \dot{\boldsymbol{P}}^{(b)}(z)&z\in\mathbb{D}_{b},\\ \dot{\boldsymbol{P}}^{\text{(out)}}(z)&z\in\mathbb{C}\setminus\left(\Sigma\cup\overline{\mathbb{D}_{a}\cup\mathbb{D}_{b}}\right).\end{cases}

Set the (unknown) error matrix to be the ratio between 𝑷(z)\boldsymbol{P}(z) and 𝑷˙(z)\dot{\boldsymbol{P}}(z). That is,

(62) 𝑬(z,x,k)𝑬(z):=𝑷(z)𝑷˙1(z).\boldsymbol{E}(z;x,k)\equiv\boldsymbol{E}(z):=\boldsymbol{P}(z)\dot{\boldsymbol{P}}^{-1}(z).

Notice, when zz is not on the jump contours of 𝑷(z)\boldsymbol{P}(z) or 𝑷˙(z)\dot{\boldsymbol{P}}(z) then 𝑬(z)\boldsymbol{E}(z) is a product of analytic functions, and hence is analytic. Thus, 𝑬(z)\boldsymbol{E}(z) will have a jump discontinuity if either zz is on a jump contour of 𝑷(z)\boldsymbol{P}(z) that is not Σ\Sigma or zz is on the boundary of 𝔻a𝔻b\mathbb{D}_{a}\cup\mathbb{D}_{b}; see Figure 16. Also, since both 𝑷(z)\boldsymbol{P}(z) and 𝑷˙(z)\dot{\boldsymbol{P}}(z) converge to the identity as zz\to\infty, 𝑬(z)\boldsymbol{E}(z) converges to the identity as zz\to\infty. Thus, we find that 𝑬(z)\boldsymbol{E}(z) is the unique solution to the following Riemann-Hilbert problem:

Riemann-Hilbert Problem 7: For each kk\in\mathbb{N}, find 𝑬(z)\boldsymbol{E}(z) so that

  1. (1)

    Analyticity: 𝑬(z)\boldsymbol{E}(z) is analytic in zz except along the jump contours shown in Figure 16.

  2. (2)

    Jump Condition: 𝑬(z)\boldsymbol{E}(z) can be continuously extended to the boundary and the boundary values taken by 𝑬(z)\boldsymbol{E}(z) are related by the jump condition 𝑬+(z)=𝑬(z)𝑽(𝑬)(z)\boldsymbol{E}_{+}(z)=\boldsymbol{E}_{-}(z)\boldsymbol{V}^{(\boldsymbol{E})}(z) as shown in Figure 16.

    𝑷˙𝑳k(2h+λ)𝑷˙1\dot{\boldsymbol{P}}\boldsymbol{L}_{k}(2h+\lambda)\dot{\boldsymbol{P}}^{-1}𝑷˙𝑳k1(2h+λ)𝑷˙1\dot{\boldsymbol{P}}\boldsymbol{L}_{k}^{-1}(2h+\lambda)\dot{\boldsymbol{P}}^{-1}𝑷˙𝑼k((2h+λ))𝑷˙1\dot{\boldsymbol{P}}\boldsymbol{U}_{k}(-(2h+\lambda))\dot{\boldsymbol{P}}^{-1}𝑷˙𝑼k1((2h+λ))𝑷˙1\dot{\boldsymbol{P}}\boldsymbol{U}_{k}^{-1}(-(2h+\lambda))\dot{\boldsymbol{P}}^{-1}𝔻a\mathbb{D}_{a}𝑽a(𝑬)\boldsymbol{V}_{a}^{(\boldsymbol{E})}𝔻b\mathbb{D}_{b}𝑽b(𝑬)\boldsymbol{V}_{b}^{(\boldsymbol{E})}𝑷˙𝑳k1(2h+λ)𝑷˙1\dot{\boldsymbol{P}}\boldsymbol{L}_{k}^{-1}(2h+\lambda)\dot{\boldsymbol{P}}^{-1}
    Figure 16. The jumps of 𝑬(z)\boldsymbol{E}(z).
  3. (3)

    Normalization: As zz\to\infty, the matrix 𝑬(z)=𝕀+𝒪(1/z)\boldsymbol{E}(z)=\mathbb{I}+\mathcal{O}\left(1/z\right).

Notice, not only does 𝑬(z)\boldsymbol{E}(z) normalize to the identity matrix, but all of its jumps are close to the identity for large kk. Indeed, due to the sign of Re(2h+λ)\Real(2h+\lambda), all of the triangular matrices in Figure 16 are exponentially close to the identity (and clearly conjugating by the bounded matrix 𝑷˙\dot{\boldsymbol{P}} does not cause growth). Further, the mismatch jumps on the boundaries of 𝔻a\mathbb{D}_{a} and 𝔻b\mathbb{D}_{b} have been shown to go like 𝕀+𝒪(1/k)\mathbb{I}+\mathcal{O}\left(1/k\right) as kk\to\infty; see (60). The upshot is that, according to the theory of small-norm Riemann-Hilbert problems, the following proposition is true.

Proposition 3.6.

Given that xx is in the pole-free region of the xx-plane, as kk\to\infty

(63) 𝑬(z,x,k)=𝕀+𝒪(1/k).\boldsymbol{E}(z;x,k)=\mathbb{I}+\mathcal{O}(1/k).

3.9.2. Tracking the Error Term in the Extraction Formula

We recall the transformations and deformations we employed to arrive at 𝑷˙\dot{\boldsymbol{P}}.

(64) 𝑴(z){\lx@inpgf@ignorespaces\boldsymbol{M}(z)}𝑵(z){\lx@inpgf@ignorespaces\boldsymbol{N}(z)}𝑶(z){\lx@inpgf@ignorespaces\boldsymbol{O}(z)}𝑷(z){\lx@inpgf@ignorespaces\boldsymbol{P}(z)}𝑷˙(z){\lx@inpgf@ignorespaces\dot{\boldsymbol{P}}(z)}

We want to approximate 𝑴(z)\boldsymbol{M}(z) in terms of the explicit function 𝑷˙(z)\dot{\boldsymbol{P}}(z). Towards this goal we start off by observing that the transformations 𝑴(z)𝑵(z)𝑶(z)\boldsymbol{M}(z)\to\boldsymbol{N}(z)\to\boldsymbol{O}(z) all occur in a bounded subset of the zz-plane. Hence, for large enough zz, we have 𝑴(z)=𝑵(z)=𝑶(z)\boldsymbol{M}(z)=\boldsymbol{N}(z)=\boldsymbol{O}(z). Thus, inverting (51), we find for large zz,

(65) 𝑴(z)=ekλ2σ3𝑷(z)ekg(z)σ3ekλ2σ3=ekλ2σ3𝑬(z)𝑷˙(z)ekg(z)σ3ekλ2σ3.\boldsymbol{M}(z)=e^{\frac{k\lambda}{2}\sigma_{3}}\boldsymbol{P}(z)e^{kg(z)\sigma_{3}}e^{-\frac{k\lambda}{2}\sigma_{3}}=e^{\frac{k\lambda}{2}\sigma_{3}}\boldsymbol{E}(z)\dot{\boldsymbol{P}}(z)e^{kg(z)\sigma_{3}}e^{-\frac{k\lambda}{2}\sigma_{3}}.

Now, write the large-zz expansions for 𝑬(z)\boldsymbol{E}(z) and 𝑷˙(z)\dot{\boldsymbol{P}}(z) as

(66) 𝑬(z)=𝕀+𝑬1z+𝑬2z2+𝒪(1z3)and𝑷˙(z)=𝕀+𝑷˙1z+𝑷˙2z2+𝒪(1z3).\boldsymbol{E}(z)=\mathbb{I}+\frac{\boldsymbol{E}_{-1}}{z}+\frac{\boldsymbol{E}_{-2}}{z^{2}}+\mathcal{O}\left(\frac{1}{z^{3}}\right)\hskip 7.11317pt\text{and}\hskip 7.11317pt\dot{\boldsymbol{P}}(z)=\mathbb{I}+\frac{\dot{\boldsymbol{P}}_{-1}}{z}+\frac{\dot{\boldsymbol{P}}_{-2}}{z^{2}}+\mathcal{O}\left(\frac{1}{z^{3}}\right).

Also, using (36) we find there exists some g1(x)g1g_{-1}(x)\equiv g_{-1}\in\mathbb{C} such that as, zz\to\infty,

(67) g(z)=log(z)+g1z+𝒪(1/z2).g(z)=\log(z)+\frac{g_{-1}}{z}+\mathcal{O}\left(1/z^{2}\right).

This implies as, zz\to\infty,

(68) ekg(z)σ3zkσ3=𝕀+kg1σ3z+[𝒪(1/z2)𝒪(1/z3)𝒪(1/z3)𝒪(1/z2)].e^{kg(z)\sigma_{3}}z^{-k\sigma_{3}}=\mathbb{I}+\frac{kg_{-1}\sigma_{3}}{z}+\begin{bmatrix}\mathcal{O}\left(1/z^{2}\right)&\mathcal{O}\left(1/z^{3}\right)\\ \mathcal{O}\left(1/z^{3}\right)&\mathcal{O}\left(1/z^{2}\right)\end{bmatrix}.

In view of (21), we extract [𝑴1]22[\boldsymbol{M}_{-1}]_{22}, [𝑴1]12[\boldsymbol{M}_{-1}]_{12}, and [𝑴2]12[\boldsymbol{M}_{-2}]_{12} and find

(69) [𝑴1]22=[𝑬1]22+[𝑷˙1]22kg1,[𝑴1]12=([𝑬1]12+[𝑷˙1]12)ekλ,[𝑴2]12=ekλ([𝑬1]11[𝑷˙1]12+[𝑬1]12[𝑷˙1]22CLOSEOPEN([𝑬1]12+[𝑷˙1]12)kg1+[𝑬2]12+[𝑷˙2]22).\displaystyle\begin{split}[\boldsymbol{M}_{-1}]_{22}&=[\boldsymbol{E}_{-1}]_{22}+[\dot{\boldsymbol{P}}_{-1}]_{22}-kg_{-1},\\ [\boldsymbol{M}_{-1}]_{12}&=\left([\boldsymbol{E}_{-1}]_{12}+[\dot{\boldsymbol{P}}_{-1}]_{12}\right)e^{k\lambda},\\ [\boldsymbol{M}_{-2}]_{12}&=e^{k\lambda}\Big([\boldsymbol{E}_{-1}]_{11}[\dot{\boldsymbol{P}}_{-1}]_{12}+[\boldsymbol{E}_{-1}]_{12}[\dot{\boldsymbol{P}}_{-1}]_{22}-\\ &\hskip 64.01869pt\left([\boldsymbol{E}_{-1}]_{12}+[\dot{\boldsymbol{P}}_{-1}]_{12}\right)kg_{-1}+[\boldsymbol{E}_{-2}]_{12}+[\dot{\boldsymbol{P}}_{-2}]_{22}\Big).\end{split}

Therefore,

(70) pk((k2)2/3x)=2i(k2)1/3([𝑬1]22+[𝑷˙1]22CLOSEOPEN[𝑬1]11[𝑷˙1]12+[𝑬1]12[𝑷˙1]22+[𝑬2]12+[𝑷˙2]12[𝑬1]12+[𝑷˙1]12).p_{k}\left(\left(\frac{k}{2}\right)^{2/3}x\right)=2i\left(\frac{k}{2}\right)^{1/3}\Bigg([\boldsymbol{E}_{-1}]_{22}+[\dot{\boldsymbol{P}}_{-1}]_{22}-\\ \frac{[\boldsymbol{E}_{-1}]_{11}[\dot{\boldsymbol{P}}_{-1}]_{12}+[\boldsymbol{E}_{-1}]_{12}[\dot{\boldsymbol{P}}_{-1}]_{22}+[\boldsymbol{E}_{-2}]_{12}+[\dot{\boldsymbol{P}}_{-2}]_{12}}{[\boldsymbol{E}_{-1}]_{12}+[\dot{\boldsymbol{P}}_{-1}]_{12}}\Bigg).

A direct calculation finds that

(71) [𝑷˙(z)]22=12(β(z)+1β(z))=1+𝒪(z2)[\dot{\boldsymbol{P}}(z)]_{22}=\frac{1}{2}\left(\beta(z)+\frac{1}{\beta(z)}\right)=1+\mathcal{O}\left(z^{-2}\right)

and

(72) [𝑷˙(z)]12=i2(β(z)1β(z))=i(ab)4z+i(a2b2)8z2+𝒪(z3).[\dot{\boldsymbol{P}}(z)]_{12}=\frac{i}{2}\left(\beta(z)-\frac{1}{\beta(z)}\right)=\frac{i(a-b)}{4z}+\frac{i(a^{2}-b^{2})}{8z^{2}}+\mathcal{O}\left(z^{-3}\right).

We are now ready to prove Theorem 1.1.

Proof of Theorem 1.1.

Using (63), we can write (70) as

(73) pk((k2)2/3x)=2i(k2)1/3([𝑷˙1(x)]22[𝑷˙2(x)]12+𝒪(1/k)[𝑷˙1(x)]12+𝒪(1/k)).p_{k}\left(\left(\frac{k}{2}\right)^{2/3}x\right)=2i\left(\frac{k}{2}\right)^{1/3}\left([\dot{\boldsymbol{P}}_{-1}(x)]_{22}-\frac{[\dot{\boldsymbol{P}}_{-2}(x)]_{12}+\mathcal{O}\left(1/k\right)}{[\dot{\boldsymbol{P}}_{-1}(x)]_{12}+\mathcal{O}\left(1/k\right)}\right).

Further, looking at (72) we have that

(74) [𝑷˙1(x)]12=i(a(x)b(x))4=iΔ(x)4.[\dot{\boldsymbol{P}}_{-1}(x)]_{12}=\frac{i(a(x)-b(x))}{4}=-\frac{i\Delta(x)}{4}.

Notice that Δ(x)=4i/S(x)\Delta(x)=\sqrt{-4i/S(x)} never vanishes in the pole-free region of the xx-plane because S(x)S(x) is analytic (and hence pole free) in the pole-free region. Therefore, the quotient in (74) never blows up and we can write

(75) pk((k2)2/3x)=2i(k2)1/3([𝑷˙1(x)]22[𝑷˙2(x)]12[𝑷˙1(x)]12+𝒪(1/k)).p_{k}\left(\left(\frac{k}{2}\right)^{2/3}x\right)=2i\left(\frac{k}{2}\right)^{1/3}\left([\dot{\boldsymbol{P}}_{-1}(x)]_{22}-\frac{[\dot{\boldsymbol{P}}_{-2}(x)]_{12}}{[\dot{\boldsymbol{P}}_{-1}(x)]_{12}}+\mathcal{O}(1/k)\right).

Now, using (71) and (72) to express the right-hand side of (75) in terms of SS we find

(76) pk((k2)2/3x)=2i(k2)1/3(S(x)2+𝒪(1/k)).p_{k}\left(\left(\frac{k}{2}\right)^{2/3}x\right)=-2i\left(\frac{k}{2}\right)^{1/3}\left(\frac{S(x)}{2}+\mathcal{O}(1/k)\right).

In view of (14) and (17) we obtain,

(77) (2k)1/3uHM(α)(k2/321/3x)=iS(x)2+𝒪(1/k),-(2k)^{-1/3}u^{(\alpha)}_{\text{HM}}\left(-\frac{k^{2/3}}{2^{1/3}}x\right)=-i\frac{S(x)}{2}+\mathcal{O}\left(1/k\right),

our desired result. ∎

4. Analysis in the Pole Region

We now begin our analysis in the pole region.

4.1. The G-function

Motivated by the bifurcation of the zero-level set of Re(2h+λ)\Real(2h+\lambda) as xx leaves the pole-free region (see Figure 12), we aim to deform Riemann-Hilbert Problem 2 so that its jump matrices decay to the identity as kk\to\infty along all of its jump contours except for two bands and one gap (instead of one band as in the pole-free case). As we will have two bands, we will have four endpoints: A(x)AA(x)\equiv A, B(x)BB(x)\equiv B, C(x)CC(x)\equiv C, and D(x)DD(x)\equiv D. The normalization of the soon-to-be-defined GG-function will be dictated by the endpoints. In order to enforce our desired normalization we require

(78) 𝔰1:=A+B+C+D=0,𝔰2:=AB+AC+AD+BC+BD+CD=x/2,𝔰3:=ABC+ACD+BCD=i.\displaystyle\begin{split}\mathfrak{s}_{1}&:=A+B+C+D=0,\\ \mathfrak{s}_{2}&:=AB+AC+AD+BC+BD+CD=x/2,\\ \mathfrak{s}_{3}&:=ABC+ACD+BCD=-i.\end{split}

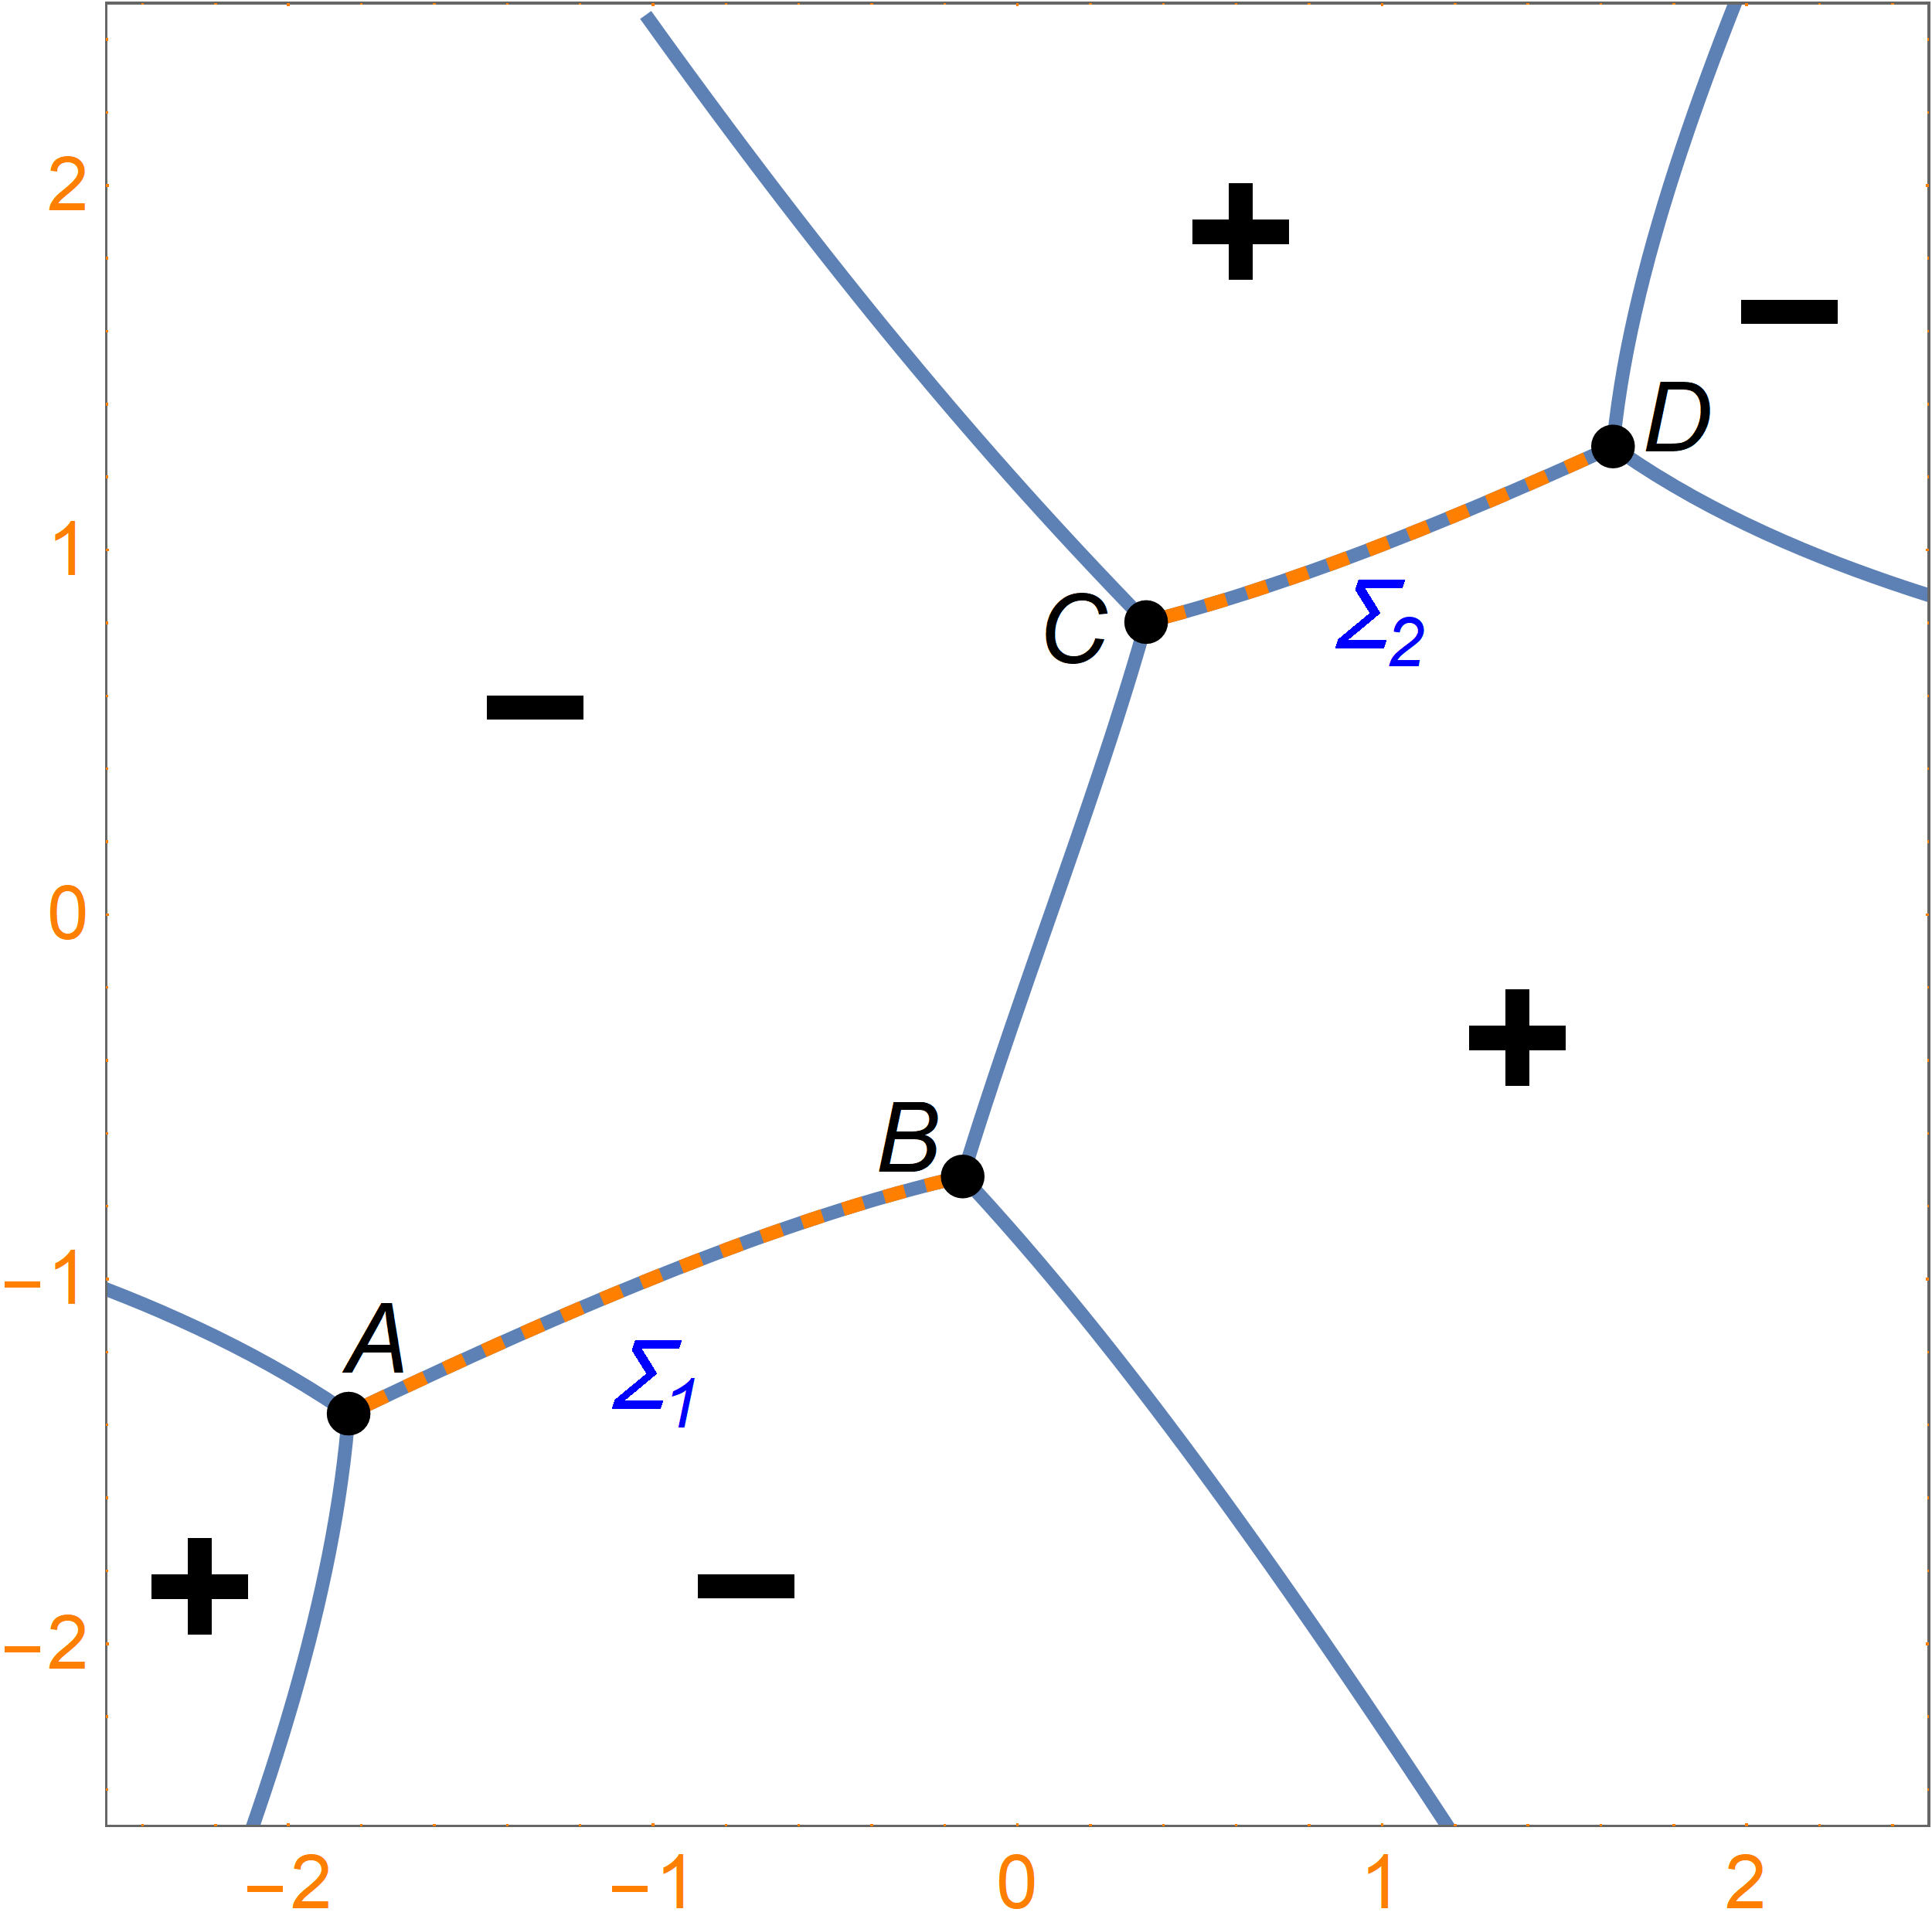
These conditions give us six real equations to determine the endpoints. The remaining two real equations will be derived from what are commonly known as the Boutroux conditions. To state these conditions we need to introduce the function R(z,x)R(z;x). Temporarily set Σ1\Sigma_{1} as the line segment with endpoints AA and BB, Γ\Gamma as the line segment with endpoints BB and CC, and Σ2\Sigma_{2} as the line segment with endpoints CC and DD. Now, let R(z,x)R(z)R(z;x)\equiv R(z) denote the function analytic for z(Σ1Σ2)z\in\mathbb{C}\setminus(\Sigma_{1}\cup\Sigma_{2}) that satisfies the conditions

(79) R(z)2=(zA)(zB)(zC)(zD)andR(z)=z2+𝒪(z) as z.R(z)^{2}=(z-A)(z-B)(z-C)(z-D)\hskip 9.38945pt\text{and}\hskip 9.38945ptR(z)=z^{2}+\mathcal{O}(z)\text{ as }z\to\infty.

Also, the moment conditions (78) imply R(z)R(z) has the large-zz expansion

(80) R(z)=z2+x4+i2z+𝒪(1/z2).R(z)=z^{2}+\frac{x}{4}+\frac{i}{2z}+\mathcal{O}\left(1/z^{2}\right).

The Boutroux conditions are

(81) Im(Σ1R+(w)dw)=0andIm(ΓR(w)dw)=0.\text{Im}\left(\int\limits_{\Sigma_{1}}R_{+}(w)\text{d}w\right)=0\hskip 14.22636pt\text{and}\hskip 14.22636pt\Imag\left(\int\limits_{\Gamma}R(w)\text{d}w\right)=0.

4.1.1. Definition and Properties of the G-function

As in the pole-free case, we will define the GG-function as an antiderivative. Let

(82) G(z,x)G(z)=R(z)2πiΣ1Σ2iθ(w)R+(w)(wz)dw,G^{\prime}(z;x)\equiv G^{\prime}(z)=\frac{R(z)}{2\pi i}\int\limits_{\Sigma_{1}\cup\Sigma_{2}}\frac{i\theta^{\prime}(w)}{R_{+}(w)(w-z)}\text{d}w,

where the path of integration on Σ1Σ2\Sigma_{1}\cup\Sigma_{2} goes from AA to BB and then from CC to DD. The moment conditions (78) guarantee that G(z)=1/z+𝒪(1/z2)G^{\prime}(z)=1/z+\mathcal{O}\left(1/z^{2}\right) as zz\to\infty. Thus, G(z)1/(zA)G^{\prime}(z)-1/(z-A) is integrable at z=z=\infty. Integrating the latter expression introduces a logarithmic cut. Let LL denote an oriented, unbounded arc from z=z=\infty to z=Az=A. We further require that LL only intersects Σ1\Sigma_{1} at z=Az=A, avoids ΓΣ2\Gamma\cup\Sigma_{2}, and coincides with the negative real numbers for large enough zz. We now define G(z)G(z) as an integral where the path of integration can be any path that does not cross Σ1ΓΣ2\Sigma_{1}\cup\Gamma\cup\Sigma_{2}. Set

(83) G(z,x)G(z):=log(zA)+zG(w)1wAdw.G(z;x)\equiv G(z):=\log(z-A)+\int_{\infty}^{z}G^{\prime}(w)-\frac{1}{w-A}\text{d}w.

For notational convenience, we write

(84) H(z,x)H(z):=iθ(z)2G(z).H(z;x)\equiv H(z):=\frac{i\theta(z)}{2}-G(z).

Analogously to the pole-free case, the zero-level lines of Re(2H(z)+Λ)\Real\left(2H(z)+\Lambda\right) are independent of the placement of the curves Σ1\Sigma_{1}, Γ\Gamma, and Σ2\Sigma_{2} given the three curves are finite and simple, and Σ1\Sigma_{1} connects AA to BB, Γ\Gamma connects BB to CC, and Σ2\Sigma_{2} connects CC to DD. It is convenient to make the following selections:

  • Let Σ1\Sigma_{1} coincide with the zero-level arc of Re(2H+Λ)\Real\left(2H+\Lambda\right) that connects AA to BB.

  • Let Γ\Gamma coincide with the zero-level arc of Re(2H+Λ)\Real\left(2H+\Lambda\right) that connects BB to CC.

  • Let Σ2\Sigma_{2} coincide with the zero-level arc of Re(2H+Λ)\Real\left(2H+\Lambda\right) that connects CC to DD.

In the same vein as in the pole-free case, the leading error in our approximation will propagate from the endpoints. As such, we will need to do local analysis at each endpoint. For each p{A,B,C,D}p\in\{A,B,C,D\}, let 𝔻p\mathbb{D}_{p} denote a sufficiently small disk around z=pz=p. For the points A,B,CA,B,C we will need to further specify certain regions of 𝔻p\mathbb{D}_{p}. In particular, we make the following partitions (also see Figure 17):

  • For 𝔻A\mathbb{D}_{A}, notice LΣ1L\cup\Sigma_{1} divides 𝔻A\mathbb{D}_{A} into two open components. Let 𝔻A\mathbb{D}^{\uparrow}_{A} denote the open component that is on the left side of LΣ1L\cup\Sigma_{1}, and set 𝔻A:=𝔻A𝔻A¯\mathbb{D}_{A}^{\downarrow}:=\mathbb{D}_{A}\setminus\overline{\mathbb{D}^{\uparrow}_{A}}.

  • For 𝔻B\mathbb{D}_{B}, notice Σ1Γ\Sigma_{1}\cup\Gamma divides 𝔻B\mathbb{D}_{B} into two open components (recall that Σ1\Sigma_{1} and Σ~1\widetilde{\Sigma}_{1} are the same contours with opposite orientations). Let 𝔻B\mathbb{D}^{\uparrow}_{B} denote the open component that is on the left side of Σ1Γ\Sigma_{1}\cup\Gamma, and set 𝔻B:=𝔻B𝔻B¯\mathbb{D}^{\downarrow}_{B}:=\mathbb{D}_{B}\setminus\overline{\mathbb{D}^{\uparrow}_{B}}.

  • For 𝔻C\mathbb{D}_{C}, notice ΓΣ2\Gamma\cup\Sigma_{2} divides 𝔻C\mathbb{D}_{C} into two components. Let 𝔻C\mathbb{D}_{C}^{\uparrow} denote the open component that is on the left side of ΓΣ2\Gamma\cup\Sigma_{2}, and set 𝔻C:=𝔻C𝔻C¯\mathbb{D}_{C}^{\downarrow}:=\mathbb{D}_{C}\setminus\overline{\mathbb{D}^{\uparrow}_{C}}.

We now list the basic properties of GG and HH that we will use throughout the Riemann-Hilbert analysis.

Proposition 4.1.

For each xx in the pole region of the xx-plane, given that the moment conditions (78) and the Boutroux conditions (81) are satisfied, guaranteeing that G(z)G(z) and H(z)H(z) are well-defined by (83) and (84) respectively, then the following statements hold:

  • There exists a complex number Λ(x)Λ\Lambda(x)\equiv\Lambda such that

    (85) H+(z)+H(z)=iθ(z)G+(z)G(z)=Λfor each zΣ1.H_{+}(z)+H_{-}(z)=i\theta(z)-G_{+}(z)-G_{-}(z)=-\Lambda\hskip 14.22636pt\textit{for each }z\in\Sigma_{1}.
  • There exists a real number ω(x)ω\omega(x)\equiv\omega\in\mathbb{R} such that

    (86) H+H=(G+G)=iωfor each zΓ.H_{+}-H_{-}=-(G_{+}-G_{-})=-i\omega\hskip 14.22636pt\textit{for each }z\in\Gamma.
  • There exists a real number Ω(x)Ω\Omega(x)\equiv\Omega\in\mathbb{R} such that

    (87) H+(z)+H(z)=iθ(z)G+(z)G(z)=ΛiΩfor each zΣ2.H_{+}(z)+H_{-}(z)=i\theta(z)-G_{+}(z)-G_{-}(z)=-\Lambda-i\Omega\hskip 14.22636pt\textit{for each }z\in\Sigma_{2}.
  • On the logarithmic cut LL,

    (88) G+(z)G(z)=2πi.G_{+}(z)-G_{-}(z)=-2\pi i.
  • As zz\to\infty,

    (89) G(z)=log(z)+𝒪(1/z).G(z)=\log(z)+\mathcal{O}(1/z).
  • At each endpoint, under the right perturbation, 2H(z)+iΛ2H(z)+i\Lambda locally looks like a 3/23/2-root function. More precisely, if we consider the functions

    (90) JA(z):={2H(z)+Λ2πi,z𝔻A,2H(z)+Λ+2πi,z𝔻A,J_{A}(z):=\begin{cases}2H(z)+\Lambda-2\pi i,&z\in\mathbb{D}_{A}^{\uparrow},\\ 2H(z)+\Lambda+2\pi i,&z\in\mathbb{D}_{A}^{\downarrow},\end{cases}
    (91) JB(z):={2H(z)+Λ+iω,z𝔻B,2H(z)+Λiω,z𝔻B,J_{B}(z):=\begin{cases}2H(z)+\Lambda+i\omega,&z\in\mathbb{D}^{\uparrow}_{B},\\ 2H(z)+\Lambda-i\omega,&z\in\mathbb{D}^{\downarrow}_{B},\end{cases}
    (92) JC(z):={2H(z)+Λ+iω+iΩ,z𝔻C,2H(z)+Λiω+iΩz𝔻C,J_{C}(z):=\begin{cases}2H(z)+\Lambda+i\omega+i\Omega,&z\in\mathbb{D}^{\uparrow}_{C},\\ 2H(z)+\Lambda-i\omega+i\Omega&z\in\mathbb{D}^{\downarrow}_{C},\end{cases}

    and

    (93) JD(z):=2H(z)+Λ+iΩ,J_{D}(z):=2H(z)+\Lambda+i\Omega,

    then for each endpoint p{A,B,C,D}p\in\left\{A,B,C,D\right\} there exists κp\kappa_{p}\in\mathbb{C} such that

    (94) Jp(z)=κp(zp)3/2+𝒪((zp)5/2)for z𝔻p.J_{p}(z)=\kappa_{p}(z-p)^{3/2}+\mathcal{O}\left((z-p)^{5/2}\right)\hskip 23.84923pt\text{for }z\in\mathbb{D}_{p}.

These statements are standard and can be proved by direct computation.

4.2. Preliminary Deformations in the Riemann-Hilbert Analysis

As in the pole-free analysis, we deform Riemann-Hilbert Problem 2 in preparation for introducing the GG-function. These deformations are motivated by the sign chart of Re(2H+Λ)\Real(2H+\Lambda); see Figure 19. To specify the exact placement of the deformed jump contours, we will construct conformal maps at each endpoint. Then, we will collapse contours and open lenses.

4.2.1. Conformal Map Constructions

Using the same argument, as in Section 3.4.1 and Proposition 4.1, we are able to construct conformal maps τA\tau_{A}, τB\tau_{B}, τC\tau_{C}, and τD\tau_{D} according to the table below.

pp Conformal Map τp:𝔻p\tau_{p}:\mathbb{D}_{p}\to\mathbb{C} τp1((,0])𝔻p\tau_{p}^{-1}((-\infty,0])\cap\mathbb{D}_{p}
z=Az=A τA(z)3={(2H(z)+Λ2πi)2,z𝔻A,(2H(z)+Λ+2πi)2,z𝔻A,\tau_{A}(z)^{3}=\begin{cases}\left(2H(z)+\Lambda-2\pi i\right)^{2},&z\in\mathbb{D}_{A}^{\uparrow},\\ \left(2H(z)+\Lambda+2\pi i\right)^{2},&z\in\mathbb{D}_{A}^{\downarrow},\end{cases} Σ1𝔻A\Sigma_{1}\cap\mathbb{D}_{A}
z=Bz=B τB(z)3={(2H(z)+Λ+iω)2,z𝔻B,(2H(z)+Λiω)2,z𝔻B,\tau_{B}(z)^{3}=\begin{cases}(2H(z)+\Lambda+i\omega)^{2},&z\in\mathbb{D}^{\uparrow}_{B},\\ (2H(z)+\Lambda-i\omega)^{2},&z\in\mathbb{D}^{\downarrow}_{B},\end{cases} Σ1𝔻B\Sigma_{1}\cap\mathbb{D}_{B}
z=Cz=C τC(z)3={(2H(z)+Λ+iω+iΩ)2,z𝔻C,(2H(z)+Λiω+iΩ)2z𝔻C,\tau_{C}(z)^{3}=\begin{cases}(2H(z)+\Lambda+i\omega+i\Omega)^{2},&z\in\mathbb{D}^{\uparrow}_{C},\\ (2H(z)+\Lambda-i\omega+i\Omega)^{2}&z\in\mathbb{D}^{\downarrow}_{C},\end{cases} Γ𝔻C\Gamma\cap\mathbb{D}_{C}
z=Dz=D τD(z)3=(2H(z)+Λ+iΩ)2\tau_{D}(z)^{3}=(2H(z)+\Lambda+i\Omega)^{2} Σ2𝔻D\Sigma_{2}\cap\mathbb{D}_{D}
Table 2. Conformal maps used in the pole region.
Σ1\Sigma_{1}LLAA𝔻A\mathbb{D}_{A}^{\downarrow}𝔻A\mathbb{D}_{A}^{\uparrow}
fl
Σ1~\widetilde{\Sigma_{1}}Γ\GammaBB𝔻B\mathbb{D}_{B}^{\downarrow}𝔻B\mathbb{D}_{B}^{\uparrow}
fl
Γ~\widetilde{\Gamma}Σ2\Sigma_{2}CC𝔻C\mathbb{D}_{C}^{\downarrow}𝔻C\mathbb{D}_{C}^{\uparrow}
Figure 17. The partitions of 𝔻A\mathbb{D}_{A}, 𝔻B\mathbb{D}_{B}, and 𝔻C\mathbb{D}_{C}. Here, Σ1~\widetilde{\Sigma_{1}} denotes the same contour Σ1\Sigma_{1} but with reverse orientation. Γ~\widetilde{\Gamma} is defined analogously.

4.2.2. The Collapsing Deformation

We collapse the jump contours of 𝑴(z)\boldsymbol{M}(z) according to Figure 18. We make the following specifications:

  • The jump contour that connects AA to BB coincides with Σ1\Sigma_{1}.

  • In 𝔻A\mathbb{D}_{A}, the jump contour where the jump is upper triangular is contained in τA1((0,))\tau_{A}^{-1}((0,\infty)).

  • In 𝔻A\mathbb{D}_{A}, the jump contour where the jump is lower triangular is contained in τB1(ρe2πi/3)\tau_{B}^{-1}(\rho e^{2\pi i/3}) for ρ>0\rho>0.

  • In 𝔻B\mathbb{D}_{B}, the jump contour where the jump is upper triangular is contained in τB1((0,))\tau_{B}^{-1}((0,\infty)) for ρ>0\rho>0.

  • In 𝔻B\mathbb{D}_{B}, the jump contour that connects BB to CC is contained in τB1(ρe3πi/2)\tau_{B}^{-1}(\rho e^{3\pi i/2}) for ρ>0\rho>0.

  • The jump contour that connects CC to DD coincides with Σ2\Sigma_{2}.

  • In 𝔻C\mathbb{D}_{C}, the jump contour that connects BB to CC is contained in τC1(ρe2πi/3)\tau_{C}^{-1}(\rho e^{2\pi i/3}) for ρ>0\rho>0.

  • In 𝔻D\mathbb{D}_{D}, the jump contour that emanates from DD and goes to \infty is contained τD1((0,))\tau_{D}^{-1}((0,\infty)).

  • For all other jumps contours, we only require that they avoid the zero-level set of Re(2H+Λ)\Real(2H+\Lambda) and do not self-intersect.

Let 𝑵(z)\boldsymbol{N}(z) denote the solution of the Riemann-Hilbert problem obtained from the collapsing deformation. More precisely:

Riemann-Hilbert Problem 8: For each kk\in\mathbb{N}, find 𝑵(z,x,k)𝑵(z)\boldsymbol{N}(z;x,k)\equiv\boldsymbol{N}(z) so that

  1. (1)

    Analyticity: 𝑵(z)\boldsymbol{N}(z) is analytic in zz except along the jump contours shown in Figure 18.

  2. (2)

    Jump Condition: 𝑵(z)\boldsymbol{N}(z) can be continuously extended to the boundary and the boundary values taken by 𝑵(z)\boldsymbol{N}(z) are related by the jump condition 𝑵+(z)=𝑵(z)𝑽(𝑵)(z)\boldsymbol{N}_{+}(z)=\boldsymbol{N}_{-}(z)\boldsymbol{V}^{(\boldsymbol{N})}(z) as shown in Figure 18.

    AABBCCDD𝑳k1(iθ)\boldsymbol{L}_{k}^{-1}(i\theta)𝑼k(iθ)\boldsymbol{U}_{k}(-i\theta)[0eikθeikθ1]\begin{bmatrix}0&-e^{-ik\theta}\\ e^{ik\theta}&1\end{bmatrix}𝑼k1(iθ)\boldsymbol{U}_{k}^{-1}(-i\theta)𝑳k(iθ)\boldsymbol{L}_{k}(i\theta)Σ1{\color[rgb]{0,0,1}\Sigma_{1}}Σ2{\color[rgb]{0,0,1}\Sigma_{2}}
    Figure 18. The jumps of 𝑵(z)\boldsymbol{N}(z) in the pole case.
  3. (3)

    Normalization: As zz\to\infty, the matrix 𝑵(z)zkσ3=𝕀+𝒪(1/z)\boldsymbol{N}(z)z^{-k\sigma_{3}}=\mathbb{I}+\mathcal{O}\left(1/z\right).

Refer to caption
Figure 19. The sign chart for Re(2H+Λ)\Real(2H+\Lambda) when x=3/210ix=-3/2-10i. The dashed blue-and-orange lines indicate that a zero-level line is also a cut of Re(2H+Λ)\Real(2H+\Lambda).

4.2.3. Opening Lenses

We now open lenses on Σ1\Sigma_{1} and Σ2\Sigma_{2} guided by the sign chart for Re(2H+Λ)\Real\left(2H+\Lambda\right) (see Figure 19).

On Σ1\Sigma_{1}, we use the same factorization we used in the pole-free analysis; see (50). The jump matrix on Σ2\Sigma_{2} has the factorization

(95) [10eikθ1]=[1eikθ01][0eikθeikθ0][1eikθ01].\begin{bmatrix}1&0\\ e^{ik\theta}&1\end{bmatrix}=\begin{bmatrix}1&e^{-ik\theta}\\ 0&1\end{bmatrix}\begin{bmatrix}0&-e^{-ik\theta}\\ e^{ik\theta}&0\end{bmatrix}\begin{bmatrix}1&e^{-ik\theta}\\ 0&1\end{bmatrix}.

We open three lenses according to Figure 20. We make the following specifications:

  • In 𝔻A\mathbb{D}_{A}, the boundary of the lens that is on the right side of Σ1\Sigma_{1} is contained in τA1(ρe2πi/3)\tau^{-1}_{A}(\rho e^{2\pi i/3}) for ρ>0\rho>0.

  • In 𝔻B\mathbb{D}_{B}, the boundary of the lens that is on the right side of Σ1\Sigma_{1} is contained in τB1(ρe2πi/3)\tau_{B}^{-1}(\rho e^{-2\pi i/3}) for ρ>0\rho>0.

  • In 𝔻C\mathbb{D}_{C}, the boundary of the lens that is on the right side of Σ2\Sigma_{2} is contained in τC1(ρe2πi/3)\tau_{C}^{-1}(\rho e^{-2\pi i/3}) for ρ>0\rho>0.

  • In 𝔻C\mathbb{D}_{C}, the boundary of the lens that is on the left side of Σ2\Sigma_{2} is contained in τC1((0,))\tau_{C}^{-1}((0,\infty)).

  • In 𝔻D\mathbb{D}_{D}, the boundary of the lens that is on the right side of Σ2\Sigma_{2} is contained in τD1(ρe2πi/3)\tau_{D}^{-1}(\rho e^{-2\pi i/3}) for ρ>0\rho>0.

  • In 𝔻D\mathbb{D}_{D}, the boundary of the lens that is on the left side of Σ2\Sigma_{2} is contained in τD1(ρe2πi/3)\tau_{D}^{-1}(\rho e^{2\pi i/3}) for ρ>0\rho>0.

Let 𝑶(z)\boldsymbol{O}(z) denote the solution of the Riemann-Hilbert problem obtained from the opening lenses deformation. Specifically:

Riemann-Hilbert Problem 9: Determine the 2×22\times 2 matrix 𝑶(z,x,k)𝑶(z)\boldsymbol{O}(z;x,k)\equiv\boldsymbol{O}(z) with the following properties:

  1. (1)

    Analyticity: 𝑶(z)\boldsymbol{O}(z) is analytic in zz except on the jump contours shown in Figure 20.

  2. (2)

    Jump Condition: The boundary values taken by 𝑶(z)\boldsymbol{O}(z) are related by the jump condition 𝑶+(z)=𝑶(z)𝑽(𝑶)(z)\boldsymbol{O}_{+}(z)=\boldsymbol{O}_{-}(z)\boldsymbol{V}^{(\boldsymbol{O})}(z) as shown in Figure 20.

    AABBCCDD𝑳k1(iθ)\boldsymbol{L}_{k}^{-1}(i\theta)𝑼k(iθ)\boldsymbol{U}_{k}(-i\theta)𝑳k1(iθ)\boldsymbol{L}_{k}^{-1}(i\theta)𝑻(eikθ)\boldsymbol{T}(e^{ik\theta})Σ1{\color[rgb]{0,0,1}\Sigma_{1}}𝑼k1(iθ)\boldsymbol{U}_{k}^{-1}(-i\theta)𝑳k(iθ)\boldsymbol{L}_{k}(i\theta)𝑳k(iθ)\boldsymbol{L}_{k}(i\theta)Σ2{\color[rgb]{0,0,1}\Sigma_{2}}𝑻(ikθ)\boldsymbol{T}(ik\theta)𝑼k(iθ)\boldsymbol{U}_{k}(-i\theta)𝑼k(iθ)\boldsymbol{U}_{k}(-i\theta)
    Figure 20. The jumps of 𝑶(z)\boldsymbol{O}(z) in the pole case.
  3. (3)

    Normalization: As zz\to\infty, the matrix 𝑶(z)zkσ3=𝕀+𝒪(1/z)\boldsymbol{O}(z)z^{-k\sigma_{3}}=\mathbb{I}+\mathcal{O}\left(1/z\right).

.

4.3. Applying the G-function.

Analogously to the pole-free case, we apply the GG-function defined in Section 4.1 (see (83)) to the function 𝑶(z)\boldsymbol{O}(z). We consider

(96) 𝑷(z,x,k)𝑷(z):=ekΛ2σ3𝑶(z)ekG(z)σ3ekΛ2σ3.\boldsymbol{P}(z;x,k)\equiv\boldsymbol{P}(z):=e^{-\frac{k\Lambda}{2}\sigma_{3}}\boldsymbol{O}(z)e^{-kG(z)\sigma_{3}}e^{\frac{k\Lambda}{2}\sigma_{3}}.

Then, 𝑷(z)\boldsymbol{P}(z) is analytic where both 𝑶(z)\boldsymbol{O}(z) and eG(z)e^{G(z)} are (that is, for z(Σ1ΓΣ2)z\in\mathbb{C}\setminus(\Sigma_{1}\cup\Gamma\cup\Sigma_{2})). Hence, we have introduced a jump on Γ\Gamma. In particular, 𝑽Γ(𝑷)=ekiωσ3\boldsymbol{V}^{(\boldsymbol{P})}_{\Gamma}=e^{-ki\omega\sigma_{3}}, where ω\omega was introduced in (86). For compensation, both the normalization and jump conditions for 𝑷(z)\boldsymbol{P}(z) are now simplified. Indeed, for large zz, 𝑷(z)\boldsymbol{P}(z) converges to 𝕀\mathbb{I} instead of zkσ3z^{k\sigma_{3}}.

The jump recipe (52) is valid after replacing the lowercase symbols ‘gg’ and ‘λ\lambda’ with their corresponding uppercase counterparts. From this, we glean that the nontrivial exponential entry of the triangular jump matrices is transformed by the rule e±ikθe±k(2H+Λ)e^{\pm ik\theta}\Rightarrow e^{\pm k(2H+\Lambda)}. Further, the sign chart of Re(2H+Λ)\Real(2H+\Lambda) implies that all of the triangular jump matrices for 𝑷(z)\boldsymbol{P}(z) decay to the identity as kk\to\infty. Moreover, the twist jump matrices on Σ1\Sigma_{1} and Σ2\Sigma_{2} become constant. Using the jump recipe, (85), and (87), we find

(97) 𝑽Σ1(𝑷)=[0110] and 𝑽Σ2(𝑷)=[0ekiΩekiΩ0].\boldsymbol{V}^{(\boldsymbol{P})}_{\Sigma_{1}}=\begin{bmatrix}0&-1\\ 1&0\end{bmatrix}\hskip 37.84221pt\text{ and }\hskip 37.84221pt\boldsymbol{V}^{(\boldsymbol{P})}_{\Sigma_{2}}=\begin{bmatrix}0&-e^{ki\Omega}\\ e^{-ki\Omega}&0\end{bmatrix}.

Therefore the Riemann-Hilbert problem 𝑷(z)\boldsymbol{P}(z) solves is:

Riemann-Hilbert Problem 10: Determine the 2×22\times 2 matrix 𝑷(z,x,k)𝑷(z)\boldsymbol{P}(z;x,k)\equiv\boldsymbol{P}(z) with the following properties:

  1. (1)

    Analyticity: 𝑷(z)\boldsymbol{P}(z) is analytic in zz except on the jump contours shown in Figure 21.

  2. (2)

    Jump Condition: The boundary values taken by 𝑷(z)\boldsymbol{P}(z) are related by the jump condition 𝑷+(z)=𝑷(z)𝑽(𝑷)(z)\boldsymbol{P}_{+}(z)=\boldsymbol{P}_{-}(z)\boldsymbol{V}^{(\boldsymbol{P})}(z) as shown in Figure 21.

    AABBCCDD𝑳k1\boldsymbol{L}_{k}^{-1}𝑼k\boldsymbol{U}_{k}𝑳k1\boldsymbol{L}^{-1}_{k}𝑻(1)\boldsymbol{T}(1)Σ1{\color[rgb]{0,0,1}\Sigma_{1}}𝑼k1\boldsymbol{U}_{k}^{-1}𝑳k\boldsymbol{L}_{k}𝑳k\boldsymbol{L}_{k}Σ2{\color[rgb]{0,0,1}\Sigma_{2}}𝑻(eikΩ)\boldsymbol{T}(e^{-ik\Omega})𝑼k\boldsymbol{U}_{k}𝑼k\boldsymbol{U}_{k}Γ{\color[rgb]{0,0,1}\Gamma}eikωσ3e^{-ik\omega\sigma_{3}}
    Figure 21. The jumps of 𝑷(z)\boldsymbol{P}(z) for xx in the pole region. Here, if the jump matrix is upper triangular then its exponent is (2H+Λ)-(2H+\Lambda), while if the jump matrix is lower triangular then its exponent is 2H+Λ2H+\Lambda.
  3. (3)

    Normalization: As zz\to\infty, the matrix 𝑷(z)=𝕀+𝒪(1/z)\boldsymbol{P}(z)=\mathbb{I}+\mathcal{O}\left(1/z\right).

4.4. Constructing the Outer Parametrix

In this section we explicitly construct the outer parametrix for the pole region. See [2] for a similar construction. We start by introducing the Riemann-Hilbert problem corresponding to the outer parametrix. Next, we deform the Riemann-Hilbert problem so that both of its jumps on Σ1\Sigma_{1} and Σ2\Sigma_{2} are the twist matrix 𝑻(1)\boldsymbol{T}(1). Then, we recall and implement the necessary machinery (the Abel map, the Riemann Θ\Theta-function, and holomorphic differentials) in order to construct a 2×22\times 2 matrix-valued function whose jumps on Σ1Σ2\Sigma_{1}\cup\Sigma_{2} ultimately amounts to switching the columns. Finally, we use algebraic functions to complete our construction of the outer parametrix.

4.4.1. The Riemann-Hilbert Problem for the Outer Parametrix

Disregarding the jumps of 𝑷(z)\boldsymbol{P}(z) that decay to the identity matrix we obtain the following Riemann-Hilbert problem:

Riemann-Hilbert Problem 11: For each kk\in\mathbb{N}, find the 2×22\times 2 matrix-valued function 𝑷˙(out)(z,x,k)𝑷˙(out)(z)\dot{\boldsymbol{P}}^{\text{(out)}}(z;x,k)\equiv\dot{\boldsymbol{P}}^{\text{(out)}}(z) that satisfies the following properties:

  1. (1)

    Analyticity: 𝑷˙(out)(z)\dot{\boldsymbol{P}}^{\text{(out)}}(z) is analytic in the complex zz-plane except on Σ1ΓΣ2\Sigma_{1}\cup\Gamma\cup\Sigma_{2}.

  2. (2)

    Jump Condition: The jumps of 𝑷˙(out)(z)\dot{\boldsymbol{P}}^{\text{(out)}}(z) are topologically equivalent to those shown in Figure 22.

    [0110]\begin{bmatrix}0&-1\\ 1&0\end{bmatrix}BB[eikω00eikω]\begin{bmatrix}e^{-ik\omega}&0\\ 0&e^{ik\omega}\end{bmatrix}CC[0eikΩeikΩ0]\begin{bmatrix}0&-e^{ik\Omega}\\ e^{-ik\Omega}&0\end{bmatrix}AADD
    Figure 22. A topologically equivalent version of the jump contours for 𝑷˙(out)(z)\dot{\boldsymbol{P}}^{\text{(out)}}(z). Here, ω,Ω\omega,\Omega\in\mathbb{R}, and Σ1\Sigma_{1} corresponds to the line segment ABAB, Γ\Gamma corresponds to the line segment BCBC, and Σ2\Sigma_{2} corresponds to the line segment CDCD.
  3. (3)

    Normalization: As zz\to\infty, 𝑷˙(out)(z)=𝕀+𝒪(1/z)\dot{\boldsymbol{P}}^{\text{(out)}}(z)=\mathbb{I}+\mathcal{O}(1/z).

Our next step is to move the dependence on ω\omega and Ω\Omega from the jump matrices to the normalization condition. We consider

(98) F(z;x)F(z):=R(z)2πi(ΓiωR(w)(wz)dwΣ2iΩR+(w)(wz)dw).F(z;x)\equiv F(z):=\frac{R(z)}{2\pi i}\left(-\int\limits_{\Gamma}\frac{i\omega}{R(w)(w-z)}\text{d}w-\int\limits_{\Sigma_{2}}\frac{i\Omega}{R_{+}(w)(w-z)}\text{d}w\right).

Notice FF satisfies the following jumps:

  • For zΣ1z\in\Sigma_{1}, F+(z)+F(z)=0F_{+}(z)+F_{-}(z)=0.

  • For zΓz\in\Gamma, F+(z)F(z)=iωF_{+}(z)-F_{-}(z)=-i\omega.

  • For zΣ2z\in\Sigma_{2}, F+(z)+F(z)=iΩF_{+}(z)+F_{-}(z)=-i\Omega.

Also, as zz\to\infty, F(z)=F1z+F0+𝒪(1/z)F(z)=F_{1}z+F_{0}+\mathcal{O}(1/z), where

(99) F1:=12πi(ΓiωR(w)dw+Σ2iΩR+(w)dw)F_{1}:=\frac{1}{2\pi i}\left(\int\limits_{\Gamma}\frac{i\omega}{R(w)}\text{d}w+\int\limits_{\Sigma_{2}}\frac{i\Omega}{R_{+}(w)}\text{d}w\right)

and

(100) F0:=12πi(ΓiωwR(w)dw+Σ2iΩwR+(w)dw).F_{0}:=\frac{1}{2\pi i}\left(\int\limits_{\Gamma}\frac{i\omega w}{R(w)}\text{d}w+\int\limits_{\Sigma_{2}}\frac{i\Omega w}{R_{+}(w)}\text{d}w\right).

Set

(101) 𝑸˙(z,x,k)𝑸˙(z):=ekF0σ3𝑷˙(out)(z)ekF(z)σ3.\dot{\boldsymbol{Q}}(z;x,k)\equiv\dot{\boldsymbol{Q}}(z):=e^{kF_{0}\sigma_{3}}\dot{\boldsymbol{P}}^{\text{(out)}}(z)e^{-kF(z)\sigma_{3}}.

Then 𝑸˙\dot{\boldsymbol{Q}} solves the following Riemann-Hilbert problem:

Riemann-Hilbert Problem 12: For each kk\in\mathbb{N}, find the 2×22\times 2 matrix-valued function 𝑸˙(z,x,k)𝑸˙(z)\dot{\boldsymbol{Q}}(z;x,k)\equiv\dot{\boldsymbol{Q}}(z) that satisfies the following properties:

  1. (1)

    Analyticity: 𝑸˙(z)\dot{\boldsymbol{Q}}(z) is analytic in the complex zz-plane except on Σ1Σ2\Sigma_{1}\cup\Sigma_{2}.

  2. (2)

    Jump Condition: The boundary values taken by 𝑸˙\dot{\boldsymbol{Q}} on Σ1Σ2\Sigma_{1}\cup\Sigma_{2} are related by the jump condition 𝑸˙+=𝑸˙[0110]\dot{\boldsymbol{Q}}_{+}=\dot{\boldsymbol{Q}}_{-}\begin{bmatrix}0&-1\\ 1&0\end{bmatrix}.

  3. (3)

    Normalization: As zz\to\infty,

    (102) 𝑸˙(z)ekF1zσ3=𝕀+𝑸˙1z+𝑸˙2z2+𝒪(1/z3).\dot{\boldsymbol{Q}}(z)e^{kF_{1}z\sigma_{3}}=\mathbb{I}+\frac{\dot{\boldsymbol{Q}}_{-1}}{z}+\frac{\dot{\boldsymbol{Q}}_{-2}}{z^{2}}+\mathcal{O}(1/z^{3}).

Notice we eliminated the jump on Γ\Gamma.

4.4.2. The Baker-Akhiezer Map

Recall the scalar function R(z)R(z) is cut on Σ1Σ2\Sigma_{1}\cup\Sigma_{2}. We consider 𝕋\mathbb{T}, the genus-one Riemann surface defined by R(z)R(z). For our purposes it is convenient to view 𝕋\mathbb{T} as two copies of the complex zz-plane cut on Σ1Σ2\Sigma_{1}\cup\Sigma_{2}. Given a complex point zz, we relate the two copies or sheets by the identity R(z+)=R(z)R\left(z^{+}\right)=-R\left(z^{-}\right). We say z+z^{+} lives on the plus sheet of 𝕋\mathbb{T}, while zz^{-} lives on the minus sheet of 𝕋\mathbb{T}. In our discussion unless otherwise specified we assume the inputs of 𝒜()\mathcal{A}(\cdot) are on the plus sheet. We now introduce a basis of homology cycles {𝔞,𝔟}\{\mathfrak{a},\mathfrak{b}\} on 𝕋\mathbb{T} as shown in Figure 23. Here integration on the second sheet is accomplished by replacing R(z)R(z) by R(z)-R(z).

BBAACCDD𝔞\mathfrak{a}𝔟\mathfrak{b}
Figure 23. The homology basis {𝔞,𝔟}\left\{\mathfrak{a},\mathfrak{b}\right\} of 𝕋\mathbb{T}. Thick solid curves lie on the plus sheet while the dotted curve lies on the minus sheet.

As {𝔞,𝔟}\{\mathfrak{a},\mathfrak{b}\} is a homology basis, we see that any map defined via path integration on this genus-one surface will be well-defined modulo the periods defined by integrating along 𝔞\mathfrak{a} and 𝔟\mathfrak{b}. In particular, in order for the Abel map,

(103) 𝒜(z,x)𝒜(z):=2πi𝔞dwR(w)AzdwR(w),\mathcal{A}(z;x)\equiv\mathcal{A}(z):=\frac{2\pi i}{\ointctrclockwise_{\mathfrak{a}}\frac{\text{d}w}{R(w)}}\int_{A}^{z}\frac{\text{d}w}{R(w)},

to be well defined we mod out the value obtained from integrating along 𝔞\mathfrak{a},

(104) 2πi𝔞dwR(w)𝔞dwR(w)=2πi,\frac{2\pi i}{\ointctrclockwise_{\mathfrak{a}}\frac{\text{d}w}{R(w)}}\ointctrclockwise_{\mathfrak{a}}\frac{\text{d}w}{R(w)}=2\pi i,

and the value obtained from integrating along 𝔟\mathfrak{b},

(105) (x):=2πi𝔞dwR(w)𝔟dwR(w).\mathcal{B}(x)\equiv\mathcal{B}:=\frac{2\pi i}{\ointctrclockwise_{\mathfrak{a}}\frac{\text{d}w}{R(w)}}\ointclockwise_{\mathfrak{b}}\frac{\text{d}w}{R(w)}.

We now list the basic properties of 𝒜(z)\mathcal{A}(z).

Proposition 4.2.

Given the lattice :={j12πi+j2:j1,j2}\mathcal{L}:=\left\{j_{1}2\pi i+j_{2}\mathcal{B}:j_{1},j_{2}\in\mathbb{Z}\right\}, the boundary values taken by the Abel map, 𝒜(z)\mathcal{A}(z), on the cuts on the plus sheet are related by the jump conditions

(106) 𝒜+(z+)𝒜(z+)=0modfor z+Σ1,\mathcal{A}_{+}\left(z^{+}\right)-\mathcal{A}_{-}\left(z^{+}\right)=0\mod\mathcal{L}\hskip 28.45274pt\text{for }z^{+}\in\Sigma_{1},
(107) 𝒜+(z+)𝒜(z+)=2πimodfor z+Γ,\mathcal{A}_{+}\left(z^{+}\right)-\mathcal{A}_{-}\left(z^{+}\right)=-2\pi i\mod\mathcal{L}\hskip 28.45274pt\text{for }z^{+}\in\Gamma,

and

(108) 𝒜+(z+)𝒜(z+)=modfor z+Σ2.\mathcal{A}_{+}\left(z^{+}\right)-\mathcal{A}_{-}\left(z^{+}\right)=-\mathcal{B}\mod\mathcal{L}\hskip 28.45274pt\text{for }z^{+}\in\Sigma_{2}.

Also, as zz\to\infty on the plus sheet,

(109) 𝒜(z)=𝒜()+𝒜1z+𝒪(1/z2),where 𝒜1(x)𝒜1:=2πi𝔞dwR(w).\mathcal{A}(z)=\mathcal{A}(\infty)+\frac{\mathcal{A}_{-1}}{z}+\mathcal{O}\left(1/z^{2}\right),\hskip 28.45274pt\text{where }\mathcal{A}_{-1}(x)\equiv\mathcal{A}_{-1}:=-\frac{2\pi i}{\oint_{\mathfrak{a}}\frac{\text{d}w}{R(w)}}.

Next, we use 𝒜(z)\mathcal{A}(z) to construct a function (the Baker-Akhiezer function), defined on 𝕋\mathbb{T}, that is path independent without modding. To do this, we employ Riemann Θ\Theta-functions. Recall, given MM\in\mathbb{C}, with Re(M)<0\Real(M)<0, then for each zz\in\mathbb{C},

(110) Θ(z,M)Θ(z):=kexp(kz+12Mk2).\Theta(z;M)\equiv\Theta(z):=\sum\limits_{k\in\mathbb{Z}}\exp\left(kz+\frac{1}{2}Mk^{2}\right).

It is well known (see [18]) that Θ(z,M)\Theta(z;M) satisfies the following properties:

  • Periodicity: Θ(z+2πi)=Θ(z)\Theta(z+2\pi i)=\Theta(z).

  • Quasiperiodicity: Θ(z+M,M)=eM2ezΘ(z,M)\Theta(z+M;M)=e^{-\frac{M}{2}}e^{-z}\Theta(z;M). More generally, for nn\in\mathbb{Z} Θ(z+nM;M)=eMn2/2enzΘ(z;M)\Theta(z+nM;M)=e^{-Mn^{2}/2}e^{-nz}\Theta(z;M).

  • Evenness: Θ(z)=Θ(z)\Theta(-z)=\Theta(z).

  • All of the zeros of Θ\Theta are simple, and Θ(z0)=0\Theta(z_{0})=0 if and only if there exist integers j1,j2j_{1},j_{2} such that

    (111) z0=(πi+M/2)+j12πi+j2M.z_{0}=\left(\pi i+M/2\right)+j_{1}2\pi i+j_{2}M.

We see that the Θ\Theta-function gives us a handle on our goal of constructing a well-defined function on 𝕋\mathbb{T} from 𝒜(z)\mathcal{A}(z). Naturally, we consider Θ(z,)\Theta(z;\mathcal{B}). Notice by using the 2πi2\pi i-periodicity of the Θ\Theta-function, Θ(𝒜(z))\Theta\left(\mathcal{A}(z)\right) is independent of the number of 𝔞\mathfrak{a}-cycles used in the path that connects AA to zz (or any cycle in the same homology class as 𝔞\mathfrak{a}). We now develop the machinery that allows us to use the \mathcal{B}-quasiperiodicity of Θ\Theta to construct a function that is also independent of the number of 𝔟\mathfrak{b}-cycles used in the path that connects AA to zz. We start with the observation that the \mathcal{B}-quasiperiodicity of Θ\Theta allows us to construct a function whose 𝔟\mathfrak{b}-cycle dependence is multiplicative, not additive. Indeed, for complex constants C1,C2C_{1},C_{2}\in\mathbb{C} and nn\in\mathbb{Z}, notice

(112) Θ(𝒜(z)+C1+C2+n)Θ(𝒜(z)+C1+n)=Θ(𝒜(z)+C1+C2)Θ(𝒜(z)+C1)enC2.\displaystyle\begin{split}\frac{\Theta\left(\mathcal{A}(z)+C_{1}+C_{2}+n\mathcal{B}\right)}{\Theta\left(\mathcal{A}(z)+C_{1}+n\mathcal{B}\right)}&=\frac{\Theta\left(\mathcal{A}(z)+C_{1}+C_{2}\right)}{\Theta\left(\mathcal{A}(z)+C_{1}\right)}e^{-nC_{2}}.\end{split}

We see that the above quotient “counts” (in the negative direction in the exponent with weight C2C_{2}) the number of 𝔟\mathfrak{b}-cycles used to connect AA to zz. So, if we multiply it with a function that “counts” in the positive direction, then the product will be independent of the number of 𝔟\mathfrak{b}-cycles.

We define the differentials

(113) Φ:=2πi𝔞dwR(w)dwR(w),Υ0:=w2R(w)dw, and Υ:=Υ0(12πi𝔞Υ0)Φ.\Phi:=\frac{2\pi i}{\ointctrclockwise_{\mathfrak{a}}\frac{\text{d}w}{R(w)}}\frac{\text{d}w}{R(w)},\hskip 18.77892pt\Upsilon_{0}:=\frac{w^{2}}{R(w)}\text{d}w,\hskip 18.77892pt\text{ and }\hskip 18.77892pt\Upsilon:=\Upsilon_{0}-\left(\frac{1}{2\pi i}\ointctrclockwise_{\mathfrak{a}}\Upsilon_{0}\right)\Phi.

Notice that Υ\Upsilon vanishes when it is integrated against an 𝔞\mathfrak{a}-cycle. We set the constant

(114) U(x)U:=𝔟Υ.U(x)\equiv U:=\ointclockwise_{\mathfrak{b}}\Upsilon.

We now list some of the basic properties of the differential Υ\Upsilon.

Proposition 4.3.

The boundary values taken by the map

(115) zAzΥz\mapsto\int_{A}^{z}\Upsilon

on Σ1Σ2\Sigma_{1}\cup\Sigma_{2} in the plus-sheet are related by the jump conditions

(116) (Az+Υ)++(Az+Υ)=0modUfor z+Σ1\left(\int_{A}^{z^{+}}\Upsilon\right)_{+}+\left(\int_{A}^{z^{+}}\Upsilon\right)_{-}=0\mod U\mathbb{Z}\hskip 28.45274pt\text{for }z^{+}\in\Sigma_{1}

and

(117) (Az+Υ)++(Az+Υ)=UmodUfor z+Σ2.\left(\int_{A}^{z^{+}}\Upsilon\right)_{+}+\left(\int_{A}^{z^{+}}\Upsilon\right)_{-}=-U\mod U\mathbb{Z}\hskip 28.45274pt\text{for }z^{+}\in\Sigma_{2}.

Also, for some constants Υ0,Υ1\Upsilon_{0},\Upsilon_{-1}\in\mathbb{C}, as zz\to\infty

(118) zAzΥ=Υ0+Υ1z+𝒪(1/z2).z-\int_{A}^{z}\Upsilon=\Upsilon_{0}+\frac{\Upsilon_{-1}}{z}+\mathcal{O}\left(1/z^{2}\right).

Let PP be a path that connects AA to zz using exactly nn 𝔟\mathfrak{b}-cycles, for some nn\in\mathbb{Z}. Notice

(119) exp(kF1PΥ)=exp(kF1n𝔟Υ)exp(kF1AzΥ)=exp(nkF1U)exp(kF1AzΥ).\displaystyle\begin{split}\exp\left(kF_{1}\int_{P}\Upsilon\right)&=\exp\left(kF_{1}n\ointclockwise_{\mathfrak{b}}\Upsilon\right)\exp\left(kF_{1}\int_{A}^{z}\Upsilon\right)\\ &=\exp(nkF_{1}U)\exp\left(kF_{1}\int_{A}^{z}\Upsilon\right).\end{split}

Looking at (112) and (119), we see that if we choose C2=kF1UC_{2}=kF_{1}U and if the paths in the Abel map and the differential are consistent, then their product is path independent on 𝕋\mathbb{T}.

We also need to specify the constant C1C_{1}. As we are trying to solve a Riemann-Hilbert problem with no poles, we need to control where the denominator of (112) vanishes. Thus, we set

(120) 𝒦(x)𝒦:=iπ+2\mathcal{K}(x)\equiv\mathcal{K}:=i\pi+\frac{\mathcal{B}}{2}

to be the Riemann constant and

(121) C1:=𝒜(Q)𝒦,C_{1}:=-\mathcal{A}(Q)-\mathcal{K},

where QQ\in\mathbb{C} is specified in (128). Now, the Baker-Akhiezer function is given as

(122) q(z;x,k)q(z):=Θ(𝒜(z)𝒜(Q)𝒦kF1U)Θ(𝒜(z)𝒜(Q)𝒦)ekF1AzΥ.q(z;x,k)\equiv q(z):=\frac{\Theta\left(\mathcal{A}(z)-\mathcal{A}(Q)-\mathcal{K}-kF_{1}U\right)}{\Theta\left(\mathcal{A}(z)-\mathcal{A}(Q)-\mathcal{K}\right)}e^{-kF_{1}\int_{A}^{z}\Upsilon}.

Notice qq has a simple pole at z=Qz=Q.

4.4.3. The Solution to the Model Riemann-Hilbert Problem

We start with the observation that by permuting the signs of C1C_{1} and F1UF_{1}U in q(z)q(z) we can construct a matrix-valued function that is analytic in (Σ1Σ2)\mathbb{C}\setminus(\Sigma_{1}\cup\Sigma_{2}) with a simple jump discontinuity. Define

(123) 𝑹˙(z,x,k)𝑹˙(z):=[Θ(𝒜(z)+𝒜(Q)+𝒦kF1U)Θ(𝒜(z)+𝒜(Q)+𝒦)ekF1AzΥΘ(𝒜(z)𝒜(Q)𝒦+kF1U)Θ(𝒜(z)𝒜(Q)𝒦)ekF1AzΥΘ(𝒜(z)𝒜(Q)𝒦kF1U)Θ(𝒜(z)𝒜(Q)𝒦)ekF1AzΥΘ(𝒜(z)+𝒜(Q)+𝒦+kF1U)Θ(𝒜(z)+𝒜(Q)+𝒦)ekF1AzΥ].\dot{\boldsymbol{R}}(z;x,k)\equiv\dot{\boldsymbol{R}}(z):=\\ \begin{bmatrix}\displaystyle\frac{\Theta(\mathcal{A}(z)+\mathcal{A}(Q)+\mathcal{K}-kF_{1}U)}{\Theta(\mathcal{A}(z)+\mathcal{A}(Q)+\mathcal{K})}e^{-kF_{1}\int_{A}^{z}\Upsilon}&\displaystyle\frac{\Theta(\mathcal{A}(z)-\mathcal{A}(Q)-\mathcal{K}+kF_{1}U)}{\Theta(\mathcal{A}(z)-\mathcal{A}(Q)-\mathcal{K})}e^{kF_{1}\int_{A}^{z}\Upsilon}\\ \displaystyle\frac{\Theta(\mathcal{A}(z)-\mathcal{A}(Q)-\mathcal{K}-kF_{1}U)}{\Theta(\mathcal{A}(z)-\mathcal{A}(Q)-\mathcal{K})}e^{-kF_{1}\int_{A}^{z}\Upsilon}&\displaystyle\frac{\Theta(\mathcal{A}(z)+\mathcal{A}(Q)+\mathcal{K}+kF_{1}U)}{\Theta(\mathcal{A}(z)+\mathcal{A}(Q)+\mathcal{K})}e^{kF_{1}\int_{A}^{z}\Upsilon}\end{bmatrix}.

The jump conditions in Propositions 4.2 and 4.3 imply

(124) 𝑹˙+(z)=𝑹˙(z)[0110] for zΣ1Σ2.\dot{\boldsymbol{R}}_{+}(z)=\dot{\boldsymbol{R}}_{-}(z)\begin{bmatrix}0&1\\ 1&0\end{bmatrix}\hskip 28.45274pt\text{ for }z\in\Sigma_{1}\cup\Sigma_{2}.

We will construct 𝑸˙(z)\dot{\boldsymbol{Q}}(z) out of 𝑹˙(z)\dot{\boldsymbol{R}}(z). Our first step is to introduce a sign change into the jump of 𝑹˙\dot{\boldsymbol{R}}. In order to do so, we define

(125) γ(z):=((zA)(zC)(zB)(zD))1/4,\gamma(z):=\left(\frac{(z-A)(z-C)}{(z-B)(z-D)}\right)^{1/4},

where γ\gamma is cut on Σ1Σ2\Sigma_{1}\cup\Sigma_{2} and as zz\to\infty, γ(z)=1+𝒪(1/z)\gamma(z)=1+\mathcal{O}(1/z). We also define

(126) fD(z):=γ(z)+γ1(z)2 and fOD(z):=γ(z)γ1(z)2i.f^{\text{D}}(z):=\frac{\gamma(z)+\gamma^{-1}(z)}{2}\hskip 49.79231pt\text{ and }\hskip 49.79231ptf^{OD}(z):=\frac{\gamma(z)-\gamma^{-1}(z)}{2i}.

A direct calculation shows that γ+=γeiπ/2\gamma_{+}=\gamma_{-}e^{-i\pi/2} on Σ1Σ2\Sigma_{1}\cup\Sigma_{2}. Hence,

(127) f+D(z)=fOD(z)andf+OD(z)=fD(z) for zΣ1Σ2.f^{D}_{+}(z)=f^{OD}_{-}(z)\hskip 28.45274pt\text{and}\hskip 28.45274ptf^{OD}_{+}(z)=-f^{D}_{-}(z)\hskip 28.45274pt\text{ for }z\in\Sigma_{1}\cup\Sigma_{2}.

Also, a straightforward computation shows that

(128) Q(x)Q:=BDACB+DACQ(x)\equiv Q:=\frac{BD-AC}{B+D-A-C}

is the unique solution to the equation fD(z)fOD(z)=0f^{\text{D}}(z)f^{\text{OD}}(z)=0. Further, it is a simple zero and either fD(Q)=0f^{\text{D}}(Q)=0 or fOD(Q)=0f^{\text{OD}}(Q)=0. It has been shown in [3] that while the construction of the parametrix does depend on whether QQ is a zero of fDf^{\text{D}} or fODf^{\text{OD}}, the final answer (i.e. the formula we extract from 𝑷˙(out)(z)\dot{\boldsymbol{P}}^{\text{(out)}}(z); see (10)) is the same regardless of which function vanishes at QQ. Numerically, we see that fOD(Q)=0f^{\text{OD}}(Q)=0 for various xx-values in the pole region. Thus, we assume that QQ is the unique simple zero of fOD(z)f^{\text{OD}}(z), and we proceed accordingly.

We now modify 𝑹˙(z)\dot{\boldsymbol{R}}(z) by setting

(129) 𝑸˙(z,x,k)𝑸˙(z)=[C1100C22][fD(z)[𝑹˙(z)]11fOD(z)[𝑹˙(z)]12fOD(z)[𝑹˙(z)]21fD(z)[𝑹˙(z)]22],\dot{\boldsymbol{Q}}(z;x,k)\equiv\dot{\boldsymbol{Q}}(z)=\begin{bmatrix}C_{11}&0\\ 0&C_{22}\end{bmatrix}\begin{bmatrix}f^{\text{D}}(z)[\dot{\boldsymbol{R}}(z)]_{11}&f^{\text{OD}}(z)[\dot{\boldsymbol{R}}(z)]_{12}\\ -f^{\text{OD}}(z)[\dot{\boldsymbol{R}}(z)]_{21}&f^{\text{D}}(z)[\dot{\boldsymbol{R}}(z)]_{22}\end{bmatrix},

where C11C_{11} and C22C_{22} are normalizing constants specified in (130) and (131). Now, 𝑸˙(z)\dot{\boldsymbol{Q}}(z) satisfies the jump condition 𝑸˙+(z)=𝑸˙(z)𝑻(1)\dot{\boldsymbol{Q}}_{+}(z)=\dot{\boldsymbol{Q}}_{-}(z)\boldsymbol{T}(1) for zzΣ1Σ2z\in z\in\Sigma_{1}\cup\Sigma_{2}.

It is well known that the Abel map 𝒜(z)\mathcal{A}(z) with domain 𝕋\mathbb{T} is injective (see for example the discussion in Section 4.5.2 in [6]). Since 𝒜(Q)+𝒜(Q)=0\mathcal{A}(Q^{-})+\mathcal{A}(Q)=0 (here QQ is on the plus sheet and QQ^{-} is the equivalent point on the minus sheet), it follows that for each zz on the plus sheet, 𝒜(z)+𝒜(Q)0\mathcal{A}(z)+\mathcal{A}(Q)\neq 0, otherwise 𝒜(z)\mathcal{A}(z) would not be injective. Hence, the diagonal entries of 𝑹˙(z)\dot{\boldsymbol{R}}(z) are analytic in (Σ1Σ2)\mathbb{C}\setminus(\Sigma_{1}\cup\Sigma_{2}). Further, QQ was selected so that in the off-diagonal entries of 𝑹˙(z)\dot{\boldsymbol{R}}(z) the simple pole z=Qz=Q is canceled by the simple zero of fOD(z)f^{\text{OD}}(z). Therefore, the off-diagonal entries of 𝑸˙(z)\dot{\boldsymbol{Q}}(z) are analytic in (Σ1Σ2)\mathbb{C}\setminus(\Sigma_{1}\cup\Sigma_{2}).

Finally, to deduce the values of C11,C22C_{11},C_{22}, we notice as zz\to\infty, fD(z)=1+𝒪(1/z)f^{\text{D}}(z)=1+\mathcal{O}(1/z) and fOD(z)=𝒪(1/z)f^{\text{OD}}(z)=\mathcal{O}(1/z), thus we find the limits of [𝑹˙]11[\dot{\boldsymbol{R}}]_{11} and [𝑹˙]22[\dot{\boldsymbol{R}}]_{22} as zz\to\infty and take the reciprocal to find

(130) C11(x,k)C11:=Θ(𝒜()+𝒜(Q)+𝒦)Θ(𝒜()+𝒜(Q)+𝒦kF1U)ekF1Υ0C_{11}(x;k)\equiv C_{11}:=\frac{\Theta\left(\mathcal{A}(\infty)+\mathcal{A}(Q)+\mathcal{K}\right)}{\Theta\left(\mathcal{A}(\infty)+\mathcal{A}(Q)+\mathcal{K}-kF_{1}U\right)}e^{-kF_{1}\Upsilon_{0}}

and

(131) C22(x,k)C22:=Θ(𝒜()+𝒜(Q)+𝒦)Θ(𝒜()+𝒜(Q)+𝒦+kF1U)ekF1Υ0.C_{22}(x;k)\equiv C_{22}:=\frac{\Theta\left(\mathcal{A}(\infty)+\mathcal{A}(Q)+\mathcal{K}\right)}{\Theta\left(\mathcal{A}(\infty)+\mathcal{A}(Q)+\mathcal{K}+kF_{1}U\right)}e^{kF_{1}\Upsilon_{0}}.

Here, C11C_{11} and C22C_{22} are not guaranteed to exist. Indeed, their denominators can vanish. In other words, C11C_{11} and C22C_{22} do not exist if and only if

(132) 𝒜()+𝒜(Q)+𝒦=±kF1Umod{𝒦+j12πi+j2:j1,j2}.\mathcal{A}(\infty)+\mathcal{A}(Q)+\mathcal{K}=\pm kF_{-1}U\mod\left\{\mathcal{K}+j_{1}2\pi i+j_{2}\mathcal{B}:j_{1},j_{2}\in\mathbb{Z}\right\}.

When kk is large enough, if the latter equality holds for some xx in the pole region, then the left-hand side of (1.1) has a pole near k2/321/3x-k^{2/3}2^{1/3}x.

For each kk\in\mathbb{N}, let 𝒫k\mathscr{P}_{k} denote all of the solutions in the xx-plane of (132). Notice, 𝒫k\mathscr{P}_{k} is the set of exceptional points for which Riemann-Hilbert Problem 4.4.1 does not admit a solution. Now, let δ>0\delta>0 be a fixed small number. For each kk\in\mathbb{N} let

(133) 𝒮k:={x in the pole region :dist(x,𝒫k)>δk2/3}.\mathscr{S}_{k}:=\left\{x\text{ in the pole region }:\text{dist}(x,\mathscr{P}_{k})>\frac{\delta}{k^{2/3}}\right\}.

That is, 𝒮k\mathscr{S}_{k} is the result of excising a neighborhood of each exceptional point from the pole region.

We have completed the construction of 𝑸˙(z)\dot{\boldsymbol{Q}}(z), and thus 𝑷˙(out)(z)\dot{\boldsymbol{P}}^{\text{(out)}}(z) with the help of (101).

4.5. Constructing the Inner Parametrices

In this section, we construct the inner parametrices around the points AA, BB, CC, and DD. In particular, we go over in detail the construction of the local parametrix at z=Cz=C. For the other three we just give the resulting formulae. Our approach is modeled from the methodology presented in Section 7.6.2 in [8].

4.5.1. Local Parametrix at z=Cz=C

Our first step is to massage the jumps of 𝑷(z)\boldsymbol{P}(z) so that they match the jumps of 𝑨(k2/3τC(z))\boldsymbol{A}\left(k^{2/3}\tau_{C}(z)\right), where 𝑨()\boldsymbol{A}(\cdot) is the solution to Riemann-Hilbert Problem A. We give a systematic approach to do this.

  1. (1)

    Clear the zz-dependence. Multiply (on the right) by ek(H(z)+Λ/2)σ3e^{-k(H(z)+\Lambda/2)\sigma_{3}} to obtain the “core” jumps of 𝑷(z)\boldsymbol{P}(z).

  2. (2)

    Mold the core jumps into the shape of the Airy jump matrices. In this case, we move (by sectionally analytic substitutions) Σ2\Sigma_{2} onto Γ\Gamma. This deformation flips the triangularity of the jump matrix whose jump contour is contained in 𝔻C\mathbb{D}_{C}^{\downarrow}.

  3. (3)

    Insert τ\tau dependence. Multiply by ek2τC3/2σ3e^{\frac{k}{2}\tau_{C}^{3/2}\sigma_{3}}. Here, τC(z)3/2\tau_{C}(z)^{3/2} is cut on Γ~\widetilde{\Gamma} with (τC(z)3/2)+=(τC(z)3/2)\left(\tau_{C}(z)^{3/2}\right)_{+}=-\left(\tau_{C}(z)^{3/2}\right)_{-}.

In Figure 24 we track the jumps of 𝑷(z)\boldsymbol{P}(z) as we apply the above procedure. Following it yields

(134) 𝑸(C)(z,x,k)𝑸(C)(z):={𝑷(z)ek(H(z)+Λ/2)σ3ek2τC(z)3/2σ3,z𝔻C,𝑷(z)ek(H(z)+Λ/2)σ3𝑻(1)ek2τC(z)3/2σ3,z𝔻C.\boldsymbol{Q}^{(C)}(z;x,k)\equiv\boldsymbol{Q}^{(C)}(z):=\displaystyle\begin{cases}\boldsymbol{P}(z)e^{-k(H(z)+\Lambda/2)\sigma_{3}}e^{\frac{k}{2}\tau_{C}(z)^{3/2}\sigma_{3}},&z\in\mathbb{D}_{C}^{\uparrow},\\ \boldsymbol{P}(z)e^{-k(H(z)+\Lambda/2)\sigma_{3}}\boldsymbol{T}(1)e^{\frac{k}{2}\tau_{C}(z)^{3/2}\sigma_{3}},&z\in\mathbb{D}_{C}^{\downarrow}.\end{cases}
eikωσ3e^{ik\omega\sigma_{3}}𝑻(eikΩ)\boldsymbol{T}(e^{-ik\Omega})𝑼k(χ)\boldsymbol{U}_{k}(-\chi)𝑳k1(χ)\boldsymbol{L}_{k}^{-1}(\chi)𝑼k(χ)\boldsymbol{U}_{k}(-\chi)CCzz fill me up 𝑻(1)\boldsymbol{T}(1)𝑼0\boldsymbol{U}_{0}𝑳01\boldsymbol{L}_{0}^{-1}𝑼0\boldsymbol{U}_{0}CCzz(1)(1)
s s s
𝑻(1)\boldsymbol{T}(1)𝑳01\boldsymbol{L}_{0}^{-1}𝑳01\boldsymbol{L}_{0}^{-1}𝑼0\boldsymbol{U}_{0}CCzz(2)(2) fill me up 𝑼k(τC3/2)\boldsymbol{U}_{k}(-\tau_{C}^{3/2})𝑻(1)\boldsymbol{T}(1)𝑳k1(τC3/2)\boldsymbol{L}_{k}^{-1}(\tau_{C}^{3/2})𝑳k1(τC3/2)\boldsymbol{L}_{k}^{-1}(\tau_{C}^{3/2})00τC\tau_{C}(3)(3)
Figure 24. The top-left panel shows the jumps of 𝑷(z)\boldsymbol{P}(z) in 𝔻C\mathbb{D}_{C}, where χ:=Re(2H+Λ)\chi:=\Real(2H+\Lambda). The top-right panel shows the jumps of 𝑷(z)ek(H(z)+Λ/2)σ3\boldsymbol{P}(z)e^{-k(H(z)+\Lambda/2)\sigma_{3}}. The bottom-left panel shows the jumps of 𝑸(C)(z)ek2τC(z)3/2\boldsymbol{Q}^{(C)}(z)e^{-\frac{k}{2}\tau_{C}(z)^{3/2}}. The bottom-right panel shows the jumps of 𝑸(C)(z)\boldsymbol{Q}^{(C)}(z) in the τC\tau_{C}-plane.

Comparing the jumps of 𝑸(C)(z)\boldsymbol{Q}^{(C)}(z) to the jumps of 𝑨(k2/3τC(z))\boldsymbol{A}\left(k^{2/3}\tau_{C}(z)\right) (see Appendix A) we see that they agree. Notice, if we replace 𝑷(z)\boldsymbol{P}(z) with 𝑷˙(out)(z)\dot{\boldsymbol{P}}^{\text{(out)}}(z) in (134), then the resulting function will only have a jump of 𝑻(1)\boldsymbol{T}(1) on Γ~\widetilde{\Gamma}. Set

(135) 𝑯(C)(z):={𝑷˙(out)(z)ek(H(z)+Λ/2)σ3ek2τC(z)3/2σ3𝑽1τCσ3/4,z𝔻C,𝑷˙(out)(z)ek(H(z)+Λ/2)σ3𝑻(1)ek2τC(z)3/2σ3𝑽1τCσ3/4,z𝔻C,\boldsymbol{H}^{(C)}(z):=\displaystyle\begin{cases}\dot{\boldsymbol{P}}^{\text{(out)}}(z)e^{-k(H(z)+\Lambda/2)\sigma_{3}}e^{\frac{k}{2}\tau_{C}(z)^{3/2}\sigma_{3}}\boldsymbol{V}^{-1}\tau_{C}^{-\sigma_{3}/4},&z\in\mathbb{D}_{C}^{\uparrow},\\ \dot{\boldsymbol{P}}^{\text{(out)}}(z)e^{-k(H(z)+\Lambda/2)\sigma_{3}}\boldsymbol{T}(1)e^{\frac{k}{2}\tau_{C}(z)^{3/2}\sigma_{3}}\boldsymbol{V}^{-1}\tau_{C}^{-\sigma_{3}/4},&z\in\mathbb{D}_{C}^{\downarrow},\end{cases}

where 𝑽\boldsymbol{V} is defined in (184). Seeing as τC(z)σ3/4𝑽\tau_{C}(z)^{-\sigma_{3}/4}\boldsymbol{V} also has a jump of 𝑻(1)\boldsymbol{T}(1) on Γ~\widetilde{\Gamma} (because τC\tau_{C} maps Γ~\widetilde{\Gamma} to the negative real numbers and the 3/23/2-root function is principal), it follows that 𝑯(C)(z)\boldsymbol{H}^{(C)}(z) is continuous across Γ~\widetilde{\Gamma}. Further, as zCz\to C, the largest blowup in (135) is a square-root blowup (coming from the quarter-root blowups of 𝑷˙(out)(z)\dot{\boldsymbol{P}}^{\text{(out)}}(z) and τC(z)σ3/4\tau_{C}(z)^{-\sigma_{3}/4}). This implies that 𝑯(C)(z)\boldsymbol{H}^{(C)}(z) is analytic in 𝔻C\mathbb{D}_{C} because 𝑯(C)(z)\boldsymbol{H}^{(C)}(z) has no square-root jumps in 𝔻C\mathbb{D}_{C} as it is continuous in 𝔻C\mathbb{D}_{C}.

Now, since 𝑨(k2/3τC(z))\boldsymbol{A}\left(k^{2/3}\tau_{C}(z)\right) and 𝑸(C)(z)\boldsymbol{Q}^{(C)}(z) satisfy the same jump conditions, and 𝑯(C)\boldsymbol{H}^{(C)} is analytic in 𝔻C\mathbb{D}_{C}, it follows that 𝑯(C)(z)kσ3/6𝑨(k2/3τC(z))𝑸(C)(z)1\boldsymbol{H}^{(C)}(z)k^{-\sigma_{3}/6}\boldsymbol{A}\left(k^{2/3}\tau_{C}(z)\right)\boldsymbol{Q}^{(C)}(z)^{-1} is analytic in 𝔻C\mathbb{D}_{C}. This in turn implies

(136) 𝑷˙(C)(z;x,k)𝑷˙(C)(z):=𝑯(C)(z)kσ3/6𝑨(k2/3τC(z))𝑸(C)(z)1𝑷(z)\dot{\boldsymbol{P}}^{(C)}(z;x,k)\equiv\dot{\boldsymbol{P}}^{(C)}(z):=\boldsymbol{H}^{(C)}(z)k^{-\sigma_{3}/6}\boldsymbol{A}\left(k^{2/3}\tau_{C}(z)\right)\boldsymbol{Q}^{(C)}(z)^{-1}\boldsymbol{P}(z)

satisfies the same jump conditions as 𝑷(z)\boldsymbol{P}(z). The upshot is that we have an explicit formula for 𝑷˙(C)(z)\dot{\boldsymbol{P}}^{(C)}(z) because we can solve for 𝑸(C)(z)1𝑷(z)\boldsymbol{Q}^{(C)}(z)^{-1}\boldsymbol{P}(z) in (134). Indeed,

(137) 𝑷˙(C)(z)={𝑯(C)(z)kσ3/6𝑨(k2/3τC(z))ek2τC(z)3/2σ3ek(H(z)+Λ/2)σ3,z𝔻C,𝑯(C)(z)kσ3/6𝑨(k2/3τC(z))ek2τC(z)3/2σ3𝑻(1)ek(H(z)+Λ/2)σ3,z𝔻C.\dot{\boldsymbol{P}}^{(C)}(z)=\begin{cases}\boldsymbol{H}^{(C)}(z)k^{-\sigma_{3}/6}\boldsymbol{A}\left(k^{2/3}\tau_{C}(z)\right)e^{-\frac{k}{2}\tau_{C}(z)^{3/2}\sigma_{3}}e^{k(H(z)+\Lambda/2)\sigma_{3}},&z\in\mathbb{D}_{C}^{\uparrow},\\ \boldsymbol{H}^{(C)}(z)k^{-\sigma_{3}/6}\boldsymbol{A}\left(k^{2/3}\tau_{C}(z)\right)e^{-\frac{k}{2}\tau_{C}(z)^{3/2}\sigma_{3}}\boldsymbol{T}(-1)e^{k(H(z)+\Lambda/2)\sigma_{3}},&z\in\mathbb{D}_{C}^{\downarrow}.\end{cases}

Also, we can express 𝑷˙(out)(z)1\dot{\boldsymbol{P}}^{\text{(out)}}(z)^{-1} in terms of 𝑯(C)(z)\boldsymbol{H}^{(C)}(z) to find that

(138) 𝑷˙(C)(z)𝑷˙(out)(z)1=𝑯(C)(z)kσ3/6(𝑨(k2/3τC)𝑽1(k2/3τC(z))σ3/4)kσ3/6𝑯(C)(z)1.\dot{\boldsymbol{P}}^{(C)}(z)\dot{\boldsymbol{P}}^{\text{(out)}}(z)^{-1}=\boldsymbol{H}^{(C)}(z)k^{-\sigma_{3}/6}\left(\boldsymbol{A}\left(k^{2/3}\tau_{C}\right)\boldsymbol{V}^{-1}\left(k^{2/3}\tau_{C}(z)\right)^{-\sigma_{3}/4}\right)k^{\sigma_{3}/6}\boldsymbol{H}^{(C)}(z)^{-1}.

Therefore, using the normalization of 𝑨\boldsymbol{A} (see (183)), on 𝔻C\partial\mathbb{D}_{C}, as kk\to\infty,

(139) 𝑷˙(C)(z)𝑷˙(out)(z)1=𝕀+[𝒪(k2)𝒪(k1)𝒪(k1)𝒪(k2)].\dot{\boldsymbol{P}}^{(C)}(z)\dot{\boldsymbol{P}}^{\text{(out)}}(z)^{-1}=\mathbb{I}+\begin{bmatrix}\mathcal{O}\left(k^{-2}\right)&\mathcal{O}\left(k^{-1}\right)\\ \mathcal{O}\left(k^{-1}\right)&\mathcal{O}\left(k^{-2}\right)\end{bmatrix}.

4.5.2. Local Parametrices at the Endpoints z=Az=A, z=Bz=B, and z=Dz=D

We now construct the other parametrices. In 𝔻A\mathbb{D}_{A}, after clearing the zz-dependence, the core jumps of 𝑷(z)\boldsymbol{P}(z) are already in the correct shape. Thus, set

(140) 𝑯(A)(z):=𝑷˙(out)(z)ek(H(z)+Λ/2)σ3ek2τA(z)3/2σ3𝑽1τA(z)σ3/4\boldsymbol{H}^{(A)}(z):=\dot{\boldsymbol{P}}^{\text{(out)}}(z)e^{-k(H(z)+\Lambda/2)\sigma_{3}}e^{\frac{k}{2}\tau_{A}(z)^{3/2}\sigma_{3}}\boldsymbol{V}^{-1}\tau_{A}(z)^{-\sigma_{3}/4}

and

(141) 𝑷˙(A)(z):=𝑯(A)(z)kσ3/6𝑨(k2/3τA(z))ek2τA(z)3/2σ3ek(H(z)+Λ/2)σ3.\dot{\boldsymbol{P}}^{(A)}(z):=\boldsymbol{H}^{(A)}(z)k^{-\sigma_{3}/6}\boldsymbol{A}\left(k^{2/3}\tau_{A}(z)\right)e^{-\frac{k}{2}\tau_{A}(z)^{3/2}\sigma_{3}}e^{k(H(z)+\Lambda/2)\sigma_{3}}.

In 𝔻B\mathbb{D}_{B}, after clearing the zz-dependence, the core jumps of 𝑷(z)\boldsymbol{P}(z) are all off by a sign in the off-diagonal entries. So, set

(142) 𝑯(B)(z):=𝑷˙(out)(z)ek(H(z)+Λ/2)σ3eiπ2σ3ek2τB(z)3/2σ3𝑽1τB(z)σ3/4\boldsymbol{H}^{(B)}(z):=\dot{\boldsymbol{P}}^{\text{(out)}}(z)e^{-k(H(z)+\Lambda/2)\sigma_{3}}e^{\frac{i\pi}{2}\sigma_{3}}e^{\frac{k}{2}\tau_{B}(z)^{3/2}\sigma_{3}}\boldsymbol{V}^{-1}\tau_{B}(z)^{-\sigma_{3}/4}

and

(143) 𝑷˙(B)(z):=𝑯(B)(z)kσ3/6𝑨(k2/3τB(z))ek2τB(z)3/2σ3eiπ2σ3ek(H(z)+Λ/2)σ3.\dot{\boldsymbol{P}}^{(B)}(z):=\boldsymbol{H}^{(B)}(z)k^{-\sigma_{3}/6}\boldsymbol{A}\left(k^{2/3}\tau_{B}(z)\right)e^{-\frac{k}{2}\tau_{B}(z)^{3/2}\sigma_{3}}e^{-\frac{i\pi}{2}\sigma_{3}}e^{k(H(z)+\Lambda/2)\sigma_{3}}.

In 𝔻D\mathbb{D}_{D}, after clearing the zz-dependence, the core triangular jumps of 𝑷(z)\boldsymbol{P}(z) are all the wrong triangularity. Hence, set

(144) 𝑯(D)(z):=𝑷˙(out)(z)ek(H(z)+Λ/2)σ3𝑻(1)eiπ2σ3ek2τD(z)3/2σ3𝑽1τD(z)σ3/4\boldsymbol{H}^{(D)}(z):=\dot{\boldsymbol{P}}^{\text{(out)}}(z)e^{-k(H(z)+\Lambda/2)\sigma_{3}}\boldsymbol{T}(1)e^{\frac{i\pi}{2}\sigma_{3}}e^{\frac{k}{2}\tau_{D}(z)^{3/2}\sigma_{3}}\boldsymbol{V}^{-1}\tau_{D}(z)^{-\sigma_{3}/4}

and

(145) 𝑷˙(D)(z):=𝑯(D)(z)kσ3/6𝑨(k2/3τD(z))ek2τD(z)3/2σ3eiπ2σ3𝑻(1)ek(H(z)+Λ/2)σ3.\dot{\boldsymbol{P}}^{(D)}(z):=\boldsymbol{H}^{(D)}(z)k^{-\sigma_{3}/6}\boldsymbol{A}\left(k^{2/3}\tau_{D}(z)\right)e^{-\frac{k}{2}\tau_{D}(z)^{3/2}\sigma_{3}}e^{-\frac{i\pi}{2}\sigma_{3}}\boldsymbol{T}(-1)e^{k(H(z)+\Lambda/2)\sigma_{3}}.

Further, for each endpoint the local parametrix matches well with the outer parametrix. That is, for p{A,B,C,D}p\in\left\{A,B,C,D\right\}, for each z𝔻pz\in\partial\mathbb{D}_{p}, as kk\to\infty, the mismatch jumps satisfy

(146) 𝑷˙(p)(z)𝑷˙(out)(z)1=𝕀+[𝒪(k2)𝒪(k1)𝒪(k1)𝒪(k2)].\dot{\boldsymbol{P}}^{(p)}(z)\dot{\boldsymbol{P}}^{\text{(out)}}(z)^{-1}=\mathbb{I}+\begin{bmatrix}\mathcal{O}\left(k^{-2}\right)&\mathcal{O}\left(k^{-1}\right)\\ \mathcal{O}\left(k^{-1}\right)&\mathcal{O}\left(k^{-2}\right)\end{bmatrix}.

4.6. Error Analysis

In this section we quantify the error introduced by omitting the triangular jumps that decay to the identity.

4.6.1. The Global Parametrix

We are now ready to define the global parametrix. In (Σ1ΓΣ2)\mathbb{C}\setminus(\Sigma_{1}\cup\Gamma\cup\Sigma_{2}) set

(147) 𝑷˙(z,x,k)𝑷˙(z)={𝑷˙(A)(z),z𝔻A,𝑷˙(B)(z),z𝔻B,𝑷˙(C)(z),z𝔻C,𝑷˙(D)(z),z𝔻D,𝑷˙(out)(z),otherwise.\dot{\boldsymbol{P}}(z;x,k)\equiv\dot{\boldsymbol{P}}(z)=\begin{cases}\dot{\boldsymbol{P}}^{(A)}(z),&z\in\mathbb{D}_{A},\\ \dot{\boldsymbol{P}}^{(B)}(z),&z\in\mathbb{D}_{B},\\ \dot{\boldsymbol{P}}^{(C)}(z),&z\in\mathbb{D}_{C},\\ \dot{\boldsymbol{P}}^{(D)}(z),&z\in\mathbb{D}_{D},\\ \dot{\boldsymbol{P}}^{\text{(out)}}(z),&\text{otherwise}.\end{cases}

Notice, for zz large enough, 𝑷˙(z)=𝑷˙(out)(z)\dot{\boldsymbol{P}}(z)=\dot{\boldsymbol{P}}^{\text{(out)}}(z) and we can use the normalization condition of 𝑷˙(out)(z)\dot{\boldsymbol{P}}^{\text{(out)}}(z) to write

(148) 𝑷˙(z)=𝕀+𝑷˙1z+𝑷˙2z2+𝒪(1/z3),z.\dot{\boldsymbol{P}}(z)=\mathbb{I}+\frac{\dot{\boldsymbol{P}}_{-1}}{z}+\frac{\dot{\boldsymbol{P}}_{-2}}{z^{2}}+\mathcal{O}(1/z^{3}),\hskip 28.45274ptz\to\infty.

We introduce the error as

(149) 𝑬(z,x,k)𝑬(z):=𝑷(z)𝑷˙1(z).\boldsymbol{E}(z;x,k)\equiv\boldsymbol{E}(z):=\boldsymbol{P}(z)\dot{\boldsymbol{P}}^{-1}(z).

As in the pole-free case, when zz is not on a jump contour of 𝑷(z)\boldsymbol{P}(z) or 𝑷˙(z)\dot{\boldsymbol{P}}(z) then 𝑬(z)\boldsymbol{E}(z) is the product of analytic functions and thus is analytic. Further, for each p{A,B,C,D}p\in\left\{A,B,C,D\right\}, 𝑷(z)\boldsymbol{P}(z) and 𝑷˙(z)\dot{\boldsymbol{P}}(z) have exactly the same jump conditions inside 𝔻p\mathbb{D}_{p}, and thus 𝑬(z)\boldsymbol{E}(z) is analytic in 𝔻p\mathbb{D}_{p}. Similarly, 𝑷(z)\boldsymbol{P}(z) and 𝑷˙(z)\dot{\boldsymbol{P}}(z) satisfying the same jump conditions on Σ1ΓΣ2\Sigma_{1}\cup\Gamma\cup\Sigma_{2} implies that 𝑬(z)\boldsymbol{E}(z) is analytic on Σ1ΓΣ2\Sigma_{1}\cup\Gamma\cup\Sigma_{2}. Therefore, the only jumps of 𝑬(z)\boldsymbol{E}(z) are the boundary of each disk and the jump contours of 𝑷(z)\boldsymbol{P}(z) that are bounded away from the endpoints AA, BB, CC, and DD.

Riemann-Hilbert Problem 13: For each kk\in\mathbb{N}, find 𝑬(z)\boldsymbol{E}(z) so that

  1. (1)

    Analyticity: 𝑬(z)\boldsymbol{E}(z) is analytic in zz except along the jump contours described above.

  2. (2)

    Jump Condition: 𝑬(z)\boldsymbol{E}(z) can be continuously extended to the boundary and the boundary values taken by 𝑬(z)\boldsymbol{E}(z) are related by the jump condition 𝑬+(z)=𝑬(z)𝑽(𝑬)(z)\boldsymbol{E}_{+}(z)=\boldsymbol{E}_{-}(z)\boldsymbol{V}^{\boldsymbol{(E)}}(z), where

    (150) 𝑽(𝑬)(z)={𝑷˙(p)(z)𝑷˙(out)(z)1,z𝔻p for p{A,B,C,D},𝑷˙(out)(z)𝑽(𝑷)(z)𝑷˙(out)(z)1,otherwise.\boldsymbol{V}^{\boldsymbol{(E)}}(z)=\begin{cases}\dot{\boldsymbol{P}}^{(p)}(z)\dot{\boldsymbol{P}}^{\text{(out)}}(z)^{-1},&z\in\partial\mathbb{D}_{p}\text{ for }p\in\{A,B,C,D\},\\ \dot{\boldsymbol{P}}^{\text{(out)}}(z)\boldsymbol{V}^{(\boldsymbol{P})}(z)\dot{\boldsymbol{P}}^{\text{(out)}}(z)^{-1},&\text{otherwise}.\end{cases}
  3. (3)

    Normalization: As zz\to\infty, the matrix 𝑬(z)=𝕀+𝒪(1/z)\boldsymbol{E}(z)=\mathbb{I}+\mathcal{O}\left(1/z\right).

Just like in the pole-free case, since 𝑬(z)\boldsymbol{E}(z) normalizes to the identity and all of its jump matrices are close to the identity matrix we have the following proposition:

Proposition 4.4.

Let xx be in the pole region of the xx-plane. For large kk\in\mathbb{N}, if x𝒮kx\in\mathscr{S}_{k} then

(151) 𝑬(z)=𝕀+𝒪(1/k).\boldsymbol{E}(z)=\mathbb{I}+\mathcal{O}(1/k).

4.6.2. Extraction Formula

The formula (70) is still valid in the pole region given that x𝒮kx\in\mathscr{S}_{k}. Moreover, Proposition 4.4 implies (70) can be written as

(152) pk(s)=2i(k2)1/3([𝑷˙2]12+[𝑷˙1]22[𝑷˙1]12+𝒪(1/k)[𝑷˙1]12+𝒪(1/k)).p_{k}(s)=2i\left(\frac{k}{2}\right)^{1/3}\left(\frac{-[\dot{\boldsymbol{P}}_{-2}]_{12}+[\dot{\boldsymbol{P}}_{-1}]_{22}[\dot{\boldsymbol{P}}_{-1}]_{12}+\mathcal{O}(1/k)}{[\dot{\boldsymbol{P}}_{-1}]_{12}+\mathcal{O}(1/k)}\right).

A direct computation shows that

(153) [𝑷˙2]12+[𝑷˙1]22[𝑷˙1]12+𝒪(1/k)[𝑷˙1]12+𝒪(1/k)=[𝑸˙2]12+[𝑸˙1]22[𝑸˙1]12+𝒪(1/k)[𝑸˙1]12+𝒪(1/k),\frac{-[\dot{\boldsymbol{P}}_{-2}]_{12}+[\dot{\boldsymbol{P}}_{-1}]_{22}[\dot{\boldsymbol{P}}_{-1}]_{12}+\mathcal{O}(1/k)}{[\dot{\boldsymbol{P}}_{-1}]_{12}+\mathcal{O}(1/k)}=\frac{-[\dot{\boldsymbol{Q}}_{-2}]_{12}+[\dot{\boldsymbol{Q}}_{-1}]_{22}[\dot{\boldsymbol{Q}}_{-1}]_{12}+\mathcal{O}(1/k)}{[\dot{\boldsymbol{Q}}_{-1}]_{12}+\mathcal{O}(1/k)},

where the quantities in the right-hand side are defined in (102). We now recover the large-zz expansion coefficients that are present in the right-hand side of (153). First, using (109) and the fact Θ(z)\Theta(z) is entire we have for any constant vv, as zz\to\infty,

(154) Θ(𝒜(z)+v)=Θ(𝒜()+v)+Θ(𝒜()+v)𝒜1z+𝒪(1/z2).\Theta(\mathcal{A}(z)+v)=\Theta(\mathcal{A}(\infty)+v)+\Theta^{\prime}(\mathcal{A}(\infty)+v)\frac{\mathcal{A}_{-1}}{z}+\mathcal{O}\left(1/z^{2}\right).

Recall

(155) [𝑸˙]22ekF1z=C22Θ(𝒜(z)C1+kF1U)Θ(𝒜(z)C1)ekF1AzΥzfD(z),[\dot{\boldsymbol{Q}}]_{22}e^{-kF_{1}z}=C_{22}\frac{\Theta(\mathcal{A}(z)-C_{1}+kF_{1}U)}{\Theta(\mathcal{A}(z)-C_{1})}e^{kF_{1}\int_{A}^{z}\Upsilon-z}f^{\text{D}}(z),

where C1=𝒜(Q)𝒦C_{1}=-\mathcal{A}(Q)-\mathcal{K}. Using (131), (154), and (118) we can the above equation as

(156) [𝑸˙]22ekF1z=(Θ(𝒜()C1)Θ(𝒜()C1+kF1U)Θ(𝒜(z)C1+kF1U)Θ(𝒜(z)C1))(ekF1(AzΥz+Υ0))fD(z)=(1+𝔏22𝒜1z+𝒪(1/z2))(1kF1Υ1z+𝒪(1/z2))(1+𝒪(1/z2))=1+𝔏22𝒜1kF1Υ1z+𝒪(1/z2),\displaystyle\begin{split}[\dot{\boldsymbol{Q}}]_{22}e^{-kF_{1}z}&=\left(\frac{\Theta(\mathcal{A}(\infty)-C_{1})}{\Theta(\mathcal{A}(\infty)-C_{1}+kF_{1}U)}\frac{\Theta(\mathcal{A}(z)-C_{1}+kF_{1}U)}{\Theta(\mathcal{A}(z)-C_{1})}\right)\left(e^{kF_{1}\left(\int_{A}^{z}\Upsilon-z+\Upsilon_{0}\right)}\right)f^{\text{D}}(z)\\[5.0pt] &=\left(1+\frac{\mathfrak{L}_{22}\mathcal{A}_{-1}}{z}+\mathcal{O}(1/z^{2})\right)\left(1-\frac{kF_{1}\Upsilon_{-1}}{z}+\mathcal{O}(1/z^{2})\right)(1+\mathcal{O}(1/z^{2}))\\[5.0pt] &=1+\frac{\mathfrak{L}_{22}\mathcal{A}_{-1}-kF_{1}\Upsilon_{-1}}{z}+\mathcal{O}(1/z^{2}),\end{split}

where 𝔏22(x,k)𝔏22\mathfrak{L}_{22}(x;k)\equiv\mathfrak{L}_{22} is defined in (11). Therefore, we find that

(157) [𝑸˙1]22=𝒜1𝔏22kF1Υ1.[\dot{\boldsymbol{Q}}_{-1}]_{22}=\mathcal{A}_{-1}\mathfrak{L}_{22}-kF_{1}\Upsilon_{-1}.

Next, we find the quotient [𝑸˙2]12/[𝑸˙1]12[\dot{\boldsymbol{Q}}_{-2}]_{12}/[\dot{\boldsymbol{Q}}_{-1}]_{12}. We write

(158) [𝑸˙]12ekF1z=C11Θ(𝒜(z)+C1+kF1U)Θ(𝒜(z)+C1)fOD(z)ekF1(AzΥz)=μekF1Υ0(1+𝔏12𝒜1kF1Υ1z+𝒪(1/z2))(i(B+DAC)4zi(B2+D2A2C2)8z2+𝒪(1/z3)),\displaystyle\begin{split}[\dot{\boldsymbol{Q}}]_{12}e^{-kF_{1}z}&=C_{11}\frac{\Theta(\mathcal{A}(z)+C_{1}+kF_{1}U)}{\Theta(\mathcal{A}(z)+C_{1})}f^{\text{OD}}(z)e^{kF_{1}\left(\int_{A}^{z}\Upsilon-z\right)}\\[5.0pt] &=\mu e^{-kF_{1}\Upsilon_{0}}\left(1+\frac{\mathfrak{L}_{12}\mathcal{A}_{-1}-kF_{1}\Upsilon_{-1}}{z}+\mathcal{O}(1/z^{2})\right)\\ &\hskip 9.38945pt\cdot\left(\frac{-i(B+D-A-C)}{4z}-\frac{i(B^{2}+D^{2}-A^{2}-C^{2})}{8z^{2}}+\mathcal{O}(1/z^{3})\right),\end{split}

where

(159) μ(x,k)μ:=C11Θ(𝒜()+C1+kF1U)Θ(𝒜()+C1)\mu(x;k)\equiv\mu:=C_{11}\frac{\Theta(\mathcal{A}(\infty)+C_{1}+kF_{1}U)}{\Theta(\mathcal{A}(\infty)+C_{1})}

and 𝔏12(x,k)𝔏12\mathfrak{L}_{12}(x;k)\equiv\mathfrak{L}_{12} is defined in (12). Thus, we have that

(160) [𝑸˙1]12=μekF1Υ0(iB+DAC4)[\dot{\boldsymbol{Q}}_{-1}]_{12}=\mu e^{-kF_{1}\Upsilon_{0}}\left(-i\frac{B+D-A-C}{4}\right)

and

(161) [𝑸˙2]12=μekF1Υ0(i(B+DAC)(𝔏12𝒜1kF1Υ1)4i(B2+D2A2C2)8).\displaystyle\begin{split}&[\dot{\boldsymbol{Q}}_{-2}]_{12}=\\ &\mu e^{-kF_{1}\Upsilon_{0}}\left(-\frac{i(B+D-A-C)(\mathfrak{L}_{12}\mathcal{A}_{-1}-kF_{1}\Upsilon_{-1})}{4}-\frac{i(B^{2}+D^{2}-A^{2}-C^{2})}{8}\right).\end{split}

Therefore,

(162) [𝑸˙2]12[𝑸˙1]12=𝒜1𝔏12kF1Υ1+B2+D2A2C22(B+DAC).\frac{[\dot{\boldsymbol{Q}}_{-2}]_{12}}{[\dot{\boldsymbol{Q}}_{-1}]_{12}}=\mathcal{A}_{-1}\mathfrak{L}_{12}-kF_{1}\Upsilon_{-1}+\frac{B^{2}+D^{2}-A^{2}-C^{2}}{2(B+D-A-C)}.

We are now ready to prove Theorem 1.2.

Proof of Theorem 1.2.

Notice (152) and (153) give

(163) pk(s)=2i(k2)1/3([𝑸˙2]12+[𝑸˙1]22[𝑸˙1]12+𝒪(1/k)[𝑸˙1]12+𝒪(1/k)).p_{k}(s)=2i\left(\frac{k}{2}\right)^{1/3}\left(\frac{-[\dot{\boldsymbol{Q}}_{-2}]_{12}+[\dot{\boldsymbol{Q}}_{-1}]_{22}[\dot{\boldsymbol{Q}}_{-1}]_{12}+\mathcal{O}(1/k)}{[\dot{\boldsymbol{Q}}_{-1}]_{12}+\mathcal{O}(1/k)}\right).

Writing pkp_{k} in terms of uHM(k+1/2)u^{(k+1/2)}_{\text{HM}} using (14) and (17) results in

(164) (2k)1/3uHM(k+1/2)(k2/321/3x)=i([𝑸˙2]12+[𝑸˙1]22[𝑸˙1]12+𝒪(1/k)[𝑸˙1]12+𝒪(1/k)).-(2k)^{-1/3}u^{(k+1/2)}_{\text{HM}}\left(-\frac{k^{2/3}}{2^{1/3}}x\right)=i\left(\frac{-[\dot{\boldsymbol{Q}}_{-2}]_{12}+[\dot{\boldsymbol{Q}}_{-1}]_{22}[\dot{\boldsymbol{Q}}_{-1}]_{12}+\mathcal{O}(1/k)}{[\dot{\boldsymbol{Q}}_{-1}]_{12}+\mathcal{O}(1/k)}\right).

This is the first statement of the theorem. Now, assume that [𝑸˙1]120[\dot{\boldsymbol{Q}}_{-1}]_{12}\neq 0. In this case, we can geometrically expand the denominator of the above equation to find

(165) (2k)1/3uHM(k+1/2)(k2/321/3x)=i([𝑸˙1]22[𝑸˙2]12[𝑸˙1]12+𝒪(1/k)).-(2k)^{-1/3}u^{(k+1/2)}_{\text{HM}}\left(-\frac{k^{2/3}}{2^{1/3}}x\right)=-i\left([\dot{\boldsymbol{Q}}_{-1}]_{22}-\frac{[\dot{\boldsymbol{Q}}_{-2}]_{12}}{[\dot{\boldsymbol{Q}}_{-1}]_{12}}+\mathcal{O}\left(1/k\right)\right).

Finally, (157) and (162) give our desired result. ∎

5. Numerical Approximation

We use numerical methods to obtain approximations of the exact generalized Hastings-McLeod functions. However, since uHM(α)u_{\text{HM}}^{(\alpha)} has poles in the pole region of the plane, we will employ two distinct solvers: a spectral collocation boundary condition solver to handle the smooth, pole-free region, and a pole-vaulting method for the pole region developed by Fornberg and Weideman [15]. This numerical scheme has been used to survey the pole fields of various Painlevé transcendents; see [14, 16, 19]. In this section we will give a brief description of each method.

5.1. Spectral Collocation Method

For NN\in\mathbb{N}, we consider the interpolation nodes

(166) tk=cos((k1)πN1),k=1,,N,t_{k}=\cos\left(\frac{(k-1)\pi}{N-1}\right),\hskip 28.45274ptk=1,\dots,N,

which are Chebyshev points of the second kind, i.e. the extreme points on [1,1][-1,1] of TN1(t)T_{N-1}(t), the Chebyshev polynomial of degree N1N-1. For a smooth function ff on [1,1][-1,1] we set the interpolant PN1(t)P_{N-1}(t) to be a linear combination of Lagrangian interpolating polynomials. So,

(167) f(t)PN1(t)=j=1Nφj(t)fj,f(t)\approx P_{N-1}(t)=\sum\limits_{j=1}^{N}\varphi_{j}(t)f_{j},

where

(168) fj:=f(tj)andφj(t):=k=1,kjN(ttk)(tjtk).f_{j}:=f(t_{j})\hskip 18.77892pt\text{and}\hskip 18.77892pt\varphi_{j}(t):=\prod\limits_{k=1,k\neq j}^{N}\frac{(t-t_{k})}{(t_{j}-t_{k})}.

In fact, since t2,,tN1t_{2},\dots,t_{N-1} are the critical points of TN1(t)T_{N-1}(t),

(169) φj(t)=(1)jcj1t2(N1)2TN1(t)ttj,\varphi_{j}(t)=\frac{(-1)^{j}}{c_{j}}\frac{1-t^{2}}{(N-1)^{2}}\frac{T_{N-1}^{\prime}(t)}{t-t_{j}},

where c1=cN=2c_{1}=c_{N}=2 and c2,,cN1=1c_{2},\dots,c_{N-1}=1. Notice, on the set of interpolation nodes {t1,,tN}\{t_{1},\dots,t_{N}\}, φj(tk)\varphi_{j}(t_{k}) acts as a Kronecker delta function of jj and kk. That is,

(170) φj(tk)=δjk={0if jk,1,otherwise.\varphi_{j}\left(t_{k}\right)=\delta_{jk}=\begin{cases}0&\text{if }j\neq k,\\ 1,&\text{otherwise}.\end{cases}

We now define a collocation derivative operator, 𝑫\boldsymbol{D}, on the interpolant PN1(t)P_{N-1}(t) by

(171) 𝑫pN1(t):=[PN1(t1),,PN1(tN)]T.\boldsymbol{D}p_{N-1}(t):=\left[P^{\prime}_{N-1}\left(t_{1}\right),\dots,P^{\prime}_{N-1}\left(t_{N}\right)\right]^{T}.

It was shown in [9, p. 69] that

(172) [𝑫]k,j={ck(1)j+kcj(tktj),jk,2(N1)2+16,j=k=1,2(N1)2+16,j=k=N,tk2(1tk2),otherwise..[\boldsymbol{D}]_{k,j}=\begin{cases}\displaystyle\frac{c_{k}(-1)^{j+k}}{c_{j}(t_{k}-t_{j})},&j\neq k,\\[10.0pt] \displaystyle\frac{2(N-1)^{2}+1}{6},&j=k=1,\\[10.0pt] \displaystyle-\frac{2(N-1)^{2}+1}{6},&j=k=N,\\ \displaystyle\frac{-t_{k}}{2(1-t_{k}^{2})},&\text{otherwise.}\end{cases}.

Furthermore, in our context, taking kk derivatives of PN1(t)P_{N-1}(t) and evaluating at the nodes {t1,,tN}\{t_{1},\dots,t_{N}\} can be accomplished by the operator 𝑫(k)\boldsymbol{D}^{(k)} where

(173) 𝑫(k):=(𝑫)k.\boldsymbol{D}^{(k)}:=\left(\boldsymbol{D}\right)^{k}.

5.1.1. Collocation Method for Generalized Hastings-McLeod

We now turn our attention to applying this method to the generalized Hastings-McLeod function for fixed α>1/2\alpha>-1/2. First, we fix complex numbers y1y_{1} and y2y_{2} in the yy-plane with Im(y1)=Im(y2)\Imag\left(y_{1}\right)=\Imag\left(y_{2}\right), Re(y1)0Re(y2)\Real\left(y_{1}\right)\ll 0\ll\Real\left(y_{2}\right), so that the asymptotics (2) are good approximations for both u(y1)u(y_{1}) and u(y2)u(y_{2}). We also require that, after the appropriate scaling, the horizontal line segment connecting x1x_{1} to x2x_{2} (which we will denote as [x1,x2][x_{1},x_{2}]) is contained in the pole-free region of the xx-plane. Next, we transform the ODE (1) from [y1,y2][y_{1},y_{2}], to [1,1][-1,1]. In particular, we use the linear transformation

(174) f(t):=y1+y2+(y2y1)t2.f(t):=\frac{y_{1}+y_{2}+\left(y_{2}-y_{1}\right)t}{2}.

Then, if uu satisfies (1), then v:[1,1]v:[-1,1]\to\mathbb{C} defined by v(t):=u(f(t))v(t):=u(f(t)) satisfies

(175) d2vdt2(t)=(y2y1)24(2v(t)3+f(t)v(t)α).\frac{\text{d}^{2}v}{\text{d}t^{2}}(t)=\frac{\left(y_{2}-y_{1}\right)^{2}}{4}\left(2v(t)^{3}+f(t)v(t)-\alpha\right).

We interpolate v(t)v(t) as in (167). That is, for NN unknown values v1,,vNv_{1},\dots,v_{N} we set

(176) PN1(t):=j=1Nφj(t)vj.P_{N-1}(t):=\sum\limits_{j=1}^{N}\varphi_{j}(t)v_{j}.

Our aim is for v1,,vNv_{1},\dots,v_{N} to approximate the values v(t1),,v(tN)v(t_{1}),\dots,v(t_{N}) respectively. Then, v(t)PN1(t)v(t)\approx P_{N-1}(t). Now, we apply the discrete derivative operator (173) on the left-hand side of (176) and plug in PN1P_{N-1} for vv in the right-hand side of (175). As a result, we obtain an N×NN\times N system of equations. We can enforce the boundary conditions of the generalized Hastings-McLeod solutions (2) by setting

(177) vN:=f(a/2),v_{N}:=f\left(\sqrt{-a/2}\right),

since x1x_{1} was chosen so that (2) holds. Hence, f(a/2)f(uHM(α)(x1))vNf\left(\sqrt{-a/2}\right)\approx f\left(u^{(\alpha)}_{\text{HM}}\left(x_{1}\right)\right)\approx v_{N}. Similarly, we set v1:=f(α/2)v_{1}:=f\left(\alpha/2\right). Finally, we use a Newton solver on the remaining N2N-2 equations and variables.

5.2. Padé Approximant Method

The collocation method is a boundary condition solver and hence assumes the function is smooth between the two boundary conditions. However, this is not always the case for the generalized Hastings-McLeod functions. Indeed, we know they blow up in the pole region of the xx-plane. Therefore, we use a Padé approximant method due to Fornberg and Weideman, which is an initial-value problem solver, to handle this case. We now give a brief overview of Padé approximants and apply this method to the generalized Hastings-McLeod functions.

5.2.1. Padé Expansion

Let UU be an open set in \mathbb{C}. Say ff is a meromorphic function in UU and, for some fixed x0Ux_{0}\in U, ff is analytic at x0x_{0}. As such, ff has the following Taylor expansion about x0x_{0}:

(178) f(x0+h)=k=0nckhk+𝒪(hn+1).f(x_{0}+h)=\sum\limits_{k=0}^{n}c_{k}h^{k}+\mathcal{O}\left(h^{n+1}\right).

However, this approximation fails in a neighborhood of a pole. To obtain a more robust approximation that allows for some poles, we convert the Taylor expansion into a Padé expansion. That is, instead of approximating ff as a polynomial, we approximate ff as a nontrivial rational function. So, we need to find complex coefficients a0,,aν1,b1,bν2a_{0},\dots,a_{\nu_{1}},b_{1},\dots b_{\nu_{2}} such that

(179) f(x0+h)=a0+a1h++aν1hν11+b1h++bν2hν2+𝒪(hn+1),f(x_{0}+h)=\frac{a_{0}+a_{1}h+\cdots+a_{\nu_{1}}h^{\nu_{1}}}{1+b_{1}h+\cdots+b_{\nu_{2}}h^{\nu_{2}}}+\mathcal{O}\left(h^{n+1}\right),

where ν1+ν2=n\nu_{1}+\nu_{2}=n. In our problem we take nn to be even and set ν=ν1=ν2:=n/2\nu=\nu_{1}=\nu_{2}:=n/2. The neighborhood in which the Padé approximation (179) is decent is larger than the corresponding neighborhood of the Taylor approximation (178) because if xx_{*} is a pole, then the denominator of (179) can vanish near xx_{*}. As the denominator has ν2\nu_{2} zeros, we see that the closure of the domain of (179) can contain ν2\nu_{2} poles before we lose control of the error term.

5.2.2. Padé Approximant Method for Generalized Hastings-McLeod.

Fix α>1/2\alpha>-1/2 and let u(y)u(y) be the generalized Hastings-McLeod solution to (1). In order to obtain an approximation of uu in the form of (179) we will need a pair of initial values u(y0)u(y_{0}) and u(y0)u^{\prime}(y_{0}). First, we use the forward Euler numerical scheme to obtain a partial Taylor series approximation of uu about y0y_{0} for some even integer nn (in our problem we set n=24n=24). That is, we set c0=u(y0)c_{0}=u(y_{0}) and c1=u(y0)c_{1}=u^{\prime}\left(y_{0}\right) and write

(180) u(y0+h)=k=0nckhk+𝒪(hn+1)u(y_{0}+h)=\sum\limits_{k=0}^{n}c_{k}h^{k}+\mathcal{O}\left(h^{n+1}\right)

for n1n-1 unknown complex values c2,,cnc_{2},\dots,c_{n}. To solve for c2,,cnc_{2},\dots,c_{n} we plug (180) into the ODE (1) and find that

k=2nk(k1)ckhk2+𝒪(hn1)=2(k=0nckhk)3+(y0+h)(k=0nckhk)α+𝒪(hn1).\sum\limits_{k=2}^{n}k(k-1)c_{k}h^{k-2}+\mathcal{O}\left(h^{n-1}\right)=2\left(\sum_{k=0}^{n}c_{k}h^{k}\right)^{3}+(y_{0}+h)\left(\sum\limits_{k=0}^{n}c_{k}h^{k}\right)-\alpha+\mathcal{O}\left(h^{n-1}\right).

So, we can compare the coefficients of 1,h,,hn21,h,\dots,h^{n-2} and obtain an (n1)×(n1)(n-1)\times(n-1) system of equations (that can be solved recursively) for the variables c2,,cnc_{2},\dots,c_{n}. To convert (180) into a Padé approximant, with n+1n+1 unknown complex values a0,,aν,b1,bνa_{0},\dots,a_{\nu},b_{1},\dots b_{\nu} we write

(181) a0++aνhν1+b1h++bνhν=k=0nckhk+𝒪(hn+1).\frac{a_{0}+\cdots+a_{\nu}h^{\nu}}{1+b_{1}h+\cdots+b_{\nu}h^{\nu}}=\sum\limits_{k=0}^{n}c_{k}h^{k}+\mathcal{O}\left(h^{n+1}\right).

Now, by multiplying both sides of (181) by 1+b1h++bνhν1+b_{1}h+\cdots+b_{\nu}h^{\nu}, we can compare the coefficients of the n+1n+1 monomials 1,h,,hn1,h,\dots,h^{n} and obtain an (n+1)×(n+1)(n+1)\times(n+1) system of equations that once again can be solved recursively. Hence, we find that

(182) u(y0+h)=a0++aνhν1+b1h++bνhν+𝒪(hn+1)u(y_{0}+h)=\frac{a_{0}+\cdots+a_{\nu}h^{\nu}}{1+b_{1}h+\cdots+b_{\nu}h^{\nu}}+\mathcal{O}\left(h^{n+1}\right)

in a neighborhood of y0y_{0} for which ν\nu poles have been excised.

Notice, in order to obtain an approximation resilient to ν\nu poles, we just needed the initial values u(y0)u(y_{0}) and u(y0)u^{\prime}(y_{0}). Further, (182) can generate decent approximations of uu (and hence uu^{\prime}) at points that are not y0y_{0}. Thus, by choosing a point y1y_{1} that is close enough to y0y_{0} such that (182) is still a good approximation of u(y1)u(y_{1}), we are able to extend the region of the yy-plane where we can approximate uu. As such, given UU, a “pole filled” region of the complex yy-plane and y0Uy_{0}\in U such that the values u(y0)u(y_{0}) and u(y0)u^{\prime}(y_{0}) are known, we create a coarse grid of node points filling out UU, with the aim of finding a Padé approximant near each node point. Fornberg and Weideman first implemented such an algorithm in [15].

Their idea is to start at y0y_{0} and to generate integration paths that branch out so that each node point is near a path. Further, to preserve accuracy by minimizing numerical cancellations, we want to avoid integrating near a pole. Therefore, we want to choose paths along which the solution remains small in magnitude. This is accomplished by running the following routine.

  1. (1)

    Uniformly sample a target node from the aforementioned grid of node points.

  2. (2)

    Find the nearest point with a recorded Padé approximation. (Since we start with initial values we know such a point will exist.)

  3. (3)

    Take a step of length hh (in our case h=1/2h=1/2) towards the target. We consider five candidate directions: one aiming directly at the target and the remaining ones veering off by 22.522.5^{\circ} and 4545^{\circ} to either side. Evaluate the known Padé approximant at each of the five candidate points, and pick the direction whose candidate had the smallest norm evaluation.

  4. (4)

    Apply the forward Euler scheme and Padé approximation method with initial data uu and uu^{\prime} corresponding to the chosen candidate.

  5. (5)

    Add the candidate point to the list of points with Padé approximants, record the Padé coefficients, and remove all node points within distance 1/21/2 of the Padé approximant.

  6. (6)

    Repeat steps (3)(3) through (5)(5) until we are within distance hh away from our target.

Finally, we repeat the above routine until the target points are empty. Now given yUy\in U, we approximate u(y)u(y) by finding ww, the nearest point to yy with a Padé approximant, and evaluating this Padé approximant at wyw-y. See Figure 25 for an example when α=3/2\alpha=3/2. Here, y0=α2/321/33e2π3iy_{0}=-\alpha^{2/3}\cdot 2^{-1/3}\cdot 3\cdot e^{-\frac{2\pi}{3}i}, and the values u(y0)u\left(y_{0}\right) and u(y0)u^{\prime}\left(y_{0}\right) were found using the collocation method.
Refer to caption
Figure 25. Illustration of integration paths in the complex yy-plane with α=3/2\alpha=3/2. The open circles are the points with Padé approximants about them. Notice, each gray dot (a node point) is within distance h=1/2h=1/2 of an open circle.

Appendix A The Airy Parametrix

Here we give the Riemann-Hilbert problem corresponding to the standard Airy parametrix 𝑨(ζ)\boldsymbol{A}(\zeta).

Riemann-Hilbert Problem 14: Find the 2×22\times 2 matrix-valued function 𝑨(ζ)\boldsymbol{A}(\zeta) that satisfies the following properties:

  1. (1)

    Analyticity: 𝑨(ζ)\boldsymbol{A}(\zeta) is analytic off the rays arg(±ζ)=0\arg(\pm\zeta)=0 and arg(ζ)=±2π/3\arg(\zeta)=\pm 2\pi/3.

  2. (2)

    Jump Condition: The boundary values taken by 𝑨(ζ)\boldsymbol{A}(\zeta) are related by the jump condition 𝑨+(ζ)=𝑨(ζ)𝑽(𝑨)(ζ)\boldsymbol{A}_{+}(\zeta)=\boldsymbol{A}_{-}(\zeta)\boldsymbol{V}^{(\boldsymbol{A})}(\zeta), where the jump matrix is as shown in Figure 26.

    00𝑼1(ζ3/2)\boldsymbol{U}_{1}(-\zeta^{3/2})𝑳11(ζ3/2)\boldsymbol{L}_{1}^{-1}(\zeta^{3/2})𝑻(1)\boldsymbol{T}(1)𝑳11(ζ3/2)\boldsymbol{L}_{1}^{-1}(\zeta^{3/2})
    Figure 26. The jumps of the standard Airy parametrix 𝑨(τ)\boldsymbol{A}(\tau).
  3. (3)

    Normalization: As ζ\zeta\to\infty,

    (183) 𝑨(ζ)𝑽1ζσ/4=𝕀+[𝒪(ζ3)𝒪(ζ1)𝒪(ζ2)𝒪(ζ3)],\boldsymbol{A}(\zeta)\boldsymbol{V}^{-1}\zeta^{-\sigma/4}=\mathbb{I}+\begin{bmatrix}\mathcal{O}\left(\zeta^{-3}\right)&\mathcal{O}\left(\zeta^{-1}\right)\\ \mathcal{O}\left(\zeta^{-2}\right)&\mathcal{O}\left(\zeta^{-3}\right)\end{bmatrix},

    where 𝑽\boldsymbol{V} is the unimodular and unitary matrix

    (184) 𝑽:=12[1ii1].\boldsymbol{V}:=\frac{1}{\sqrt{2}}\begin{bmatrix}1&-i\\ -i&1\end{bmatrix}.

The Airy parametrix is solved in terms of the Airy function Ai()\Ai(\cdot). For the explicit formula see Appendix A of [6].

Appendix B Behavior of Re(2h+λ)(2h+\lambda) when xx is real.

In this appendix we provide proofs of statements (33) and (34). In both statements xx is a fixed, real number (and hence, in the pole-free region). The first statement is when xx\in\mathbb{R}, then

(185) Re(2h(z¯,x)+λ(x))=Re(2h(z,x)+λ(x)).\Real\left(2h\left(-\overline{z};x\right)+\lambda(x)\right)=\Real\left(2h(z;x)+\lambda(x)\right).

We prove the equivalent statement that

(186) Re(h(z¯:x))=Re(h(z,x)).\Real\left(h(-\overline{z}:x)\right)=\Real\left(h(z;x)\right).
Proof.

Consider the function T(x):=iS(x)T(x):=iS(x). Then, T(x)T(x) is one of the solutions to the cubic equation

(187) T3xT2=0.T^{3}-xT-2=0.

The discriminant of (187) is 4x31084x^{3}-108, which vanishes at x=3x=3. Indeed, at x=3x=3, (187) has a double root at T=1T=-1 and a simple root at T=2T=2. Since S(x)S(x) is continuous at x=3x=3, it follows that T(3)=2T(3)=2. Further, 4x31084x^{3}-108 does not vanish along the real line (except at x=3x=3), so when xx is real T(x)T(x) is the largest real root of (187). So, when x<3x<3, T(x)T(x) will be the only real root of (187); on the other hand, when x>3x>3, T(x)T(x) will be the largest root among the three distinct real roots of (187). Notice, for each xx\in\mathbb{R} the cubic polynomial p(T):=T3xT2p(T):=T^{3}-xT-2 is negative at T=0T=0. Indeed, P(0)=2P(0)=-2. However, since P(T)+P(T)\to+\infty as T+T\to+\infty, P(T)P(T) must have at least one positive root. Therefore, T(x)T(x), being the largest real root of pp, must be positive, which implies that S(x)S(x) is negative-imaginary for xx\in\mathbb{R}.

Since the square root in (22) is principal, it follows that Δ(x)\Delta(x) is on the positive real axis and

(188) a(x)=b(x)¯.a(x)=-\overline{b(x)}.

Further, (188) (along with basic trigonometric identities) implies when xx is real, the square-root function r(z,x)r(z;x) (defined in (23)) exhibits the symmetry

(189) r(z¯,x)=r(z,x)¯.r\left(-\overline{z};x\right)=-\overline{r(z;x)}.

Fix xx\in\mathbb{R} and consider the bivariate function of real variables uu and vv defined by

(190) j(u,v,x)j(u,v):=h(u+iv)h(u+iv)=h(z)h(z¯)j(u,v;x)\equiv j(u,v):=h(u+iv)-h(-u+iv)=h(z)-h\left(-\overline{z}\right)

(here z=u+ivz=u+iv and j(u,v)j(u,v) is well defined whenever h(z)h(z) is). Notice, (33) holds if and only if the real part of j(u,v)j(u,v) is identically zero. Moreover, since j(0,0)=0j(0,0)=0, it suffices to show that the real part of the partials of jj vanish. Using the Cauchy-Riemann equations one can show this is equivalent to Re(h(z)+h(z¯))=0\Real(h^{\prime}(z)+h^{\prime}(-\overline{z}))=0 and Im(h(z)h(z¯))=0\Imag(h^{\prime}(z)-h^{\prime}(-\overline{z}))=0.

Looking at (28) and (24) we see that h(z)=i(S+2z)r(z)h^{\prime}(z)=i(S+2z)r(z). Find tt\in\mathbb{R} so that S(x)=itS(x)=it. We compute

(191) h(z)±h(z¯)=i(it+2z)r(z)±i(it2z¯)r(z¯)=i(it+2z)r(z)±i(it+2z¯)r(z)¯=i((it+2z)r(z)±(it+2z)r(z)¯).\displaystyle\begin{split}h^{\prime}(z)\pm h^{\prime}(-\overline{z})&=i(it+2z)r(z)\pm i(it-2\overline{z})r(-\overline{z})\\ &=i(it+2z)r(z)\pm i(-it+2\overline{z})\overline{r(z)}\\ &=i\big((it+2z)r(z)\pm\overline{(it+2z)r(z)}\big).\end{split}

Thus, we have that h(z)+h(z¯)h^{\prime}(z)+h^{\prime}(-\overline{z}) is purely imaginary and h(z)h(z¯)h^{\prime}(z)-h^{\prime}(-\overline{z}) is purely real, our desired results. ∎

We now prove when xx\in\mathbb{R}, Re(2h(z,x)+λ(x))\Real(2h(z;x)+\lambda(x)) can at most vanish two times on the real line (in the zz-plane).

Proof.

Fix xx\in\mathbb{R}, and consider the function :\mathcal{F}:\mathbb{R}\to\mathbb{R} defined by

(192) (u):=Re(2h(u,x)+λ(x)).\mathcal{F}(u):=\Real(2h(u;x)+\lambda(x)).

Rolle’s theorem tells us for any two zeros of \mathcal{F}, there exists a point between them such that Re(h)\Real(h^{\prime}) vanishes at that point. In particular, if \mathcal{F} has three or more zeros, then Re(h)\Real(h^{\prime}) would vanish at least two times on \mathbb{R}. Thus, in order to show that \mathcal{F} can have at most two zeros on \mathbb{R} it suffices to show that Re(h)\Real(h^{\prime}) only vanishes once on \mathbb{R}, namely at 00. Recall

(193) h(z)=i(S+2z)r(z).h^{\prime}(z)=i(S+2z)r(z).

Using (188) we see that h(0)=S|b|h^{\prime}(0)=-S|b|. Seeing as SS is purely imaginary, we have that Re(h(0))=0\Real(h^{\prime}(0))=0. Since hh^{\prime} only vanishes at z=az=a, z=bz=b, and z=cz=c (none of which are real numbers), it follows |h(u)|>0|h^{\prime}(u)|>0 for uu\in\mathbb{R}. This means we need only to control arg(h(u))\arg(h^{\prime}(u)). Moreover, the symmetry (189) implies that for uu\in\mathbb{R}, we have

(194) arg(h(u))=πarg(h(u)).\arg(h^{\prime}(-u))=\pi-\arg(h(u)).

Hence, it suffices to show that for u>0u>0 arg(h(u))(π/2,π)\arg(h^{\prime}(u))\in(\pi/2,\pi).

For the upper bound we see that, since SS is negative-imaginary and uu is positive-real, it follows

(195) arg(h(u))=arg(i)+arg(S+2u)+arg(r(u))<π2+arg(a)+arg(a¯)2=π.\arg(h^{\prime}(u))=\arg(i)+\arg(S+2u)+\arg(r(u))<\frac{\pi}{2}+\frac{\arg(-a)+\arg(\overline{a})}{2}=\pi.

Next, a direct calculation shows that for, u>0u>0,

(196) dduarg(h(u))=Im(a)Re(a)2(|a|23u2)(Im(a)2+(Re(a)u)2)(Im(a)2+u2)(Im(a)2+(Re(a)+u)2).\frac{\text{d}}{\text{d}u}\arg(h^{\prime}(u))=\frac{-\Imag(a)\Real(a)^{2}\left(|a|^{2}-3u^{2}\right)}{\left(\Imag(a)^{2}+\left(\Real(a)-u\right)^{2}\right)\left(\Imag(a)^{2}+u^{2}\right)\left(\Imag(a)^{2}+\left(\Real(a)+u\right)^{2}\right)}.

So, arg(h(u))\arg(h^{\prime}(u)) is strictly decreasing on the interval (|a|/3,)(|a|/\sqrt{3},\infty). Further, the normalization of hh implies that h(z)=i4z2+𝒪(1)h^{\prime}(z)=i4z^{2}+\mathcal{O}(1) as zz\to\infty. Thus, as u+u\to+\infty, arg(h(u))π/2\arg(h^{\prime}(u))\to\pi/2, and for finite, positive uu, arg(h(u))>π/2\arg(h^{\prime}(u))>\pi/2. This completes our proof. ∎

References

  • [1] J. Baik, P. Deift, and K. Johansson, On the distribution of the length of the longest increasing subsequence of random permutations. J. Amer. Math. Soc. 12, 1119–1178 (1998).
  • [2] D, Bilman, R. Buckingham, and D. Wang, Far-field asymptotics for multiple-pole solitons in the large-order limit. J. Differential Equations 287, 320–369 (2021).
  • [3] T. Bothner and P. Miller, Rational solutions of the Painlevé-III equation: large parameter asymptotics. Constr. Approx. 51, 123–224 (2020).
  • [4] R. Buckingham, Large-degree asymptotics of rational Painlevé-IV functions associated to generalized Hermite polynomials. Int. Math. Res. Not. IMRN 2020, 5534–5577 (2020).
  • [5] R. Buckingham and K. Liechty, The kk-tacnode process. Probab. Theory Related Fields 175, 341–395 (2017).
  • [6] R. Buckingham and P. Miller, Large-degree asymptotics of rational Painlevé-II functions: noncritical behaviour. Nonlinearity 27, 2489–2578 (2014).
  • [7] R. Buckingham and P. Miller, Large-degree asymptotics of rational Painlevé-II functions: critical behaviour. Nonlinearity 28, 1239–1596 (2014).
  • [8] R. Buckingham and P. Miller, Large-degree asymptotics of rational Painlevé-IV solutions by the isomonodromy method. Constr. Approx. 56 (2022).
  • [9] C. Canuto, M. Quarteroni, and T. Zang, Spectral Methods in Fluid Dynamics. Springer-Verlag, Berlin, Germany (1988).
  • [10] T. Claeys, A. Kuijlaars, and M. Vanlessen, Multi-critical unitary random matrix ensembles and the general Painlevé II equation. Ann. of Math. 167, 601–641 (2008)
  • [11] P. Deift and X. Zhou, A steepest descent method for oscillatory Riemann–Hilbert problems. Asymptotics for the mKdV equation. Ann. of Math. 137, 295–368 (1993).
  • [12] S. Delvaux, Non-intersecting squared Bessel paths at a hard-edge tacnode. Comm. Math. Phys. 324, 715–766 (2013).
  • [13] S. Delvaux, D. Geudens, and L. Zhang, Universality and critical behaviour in the chiral two-matrix model. Nonlinearity 26, 2231–2298 (2013).
  • [14] M. Fasondini, B. Fornberg, and J. Weideman, A computational exploration of the McCoy-Tracy-Wu solutions of the third Painlevé equation. Phys. D 363, 18–43 (2018).
  • [15] B. Fornberg and J. Weideman, A numerical methodology for the Painlevé equations. J. Comput. Phys. 230, 5957–5973 (2011).
  • [16] B. Fornberg and J. Weideman, A computational exploration of the second Painlevé equation. Found. Comput. Math. 14, 985–1016 (2014).
  • [17] S. Hastings and J. McLeod, A boundary value problem associated with the second Painlevé transcendent and the Korteweg-de Vries equation. Arch. Ration. Mech. Anal. 73, 31–51 (1980).
  • [18] NIST Digital Library of Mathematical Functions. https://dlmf.nist.gov/, Release 1.2.0 of 2024-03-27.
  • [19] J. Reeger and B. Fornberg, Painlevé IV: a numerical study of the fundamental domain and beyond. Phys. D 280/281, 1–13 (2014).
  • [20] C. Tracy and H. Widom, Level-spacing distributions and the Airy kernel. Comm. Math. Phys. 159, 151–174 (1994).