GrADyS-GS - A ground station for managing field experiments with Autonomous Vehicles and Wireless Sensor Networks
Abstract
In many kinds of research, collecting data is tailored to individual research. It is usual to use dedicated and not reusable software to collect data. GrADyS Ground Station framework (GrADyS-GS) aims to collect data in a reusable manner with dynamic background tools. This technical report describes GrADyS-GS, a ground station software designed to connect with various technologies to control, monitor, and store results of Mobile Internet of Things field experiments with Autonomous Vehicles (UAV) and Sensor Networks (WSN). In the GrADyS project GrADyS-GS is used with ESP32-based IoT devices on the ground and Unmanned Aerial Vehicles (quad-copters) in the air. The GrADyS-GS tool was created to support the design, development and testing of simulated movement coordination algorithms for the AVs, testing of customized Bluetooth Mesh variations, and overall communication, coordination, and context-awareness field experiments planed in the GraDyS project. Nevertheless, GrADyS-GS is also a general purpose tool, as it relies on a dynamic and easy-to-use Python and JavaScript framework that allows easy customization and (re)utilization in another projects and field experiments with other kinds of IoT devices, other WSN types and protocols, and other kinds of mobile connected flying or ground vehicles. So far, GrADyS-GS has been used to start UAV flights and collects its data in s centralized manner inside GrADyS project.
Keywords Test Control Simulation and Monitoring Field Experiment Ground Station UAV Sensors WSN
1 Introduction
While developing new mobile communication solutions, simulation is a powerful tool for testing, analyzing the performance, and assessing the scalability of the protocols. Nevertheless, when it comes to the deployment of the research-based and engineered system in the wild, and subject to tests in field experiments, then many new challenges come into play. Unlike simulations, field tests usually reveal many unforeseen and unexpected behaviors, related to various causes, and which add up to the long list of "external" factors to consider. This all turns the field experiments much more unpredictable than simulated experiments, and more often than not, the operator of the field test operator must thoroughly analyze the behaviour and the data exchanges of the (sometimes mobile) system elements after the test is concluded. This calls for a tool to control and drive the field experiments, visualize and save experiment-related data for later debugging, and hence perform these tests efficiently.
This work is part of the results generated by the research entitled GrADyS [1] (Ground-and-Air Dynamic sensors networkS). The GrADyS111http://www.lac.inf.puc-rio.br/index.php/gradys/ project was created to investigate the applications of these networks in the monitoring of remote, dangerous, or hard-to-reach regions through the collection of sensor data using UAV swarms.
In the GrADyS[1] (Ground-and-Air Dynamic sensors networkS) project, there are several cooperating components and protocols in the field such as: (a) the flight trajectory of the UAVs is controlled through ArduPilot222https://ardupilot.org/; (b) a distributed algorithm, such as such as DADCA [2], coordinates the movements of the UAV ensamble, relying on single board computers as RaspBerry Pi333https://www.raspberrypi.org/ aboard the UAVs; (c) Wifi and BlueTooth radios with custom firmware running in ESP32-based444https://www.espressif.com/en/products/socs/esp32 devices. Each of these technologies has its development, control, and monitoring stack, making the field experiments to be quite complex.
In many kinds of research, collecting data is tailored to individual research. It is usual to use dedicated and not reusable software to collect data. GrADyS Ground Station framework (GrADyS-GS) aims to collect data in a reusable manner with dynamic background tools.
This technical report describes the GrADyS-GS, created to support the project’s field testing. The ground station is a web application to monitor, control, and display device networks while storing the experiments’ data for later analysis.
The GrADyS-GS contains two primary sub-modules, with the Python programming language and Django Framework, and the front-end module, built with HTML, CSS, and Javascript programming language. Both modules communicate via WebSocket connections.
Currently, GrADyS-GS can connect to and control swarms of UAVs and WSN by organizing and facilitating field experiments that may have been previously simulated using GrADyS-SIM[3].
2 Django/Javascript
The project’s back-end relies on the Django framework, a tool written in Python, for fast and easy web development. It provides an easy-to-setup developing server, an extensible simple URL route map, and a highly modular architecture. The interface logic relies on the JavaScript programming language, the most popular programming language in use.
Both technologies were chosen due to their wide use and popularity, providing a framework with high extensible usability. This ground station has a flexible foundation while built inside the GrADyS project’s requisites. It provides an easy to extend functionality for command buttons, modular components to accept different communication protocols, and highly parameterized components accessible from configuration files.
3 Architecture
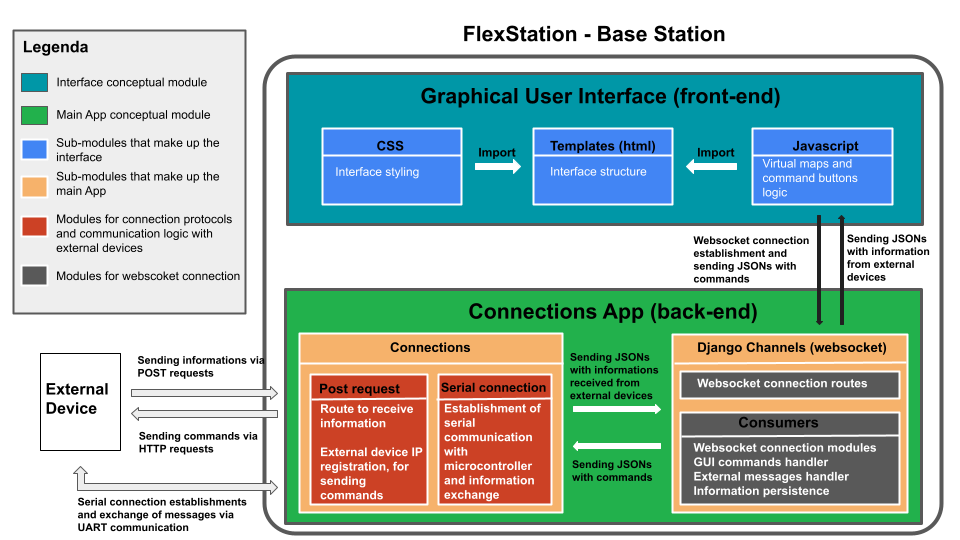
The GrADyS-GS is structured following the classic web development concept, with the Front-end module responsible for the interface and visualization and Back-end module responsible for server-side information processing and communication with external devices. Front-end is built with Javascript language, HTML, or Template language from Django, and Cascading Style Sheets (CSS) language. The back-end is mainly built with Python language, using Django Framework. Both modules communicate with each other via WebSocket channels. A socket connection is a dedicated full-duplex channel based on the Transmission Control Protocol (TCP). This project uses Django Channels library to handle WebSockets communication.
3.1 Back-end
Understanding the server-side structure of this project first required a basic understanding of how Django is structured and how it operates.
3.1.1 Server
Django provides a lightweight development Web server that can be used via the manage.py file. By default, the server runs on port 8000 on the IP address 127.0.0.1 and should not be used on production. It’s runnable with the command line:
With the server up, when the browser accesses the home page, Django will call the corresponding python method, explained in the next section. In this project, the python method called when the home page is accessed will render the index HTML file.
3.1.2 URL/View
Building a URL scheme with Django is a simple task, thanks to the URL/View mapping that the python web framework provides. When a user requests a page from the URL schema, Django does mapping to the corresponding Python function named View. So, for example, the URL scheme below has a mapping between the home page path and index view, also between /command/ path (note that ’command’ is a simple integer) and receive_command_test view.
Inside the main app’s folder, connections, there is urls.py and views.py files. The urls.py file is responsible for associating a URL address and a view. Note that there is another urls.py file inside the config folder that is responsible for the whole project’s pathing. So, for example, if there was another app in this project, a prefix path could be created to that specific app. The main app has the default path, so there is no prefix attached.
If it is needed to add a new URL path, it should be added a new path() item inside the URL patterns list, in /connections/urls.py. For example:
Now it is necessary a view to handle the new URL path request. A view is a Python function that takes a Web request and returns a Web response. This response can be the HTML contents of a Web page, or a JSON or a redirect, or a 404 error, or anything. The view itself contains whatever arbitrary logic is necessary to return that response.
The Listing 5 represents the index view, accessed when the home page is loaded. It receives a request, creates a context variable with the google maps key from .env, and load the index.html template, attached with the context. We store our views inside /connections/views.py.
To send additional parameters, it can be sent via the url body, for example, localhost:8000/new-path/10/. This URL need to be declared inside the connections/urls.py as:
Furthermore, the new view can receive an id parameter, as follows:
Now, accessing the default server 127.0.0.1:8000/new-path/5/will call the new_view method, sending the parameter 5.
This URL pathing, provided by Django’s framework, enables external devices to send POST Requests with information on the message’s body. The corresponding View is in charge of the logic on how to handle the message. It can save the data received, handle errors, return an acknowledge message, register the device on a session list, forward to the front-end the JSON with the information received, and anything the application need for that URL.
3.2 Front-end
The front-end consists of templates files, CSS styling files, and Javascript files. As shown above, the home page template file is rendered when the default ip+port is accessed. New templates files can be added inside the /templates/ folder. They work very similarly to HTML files, with some add-ons.
The code above introduces the ’{% %}’ tag (that is not HTML native), in this case, to load a CSS file to the page.
Load a Javascript file in a template, the logic is the same, as long this Javascript file is inside the folder that STATIC_URL variable is pointing to. This variable is inside config/settings.py. In our case, the STATIC_URL variable is pointing to /static/ folder.
The index.html home page template loads gmap.js, responsible for Google Map’s virtual map and main.js, which is responsible for starting websockets connections with the back-end and for the button’s logic.
3.3 Communication
The sequence message diagram, Figure 2 represents the message flow between external devices and the main modules from this framework.
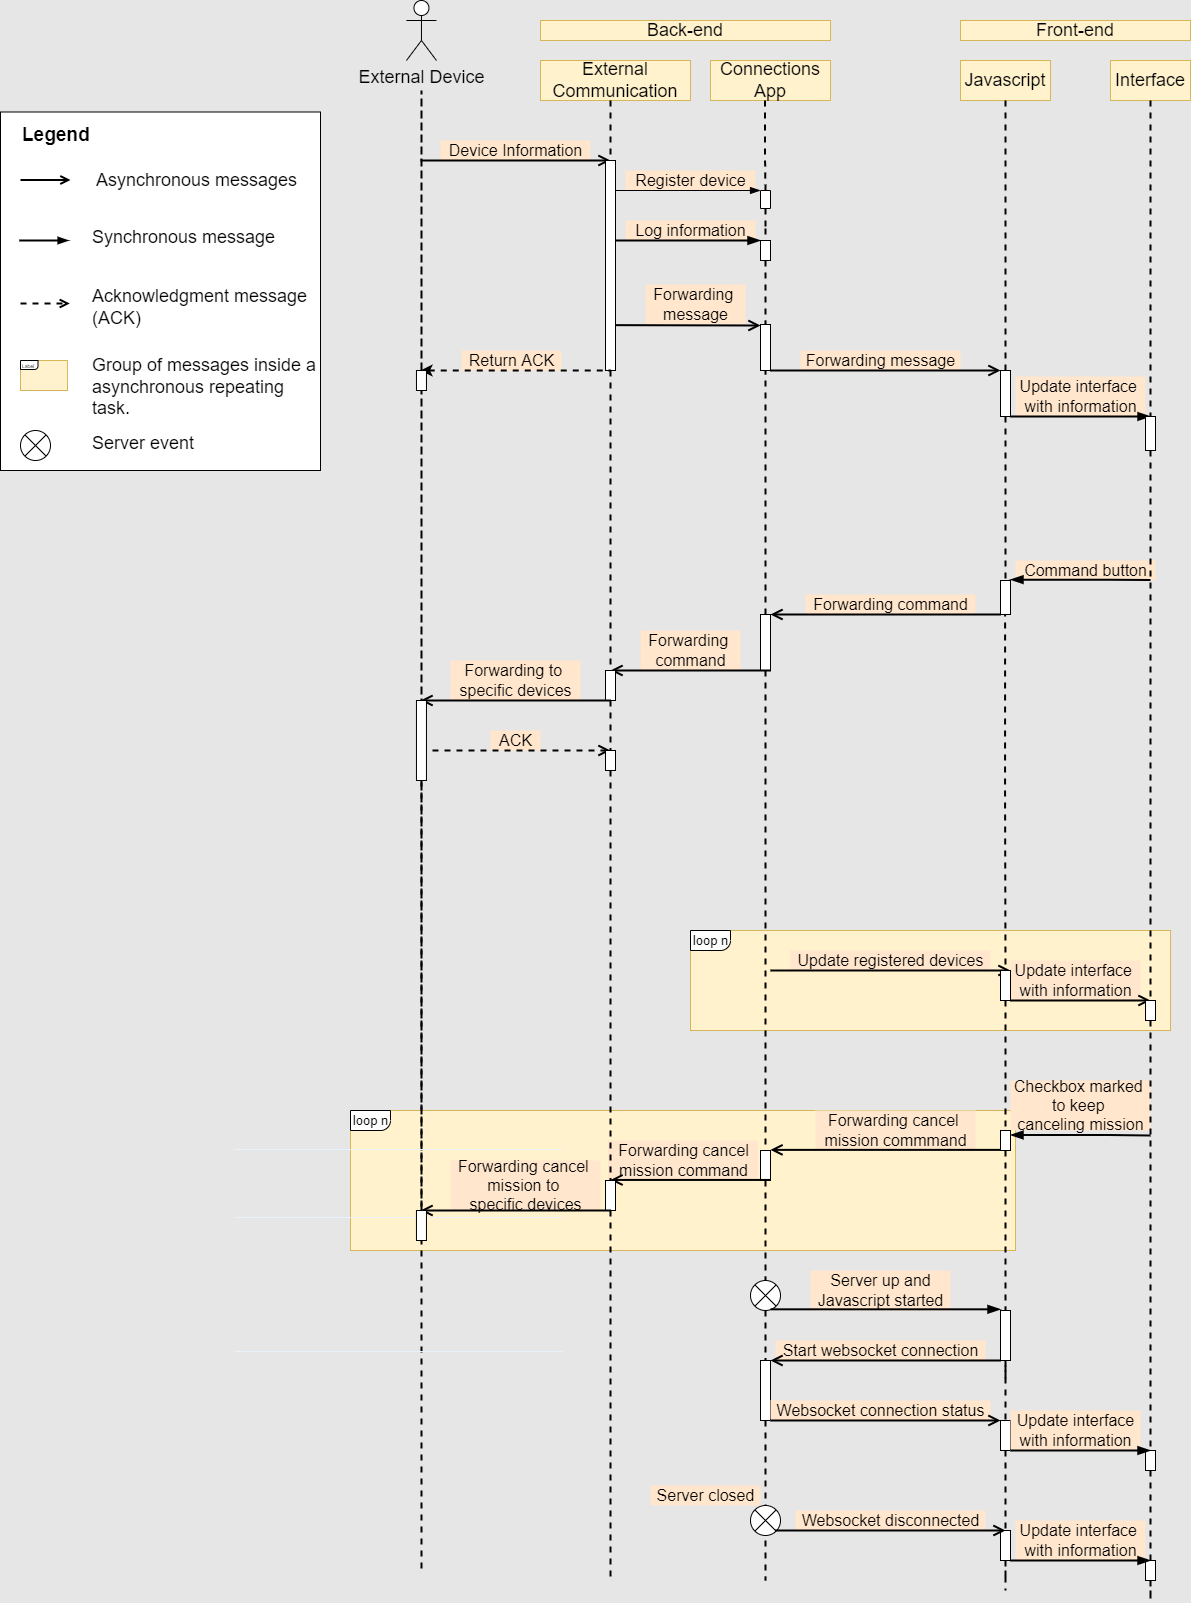
The two main modules communicate with each other, exchanging JSON messages and external devices with the back-end.
The submodule, containing Javascript files, starts the socket connection with a route stated inside the Django Channels submodule. The information gate of the ground station to external devices is through the Connections submodule, which contains the routes and logic to receive/send information.
Note that the message protocol between the framework and external devices can differ from project to project, changing the way the information is delivered, or the commands are handled. But, the messages flow between the back-end and front-end modules should remain similar to this diagram. Important things to notice are:
-
•
When a device sends information to the framework, the back-end will register this device. If not already on the persistent list, log the information and forward it to the front-end, to update the interface.
-
•
There is a Consumer in charge to keep the persistent device list, with the registered devices, inside /connections/consumers_wrapper/update_periodically.py. In this Consumer, there is a task to update the activity status of the devices on the list, every X seconds, specified at config.ini. This is represented on the third group of messages flow in the diagram above.
-
•
There is the possibility to create checkbox buttons that will trigger a constant task while the checkbox is pressed. This is represented in the fourth group of messages flow in the sequence diagram.
3.3.1 Internal Communication
The main app form of communication with templates, or HTML, is using WebSocket connections. Django Channels package mediates these connections. The logic to establish a WebSocket connection is similar to the URL/View logic presented on item 3.1.2. The connections/routing.py file contains the WebSocket URL patterns, or schema:
As previously mentioned, Django Channels makes a mapping, associating an URL with a Consumer. A Consumer is a Python Class that handles a WebSocket connection. So, when our JavaScript is loaded, it tries to connect with a specific Consumer, accessing a specific URL inside the ws_urlpatters.
When this command is received, the ConnectionConsumer class is called, and a connection is initiated. The Consumers are inside connections/consumers_wrappers/ and a new one can be created, inheriting WebsocketConsumer or AsyncWebsocketConsumer, depending on its functionality. You can substitute three main methods:
-
•
connect: called when the specific url is accessed and start a dedicated connection with self.accept. This is the only method you NEED to override.
-
•
receive: called when a message is sent via socket connection.
-
•
disconnect: called when the connection is closed
Creating a new Consumer, is simple as creating a new file inside connections/consumers_wrapper/ with a Class like:
To send a message to the other side of connection (Django -> Javascript) it can be done using the send method, inherted from WebSocket class:
Creating the new path can be done adding a new path to ws_urlpatters list:
To start a websocket connection, from the Front-end, it is necessary to create a new object on the JavaScript file, passing as argument an available URL in the routing schema.
Finnaly, accessing ws://localhost:8000/ws/new-socket/, a dedicated full-duplex connection should be stablished and our two ends can communicate with each other.
This WebSocket object created has methods to interact with the socket connection. Here are the main ones:
-
•
send: Transmits data to the server via the WebSocket connection
socket.send(jsonToSend);Listing 16: Send a JSON to the back-end -
•
readyState: The current state of the connection, this is one of the Ready state constants. Read-only.
Listing 17: Use readyState to check connection status -
•
onclose: An event listener to be called when the readyState of the WebSocket connection changes to CLOSED.
Listing 18: Use onclose to handle disconnection -
•
onmessage: An event listener to be called when a message is received from the server. Receives a message parameter.
Listing 19: Use onmessage to handle receiving a message
3.3.2 External Communication
The primary purpose of this framework is to exchange information with other devices. Currently, there are implemented two ways for external connections.
The first way is to plugin an ESP32 microcontroller to the framework’s machine. This microcontroller should be able to detect other devices that receive and send information to them. Our framework can establish a UART connection with a plugged ESP32 microcontroller, receive everything sent via serial, and send commands via serial, making the microcontroller responsible for retransmitting the command. In order to accept a connection with an ESP32 microcontroller, it is necessary to insert the correct UART Port and baud rate inside config.ini. The SerialConnection class, from /connections/serial\_connector.py, is instantiated when javascript starts a WebSocket connection of this type. The instantiated object keeps trying connection with the UART Port. Once a microcontroller is plugged in, the interface indicates this change, and you can exchange information through the ESP32 microcontroller.
Another way to communicate with our framework is with POST requests. A device, an UAV (drone) per se, wants to send its location to our ground station. This can be achieved with a POST request to the specific ground station URL.
Note that the device should attach, on the message, it’s own IP and PORT, so our framework can send commands back to it. The specific URL, to receive POSTs, is mapped to a view. So, when the device send it’s location on body’s request, the post_to_socket view receive the request and extracts the information from it’s body. We want to send this information to our interface and also to save it in the log file. Who is responsible for both actions is the PostConsumer, inside /connections/consumers_wrapper/post_consumer.py. This way, the post_to_socket view needs to send the message to PostConsumer, getting an instance of this class and calling this Class function receive_post(message).
Sending a message to an external device is also done by Consumers. When a command button is activated on the interface, the main.js uses the async method socket.send(), to transmit the command direct to the Consumer (back-end). The message received from the main.js, contains which device or group of devices it should be sent. It also contains the ID of the external devices that will receive the command. The first step is to search on the registered device’s list for the address (IP) of the devices.
There is a list on config.ini mapping the commands code (integer) to a specific endpoint, that should be added to the IP+Port of the external device.
The list contains the endpoint and the HTTP request type, if it is a GET or POST request.
With the address complete, the command will be sent via HTTP request.
Depending on the type of the request, the command will be sent and an asynchronous task will be created.
3.4 Data persistence
One of the main features of this project is the data persistence of every event that occurred during the experiments. Log files are generated, when starting the application, and filled in as messages are received, errors are caught, commands are sent, and other events that are of importance to the experiment.
To generate the .log files, the logging package, for Python, is used. Inside /connections/utils/logger.py there is a class Logger, responsible for the persistent logic. It’s possible to extend and copy this class to other modules, for example, at the uav_simulator/ module that has this class with different logic.
When the server start, a .log file is created, inside the folder specified by the Logger’s path variable, and the file’s name is composed by the module name followed by the date created. The example above represents a .log file created inside the uav_simulator module at 25/01/2022 08:18:40.
To fill this file, it must be inserted in code calls of the methods from the Logger class, according to it’s needs. The example above includes the code from the PostConsumer class, inside the method to handle a external message received.
The logger object is global and already instantiated. Two log methods are called, to save the data received and to save the Exception caught when trying to send the message to the front-end via socket.
The .log file format is specified inside the Logger class, using the syntax accepted by the Formatting class, form logging package. For more information on how to format the .log file, https://docs.python.org/3/library/logging.html#logging.Formatter.
The example above has two messages, formatted with the date of the event, who triggered the event, where it was triggered and the message itself.
4 Usage
4.1 Installation
Prerequisites
In order to use the components in this repository, you need to have Python 3.0 or higher installed. Also, pip, a Python package manager, is recommended to manage and automatically install the required packages of this project. After installing Python, pip should be installed by default. You can check if it’s already installed and its version:
Cloning the repository
With Python3 installed, you should be able to clone the repository: https://github.com/BrenoFischer/gradys-gs
Creating a virtual environment
In order to keep this framework in a separate environment, with it’s own packages and versions, it’s recommended to create a virtual environment. On Windows:
On Linux, you can check if virtualenv is already installed, install it, if not already installed, and create the venv:
This will create a folder called venv, inside the project’s folder. Now you have to activate the environment to install/use packages only from this venv.
Installing necessary packages
The list of necessary packages are inside requeriments.txt file, if you are using Windows. It’ll be installed automatically, using the Python package manager, pip. You can install, running on Windows console:
On Linux, you should run the compatible script file, requeriments_linux.txt:
Secret variables
This project uses Google Maps services, with paid features. To use these functionalities you need to have or create a Google Maps API Key. Google’s guide on how to create an API Key: https://developers.google.com/maps/gmp-get-started This project also use Django Framework that has a secret key variable, for security purposes. You can generate your Django secret key here: https://djecrety.ir/
The framework will load automatically these as environment variables. With both private keys created,
-
•
Inside /config/.env, insert the secret keys:
-
–
SECRET_KEY=’xxxx’ Changing ’xxxx’ with your Django secret key
-
–
GOOGLE_MAPS_API_KEY=’xxxx’ Changing ’xxxx’ with your Google Maps key
-
–
Running the server
Django provides lightweight development Web server, that you can use via manage.py file. By default, the server runs on port 8000 on the IP address 127.0.0.1 and should not be used on production. You can run with:
Or, with diferent IP/PORT, in the example below, Port 8000 on IP address 0.0.0.0. This IP is will listen to all IP adresses the machine supports. So for example, with this server configuration up, you can open the web navigator with localhost:8000 and the inet ip obtainable from ifconfig (linux environment):
Remember to insert, inside config.ini file, the correct IP + Port, on [post] category, if changed to a specific IP, when running the command above.
Connecting to home page
Now you should be able to connect to the home page, acessing, on your browser, the IP/PORT the server is up, on default: localhost:8000.
4.2 Extension
Since the project is Open Source anyone is able to download the source code, experiment and create new things as the project’s necessities. The project’s architecture was organized with extension in mind and it especially facilitates the development of new form of external communications, sets of buttons functionalities and logging formats.
4.2.1 Interface composition
The interface is separated into four sections:
-
•
Virtual map
-
•
Command buttons
-
•
Text log
-
•
Connection status
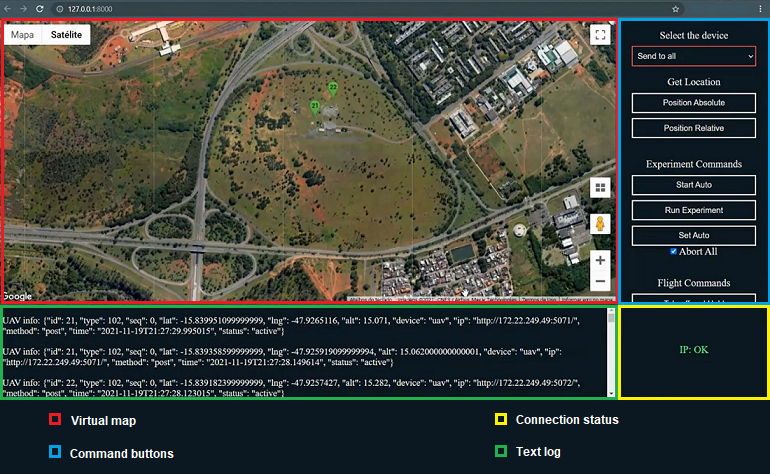
Virtual map section: Google’s virtual map occupies the biggest section. It’s an interactive map, scrollable and capable of zoom in/zoom out. Note that an internet connection is needed to load the map, after the web page is rendered. Javascript files handle the virtual map’s logic, automatically updating the devices location and status, upon receiving JSON messages from the back-end.
Upon receiving an information from the back-end, the Javascript method above will be called, updating the map.
Command buttons section: the command buttons section contains a select field, to select a group or a specific device. All commands sent will be only to the selected option. This section also contains subsections of buttons, with a title and the buttons set. A button can be a checkbox button, that’ll trigger the command while checked and a single action button, that’ll trigger an action on click. More buttons can be created, explained in detail in the subsection "Creating new buttons".
Text log section: the text log section shows all messages received by the ground station, in white text, and sent by the ground station, in red text.
Connection status section: the connection status section shows if the multiple connections are available to use.
4.2.2 Creating new buttons
It’s possible to register a new button inside the template, create a onClick callback function and send the command via websocket to Django (back-end).
-
•
Create new button in /templates/index.html
<input class="button" id="new-button" type="button" value="New Command">Listing 39: New button on /templates/index.html -
•
Register an onclick function, in /static/connections/main.js.
var newCommandNumber = 40document.querySelector(’#new-button’).onclick = function(e) {sendCommand(newCommandNumber);};Listing 40: Register onclick and code number on /static/connections/main.js -
•
Send to the back-end, when button is clicked
function sendCommand(type) {jsonToSend = {id: 1, type: type}// ...if (socket.readyState == WebSocket.OPEN) {socket.send(jsonToSend);}}Listing 41: Button’s logic on /static/connections/main.js
Notice that the socket object must be instatiated already, and the connection ’OPEN’. The corresponding Consumer will receive the message and handle, acording to it’s command type.
You already have a button on interface that sends a command, in this case ’40’, to a Consumer. This Consumer will be in charge to the command logic. Inside the ’receive’ method of this Consumer’s Class, it’s up to you to write the command’s logic, according to your communication protocol. When handling with HTTP requests, you can insert the new command to the command’s list, inside config.ini file. The Consumer can iterate this list and check the command received, mapping to the right endpoint.
This list contains a number as the key, to the corresponding endpoint address, that will receive the HTTP request. The type of request is represented after the comma, with no spaces. If your communication is using HTTP requests and this list, your new list, with the new command, should look like this:
4.2.3 Changing parameters
Some of the framework’s informations are initialized by the config.ini file. This file is located on the project root folder. Below are listed the parameters that can be changed.
UART Connection
One way this framework can comunicate with a network is with a dedicated ESP32, using UART Protocol. The ESP device connected via serial has a specific PORT and Baudrate, that can be changed inside config.ini with the [serial] tag:
POST request
Another way to comunicate with nodes of the network is receiving/sending information via POST/GET Requests. Django provides a routing system that acessibles URLs trigger methods, or Views. A device can send a POST request to http://127.0.0.1:8000/update-info/ (or IP/PORT running the application). Notice that a device should send inside the message it’s own IP/PORT, so the application can send commands via HTTP requests. This structure is described with more details below, on the Project Struct topic.
Inside the config.ini file, below the [post] tag, you can change some of the protocol’s variables:
The application saves the latest messages of unique devices in a list, inside the update_periodically_consumer.py, for each execution. From time to time, it’s sent to the front-end, via web-socket, with the activity status of each device. A device can be active, on hold and inactive, depending on the interval of it’s last message. These variables can be adjusted in the config.ini file, below the [list-updater] tag:
4.2.4 Inserting new external communication protocols
This framework is designed to accept different forms of external communication, providing the internal structure to assist the experimental tests. The logic and code of the new communication is up to the developer to write and this section will guide on this process.
Because the communication module of the ground station is built using Django, the new protocol code have to be written using the Python Programming Language. A new Consumer can be created on /connections/consumers_wrappers/, to handle the internal messages, exchanging via WebSocket with the Front-end. How the message will reach this Consumer is up to the developer. An example is cited on the External Communication subsection, where a View receive the external information and instantiate a Consumer object, to forward the message received.
With the Consumer created and connected with the new external communication module, a new WebSocket connection should be created, as explained on Internal Communication subsection.
The way the Consumer will handle commands from the interface should be written on receive(data) method.
5 Conclusion
This work is a step within a set of deliverables for a project. The GrADyS project uses this tool to validate previously simulated protocols and compare field test results with accurate sensors and UAVs.
At the moment, GrADyS-GS can connect and control swarms of UAVs and WSN by organizing and facilitating field experiments that are previously simulated on GrADyS-SIM[3] which new Bluetooth routing algorithms such as MAM[4].
This tool is in whole evolution and is being used in real tests, which facilitates and increases its functionality in a natural, practical, and result-oriented way.
In our roadmap, there is the integration with new devices and a Bind with the discrete event simulator OMNET++/INET.
We invite the open source community to fork it, use it, and contribute at https://github.com/BrenoFischer/gradys-gs.
Acknowledgments
This study was financed in part by AFOSR grant FA9550-20-1-0285.
References
- [1] Bruno José Olivieri De Souza, Marcelo Paulon, Jucá Vasconcelos, and Markus Endler. GrADyS: Exploring movement awareness for efficient routing in Ground-and-Air Dynamic Sensor Networks. dec 2020.
- [2] Bruno José Olivieri de Souza and Markus Endler. Evaluating flight coordination approaches of UAV squads for WSN data collection enhancing the internet range on WSN data collection. Journal of Internet Services and Applications, 11(1):4, dec 2020.
- [3] Thiago Lamenza, Marcelo Paulon, Breno Perricone, Bruno José Olivieri de Souza, and Markus Endler. GrADyS-SIM - A OMNET++/INET simulation framework for Internet of Flying things. arXiv.org, pages 1–9, 2022.
- [4] Marcelo Paulon J.V., Bruno José Olivieri de Souza, and Markus Endler. Exploring data collection on Bluetooth Mesh networks. Ad Hoc Networks, 130(February):102809, 2022.