The GlueX Start Counter Detector
Abstract
The design, simulation, fabrication, calibration, and performance of the GlueX Start Counter detector is described. The Start Counter was designed to operate at integrated rates of up to 9 MHz with a timing resolution in the range of 500 to 825 ps (FWHM). The Start Counter provides excellent solid angle coverage, a high degree of segmentation for background rejection, and can be utilized in the level 1 trigger for the experiment. It consists of a cylindrical array of 30 thin scintillators with pointed ends that bend towards the beam line at the downstream end. Magnetic field insensitive silicon photomultiplier detectors were used as the light sensors.
keywords:
GlueX , Multi-Pixel Photon Counter , Plastic Scintillator , Silicon Photomultiplier1 Introduction
The GlueX experiment, staged in Hall D at the Thomas Jefferson National Accelerator Facility (TJNAF), primarily aims to study the spectrum of photo-produced mesons with unprecedented statistics in search for gluonic degrees of freedom. The coherent bremsstrahlung technique is implemented to produce a linearly polarized photon beam that impinges on a liquid target. A Start Counter detector was fabricated to properly identify the photon beam buckets and to provide accurate timing information.
2 Design
In this section we discuss the details of the GlueX Start Counter design including the scintillators, support structure, light sensors and read out electronics.
2.1 Overview
The Start Counter detector (ST), shown in Fig. 1, surrounds a 30 cm long liquid target while providing solid angle coverage relative to the target center.

The primary purpose of the ST is to identify the photon beam bucket associated with the event reaction. It is designed to operate at tagged photon beam intensities of up to in the coherent peak where the photons range in energy from 8.4 to 9.0 GeV[1]. The ST has a high degree of segmentation to limit the per paddle rates while also providing background rejection information. In order to resolve the 4 ns electron beam bunch structure delivered by the CEBAF to Hall-D with accuracy, the GlueX Start Counter time resolution is required to be . It also facilitates particle identification and can be utilized in the level 1 trigger of the GlueX experiment during high luminosity running[2][3].
The ST has a cylindrical shape consisting of an array of 30 scintillators. Their pointed ends bend towards the beam line at the downstream end (Fig. 2).

EJ-200 scintillator material from Eljen Technology[4] was selected for this application. EJ-200 has a decay time of 2.1 ns and a long attenuation length[5]. Silicon photomultiplier (SiPM) detectors were selected as the light sensors. These sensors are not affected by the 2 T magnetic field produced by the GlueX superconducting solenoid magnet. The SiPMs were placed as close as possible to the upstream end of each scintillator element thereby minimizing the loss of scintillation light[2].
2.2 Scintillator Paddles
Individual paddles were machined from long, thin, scintillator bars. Each paddle was manufactured to be 3 mm thick and diamond milled to be 600 mm in length and wide. The paddles were bent around a highly polished aluminum drum by applying localized infrared heating to the bend region. The bent scintillator bars were then sent to McNeal Enterprises Inc.[6], a plastic fabrication company, where they were machined to the desired geometry illustrated in Fig. 3.

The paddles can be classified into three sections from the upstream to downstream end of the scintillator. The straight section is 39.5 cm in length and is oriented parallel to both the target cell and beam line. The bend region is a arc of radius 120 cm following the straight section. The tapered nose region is located past the target chamber and bends towards the beam line such that the tip of the nose is at a radial distance of 2 cm from the beam line.
After the straight scintillator bar was bent to the desired geometry the two flat surfaces, oriented orthogonal to the wide top and bottom surfaces, were cut at a angle. During this process, the width of the top and bottom surfaces of the straight section were machined to be 16.92 mm and 16.29 mm wide respectively. Thus, each of the paddles may be rotated with respect to the adjacent paddles so that they form a cylindrical shape with a conical end. This geometrical design for the ST increases solid angle coverage while minimizing multiple scattering.
2.3 Support Structure
The ST scintillator paddles are placed atop a low density Rohacell[7] foam support structure which envelopes the target chamber, illustrated in Fig. 1. The Rohacell is 11 mm thick and is rigidly attached to the support hub at the upstream end and extends along the length of paddles, partly covering the conical nose section. The cylindrical part of the Rohacell is reinforced with three layers of carbon fiber, each with a thickness of ; this is illustrated in green in Figures 2 and 4.
The various layers of material that comprise the ST are illustrated in Fig. 4.

To ensure that the detector is light-tight, a plastic collar was placed around the top of the SiPMs at the upstream end. The collar serves as a lip to which a cylindrical sheet of light insulation film (Tedlar[8]) is attached. The nose section is covered by a cone of Tedlar which connects to the cylindrical section. An additional cone of Tedlar is taped to the nose of the Rohacell and attached to the top Tedlar cone layer in order to ensure light-tightness. A summary of the materials utilized in the ST are presented in Table 1.
| Item | Brand name | Material | Thickness (mm) | Density () | |
|---|---|---|---|---|---|
| Carbon fiber support | Carbon fiber | Carbon | 1.950 | 1.523 | |
| Rohacell support | Rohacell | Polymethacrylimide | 11.0 | 0.075 | |
| Radial shims | Kapton | Polyimide (type HN) | 0.762 | 1.42 | |
| Reflective film | Aluminum foil | Aluminum | 0.016 | 2.70 | |
| Scintillator | EJ-200 | Polyvinyltoluene | 3.0 | 1.023 | |
| Bundling wrap | Stretch film | Polyethelene | 0.101 | 0.917 | |
| Light insulation film | Tedlar | Polyvinyl Fluoride | 0.050 | 1.50 |
2.4 SiPM Readout Detectors
Each scintillator bar is read out with an array of four magnetic field insensitive Hamamatsu S10931-050P multi-pixel photon counters (MPPCs)[9]. Studies of several photo-detectors were performed in the initial design phase of the ST[10]. Based on these studies, the S10931-050P model was selected. An individual MPPC, here referred to as a “SiPM”, consists of 3600 individual avalanche photo-diode (APD) pixel counters operating in Geiger mode. The signal output from each SiPM is the sum of the outputs from all 3600 APD pixels[11].
The SiPM detectors are housed in a ceramic case that is surface mounted to a custom-fabricated printed circuit board (PCB). The PCB is rigidly attached to the lip of the upstream support hub. The individual ST scintillators are coupled to the SiPM arrays via an 250 m air gap.
2.5 Readout Electronics
There are three primary components of the ST detector readout system. The first component “ST1”, shown in Fig. 5, collects scintillation light from three paddles independently and distributes the bias voltages for the SiPMs.
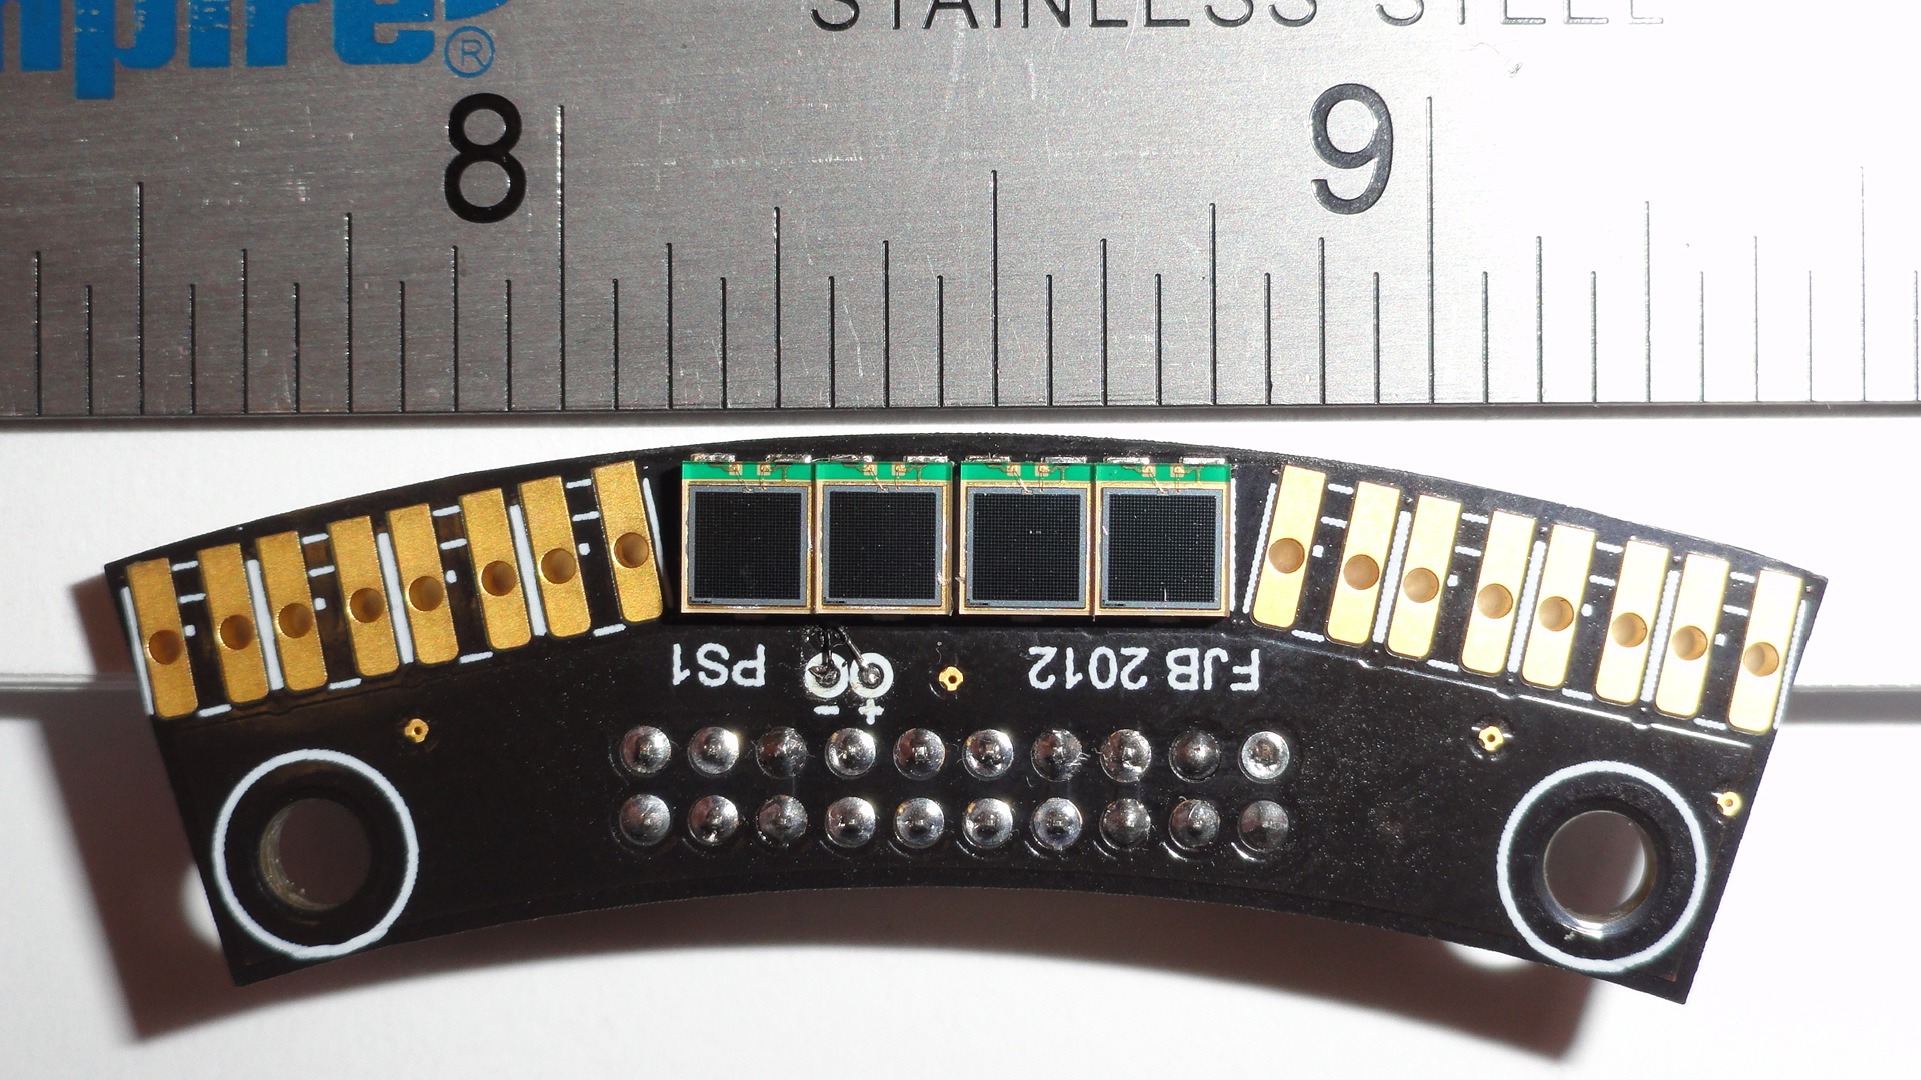
Each array of four SiPMs has a thermocouple for temperature monitoring.
The second component “ST2”, shown in Fig. 6, has three pre-amplifiers, three buffers, and three factor-five amplifiers.
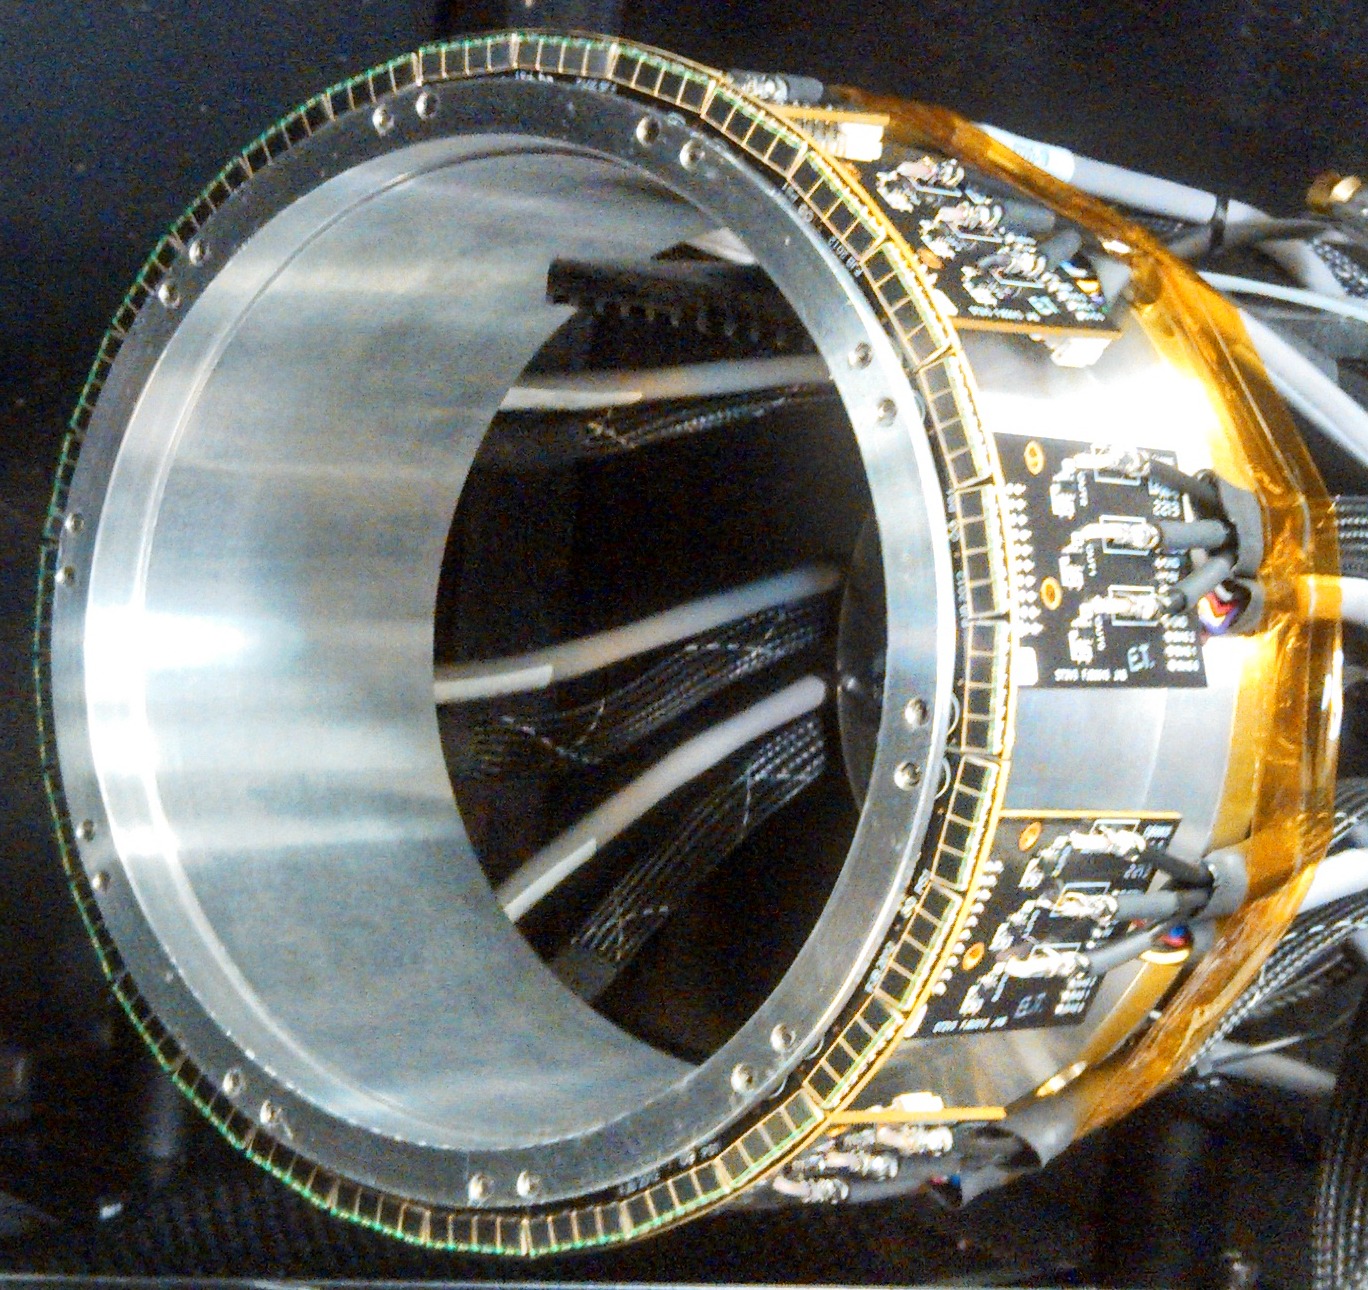
The output of each preamp is split; buffered for the analog-to-digital converter (ADC) output, and amplified for the time to digital converter (TDC) output. The ADC outputs are digitized by Jefferson Lab VXS 250 MHz Flash ADC modules[12]. The TDC outputs are input into Jefferson Lab leading edge discriminators, followed by a high resolution 32 channel Jefferson Lab VXS F1TDC V2 module[13]. Furthermore, the ST2 has three bias distribution channels with individual temperature compensation via thermistors. The ST2 is attached to the ST1 via a hermaphroditic connector.
The third component of the readout system, “ST3”, provides the interface for the power and bias supplies. It also routes the ADC and TDC outputs as well as the thermocouple output. The ST3 is installed upstream of the Start Counter next to the beam pipe. A schematic of the ST readout electronics is illustrated in Fig. 7.

3 Simulation
In this section, Monte Carlo (MC) simulations of the performance and characteristics of machined scintillators are discussed. These studies were performed using the Geant4 tool-kit, which simulates the passage of particles through matter [14]. Comparisons are made with data observed in experiments conducted on the bench (Sec. 5.2) and with beam data (Sec. 7).
3.1 Simulating a Simplified Model of the ST
As discussed in Sec. 2.2, the ST paddle geometry has a nose section which tapers at the downstream end. This causes the light collection efficiency of hits in the nose section to increase as the hit position moves farther from the photo-detectors, contrary to the usual behavior of scintillator material.
A simple Geant4 simulation was conducted to investigate the light collection efficiency. The details of the simulation are discussed in Ref. [2]. Only the two trapezoidal regions of a machined scintillator paddle were considered: the wide straight section and the tapered nose section.
Ten thousand optical photons were generated at 16 different locations inside the medium of the scintillator. The photon energies ranged between 0.5 and 3.0 eV[15] and were generated isotropically from points along a 3 mm path in the scintillator medium. This path is oriented orthogonal to the wide surface of the scintillator. The number of photons detected by the SiPM, denoted as “SiPM Hits”, is shown in Figures 8 and 9 as a function of the source locations. For these studies, 100% detection efficiency was assumed for the simulated SiPM. In the case of the nose section, the SiPM was placed at the wider upstream end of the simulated scintillator bar. The results for this simulation are presented in Fig. 8.

The simulation shows that the tapering trapezoidal geometry of the nose section results in improved light collection as the source moves further away from the readout detector. There is an increase of 50% in light collection as the source is moved from the near end to the far end of the nose section. The quasi-rectangular straight section shows the typical loss off light yield as the source moves away from the photon detector.
3.2 Simulating Machined Scintillator Geometry
Further simulations were conducted to study the effects of the ST scintillator geometry and optical surface quality on light collection. The scintillator geometry was imported into Geant4 from a Vectorworks CAD drawing utilizing the CADMesh utility[16]. The SiPM was modeled as a volume with a 100 air gap between it and the wide end of the straight section. The volume surrounding the scintillator was defined to be air. The scintillator material, SiPM photon detector, and optical photons were defined in an a manner identical to that discussed in Sec. 3.1.
To simulate the imperfections of scintillator surfaces, an optical surface “skin” was defined. The “skin” conformed to the POLISH and UNIFIED physics models[17] and was of the type “dielectric-dielectric”. Both the transmission efficiency and reflection parameters were implemented as free parameters in order to study their various effects on light transmission.
The POLISH model simulates a perfectly polished surface while the UNIFIED model defines the finish of the scintillator surface both of which are illustrated in Fig. 9 [17].

As described in section 3.1, 10,000 optical photons were generated in the scintillator medium every 2.5 cm and the number of hits in the SiPM were recorded. For the POLISH model, only the transmission efficiency was varied. For the UNIFIED model, and the radiant intensity parameters were held constant while , which characterizes the standard deviation of the surfaces micro-facet orientation, was varied. In both instances the attenuation length was extracted in the straight section. The results are shown in Fig. 10.

For the POLISH model it is clear that if the transmission efficiency increases, i.e. the reflection efficiency decreases, the amount of light collected in the SiPM decreases as illustrated in Fig. 10. Similarly, as the number of micro-facet orientations increase, meaning a more coarsely ground surface, the amount of light collection in the SiPM also decreases. Moreover, good surface quality enhances the rise in light collection in the nose region.
4 Misalignment Studies
Here we discuss the relative alignment of a scintillator paddle with a SiPM detector and its effects on light collection and time resolution.
4.1 Experimental Set-up
The SiPM was mounted atop a Newport MT-XYZ (MT) linear translation stage[18] with adjustment screws providing translations of per rotation. The SiPM collected light from a scintillator paddle at the upstream end of the straight section. A source and trigger photomultiplier tube (PMT) were fixed downstream from the readout end. The response of the SiPM was recorded as a function of its relative position to the scintillator.
Utilizing a camera, the vertical and horizontal alignment of the SiPM relative to the scintillator was measured with accuracy.

Further details of the experimental set-up are discussed in Ref. [2].
4.2 Vertical Alignment of SiPM and Scintillator
The scintillator remained fixed while the SiPM was scanned across the upstream end of the scintillator (Fig. 11). During this scan, the horizontal alignment () of the SiPM and scintillator was fixed at a distance of and was monitored closely. At the SiPM and scintillator are aligned vertically. The measurements and simulations are shown in Fig. 12.

There is no significant variation of time resolution within a range of the optimal alignment.
A Geant4 simulation, done in a manner similar to that discussed in section 3.2, was utilized to study the effect of vertical misalignment. The photon collection statistics at various -positions in simulation matched data taken on the bench. Ergo, the measured time resolution is dominated by photon collection statistics. Thus, we determined the simulated time resolutions empirically, by scaling light collection to the time resolutions measured on the bench. The acceptable range of vertical misalignment is approximately .
4.3 Horizontal Alignment of SiPM and Scintillator
The effects of varying the horizontal alignment were also studied. While the horizontal alignment () was varied, the vertical alignment () was kept constant at the optimal location (), and was monitored both optically and manually with a micrometer.
The SiPM was moved along the -axis. We defined to be the position where the active area of the SiPM was flush against the face of the scintillator paddle. The results of this study are illustrated in Fig. 13.

While the simulation underestimates the degradation of resolution with increasing horizontal alignment, it is clear from the data that the optimal coupling range is . Moreover, there is no significant degradation in time resolution for .
5 Fabrication
The details of polishing and characterizing machined scintillators, as well as the construction of the Start Counter are discussed.
5.1 Polishing Machined Scintillators
While undergoing edge polishing at McNeil Enterprises, the machined scintillators incurred surface damage and were exposed to chemical contaminants known to harm scintillator surfaces. Polishing was required to restore adequate performance characteristics.
To polish the machined scintillator surfaces, Buehler Micropolish II deagglomerated alumina suspension was utilized [19]. The polishing suspension was diluted with a 5:1 ratio of de-ionized to alumina and applied to a cold, wet Caswell Canton flannel buffing wheel [20] operated at speeds less than 1500 RPMs. The surfaces of the scintillators were carefully buffed until the large surface defects were removed. In order to eliminate small localized surface defects, hand polishing with a soft NOVUS premium Polish Mate microfilament cloth [21] and diluted polishing suspension was applied. These polishing procedures made the scintillators void of most visible scratches and surface defects.
The improved surface quality of the polished scintillators are shown in Fig. 14 where a scintillator paddle before and after polishing is shown.

A red laser beam was shone into the scintillator medium from the upstream end aimed at one edge. The unpolished scintillator had such poor surface quality that the reflections of the laser in the bend region could not be resolved. However, the reflections in the polished scintillator can clearly be observed traversing the bend and nose region. On average, at the tip of the nose, the scintillators exhibited a 15% improvement in time resolution. Moreover, variation in performance from counter to counter was substantially reduced.
5.2 Testing
The polished scintillators were tested for light output and time resolution properties.

A test stand (Fig. 15) was used to measure the response of machined scintillators at four locations in the straight section, three in the bend, and five in the nose.
The measurements were conducted with a collimated source oriented orthogonal to the wide flat surface of the scintillators. The source provides electrons ranging from in energy [22][23]. A trigger PMT was placed underneath the scintillator on the opposite side and provided the TDC start and ADC gate. A SiPM detector array identical the final ST assembly, collected light from the scintillator being tested. The ADC and TDC data were analyzed to determine the light output and time resolution.
The 30 machined scintillator paddles that exhibited the best time resolution and light output properties from a set of 50 were selected for the final construction. These scintillators were then wrapped in thick reflective film (aluminum foil) and tested again. Their measured time resolutions are illustrated in Fig. 16.

The phenomenon of increased light collection in the nose region is observed. The larger time resolution in the straight section is due to light which initially travels downstream is reflected from the nose.
5.3 Assembly
To build the ST an assembly jig (Fig. 17) was fabricated.

The upstream support hub and Rohacell support structure were attached to a rotating bracket that moved in discretized increments. Two pneumatic cylinders with soft, semi-dense rubber feet were used to hold a single scintillator in place. Two free floating acrylic rings, with 30 tapped holes apart, housed swivel pad thumb screws fitted with silicone foam. The thumb screws held installed paddles in place.
A camera was used to measure and control the scintillator/SiPM vertical and horizontal alignments. Vertical alignment was achieved by using Kapton shims between the scintillator and the support structure. The horizontal alignment was configured to a distance less than between the scintillator and the SiPMs.
To secure paddles the to the Rohacell support structure the ST was wrapped around its circumference using self-adhesive transparent bundling wrap (0.8 mil thick, 6 in wide) at six locations along the length of the detector as seen in Fig. 18.

Details regarding the assembly process are discussed in Ref. [2].
The fully assembled ST is mounted around the GlueX liquid target as shown in Fig. 19.

6 Calibration
The procedures to optimize the time resolution for particle identification (PID) and time of flight (TOF) are discussed here.
6.1 Time-walk Correction
To correct the TDC timing for variations due to pulse shape, we use the timing signal from the FADC250’s. The latter uses a digital algorithm similar to a constant-fraction discriminator and therefore gives a time largely independent of pulse height[2][24]. The TDC/FADC time difference is given by Eq. 1 where is the paddle number index.
| (1) |
The FADC250’s report the amplitude, integral, and time of the input analog signals[24]. The amplitude was selected for the time-walk corrections because it is correlated better with the leading edge time of the pulse[2]. Figure 20 (left) shows a typical time-walk spectrum, i.e. versus the pulse amplitude, for one paddle of the ST.

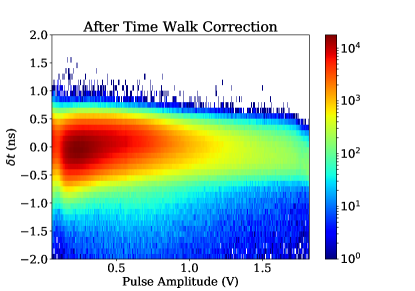
This correlation can be described empirically by the function given by Eq. 2 [25] where and are the pulse amplitude and discriminator threshold respectively, and are the fit parameters.
| (2) |
The most probable value (MPV) of the pulse amplitude spectra was chosen as the reference point where the time-walk correction is defined to be zero. Fig. 20 (right) illustrates the effect on the time difference spectrum () as a result of the applied time-walk corrections.
6.2 Propagation Time Corrections
The time between the production of scintillation light in a ST scintillator paddle and detection by the SiPM depends on the hit location along the paddle and is discussed below.
The EJ-200 scintillator material has a refractive index of 1.58 [5] and the corresponding speed of light in that medium is . The observed effective velocity is slower. Correcting for this light propagation in the scintillator is necessary since the ST paddles are 60 cm long. Studies showed that the effective velocity of light depends on the region along the paddle where the hit occurred. The propagation time corrections were conducted with well-defined reconstructed charge particle tracks. Further details regarding the event and track selection are found in Ref. [2].
The propagation time is determined by Eq. 3 where is the time-walk corrected hit time, is the flight time from the track vertex to the ST intersection point, and is the track vertex time.
| (3) |
The -coordinate of the track’s intersection point with the ST are determined by the detector geometry as well as the distance of this intersection point and the SiPM.
The propagation times were determined in three distinct regions corresponding to the three geometrical sections of the ST: the straight, bend, and nose regions. The propagation times in these regions were fit with a linear function given by Eq. 4 where indicates which region in the paddle is being fit and and are fit parameters.
| (4) |
Figure 21 (left) illustrates the correlation between the propagation time and the distance from the SiPM with when .

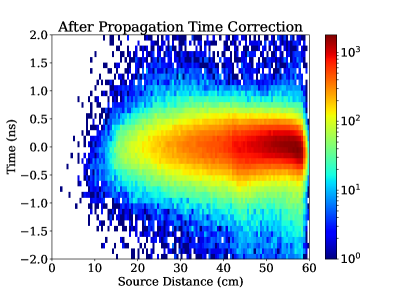
Figure 21 (right) illustrates the corrected time.
6.3 Attenuation Corrections
To measure attenuation in the scintillators, charged tracks were selected in a manner similar to that discussed in Sec. 6.2. The uncorrected energy deposition per unit length versus the track momentum for tracks intersecting to the ST are shown in Fig. 25. It is clear that no reliable PID can occur for tracks with without further corrections.
The pulse integral (PI) data, normalized to the path length of the track in the scintillator medium, were binned in 3.5 cm bins along the length of the paddle. The MPV of the PI was extracted utilizing an empirical function given by Eq. 5 where are the fit parameters.
| (5) |
A fit to the data in a single 3.5 cm bin is illustrated in Fig. 22.
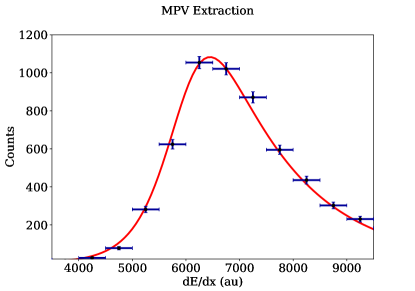
The MPV was extracted analytically and then plotted against the average value for each bin as shown in Fig. 23.
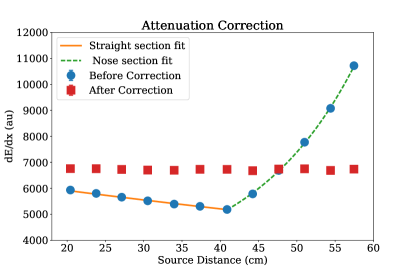
In order to characterize the photon attenuation, the straight and nose regions were treated independently. The piecewise continuous function given by Eq. 6 was selected to fit the data where the intersection (or correction boundary) of the two exponential fit functions was fixed and is shown in Fig. 23.
| (6) |
In Eq. 6, the subscripts and denote the straight and nose sections respectively while and are the fit parameters for the paddle.
An attenuation correction factor is applied to the deposited energy measurement per unit track-length to give the corrected energy deposition per unit track length for paddle and is given by Eq. 7 where the subscripts and are the corrected and measured quantities respectively.
| (7) |
After attenuation corrections are applied, particle separation is greatly improved. This will be discussed further in Sec. 7.
7 Performance
The increase in light output as a function of hit position along the ST detector during nominal GlueX beam conditions is illustrated in Fig. 24.
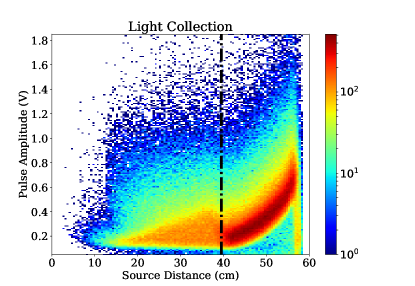
This is advantageous because the majority of the charged tracks produced intersect the ST in the forward region.
With the attenuation corrections discussed in Sec. 6.3 applied to the data, the PID capabilities of the ST were improved. Figure 25 illustrates the PID capability of charged tracks intersecting the ST.
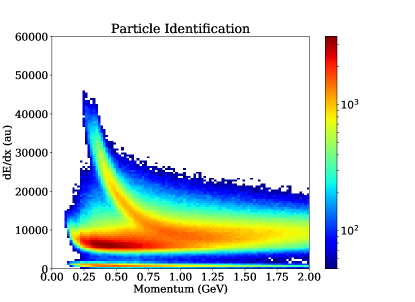
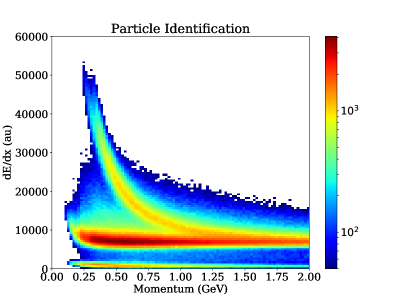
Protons can be separated from other hadrons with momenta up to 0.9 GeV/c which is a factor 1.5 improvement relative to the uncalibrated data. The PID capabilities of the ST extend the identification of low momentum protons that do propagate through the central drift chambers.
The ST was used to determine the time of the interaction of a beam photon with the target after the time-walk and propagation time corrections discussed in Sec. 6.1 and 6.2 were applied. The interaction time can be determined independently from a timing signal originating from the accelerator’s RF system, the latter with very high precision. The time difference between the ST time and the machine RF time is shown in Fig. 26. The accelerator can be run in mode where the time separation between beam bunches is 2 ns, a separation indicated in the figure. One application of the ST is to distinguish particles from different RF buckets on the basis of timing.
The measured distribution is fit with the sum of two Gaussians and the full width at half maximum (FWHM) of the resulting curve is calculated. Also, the fraction of the area of the curve within 1 ns of zero is calculated. Fits were carried out for the three individual geometrical regions and for all 30 paddles. The results are shown in Table 2.
| Section | All | Straight | Bend | Nose |
|---|---|---|---|---|
| 550 ps | 690 ps | 700 ps | 450 ps | |
| Fraction | 93% | 92% | 91% | 94% |
The ST exhibited uniformity in time resolution among all sectors of the ST. The high overall event fraction and good time resolution in the data for all sections combined is due to the majority of events intersecting the ST in the nose section. It is clear from Table 2 that measurements made with beam data also exhibit improved light collection, and thus improved time resolution, in the nose region.
Approximately four years of operation have elapsed since the paddles were first tested on the bench at Florida International University (FIU). Prior experience with scintillators indicates that degradation in time resolution as a result of mishandling will be visible in a matter of weeks. No degradation in time resolution has been observed and the ST is still performing well below design resolution.
8 Conclusion
The GlueX Start Counter was designed and constructed at Florida International University for use in Hall D at TJNAF. It provides separation of the 500 MHz photon beam bunch structure delivered by the CEBAF to within 94% accuracy. It is the first “start counter” detector to utilize magnetic field insensitive SiPMs as the readout system. Despite the many design and manufacturing complications, the ST has proven to have performed well beyond the design resolution of 825 ps (FWHM) with an average measured resolution of 550 ps (FWHM). Furthermore, the capabilities of the ST make it a viable candidate to assist in particle identification.
The unique geometry of the ST nose section has illustrated the advantage of tapering trapezoidal geometry in thin scintillators. Through simulation, tests on the bench, and analysis of data obtained with beam, it has been definitively demonstrated that this geometry results in a phenomenon in which the amount of light detected increases as the scintillation source moves further downstream from the readout detector.
Since its installation in Hall D during the Fall 2014 commissioning run, the ST has shown no measurable signs of deterioration in performance. This suggests that the ST scintillators are void of crazing and will most likely be able to meet and exceed the design performance well beyond the scheduled run periods associated with the GlueX experiment.
It is planned to incorporate the ST into the level 1 trigger of the GlueX experiment for high luminosity running when there will be in the coherent peak. Preliminary studies suggest that while operating at rates in excess of 300 kHz per paddle, the ST exhibits a high efficiency . Thus, in combination with the calorimeters the ST has the potential to provide good suppression of electromagnetic background via incorporation into the level 1 trigger of the experiment. Furthermore, the ST’s high degree of segmentation has demonstrated suppression of various background contributions associated with complex topologies while simultaneously providing precision timing information for reconstructed charged particles in GlueX.
9 Acknowledgments
The authors would like to graciously thank the plethora of Jefferson Lab staff members in both the Engineering division and Hall-D. Their numerous and invaluable contributions allowed for the Start Counter project to come to fruition. The authors would also like to extend their gratitude to the entire GlueX Collaboration who provided fruitful ideas and advice throughout the many stages of the project. Work at Florida International University was supported in part by the Department of Energy under contracts DE-FG02-99ER41065 and DE-SC00-13620. Furthermore, this material is based upon work supported by the U.S. Department of Energy, Office of Science, Office of Nuclear Physics under Contract No. DE-AC05-06OR23177.
References
References
-
[1]
H. Al Ghoul, et al.,
First results from
the gluex experiment, AIP Conference Proceedings 1735 (1) (2016) 020001.
arXiv:https://aip.scitation.org/doi/pdf/10.1063/1.4949369, doi:10.1063/1.4949369.
URL https://aip.scitation.org/doi/abs/10.1063/1.4949369 - [2] E. Pooser, The GlueX start counter and beam asymmetry in single photoproduction, Ph.D. thesis, Florida International University, http://digitalcommons.fiu.edu/etd/2450/ (2016).
- [3] A. Somov, Performance of the level-1 trigger at high luminosity, talk Given at the January 19, 2017 GlueX Collaboration meeting available at https://halldweb.jlab.org/DocDB/0031/003193/004/high_rate_status.pdf (2017).
- [4] http://www.eljentechnology.com/.
- [5] General Purpose Plastic Scintillator EJ-200, EJ-204, EJ-208, EJ-212, technical note available at http://www.eljentechnology.com/images/products/data_sheets/EJ-200_EJ-204_EJ-208_EJ-212.pdf.
- [6] http://www.mcnealplasticmachining.com/.
- [7] http://www.rohacell.com.
- [8] http://www.dupont.com/products-and-services/membranes-films/pvf-films.html.
- [9] http://www.hamamatsu.com/us/en/index.html.
- [10] F. Barbosa, Time characteristics of silicon photomultipliers used in the gluex experiment, in: 2015 IEEE Nuclear Science Symposium and Medical Imaging Conference (NSS/MIC), 2015, pp. 1–4, available at http://ieeexplore.ieee.org/document/7581740/.
- [11] Multi-Pixel Photon Counter, technical note available at https://halldweb1.jlab.org/wiki/images/4/49/S10362-33_series_kapd1023e05.pdf.
- [12] F. B. et al., A VME64x, 16 Channel, Pipelined 250 MSPS Flash ADC With Switched Serial (VXS) Extension, Jefferson Lab, technical note GlueX-doc-1022 available at https://halldweb.jlab.org/doc-public/DocDB/ShowDocument?docid=1022 (April 2008).
- [13] F. B. et al., The Jefferson Lab High Resolution Time-to-Digital Converter (TDC), Jefferson Lab, technical note GlueX-doc-1021 available at https://halldweb.jlab.org/doc-public/DocDB/ShowDocument?docid=1021 (April 2008).
- [14] https://geant4.web.cern.ch/geant4/.
- [15] K. S. Krane, Introductory Nuclear Physics, John Wiley & Sons, 1988, Ch. Detecting Nuclear Radiations, pp. 201–202.
- [16] C. M. Poole, A cad interface for geant4, paper submitted to Cornell Archive (arXiv) May 5, 2011 available at http://arxiv.org/pdf/1105.0963.pdf (2011).
- [17] A. L. . C. Moison, A more physical approach to model the surface treatment of scintillation counters and its implementation into detect, paper presented at IEEE, Nuclear Science Symposium; Anaheim, November 2-4 available at http://geant4.slac.stanford.edu/UsersWorkshop/PDF/Peter/moisan.pdf (1996).
- [18] https://www.newport.com/p/MT-XYZ.
- [19] https://shop.buehler.com/consumables/grinding-polishing/polishing-suspensions/alumina-suspensions.
- [20] http://www.caswellplating.com/buffing-polishing/buffing-wheels/canton-flannel-wheels.html#.
- [21] https://www.novuspolish.com/polish_mates.html.
- [22] Decay Radiation Data, national Nuclear Data Center, Nuclear Structure and Decay Database (NuDat) available at http://www.nndc.bnl.gov/nudat2/decaysearchdirect.jsp?nuc=90SR&unc=nds.
- [23] Decay Radiation Data, national Nuclear Data Center, Nuclear Structure and Decay Database (NuDat) available at http://www.nndc.bnl.gov/nudat2/decaysearchdirect.jsp?nuc=90Y&unc=nds.
- [24] H. Dong, Description and Instructions for the Firmware of Processing FPGA of the ADC250 Boards Version 0x0C0D, fADC250 Manual Available at https://coda.jlab.org/drupal/system/files/pdfs/HardwareManual/fADC250/FADC250_Processing_FPGA_Firmware_ver_0x0C0D_Description_Instructions.pdf (February 2017).
- [25] E. Smith, Low-level calibration constants for BCAL, technical note GlueX-doc-2618-v10, available at https://halldweb.jlab.org/DocDB/0026/002618/011/bcal_constants.pdf (December 2014).