![[Uncaptioned image]](/html/1812.05732/assets/Logo.png)
A&A Program in Structures
William E. Boeing Department of Aeronautics and Astronautics
University of Washington
Seattle, Washington 98195, USA
Strength and Cohesive Behavior of Thermoset Polymers at the Microscale: A Size-Effect Study
Yao Qiao, Marco Salviato
INTERNAL REPORT No. 18-12/03E
Submitted to Polymer December 2018
Abstract
This study investigated, experimentally and numerically, the fracturing behavior of thermoset polymer structures featuring cracks and sharp u-notches. It is shown that, even for cases in which the sharpness of the notch would suggest otherwise, the failure behavior of cracked and pre-notched specimens is substantially different, the failure loads of the former configuration being about three times lower than the latter one. To capture this interesting behavior a two-scale cohesive model is proposed. The model is in excellent agreement with the experimental data and its predictions allow to conclude that (a) residual plastic stresses cannot explain the very high failure loads of notched structures; (b) the strength of the polymer at the microscale can be from six to ten times larger than the values measured from conventional tests whereas the fracture energy at the microscale can be about forty times lower; (c) the pre-notched specimens investigated in this work failed when the stress at the tip reached the microscale strength whereas the cracked specimens failed when the energy release rate reached the total fracture energy of the material. The foregoing considerations are of utmost importance for the design of microelectronic devices or polymer matrix composites for which the main damage mechanisms are governed by the strength and cohesive behavior at the microscale.
keywords:
Notch , Crack , Size effect , Micro , Macro , Residual stress1 Introduction
Thermoset polymers find extensive application across the main engineering fields from e.g. automotive, aerospace and civil engineering to microelectronics [1, 2, 3, 4]. Thermosets are also the material of choice for the manufacturing of advanced fiber composites [5, 6] although the demand for recyclability, high manufacturability, and damage tolerance is gradually shifting the focus to thermoplastics [7, 8, 9, 10].
Considering the several structural applications of thermosets, understanding the fracturing behavior of these materials is quintessential and has been the subject of extensive research in the past four decades [11, 12, 13, 15, 16, 14, 17]. However, while significant progress has been made in the characterization and modeling of crack initiation and propagation, far less attention has been devoted to the damaging and fracturing behavior of thermosets in the presence of sharp notches [18, 19, 20, 21, 22, 23, 24]. This is an important issue considering that most of the thermoset structures inevitably feature sharp notches. Examples include microelectronic devices in which sharp geometrical features are ubiquitous or fiber composites where the matrix is subjected to the stress concentration induced by the fibers.
Narisawa et al. [13] investigated the fracturing surface morphology of epoxy resin and showed that an internal crack may nucleate at the boundary between the plastic and elastic regions, thus generating a Fracture Process Zone that affects the fracturing behavior. A comprehensive analysis on the failure mechanism of epoxy resin was provided by Kinloch et.al [12], who proposed a quantitative model accounting for the blunting at the notch tip prior to the onset of crack initiation. Several potential toughening mechanisms for polymer structures weakened by cracks and sharp notches were discussed by Argon et.al [15, 16] whereas the effect of different pre-notching methods on the fracturing behavior of polymers was studied in [18, 19, 20, 21]. In these contributions it was proposed that residual plastic stresses induced by the manufacturing of the notch may lead to very high values of apparent fracture toughness of the polymer.
According to the foregoing contributions, the failure behavior of cracked and pre-notched specimens is substantially different, even when the sharpness of the notch and Linear Elastic Fracture Mechanics (LEFM) would suggest otherwise. The present work attempts to clarify this difference leveraging computational cohesive fracture mechanics and size effect testing of both pre-cracked and pre-notched Single Edge Notch Bending (SENB) specimens. A two-scale cohesive law is proposed and shown to provide an excellent agreement with the experimental data. Leveraging the model, not only the notch mechanics of thermosets is clarified but also unprecedented insight on the strength and cohesive behavior of the polymer at the microscale is obtained. It is shown that the microscale strength can be from six to ten times larger than the values estimated from macroscale tests. In contrast, the fracture energy at the microscale is estimated to be roughly forty times lower than the values obtained from traditional fracture tests.
The results of this work disprove the hypothesis, largely accepted in the literature [18, 19, 20, 21, 22], that residual plastic stresses generated by the notching process are the cause of the different behavior of notched and cracked structures. More importantly, the two-scale cohesive model proposed in this study represents a first step towards the better understanding of the cohesive behavior of thermosets at the microscale. This information is quintessential for the formulation of accurate computational models for microelectronic devices or the damaging and fracturing behavior of the matrix in fiber composites. Further, the novel insight on the cohesive behavior can pave the way for the development of new nanomodification strategies targeting specifically the enhancement of the behavior at the microscale [25, 28, 26, 27, 29].
2 Materials and methods
2.1 Material preparation
Following [30, 31], the thermoset polymer used in this work was composed of an EPIKOTE™ Resin MGS™ and an EPIKOTE™ curing Agent MGS™ RIMH 134-RIMH 137 (Hexion [32]) combined in a 100:32 ratio by weight.
The epoxy and hardener were mixed for 10 minutes and degassed for 20 minutes in a vacuum trap using a Vacmobile mobile vacuum system [33] in order to remove any air bubbles. After degassing, the mixture was poured into silicone molds made of RTV silicone from TAP Plastics [34] to create geometrically-scaled specimens with consistent sizes. Finally, the resin was allowed to cure at room temperature for approximately 48 hours and then post-cured in an oven for hours at ∘C.
2.2 Specimen preparation
Several previous investigations on Compact Tension (CT) and Single Edge Notch Bending (SENB) specimens made of thermoset polymers have shown that the method used to create the notch has a significant influence on the failure behavior and the ultimate load [18, 19, 20, 21, 22]. In particular, it has been shown that specimens with pre-cracks created by tapping may exhibit values of the fracture toughness from to times lower than the ones estimated by testing pre-notched specimens, regardless of the way the pre-notch is made (e.g insertion of a teflon sheet or micro-sawing). This discrepancy cannot be explained by Linear Elastic Fracture Mechanics (LEFM) since, considering the very small ratios between the notch tip radius and the notch depth, this theory predicts the same failure load in case of the pre-notch or the pre-crack [35, 36, 37, 38].
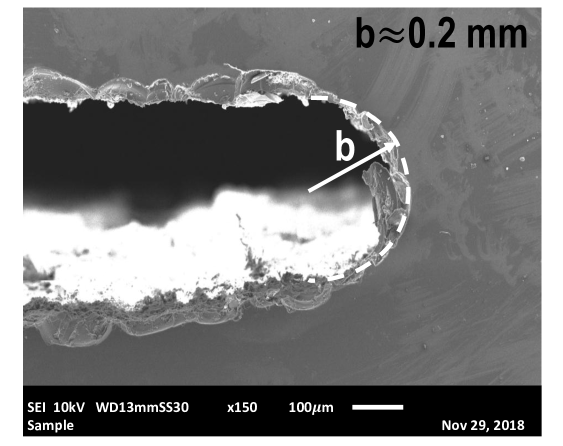
To clarify the foregoing differences and to provide an objective investigation of the fracture properties of the polymer both pre-cracked and pre-notched Single Edge Notch Bending (SENB) specimens were investigated in this work. The pre-notched specimens were created by means of a mm wide diamond coated saw leading to a 0.4 mm wide notch as illustrated in Figure 1 which shows a magnification of the notch tip by means of Scanning Electron Microscopy (SEM). The pre-cracked specimens were created through a two-stage process. The first step consisted in creating a notch about one quarter of the specimen width by means of the mm wide diamond coated saw. Then, tapping leveraging a sharp razor blade followed to create the last portion of the crack.
2.2.1 Pre-cracked specimens
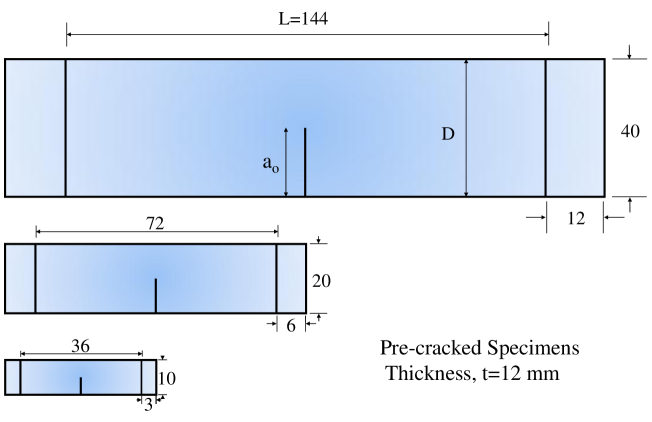
The design of the Single Edge Notch Bending (SENB) specimens was based on ASTM D5045-99 [40]. In order to study the scaling of the fracturing behavior of pre-cracked specimens, geometrically-scaled specimens of three different sizes were prepared as illustrated in Figure 2. The dimensions, scaled as , were mm, mm, and mm, respectively. The various crack lengths of the specimens were approximately in the range to , where is the width of the specimen. This aspect was very important to guarantee a proper geometrical scaling. The scaling did not involve the thickness, , which was kept about mm for all the investigated sizes.
2.2.2 Pre-notched specimens
As illustrated in Figure 3, geometrically scaled specimens of four different sizes were prepared. The dimensions, scaled as , were mm, mm, mm and mm, respectively while the width of the notch was kept the same for all the investigated sizes. Accordingly, the ratio between the depth and the radius of the notch, , was , , , and respectively. The notch length was always half of the width of the specimen. The thickness, , was kept about mm for all the investigated sizes.
2.3 Fracture testing
Three-point bending tests were performed using a closed-loop, electro-actuated 5585H Instron machine. To avoid viscoelastic effects, the load rate for the three-point bending tests was adjusted for the different sizes to achieve roughly the same average strain rate of %/min.
3 Experimental Results
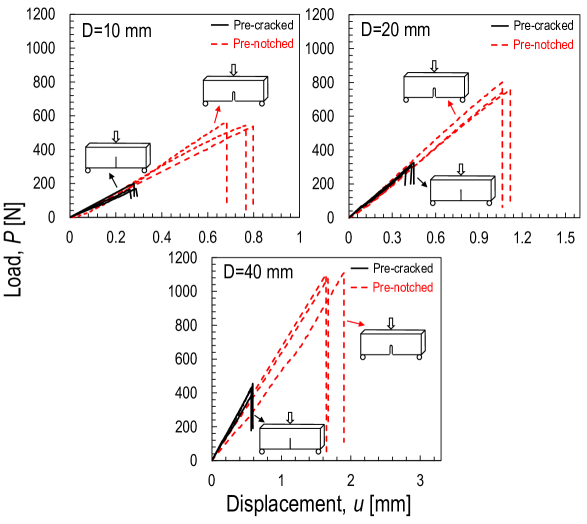
The load-displacement curves of the three-point bending tests are plotted in Figure 4. As can be noted, for both pre-cracked and pre-notched specimens, the mechanical behavior is linear up to the peak load which is followed by unstable crack propagation. This is an indication of pronounced brittle behavior for all the investigated specimens. Further, as the figure shows, the stiffness of the specimens is not affected by the sharpness of the notch which is not surprising given the significantly large aspect ratios. In contrast, the peak load of the pre-notched specimens is approximately times higher that the one of the pre-cracked specimens for all the investigated sizes. This difference, which agrees with previous investigations [18, 19, 20, 21, 22], will be discussed in the following sections.
The crack or notch length, peak load, and nominal strength for all the geometrically scaled specimens tested in this work are tabulated in Table 1. In the definition of nominal strength, is the critical load, is the thickness of the specimens, is the span between the two supports, and is the width of the specimens.
4 Analysis and Discussion
4.1 Estimation of the mode I fracture energy by LEFM
In recent works [30, 41, 31, 42], the effect of the Fracture Process Zone (FPZ) size on the fracturing behavior of thermoset nanocomposites was investigated leveraging size effect testing and analysis. It was shown that, Linear Elastic Fracture Mechanics (LEFM) provides a very accurate description of the fracture scaling in epoxy for typically laboratory-scaled, pre-cracked specimens as suggested by the ASTM D5045-99 [40]. This confirms that, for the pure epoxy and sufficiently large specimens, the FPZ size has a negligible effect. On the other hand, several investigations [12, 35, 36, 37, 38, 39] showed that, when the notch radius is sufficiently smaller than the Irwin’s characteristic length, the notch has the same effects on the ultimate failure load as a crack of the same length. In this study, the notch radius b= mm is significantly smaller than the Irwin’s characteristic length mm where MPa, and MPa [30].
In light of the foregoing considerations, both the pre-cracked and pre-notched specimens can be analyzed by means of LEFM, leveraging the equations for a cracked specimen [40]:
| (1) |
where normalized initial crack length, nominal stress, for plane stress and for plane strain, is the Poisson’s ratio, and dimensionless energy release rate which can be easily calculated following the procedure described in [46, 47, 30, 41, 31, 43, 44, 45, 48]. The mode I fracture energy calculated by means of Eq.(1) is shown in Figure 5 for the different specimen sizes and notch types. Not surprisingly, the fracture energy calculated by LEFM is not affected by the specimen size. This is a confirmation that, for all the specimens investigated in this work, the nonlinear damage in the Fracture Process Zone (FPZ) did not affect the structural behavior significantly and linear theories such as LEFM can be used to provide a first estimate of the fracture properties.
On the other hand, the results showed in Figure 5 indicate a very significant effect of the type of notch, the fracture energy of the pre-notched specimens being approximately times higher than the one of the pre-cracked specimens. This result, abundantly confirmed in the literature [18, 19, 20, 21, 22], cannot be explained by LEFM since, according to this theory, the notched specimens investigated in this work should fail at the same load as the cracked ones and the fracture energy should be a material property not affected by any geometrical feature.
In [18, 19, 20, 21, 22], the higher apparent fracture energy was ascribed to the emergence of residual, plastic stresses during the pre-notching process. However, a direct validation of this statement was never provided. The following section focuses on this particular aspect and shows that these hypothetical residual stresses should be unrealistically high to justify the difference in fracture energy reported in the present work and in the literature [18, 19, 20, 21, 22].
4.2 Residual stresses
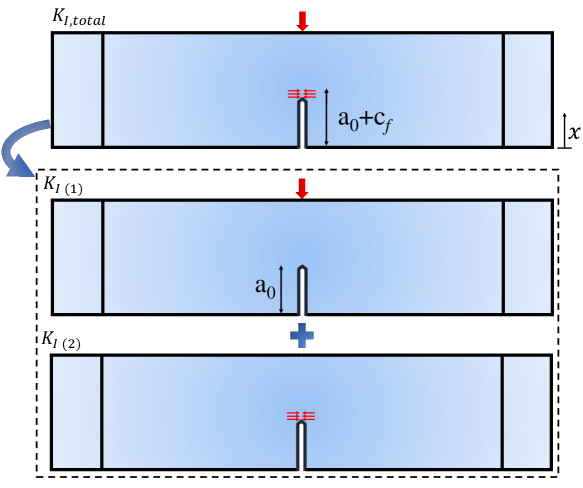
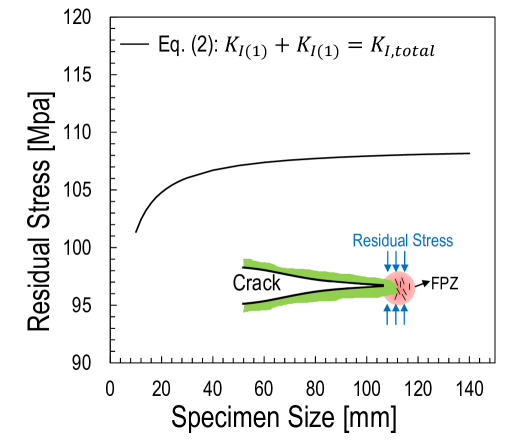
To check the possibility that the higher apparent fracture energy of pre-notched specimens is related to the presence of residual stresses as generally accepted in the literature, a simple analysis can be conducted within the framework of the Linear Elastic Fracture Mechanics (LEFM). Leveraging the superposition principle, the total mode I Stress Intensity Factor (SIF) can be calculated summing the effects of the applied load P and the residual stress distribution ahead of the crack tip:
| (2) |
where, as illustrated in Figure 6, refers to the SIF associated to the concentrated load on the middle top of the specimen without the effect of residual stresses while refers only to compressive stresses acting on the equivalent Fracture Process Zone of length [30, 41, 31, 43, 44, 45, 46, 47, 48]. The length is proportional to the Irwin’s characteristic length and it is defined as an additional equivalent crack length required to capture the nonlinear effects of the FPZ.
The stress intensity factor can be expressed as for a plane strain condition whereas has the following expression [51]:
| (3) |
where is the magnitude of the compressive stresses applied on the equivalent FPZ, is the dimensionless geometry function [51], and is the distance from the bottom surface of the SENB specimen as shown in Figure 6. At incipient crack onset, the stress intensity factor is ought to be equal to the fracture toughness of the pre-cracked specimens measured from the experiments. Accordingly, with the assumption that , [45, 44], and the residual stresses are uniformly distributed, the magnitude can be estimated. As illustrated in Figure 7, the residual stress for the pre-notched specimens investigated in this work is higher than MPa which seems unrealistically high to be created by sawing during the pre-notching process.
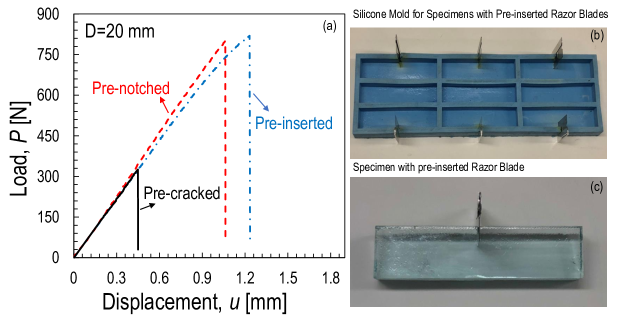
To shed more light on the possible effects of residual stresses on the fracturing behavior, additional tests on pre-notched specimens were conducted. However, this time, a sharp razor blade was pre-inserted into the specimens during the manufacturing process and eventually removed after the curing of the epoxy resin to create the notch. Thanks to this procedure, notch tip radii similar to the ones of the sawed specimens were obtained without the possible emergence of plastic residual stresses.
Figure 8 compares the load displacement curves for specimens with pre-cracks made by tapping, with pre-notches made by sawing, and with pre-notches made by pre-inserting a razor blade. As can be noted, all the notched specimens exhibit a significantly larger peak load compared to cracked specimens. More importantly, the mechanical behavior of specimens with notches made by pre-inserting a razor blade is basically identical to the one reported for the case of sawed notches. Considering that the former cannot feature any residual stress, it is concluded that plastic residual stresses are not likely the dominant reason of the higher apparent fracture energy of pre-notched specimens. A possible explanation of the true cause is presented next leveraging cohesive fracture mechanics.
4.3 Cohesive zone modeling of thermoset polymers
In this section a two-scale cohesive zone model is proposed to capture the fracturing behavior of both pre-cracked and pre-notched specimens seamlessly. The main observations that led to the development of the model are described next along with the comparison with the experimental data.
4.3.1 Bi-linear cohesive law for large crack opening displacements
In previous investigations on pre-cracked, geometrically-scaled specimens made of thermoset resin [41, 31], it was found that the cohesive behavior of this material is best described by a bi-linear law. This is evident from Figures 9a-b showing that the bi-linear cohesive law enables the matching of the nominal strength with errors always lower than % for all the specimen sizes investigated. In contrast, the errors are in the order of in case of a linear cohesive law (see Figures 9c-d).
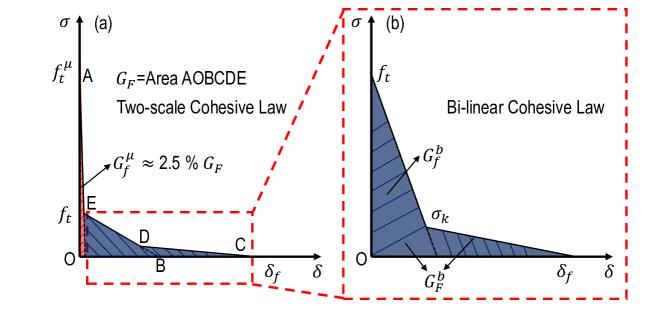
As shown in Figure 10b, the bi-linear cohesive law can be described through four parameters: (a) tensile strength , (b) initial fracture energy, , which represents the area under the initial segment of the bi-linear cohesive law; (c) total fracture energy, , which is the total area under the bi-linear cohesive law; (d) change-of-slope stress, , which is the value of stress at the intersection of the initial and tail segment. By matching the size effect data on the structural strength of the pre-cracked specimens, the cohesive parameters of the bi-linear cohesive law are tabulated in Table 2.
However, notwithstanding the excellent agreement with the data on pre-cracked specimens, it is impossible to match the experimental results on the pre-notched specimens by means of the foregoing cohesive law. A relatively good agreement is possible only by increasing the total fracture energy to N/mm, the value corresponding to the energy estimated by LEFM. However, this value would lead to a significant over-prediction of the structural strength of the pre-cracked specimens. Considering that the cohesive law should be a material property, the discrepancy between the results for pre-cracked and pre-notched specimens must be explained using the same cohesive law. A possible solution is presented next.
4.3.2 Two-scale cohesive law
In a recent publication [39], Di Luzio and Cusatis investigated the fracturing behavior of structures featuring blunt notches and characterized by materials exhibiting a linear cohesive law. In their numerical study they found that when the notch tip radius is approximately equal to the Irwin’s characteristic length the failure occurs when the maximum stress at the notch approximately reaches the material strength, i.e. with stress concentration factor. On the other hand, for sufficiently sharp notches, the fracture is driven by the formation of a Fracture Process Zone (FPZ) in front of the notch which ultimately propagates and leads to the final failure.
Based on the foregoing considerations, a cohesive zone model should be able to capture the behavior of notched and cracked specimens seamlessly provided that some particular features are added to the cohesive law. In this work, it is assumed that the cohesive behavior can be described by a two-scale cohesive law as represented in Figure 10a. As shown in the figure, represents the initial strength whereas is the initial fracture energy or, in other words, the area under the first linear branch of the curve. The rest of the curve is identical to the cohesive law identified by fracture tests on geometrically-scaled SENB specimens [41, 42] and is characterized by = macroscopic strength, stress at the third change of slope, initial macroscopic fracture energy (area AOBDE), and the total fracture energy (area AOBCDE).
The proposed cohesive law must differ from the linear one investigated in [39] to capture the peculiar cohesive behavior of thermoset polymers. Until the crack opening displacements are in the sub-micron regime, the resulting cohesive stresses are equivalent to the ones predicted by a linear cohesive law of strength and total energy . For larger opening displacements, the cohesive law becomes equivalent to the bi-linear law that provided an excellent agreement with the experimental data on pre-cracked specimens. Since the first portion of the cohesive law describes the cohesive stresses at the microscale while the rest of the cohesive curve captures the behavior for larger displacements, the proposed cohesive law is characterized by two very distinct length scales. For this reason, in this and in future contributions the model will be referred to as a two-scale cohesive model.
In this work, it is assumed that for sub-micron crack opening displacements the cohesive strength is about MPa and the cohesive stresses decrease linearly and very steeply with increasing crack openings. This captures the fact that, due to statistical size effect, the microscopic strength of the polymer can be several times higher than the one measured from macroscopic tests [49, 50]. At the same time, the steep initial part of the cohesive curve, leading to an initial fracture energy of only about of the total one, captures the lower energy dissipation occurring at the sub-micron scale. The value of about MPa is estimated from the failure loads of the pre-notched specimens. In fact, since the initial fracture energy is only a fraction of the total energy dissipated and the initial strength is significantly larger than in macroscopic tests, the Irwin’s characteristic length related to the initial formation of the FPZ is significantly smaller than the width of the notches investigated in this work. Accordingly, following [45] the fracturing behavior of the notched specimens must depart from the one of the cracked specimens and the nominal stress at failure is determined by the elastic limit condition . It is worth mentioning here that, thanks to the foregoing considerations, the initial strength can be determined very precisely. Small variations on the value proposed in this work would lead to significant changes on the predicted structural strength.
Having clarified the reason for the very high strength at the microscale, another question needs to be answered: why the cohesive stresses of the initial portion of the cohesive curve must decrease so steeply? The reason is that, if the initial slope of the cohesive curve was milder, it would not be possible to capture the size effect data on pre-cracked specimens. In the presence of a crack or a sufficiently sharp notch, the stress intensity at the tip at incipient failure would always lead to elastic stresses that are greater then the microscale strength. Accordingly, since the cohesive stresses decrease very quickly in the initial part of the cohesive curve, a cohesive FPZ can emerge and develop up to the second portion of the tri-linear cohesive curve. The cohesive law becomes equivalent to the bi-linear law of strength and total fracture energy since the initial energy is only about of or, in other words, N/mm. Thanks to the foregoing considerations it is possible to estimate the initial slope of the two-scale cohesive model very precisely by testing notched specimens of various notch tip radii and matching the experimental data by means of the two-scale cohesive model. Such a comprehensive experimental campaign is beyond the scope of the present work and will be the subject of future contributions. In this study, the initial fracture energy was calibrated against one notch tip radius only, leading to 0.02 N/mm.
Finally, one last question remains: why the foregoing cohesive behavior was not found before from tests on pre-cracked specimens? The answer lies in the particular shape of the cohesive curve. Since the initial fracture energy is only a negligible portion of the total fracture energy and, in laboratory-scale cracked specimens the cohesive stresses always overcome the initial portion of the cohesive law, it is not possible to characterize and unless micro-metric specimens are tested. In fact, any tests on large specimens would provide an estimate of which takes approximately the same value as . It is worth mentioning here that micro-tests are very challenging and are generally affected by significant uncertainties. However, based on the results of this work, a valid alternative is to test both cracked and pre-notched specimens and use the results on the latter configuration to characterize .
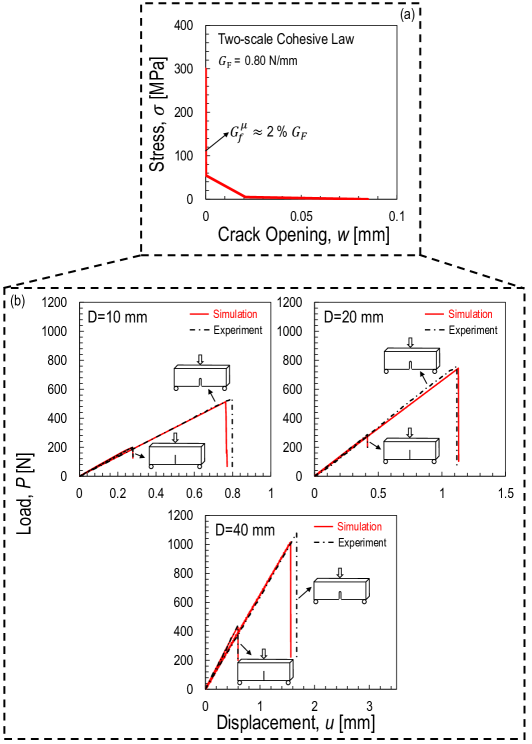
To verify the foregoing assumptions, both pre-cracked and pre-notched specimens were simulated in ABAQUS/Explicit 2017. The models combined 4-node bi-linear plain strain quadrilateral elements (CPE4R) with a linear elastic isotropic behavior and 4-node two-dimensional cohesive elements (COH2D4) with the traction-separation law shown in Figure 11 to model the crack. The parameters of the two-scale cohesive model that provided the best matching with the experimental data are given in Table 2.
Figure 11 shows a comparison between the experimental load-displacement curves and simulations by the two-scale cohesive model. As can be noted the model successfully matches the experimental curves of both the pre-notched and pre-cracked specimens of different sizes. The most remarkable aspect related to these results is that the excellent matching was possible leveraging the same cohesive law which can now be treated as a material property.
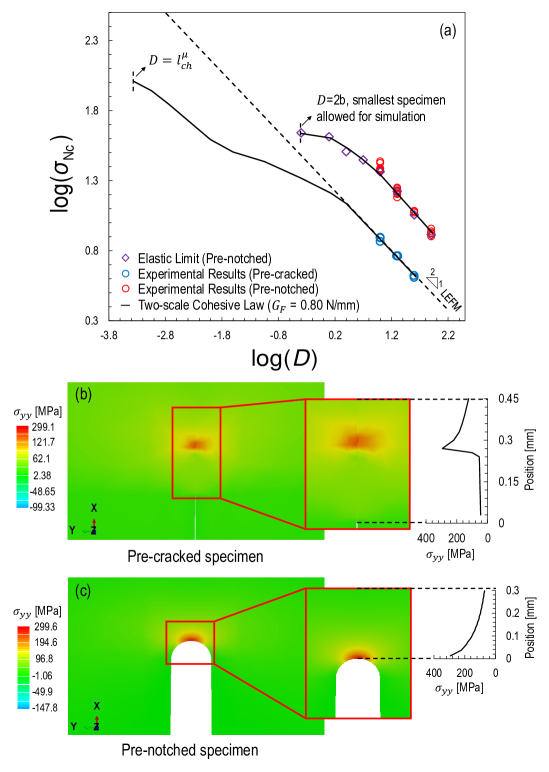
It is interesting to plot the structural strength as a function of the structure size in double-logarithmic scale. As can be noted from Figure 12, the computational model is in excellent agreement with the experimental data for all the sizes and types of notch. Further, the model seems to capture very well the size effect in both cracked and notched specimens.
In case of cracked specimens the radius at the crack tip is extremely small, approximately zero. For sufficiently large specimens, the FPZ size is negligible compared to the structure size and, as predicted by LEFM, the structural strength scales with . For decreasing sizes, the fraction of the structure occupied by the nonlinear FPZ becomes larger and larger thus affecting the fracturing behavior. The structural strength departs from the values predicted by the LEFM which is a linear theory and, inherently, ignores the cohesive stresses in the FPZ. For sufficiently small geometrically-scaled structures the nominal strength tends to the plastic limit.
On the other hand, the two-scale model predicts a significant size effect also for the notched specimens as shown by the predictions plotted in Figure 12. For the cases shown in the Figure, all the geometrical features of the structure are geometrically-scaled except for the thickness and notch tip radius, . Accordingly, the aspect ratio of the notch increases along with the structure size, . As can be noted, the structural strength decreases significantly with , this size dependence becoming less and less significant for decreasing structure sizes. This is shown in the figure by the decreasing slope of the curve of the structural strength for lower values. The diamond symbols in Figure 12 represent the elastic limit for the various structure sizes, . In this expression, the stress concentration factor is a function of since the notch tip radius is not geometrically scaled. As can be noted, the function agrees very well with the experimental data. This confirms that, for the notched specimens investigated in this work, all the failures happened by approximately reaching the elastic limit of the structure.
Finally, it is interesting to compare the cohesive stresses at the condition of incipient failure for the case of the specimens weakened by cracks and notches of equal depth considered in this work. As shown in Figures 12b,c, the cohesive stresses in these two cases differ significantly, in accordance with the observations that motivated the proposed two-scale cohesive model. For notches, the FPZ is developed only partially, with the minimum cohesive stress being significantly larger than . This means that, in agreement with the theory, only the initial part of the two-scale cohesive model governs the behavior of the notched structures investigated in this work. In contrast, in case of pre-cracked specimens, the FPZ is far more developed and the minimum cohesive stress at the tip is generally much lower than . This means that the second part of the cohesive law is entered and the cohesive behavior is equivalent to a bi-linear cohesive law of total fracture energy . All the foregoing observations confirm firmly the validity of the two-scale cohesive model.
Furthermore, based on the two-scale model proposed in this work, some considerations on the applicability of LEFM for a course estimate of the failure load can be made. In case of pre-cracked specimens, LEFM can only be applied when the FPZ size is negligible compared to the structure size. If this condition is met for micro-metric structures, then the fracture energy to be used in the calculations is . This means that to predict e.g. the onset of a microcrack in a polymer matrix composite by LEFM, one has to first verify that the micro Irwin’s characteristic length is significantly smaller than the smallest geometrical features (e.g. fiber diameter, inter-fiber distance etc). Then, if the condition is met, LEFM can used provided that the microscale fracture energy is used in the calculations. On the other hand, if the condition of negligible FPZ size is met for structures of size , the total fracture energy should be used in the calculations.
In case of pre-notched specimens, LEFM can only be applied when the notch tip radius is extremely small, smaller than the micro Irwin’s characteristic length. If this condition is met, then the same observations on the applicability of LEFM to pre-cracked structures hold.
5 Conclusions
This study investigated the fracturing behavior of thermoset polymer structures featuring cracks and sharp u-notches. Based on the results obtained in this work, the following conclusions can be elaborated:
1. the fracturing behavior of thermoset polymer structures featuring cracks is distinctively different than the one of structures weakened by u-notches. Although this result is not surprising for blunt notches with large tip radii, it was not expected for the notches investigated in this work which featured a tip radius significantly smaller than the Irwin’s characteristic length of the material;
2. for the cases studied in this work, the direct use of LEFM to estimate the mode-I fracture energy of the material provides values for the notched specimens that are about times larger than the ones estimated from cracked specimens ( N/mm for notched specimens vs N/mm for cracked specimens);
3. in contrast to what has been proposed in the literature, plastic residual stresses induced by the manufacturing of the notch cannot be the dominant cause of such a high apparent fracture toughness. In fact, the residual stresses that would be required to justify such a high toughness are larger than MPa and it seems unlikely that they can be generated by the sawing procedure. This statement is supported by additional tests on specimens with notches created by pre-inserting a sharp razor blade. Even if in such case plastic stresses cannot be induced, the failure loads were similar to those of the other notched specimens;
4. to capture the behavior of both the cracked and notched specimens, a two-scale cohesive model is proposed. For sub-micron crack opening displacements, the cohesive strength is about MPa and the cohesive stresses decrease linearly and very steeply with increasing crack openings. When the cohesive stresses reach the strength estimated from typical laboratory-scale specimens (about MPa) and the opening displacements are beyond the sub-micron range, the slope of the cohesive law becomes milder. Finally, the cohesive law ends with another linear branch starting when the stresses reach MPa. This last part of the cohesive law is characterized by a very slow decay of the cohesive stresses;
5. the proposed two-scale cohesive model captures the fact that, due to energetic-statistical size effect [54, 55, 56, 52, 53], the microscopic strength of the polymer can be several times higher than the one measured from macroscopic tests [49, 50]. At the same time, the steep initial part of the cohesive curve, leading to an initial fracture energy of only about of the total one, captures the lower energy dissipation occurring at the sub-micron scale;
6. thanks to the foregoing model the different behavior of polymer structures featuring cracks and sharp u-notches can be easily explained. Since the initial fracture energy is only a fraction of the total energy dissipated and the initial strength is significantly larger than in macroscopic tests, the Irwin’s characteristic length related to the initial formation of the FPZ is significantly smaller than the width of the notches investigated in this work. Accordingly, the fracturing behavior of the notched specimens must depart from the one of cracked specimens and the nominal stress at failure is determined by the elastic limit condition [39], i.e. with stress concentration factor. On the other hand, in laboratory-scaled cracked specimens the cohesive stresses in the FPZ at incipient failure always reach the second portion of the cohesive curve. In such a case, the Irwin’s characteristic length describing the FPZ is significantly larger since it depends on the total fracture energy and a significantly lower strength . Accordingly, the failure behavior of macroscopic cracked specimens depends only on the total fracture energy and macroscopic strength;
7. since the initial fracture energy is only a negligible portion of the total fracture energy and, in laboratory-scale cracked specimens the cohesive stresses always overcome the initial portion of the cohesive law, it is not possible to characterize and unless micro-metric specimens are tested. These tests are very challenging and are generally affected by significant uncertainties. Based on the results of this work, a valid alternative is to test both cracked and pre-notched specimens and use the results on the latter configuration to characterize ;
8. the foregoing considerations are supported by the excellent agreement between the model predictions and experimental data on geometrically-scaled Single Edge Notch Bending (SENB) specimens. As can be noted from Figures 11 and 12, the two-scale cohesive model is able to capture not only the load-displacement curves but also the related size effect on structural strength for both cracked and pre-notched specimens;
9. the foregoing results are of utmost importance for the design of microelectronic devices or polymer matrix composites. In fact, in these systems, the main damage mechanisms belong to the sub-micron scale and the fracturing behavior is dominated by the initial portion of the cohesive law since the opening displacements are not large enough to reach the second portion of the curve. The two-scale model proposed in this work and the related testing protocol, represent a first step towards the accurate yet simple simulation of thermoset polymers at the microscale.
Acknowledgments
Marco Salviato acknowledges the financial support from the Haythornthwaite Foundation through the ASME Haythornthwaite Young Investigator Award. This work was also partially supported by the Joint Center For Aerospace Technology Innovation through the grant titled “Design and Development of Non-Conventional, Damage Tolerant, and Recyclable Structures Based on Discontinuous Fiber Composites”.
References
References
- [1] lukaszewicz DHJA, Automotive Composite Structures for Crashworthiness in: Elmarakbi A, Advanced Composite Materials for Automotive Applictions: Structural Integrity and Crashworthiness, Wiley, 2013, pp. 100-27.
- [2] Rana S, Fangueiro R, Advanced composites Materials for Aerospace Engineering, Woodhead Publishing, United Kindom, 2016.
- [3] Song D, Gupta RK, The use of thermosets in the building and construction industry in: Guo QP, Thermosets: Structure, Properties, and Applications, Elsevier, 2012, pp. 165-88.
- [4] Maier G, Polymers for microelectronics, Mater Today 4(2001)22-33.
- [5] Stenzenberger HD, Recent developments of thermosetting polymers for advanced composites, Compos Struct 24(1993)219-31.
- [6] Pascault, Williams RJJ, Overview of thermosets: Present and future in: Guo QP, Thermosets: Structure, Properties, and Applications, Elsevier, 2018, pp. 3-34.
- [7] Takahashi J, Wan Y, Tensile and compressive properties of chopped carbon fiber tapes reinforced thermoplastics with different fiber lengths and molding pressures, Compos Part A 87(2016)271-81.
- [8] Blok LG, Longana ML, Yu H, Woods BKS, An investigation into 3D printing of fibre reinforced thermoplastic composites, Addit Manuf 22(2018)176-86.
- [9] Yao SS, Jin FL, Rhee KY, Hui D, Park SJ, Recent advances in carbon-fiber-reinforced thermoplastic composites: A review, Compos Part B 142(2018)241-50.
- [10] Biron M, Future Prospects for Thermoplastics and Thermoplastic Composites in: Biron M, Thermoplastics and Thermoplastic Composites, Plastics Design Library, 2018, pp. 1083-126.
- [11] Knauss WG, Mechanics of polymer fracture, Appl Mech Rev 26(1973)1-17.
- [12] Kinloch AJ, Williams JG, Crack blunting mechanisms in polymers, J Mater Sci 15(1980)987-96.
- [13] Narisawa I, Murayama T, Ogawa H, Internal fracture of notched epoxy resins, Polymer 23(1982)291-94.
- [14] Dear JP, Williams JG, Simple method of determining the fracture-resistance for rapidly propagating cracks in polymers, J Mater Sci 28(1993)259-64.
- [15] Argon AS, Cohen RE, Mower TM, Mechanisms of toughening brittle polymers, Mater Sci Eng, 176(1994)79-90.
- [16] Argon AS, Cohen RE, Toughenability of polymers, Polymer 44(2003)6013-32.
- [17] Kwon HJ, Jar PY, Fracture toughness of polymers in shear mode, Polymer 46(2005)12480-92.
- [18] Xiao K, Ye L, Kwok YS, Effects of precracking methods on fracture behaviour of an Araldite-F epoxy and its rubber-modified systems, J Mater Sci 33(1998)2831-36.
- [19] Cayard MS, Bradley WL, The effect of various precracking techniques on the fracture toughness of plastics. General papers, International Conference of Fracture ICF7 (Houston. USA):1989;2713-23.
- [20] Salazar A, Patel Y, Williams JG. Influence of crack sharpness on the fracture toughness of epoxy resin. 13th International Conference on Fracture.
- [21] Souza JM, Yoshimura HN, Peres FM, Schön CG, Effect of sample pre-cracking method and notch geometry in plane strain fracture toughness tests as applied to a PMMA resin, Polym Test 31(2012)834-40.
- [22] Kuppusamy N, Tomlinson RA, Repeatable pre-cracking preparation for fracture testing of polymeric materials, Eng Fract Mech 152(2016)81-87.
- [23] Zappalorto M, Salviato M, Quaresimin M, Mixed mode (I+ II) fracture toughness of polymer nanoclay nanocomposites, Compos Sci Technol 111(2013)50-64.
- [24] Zappalorto M, Salviato M, Pontefisso A, Quaresimin M, Notch effect in clay-modified epoxy: a new perspective on nanocomposite properties, Compos Interface 20(2013)405-19
- [25] Zappalorto M, Salviato M. Quaresimin M, Influence of the interphase zone on the nanoparticle debonding stress, Compos Sci Technol 72(2011)49-55.
- [26] Zappalorto M, Salviato M. Quaresimin M, A multiscale model to describe nanocomposite fracture toughness enhancement by the plastic yielding of nanovoids, Compos Sci Technol 72(2012)1683-1691.
- [27] Salviato M, Zappalorto M, Quaresimin M, Plastic shear bands and fracture toughness improvements of nanoparticle filled polymers: a multiscale analytical model, Compos Part A 48(2013)144-52.
- [28] Salviato M, Zappalorto M, Quaresimin M, The effect of surface stresses on the critical debonding stress around nanoparticles, International journal of fracture, 172(2011)97-103.
- [29] Quaresimin M, Salviato M, Zappalorto M, A multi-scale and multi-mechanism approach for the fracture toughness assessment of polymer nanocomposites, Compos Sci Technol 91(2014)16-21.
- [30] Mefford CH, Qiao Y, Salviato M, Failure and Scaling of Graphene Nanocomposites, Compos Struct 176(2017)961-72.
- [31] Qiao Y, Salviato M, Study of the Fracturing Behavior of Thermoset Polymer Nanocomposites via Cohesive Zone Modeling. 2018 arXiv:1808.09787
- [32] Hexion, Bellevue, USA http://hexion.com
- [33] Vacmobiles, Auckland, New Zealand https://www.vacmobiles.com/
- [34] TAP Plastics, Seattle, USA http://www.tapplastics.com
- [35] Goḿez FJ, Elices M, Berto F, Lazzarin P. A generalized notch stress intensity factor of U-notched components loaded under mixed mode. Eng Fract Mech 2008;75(16):4819-33.
- [36] Gómez FJ, Guinea GV, Elices M, Failure criteria for linear elastic materials with U-notches, Int J Fract 143(2006)99-113.
- [37] Atrzori B, Lazzarin P, Meneghetti G, Fracture mechanics and notch sensitivity, Fatigue Fract Eng M 26(2003)257-67.
- [38] Atrzori B, Lazzarin P, Notch sensitivity and defect sensitivity under fatigue loading: two sides of the same medal, Int J Fracture 107(2001)1-8.
- [39] Di Luzio G, Cusatis G, Cohesive crack analysis of size effect for samples with blunt notches and generalized size effect curve for quasi-brittle materials, Eng Fract Mech 204(2018)15-28.
- [40] ASTM D5045-99 - Standard Test Methods for Plane-Strain Fracture Toughness and Stain Energy Release Rate of Plastic Materials 1999.
- [41] Qiao Y, Salviato M, A Cohesive Zone Modeling Study on the Fracturing Behavior of Thermoset Polymer Nanocomposites. Proceedings to 33rd Annual Technical Conference, 18th US-Japan Conference on Composite Materials ASTM D30.
- [42] Qiao Y, Guo K., Salviato M, Scaling of Fatigue Crack Growth in Pristine Epoxy. Proceedings to 33rd Annual Technical Conference, 18th US-Japan Conference on Composite Materials ASTM D30.
- [43] Ko S, Tuttle ME, Yang J. and Salviato M, Characterization and computational modeling of the fracturing behavior in discontinuous fiber composite structures. Proceedings to 33rd Annual Technical Conference, 18th US-Japan Conference on Composite Materials ASTM D30.
- [44] Deleo A.A and Salviato M, Computational study for size effect in composites and nanocomposites. Proceedings to 33rd Annual Technical Conference, 18th US-Japan Conference on Composite Materials ASTM D30.
- [45] Cusatis G, Schauffert EA, Cohesive crack analysis of size effect, Eng Fract Mech 76(2009)2163-73.
- [46] Bažant ZP, Daniel IM, Li Z, Size effect and fracture characteristics of composite laminates, J Eng Mater-T ASME 118(1996)317-24.
- [47] Bažant ZP, Planas J, Fracture and size effect in concrete and other quasi-brittle materials, Boca Raton, 1998.
- [48] Salviato M, Kirane K, Ashari SE, Bažant ZP, Experimental and numerical investigation of intra-laminar energy dissipation and size effect in two-dimensional textile composites, Compos Sci Technol 135(2016)67-75.
- [49] Zike S, Sorensen BF, Mikkelsen LP, Experimental determination of the micro-scale strength and stress-strain relation of an epoxy resin, Mater Design 98(2016)47-60.
- [50] Chevalier J, Morelle XP, Camanho PP, Lani F, Pardoen T, On a unique fracture micromechanism for highly cross-linked epoxy resins, J Mech Phys Solids 122(2019)502-19.
- [51] Tada H, Paris PC, Irwin GR, The stress analysis of cracks handbook third edition, New York, 2000.
- [52] Salviato M, Bažant ZP, The asymptotic stochastic strength of bundles of elements exhibiting general stress–strain laws, Probabilist Eng Mech 36(2014)1-7.
- [53] Salviato M, Kirane K, Bažant ZP, Statistical distribution and size effect of residual strength of quasibrittle materials after a period of constant load, J Mech Phys Solids 64(2014)440-54.
- [54] Le JL, Bažant ZP, Bažant MZ, Unified nano-mechanics based probabilistic theory of quasibrittle and brittle structures: I. Strength, static crack growth, lifetime and scaling, J Mech Phys Solids 59(2011)1291-321.
- [55] Bažant, Z.P., Le, J.L. and Bažant, M.Z., Scaling of strength and lifetime probability distributions of quasibrittle structures based on atomistic fracture mechanics. Proceedings of the National Academy of Sciences, 2009;106(28):11484-11489.
- [56] Xu Z, Le JL, A first passage based model for probabilistic fracture of polycrystalline silicon MEMS structures, J Mech Phys Solids 99(2017)225-41.
Figures and Tables



| Specimen type | Specimen width (mm) | Crack or notch length (mm) | Max load (N) | Nominal strength (MPa) |
| Pre-notched | D=10 | 5.00 | 647.01 | 28.12 |
| Pre-notched | D=10 | 5.00 | 543.07 | 23.60 |
| Pre-notched | D=10 | 5.00 | 613.01 | 26.65 |
| Pre-notched | D=10 | 5.00 | 654.10 | 28.40 |
| Pre-notched | D=10 | 5.00 | 561.12 | 24.39 |
| Pre-notched | D=10 | 5.00 | 537.22 | 23.34 |
| Pre-notched | D=10 | 5.00 | 553.40 | 24.03 |
| Pre-notched | D=10 | 5.00 | 630.18 | 23.37 |
| Pre-notched | D=20 | 10.00 | 800.66 | 17.49 |
| Pre-notched | D=20 | 10.00 | 758.70 | 16.57 |
| Pre-notched | D=20 | 10.00 | 742.83 | 16.22 |
| Pre-notched | D=20 | 10.00 | 779.50 | 17.02 |
| Pre-notched | D=20 | 10.00 | 693.15 | 15.14 |
| Pre-notched | D=20 | 10.00 | 731.95 | 15.99 |
| Pre-notched | D=20 | 10.00 | 814.50 | 17.79 |
| Pre-notched | D=20 | 10.00 | 774.82 | 16.92 |
| Pre-notched | D=40 | 20.00 | 1100.05 | 12.04 |
| Pre-notched | D=40 | 20.00 | 1077.89 | 11.80 |
| Pre-notched | D=40 | 20.00 | 1108.72 | 12.14 |
| Pre-notched | D=80 | 40.00 | 1580.11 | 8.66 |
| Pre-notched | D=80 | 9.86 | 1542.20 | 8.45 |
| Pre-notched | D=80 | 15.86 | 1653.11 | 9.06 |
| Pre-notched | D=80 | 16.93 | 1532.03 | 8.40 |
| Pre-notched | D=80 | 17.68 | 1455.30 | 7.97 |
| Pre-notched | D=80 | 5.69 | 1755.01 | 9.62 |
| Pre-cracked | D=10 | 5.03 | 169.33 | 7.73 |
| Pre-cracked | D=10 | 4.96 | 164.62 | 7.47 |
| Pre-cracked | D=10 | 4.38 | 201.01 | 9.48 |
| Pre-cracked | D=20 | 7.63 | 289.27 | 7.91 |
| Pre-cracked | D=20 | 9.26 | 306.58 | 6.65 |
| Pre-cracked | D=20 | 9.28 | 325.62 | 6.61 |
| Pre-cracked | D=40 | 16.46 | 455.31 | 5.37 |
| Pre-cracked | D=40 | 17.27 | 385.44 | 4.93 |
| Pre-cracked | D=40 | 16.46 | 455.31 | 5.37 |
| Cohesive Law | (N/mm) | (N/mm) | (N/mm) | (N/mm) | (N/mm) | (MPa) | (MPa) | (MPa) |
|---|---|---|---|---|---|---|---|---|
| Two-scale | 0.8 | / | / | 0.645 | / | 55 | 300 | 5 |
| Bi-linear | / | 0.78 | / | / | 0.625 | 55 | / | 5 |
| Linear | / | / | 0.78 | / | / | 55 | / | / |