A Guide for CosmoMC Installation and Running
Abstract
CosmoMC is a Cosmological Monte Carlo package that explores parameter space, finds the best-fit values, and makes contour plots for various observational data. The present manual assists you with the installation steps and running of CosmoMC. Also, we briefly explain Markov chains analysis and generating plots and tables for the parameters. This guide is for everyone who is not familiar with GNU/Linux and wants to install and run CosmoMC for the first time.
I Introduction
CosmoMC (“Cosmological Monte Carlo”) is a free and open-source software that allows you to explore cosmological parameter space. It includes a Markov Chain Monte Carlo (MCMC) engine and some tools to analyze Markov chains and importance sampling. CosmoMC is written in FORTRAN 2003/2008. Also, There are some Python packages for building grids of runs, analyzing, and plotting. This code also includes CAMB111http://camb.info code to calculate the theoretical matter power spectrum and CMB temperature and polarization power spectra. CosmoMC parallel implementation allows you to run the code on a multicore machine as well as a massive cluster of thousands of cores. For more detailed documentation of this code, you can refer to: https://cosmologist.info/cosmomc/readme.html
II Installation and Preparation
II.1 Prerequisites
-
•
Hardware : To employ the provided parallel capabilities of CosmoMC, you need more than just one core. Markov chain algorithms are time-consuming and performing them on parallel machines will boost the code’s performance.
-
•
Operating system: CosmoMC is available for GNU/Linux distributions. Here, we installed and tested CosmoMC on Ubuntu 18.04 LTS222http://releases.ubuntu.com/18.04/. Following the instruction’s steps do not require prior knowledge of the GNU/Linux command line, however, it is highly recommended to see Appendix A for a quick tour.
-
•
Intel@FORTRAN Compiler (version 14+): CosmoMC is compatible with Intel Fortran. But You should use Intel Fortran versions older than 2019 version. CosmoMC does not compatible with the most recent version of Intel Fortran. We recommend to use Intel Parallel Studio XE 2015 for the best performance.
-
•
Open-MPI: OpenMPI library is required for running on parallel machines.
-
•
CFITSIO: CosmoMC uses the CFITSIO library to read file FITS data format including CMB data files.
-
•
FFTW and GSL: CosmoMC also uses Fastest Fourier Transform in the West (FFTW) and GNU Scientific Library (GSL) to perform some actions and computations. Although their installation is not mandatory, It might be required in some operations.
-
•
Planck Likelihood Code and Data: Planck Likelihood Code V3.0 is required to run CosmoMC with Planck 2018 data.
II.2 Preparation
In addition to the libraries mentioned earlier, there are some libraries and packages that may not include on a freshly-installed Ubuntu distribution. To make sure all the dependencies are satisfied, issue these commands in the terminal:
II.3 Installing FORTRAN Compiler
Download Intel Parallel Studio XE 2015 Update 1 from https://software.intel.com/en-us/fortran-compilers. After extracting the compressed file, navigate into the extracted directory in terminal using cd command and enter this command:
Follow the installation wizard step by step. You may either specify the installation path or leave it with default path /opt/intel/. In order to make ifort a system-wide command, you need to use this command:
To define this command permanently, you have to add to this command at the end of .bashrc, you may open bashrc file with this command:
Save changes and close the file. Then run this command in the terminal:
To check if the compiler works properly, run this command:
The output should be like this:
II.4 Installing Open MPI
In order to install Open-MPI, you need to compile it from the source code. Download Open-MPI from https://www.open-mpi.org , extract the compressed file and then navigate to the extracted directory. You need to specify installation path, FORTRAN compiler path, FORTRAN 77 compiler path and FORTRAN 90 compiler path. In this stage you need to run configure command with appropriate flags which are presented below:
Then compile and install Open-MPI using the commands below:
The configuration and the installation process takes a rather long time. After the installation completed successfully, you need to add Open-MPI to the system path; open bashrc file:
and add these lines to bashrc file:
In some versions of Open MPI you may need to run following command in the terminal:
To check if Open-MPI has been installed properly, you may run this command:
And the output would be Intel FORTRAN compiler version.
II.5 Installing CFITSIO
Download CFITSIO from http://heasarc.gsfc.nasa.gov/FTP/software/fitsio/c/cfitsio_latest.tar.gz. Extract and navigate to the extracted directory. Use the configure, make, make install commands to prepare, compile and install the compiled binary files :
After the installation successfully finished, it is essential to add the installation directory to the system PATH:
Add this line to the end of bashrc file:
Save changes and run this command:
II.6 Installing FFTW & GSL
You can download FFTW and GSL from https://www.gnu.org/software/gsl/ and http://www.fftw.org/download.html. the installation steps are similar to CFITSIO (see subsection II.5).
II.7 Building Planck Likelihood Code
After downloading PLC 3.01 from: http://pla.esac.esa.int/pla/aio/product-action?COSMOLOGY.FILE_ID=COM_Likelihood_Code-v3.0_R3.01.tar.gz, extract it and enter the extracted directory:
In plc-3.0 there is a subdirectory named plc-3.01, copy this directory to wherever you intend to be installed to, here the home directory has been chosen, but feel free to choose any other directory.
In the Makefile in plc-3.01 directory, compiler and library paths might need modification, open Makefile:
Find CFITSIOPATH and check if its value match to the path of CFITSIO
Also, check the path of MKL :
Save and exit. Make sure the current directory is plc-3.01 and run these commands:
After the installation of Planck code finished, you need to create some environmental variables by adding these lines to the end of bashrc file:
The value of CLIK_PATH is the absolute path for the plc-3.0, if you have chosen another path you may specify it here. Then in the terminal we source bashrc file again:
It is essential to put Planck likelihood data into plc-3.01 folder. We can download baseline data of Planck 2018 from http://pla.esac.esa.int/pla/aio/product-action?COSMOLOGY.FILE_ID=COM_Likelihood_Data-baseline_R3.00.tar.gz. Extract it, and copy hi_l , low_l and lensing directory into the plc-3.01 directory.
II.8 Compiling CosmoMC & GetDist
Now you ready to compile CosmoMC from the source code. You can download the latest version of this code from https://cosmologist.info/cosmomc/submit.html or clone the git repository by this command:
There is a data subdirectory inside the CosmoMC directory. if you need to use Planck 2018 data, It is essential to make a symbolic link to connect data directory to plc-3.01:
Now navigate to source inside the CosmoMC directory and compile the source code using make command
After successful compiling, a file named cosmomc will be created in CosmoMC directory.
III Running CAMB
There is subdirectory inside the CosmoMC directory named camb. CAMB333https://camb.info is a Code for Anisotropies in the Microwave Background which is responsible for theoretical calculations of CosmoMC. For compiling CAMB, go into its directory and use make command:
The subdirectory inifiles inside the camb contains some input parameter files such as params.ini or planck_2018.ini . You may use these files as an input file for running CAMB. It worth mentioning that all these files can be edited. To use them as an input, you may copy one of these files in the camb directory. After making CAMB Fortran files, it produces an executable file named camb which can be run like this:
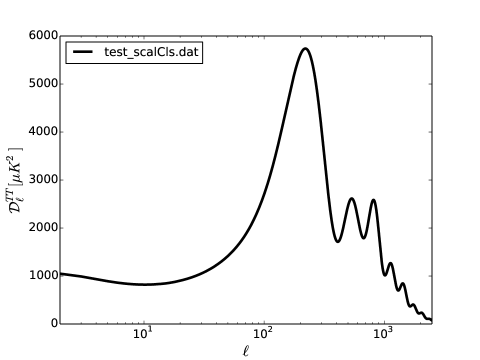
Outputs have *.dat extension such as test_scalCls.dat for scalar perturbations or test_tensCls.dat for tensor perturbations power spectrum. We can plot them by using gnuplot program. Run this command in terminal:
Now you may use the commands below to the plot power spectrum :
Output would be similar to Fig. 1.
IV Running CosmoMC
To run CosmoMC you need to run it with MPI using mpirun command. Set your corrent directory to CosmoMC directory and run this command:
The number 7 in front of the (-np) flag specifies the number of the processors. If your machine has less than 7 processors you’ll get an error. For checking number of processors , you may run this command:
For running with Planck 2018 likelihoods you may use test_planck.ini. However, it takes more time than test.ini since it was just a test, not an actual MCMC run.
For a real MCMC run, you may edit test.ini file to change the setting:
Inside the test.ini file there are some lines which start with DEFAULT keyword. If these lines are not commented, it means we can use likelihoods related to these data. For example, if you want to include just PlanckTT high- + PlanckTT low- your file should be similar to the following lines:
The line DEFAULT(batch3/plik_rd12_HM_v22_TT.ini) is for including PlanckTT high- and DEFAULT(batch3/lowl.ini) is for PlanckTT low- likelihood. Also, for Planck 2018 CMB lensing likelihood, you can use DEFAULT(batch3/lensing.ini) line. For full description of Planck data and likelihoods you may refer to
https://wiki.cosmos.esa.int/planck-legacy-archive/index.php/CMB_spectrum_%26_Likelihood_Code .
To do a MCMC run you need to find the line which starts with action and set its value to 0 :
Also, you can turn on checkpoint option to build some checkpoints during running. Checkpoint lets you resume MCMC when your run is interrupted for any reason:
After making these changes in test.ini file you may run it:
Now it will start a MCMC run to find the best-fit values and confidence intervals for your model.
V Analyzing Markov Chains
After running of MCMC process finished, we can analyze chains to make the plots or table of the best-fit and confidence interval of parameters. For this purpose, we use a simple Python script. We have already installed a Python package called GetDist in Sec. II.1.
Also, we can install Python packages included in CosmoMC from source files:
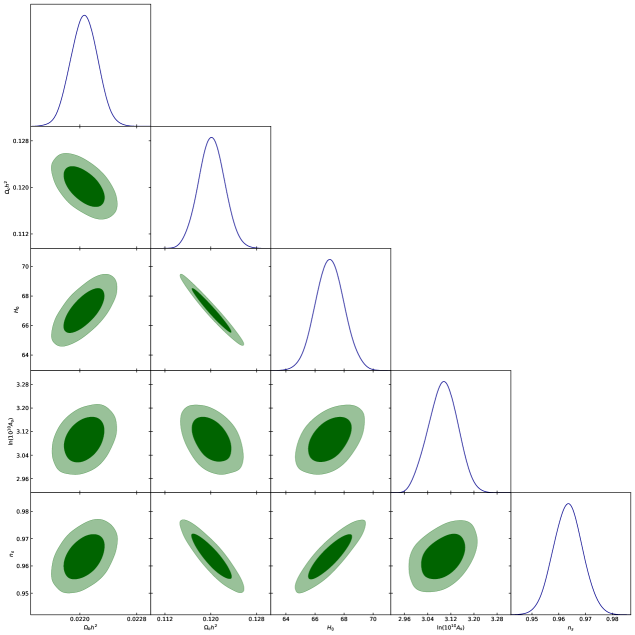
You can create triangular stack of likelihood contour plots using getdist package in python:
In this script /chains/ is the directory where contains the Markov chains, cmb is the common name of the chains. For example, if we run CosmoMC on 10 processors with common name cmb we will have chains with names of cmb_1.txt, cmb_2.txt , cmb_3.txt , ... cmb_10.txt. Now you have to determine parameters which you want to plot in f.triangle_plot function and also you may choose a legend for your plot. A sample output plot is represented in Fig. 2.
For generating the table of parameters we can use this script:
Set limit=1, and limit=2 to produce a LaTeX-format table of parameters with and confidence level respectively.
| Parameter | 95% limits |
|---|---|
For complete documentation of GetDist package you can refer to http://getdist.readthedocs.io.
Appendix A Linux
A.1 GNU/Linux
GNU/Linux or casually “Linux” operating system, consists of a Linux kernel and some GNU utilities and tools coded by or for the GNU project. GNU license make it possible for companies and individuals to make their own Linux distributions for various intents and purposes by adding additional software and documentation. Here, Among the myriad of GNU/Linux operating systems, we used a Debian-based distribution name Ubuntu444https://www.ubuntu.com for its active community and ease of use. If you are not familiar with Linux installation, you may need to read this guide https://www.wikihow.com/Install-Ubuntu-Linux
A.2 Command line Interface
A GNU/Linux shell is a command-line interpreter. Here we used the default Ubuntu shell, Bash. But you feel free to use your favorite shell.
You can run bash commands in Ubuntu Terminal to open a terminal window, you may press ctrl+Alt+t or click on the terminal icon. Also, there is an open in terminal option on right-click menu that helps you to open a terminal and set Bash current directory to a specific directory without navigating to it by using command-line commands.
Bash prompt has this structure
The flickering cursor in front of $ sign means Bash is ready to get the commands. When you open terminal in the home directory, you do not see the full address as is described in A.2.5 but a sign, which is an abbreviation for home directory address.
A.2.1 Environment Variables
The environment variable is a variable with a name and an associated value. In this manual, we mostly deal with $USER, $HOME, $PATH variables, which their values are respectively, user’s name and home directory address, and the system’s path directories. Using echo command, you may see their values:
A.2.2 Commands
There are many Bash commands to do various operations and actions. Here, we introduce some commands which help to install and run CosmoMC
-
•
pwd: print working directory command.
-
•
cd: This command helps you to change the working directory using relative or absolute address (see A.2.5)
1 cd #returns to home directory2 cd ~ #goes to home directory3 cd $HOME #goes to home directory4 cd x/ #goes to x directory using its reletive path5 cd ./x/ #goes to x directory using its reletive path6 cd /x/y/ #goes to y directory using its absolute path -
•
sudo: super user do; some actions require more than user privileges, this command gives root privileges to the user to accomplish the task.
-
•
ls: This command list all the directories and files.
-
•
tar: This command with specific options is used for extraction, for example the command below extract
cfitsio_latest.tar.gztar archive:1 tar zxvf cfitsio_latest.tar.gzAlso, you may extract the file by its designated right-click option.
A.2.3 Installing new programs
Installing new packages is possible either using a package manager and binary file or compiling from the source code. Ubuntu uses apt package manager by default which needs root privileges:
Also, it is possible to compile from the source code which usually done by three steps:
-
•
configure:The configure script used to set correct values for the compiling step. Also, it is possible user sets some values with special flags.
-
•
make: This command compiles the package according to the instruction in
Makefile. -
•
make install: This command installs the compiled files created in the last stage. It worth mentioning that sometimes you need root privileges to install the package.
A.2.4 GNU/Linux PATH
PATH is an environmental variable that tells bash which directories to lookup when users issue a command. To see the list of these directories, enter this command in the terminal:
Any other command/excutable files that are nAny other command/executable files that are not to the PATH should be either issued with its designated address, i.e.:
or it should be exported to the Linux PATH, i.e.:
This action is temporary. In order to set them permanently, it should be added to .bashrc file in the home directory. First open .bashrc file by this command:
Export the address to PATH by adding these lines at the end of the file:
Save and close the file. Then logout/login or simply enter this command in terminal:
A.2.5 Filesystem Hierarchy Standard
All the files and directories are contained under the root directory “/”. Every user has a subdirectory under the path “/home/”. Above this home directory designated to the user, it is not possible to modify any file or directory without root privileges.
Every file and directory has its unique address, it can be specified from the top-most directory in a hierarchy, i.e. the root directory or starting from the current working directory. The first called absolute address and the latter called relative address. Here are some examples for navigation to the Desktop directory from the home directory using either absolute and relative address:
The address of file can be uniquely specified by this name and its directory address, for example, the address of camb file on the Desktop directory has the absolute address of /home/$USER/Desktop/camb, the relative address has the same logic but it depends on the directory that you are in.
There is a subtle point about running the executable files; even if the file is at your current working directory you cannot run it like this:
Since Bash assumes every input as a command and will search the system PATH. So, if you have not exported your current directory to system PATH you face command not found error. To avoid this situation issue the command like this:
In the Bash “.” means “here”, so you are telling Bash you are attempting to run camb executable file which is presented in the current directory