![[Uncaptioned image]](/html/1601.02117/assets/x1.png)
Location Aware Password
Protection System
University Of Essex
The Department of Computer
Science and Electronic Engineering
Author:
Chathura M. Sarathchandra Magurawalage
Supervisor:
Prof. Kun Yang
Abstract
This report describes the design and the implementation of a password protection system that has been proposed as an idea then developed by the author for his undergraduate final year project, at the University of Essex.
When designing the system the author has concentrated on adding extra layers of security to the traditional security systems without having to completely replace the existing security systems.
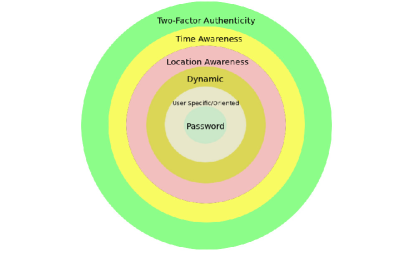
Location Aware Password Protection System (LAPPS) is designed to strengthen the security of traditional password protection systems. This is achieved by adding several layers of protection to the passwords that most traditional password protection systems generate. The current implementation looks at the Password/Pin numbers of Credit/Debit cards that are used on Automated Teller Machine (ATM),though the underlying design of the system can be used in many other scenarios. A password that is generated will be allocated to a particular user and to the ATM that is nearest to the user. LAPPS ensures the following qualities of the passwords that it generates.
-
•
Location Awareness
The passwords are generated according to the user’s geographical area, that they request their passwords from. So a password will only be active in just one location.
-
•
Time Awareness:
A password will only be valid for five minutes. The unused passwords will be discarded.
-
•
Dynamic
The user has to have a new password each time he/she logs in. A password is generated to be used only once.
-
•
User Oriented/Specific
The received password can only be used by the requester, and can only be used on its allocated ATM.
-
•
Two Factor Authenticity
The confidential information will be secured using two-factor authentication.
For extra security, a Pin generating device has been introduced. This will produce an eight digit number that the user has to supply to the mobile application, before requesting for a password. The user can obtain a pin number by inserting his/her Debit/Credit card and the fixed password that has been allocated when the user registers with the system.
Glossary
Acronyms
- ATM
- Automated Teller Machine
- GPS
- Global Positioning System
- LAPPS
- Location Aware Password Protection System
- SRID
- Spatial Reference System Identifier
- WGS
- World Geodetic System
1 Introduction
With the increasing security issues in the modern password protection systems, the security experts are concerned about their passwords more than they did few years back. With the increasing possible computing power, attackers are able to carry out multitudinous attacks on the passwords in a small amount of time.(E.g. brute force attack).
With the advancements of the malicious attacks, it is almost hard to trust the security of your confidential information that has been secured only using long term fixed passwords. As a solution LAPPS adds varied layers of security to the existing password protection systems. In section 1.3 the variations between the layers and how they work will be explained.
1.1 Background
Mobile applications are rapidly growing with the escalating usage of mobile devices such as hand held computers (Mobile Phones, Mobile Pads). In the academia research on mobile software and hardware technologies in the last decade have been increased. A core fundamental element of ”Pervasive computing” is to hide the underlying mechanisms of systems to the user and perform actions with its context-awareness. The idea is to sense and react to dynamic environments and activities. Furthermore Location Information is a compelling integral of context. So the Location aware computing is a widely heard topic in this area. The authors of the article [8] write about the appliance of the location awareness in ”Invisible Computing”. The papers [11] and [9] elaborates on ”Location Awareness” for real world applications. Moreover the latter suggests a ”Pervasive Computing” architecture that has been used on an implementation of a smart environment that assists elderly persons to live longer.
Location Awareness in most cases achieved by location sensing. Global Positioning System (GPS) has been widely used today for sensing geographical locations using satellite signals. Despite the popularity of it, the disadvantages and flows of GPS can not be neglected when considering designing a ”Location Aware” architecture. In the article [14] the authors analyse the reason why GPS is not the optimal universal location sensing mechanism. The main reason appeared to be that GPS does not work indoors, in particular in steel-framed buildings. The resolution of it is a few meters and it may not be adequate for some applications. Additionally the added weight, cost and energy consumption might not be competent for some applications. Consequently academics in the ”Lule ̵̊ University of Technology ” has designed an architecture [13] that uses more than one sensing mechanisms to retrieve Location Information, such as GPS, Bluetooth, WaveLAN, IR, HiperLAN and etc. Hence that the availability, precision and accuracy of Location Information is improved. Additionally they propose a Generic Positioning protocol (GPP) for positioning information that exchange between devices and other networked services.
Users may be apprehesive about the security when sharing their location with a third party. The author sees this being a future problem while carrying out further development of this project. One solution is to control access to the information by letting user manage the delivery and the accuracy of the location information using rule-based policies. The paper [5] introduces the ”mix zone” model which ”anonymize” user’s identity by restricting the position where users can be located. Additionally the authors of the paper [3] talk about the privacy in Location aware computing.
1.2 Related Work
1.3 Vulnerabilities in conventional password protection systems
The passwords that majority of password protection systems generate, are static passwords. Meaning that they are assigned to the users in a fixed manner. Hence these passwords can be used more than one time. Thus if the password gets in to the hands of the unwanted, they will be able to use it without the owner knowing nothing about it, in most cases. Or a third party can use the password until the password would be changed by the owner. But in most password protection systems if the password is in the hands of the unwanted then they have no restrictions to change the password without having the owners permission.
Malicious attackers are able to steal passwords from users by using advanced techniques and equipments [10] (E.g Skimming, password hacking). These stolen passwords can be reused to get access to the corresponding user accounts. If bank card details have been stolen using skimming devices, the card details can be reprinted in to dummy ATM cards, and then the recorded password can be used with its corresponding ATM card to steal money out of users accounts.
Attackers may be able to crack passwords using advanced algorithms with high computational power. (The use of ’birthday attack’ to crack password hashes) [10]
Most password protection systems use One-Factor authentication. Which is ”Something a user knows” (E.g Systems that depend on security of just one password). This is less secure. If the master password (one and only security factor) is going to be compromised then the system will be open to any kind of malicious access.
1.4 Objectives
-
•
Make the passwords dynamic so that each time a user logs in to the system he/she will use a new password.
-
•
Restrain the geographical locations that the passwords can be used, so that passwords can only be used within the users locations.
-
•
Make the passwords not reusable. So that used passwords will be inoperative.
-
•
Restrict the password’s active time. Subsequently a user will have a short time frame to use the password. After the active time is up, the password will be invalid.
-
•
Harden the security of systems by introducing a second authentication factor.
-
•
Create a uniform architecture that will accommodate above factors.
-
•
Implement the architecture as a solution to a real-world problem.
-
•
Evaluate the success of the architecture.
2 LAPPS Architecture
The LAPPS architecture follows the idea of having layers of protection that can be variable. Which means depending on the desired level of protection, the layers can be added or removed without having to worry about the relationships between the layers, since the layers does not depend on each other.
LAPPS layers can be added to the existing password protection systems, without having to entirely replace the old systems.
The following sections will elaborate on the core and the layers of the LAPPS architecture.
2.1 Password
The core of the LAPPS architecture is a standard password. A character of a password can be , or where , and imply all possible letters, Alphanumerical values and Symbols respectively.
The other layers that are wrapped around this string, will strengthen the security of the password.
2.2 User Specific/Oriented
This layer of LAPPS operates on the database level of the system
called ”lappStore”. To make the password user specific, a password
is allocated to just one particular individual. A registered
user may be allocated to more than one password over time, but
he/she will only have one active password at a time. denotes the
allocated user-password pairs in the history and implies the active user-password pairs at present.
Such that:
If a user requests for a password one after another before the former one expires, the former password will be deactivated and a new password will be allocated. This avoids a user having more than one password at a time. This ensures that there is only one active password per user at a time, and only the owner can use it.
2.3 Dynamic
With LAPPS the user has to request for a password each time they log in. So that one password can only be used once. If a criminal gets hold of a password illegally, then there won’t be any use of the password, if the owner of the password has already used it, or he/she has requested for a new one.
In the current LAPPS implementation a user is able to request for a password using an Android mobile application called ”LAPPSMobile”. When the client requests for a password, the server will reply back with a new password only if the user’s given information is correct. The information included is the user’s ID, the registration number of the application, location information and the eight digit number that has been generated by the Pin generating device. The connection between the sever and the client is encrypted.
To be able to gain a registration ID for the mobile application, the owner of the mobile phone and the particular instance of the application has to be registered with the ”LAPPSserver” (The server side application of the LAPPS architecture) along with the owner’s user information.
2.4 Location Awareness
The location awareness is the main layer of LAPPS. The reason being, this is the main factor that makes LAPPS special. This particular layer has been influenced to name the LAPPS architecture.
This layer makes the passwords active only in a particular geographical area. When a user requests for a password, the user has to be approximately in a password active zone. If the user is not in a password active zone then the LAPPS server may not generate a password for that particular individual. An error message would be passed back instead. The area size of the active zone can easily be variable according to specific requirements. If the user has successfully received a password then to use the password he/she has to be geographically present in the particular area that the received password is active. One password will be active only in one geographical area.
Because of this peculiar reason stolen unused passwords will be useless in other geographical areas other than the active zone of the particular password. Although an attacker might be determined to use the password in the active zone, the other layers of LAPPS make it harder for it to work.
2.5 Time Awareness
The passwords that are generated by LAPPS, are only active within a limited time window. If the password is not being used within this time frame, the password will be extinct. Depending on the requirements, the time frame can be increased or decreased.
This leaves unused stolen passwords a limited amount of time to be active. Hence the stolen unused passwords have to be used within a limited amount of time and also within the exact corresponding password active zone. This makes stolen passwords nonetheless useless.
2.6 Two-factor authenticity
LAPPS uses two factor authentication to harden the existing layers of protection. This layer can be removed easily if not desired.
Two-factor authentication uses two of the three well known authenticating factors [2]. These two factors are:
-
•
Something that user knows. (E.g: ”A fixed password”)
-
•
Something that user has. (E.g: ”An ATM card”)
A fixed password will be allocated to every user who is registered with LAPPS. This password can be used for this exact purpose only. By using these two factors, the LAPPS authenticates the user, even before he/she gains a password. Only if the user is able to authenticate using these two factors, he/she will be able to gain a password. Any other way the server will bounce back with an error message. Similar implementations have been introduced by other organisations such as PinSentry device of Barclays Bank PLC [1].
2.7 Evaluation on LAPPS Layers
There are five layers in the LAPPS architecture in total. The layers can be removed or added to the stack of layers, depending on the level of security desired by the user. Though new layers can be added on top of these five layers.
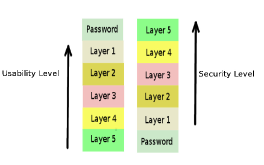
Although the idea of adding more security layers is quite promising from the security point of view, the more you add layers in to the stack the less user friendly the system would be (Figure 2). So the security administrators have to find the right security levels that would fit in to their needs. As an example lets look at a system with and without the final layer the ”Two-factor authenticity”. When this layer is present, as the first step the user has to use their fixed password number and ATM card for example, to obtain a second eight digit pin number. This number is then used to get the final pin number that can be used to access the protected information or service. This can be a tedious process granting that the user is in a hurry or conceding that the user has not got the ATM card with them when they need to get access to the particular service or data.
An example for an extra layer of security would be to use the third authentication factor, which is ”Something that user is” (E.g. fingerprints), with the other two authentication factors that is mentioned in section 2.6.
2.8 LAPPS solution to the vulnerabilities in traditional password protection systems
In section 1.3 the author has mentioned the vulnerabilities that is in traditional password protection systems. The following pointers will summarise the factors about the solution LAPPS architecture that has been explained in detail in section 2.
-
•
A password that is generated by the LAPPS is allocated to just one individual.
-
•
There will only be one active password per user. So only the owner owns an active password.
-
•
The passwords are generated in a dynamic fashion so that a user may use a new password each time he/she access the secured data/service.
-
•
One password can only be used once. So that the stolen used passwords are dysfunctional.
-
•
The passwords will only be generated if the user can successfully authenticate. If a criminal steals a password requesting device (E.g. Smart Mobile phone with a registered ”LAPPSMobile” Application installed) he/she will not be able to gain a password without supplying other information to the device.
-
•
The users have to be in a ”Password Active zone” to be able to request for passwords.
-
•
Every password is allocated to only one ”Password Active Zone”. Stolen unused passwords can not be used in multiple locations.
-
•
A password can only be used within its allocated ”Password Active Zone”. Stolen unused passwords can not be used outside the allocated geographical area.
-
•
A password is only valid for a very limited amount of time. So that the user will have to use the password within this time frame. If the password is not being used within this time window, the password will be extinct.
-
•
To be able to authenticate, the user has to acquire an eight digit pin number using their fixed password and the corresponding smart card, for an example. So that stolen password requesting devices will be useless to a person who does not know the fixed password and does not own a Pin generating device with the corresponding fixed password.
3 LAPPS ATM Implementation
The current implementation of LAPPS architecture focuses on hardening
ATM password systems by utilising its layers to fit in to the
conventional ATM systems.
Factors about traditional ATM password protection systems.
-
•
A user may be assigned to a fixed password with its dedicated Credit/Debit card number.
-
•
The password can be used from anywhere in the world, along with its Credit/Debit card. The geographical location has no effect on the authenticity of the user.
-
•
The vulnerabilities mentioned in section 1.3 are valid in this case.
There have been reported many crimes that are related to the security of ATMs and other password protection systems [10]. Such as, robberies, stealing confidential information using hidden cameras and card readers and hacking, with the advancements of technology.
3.1 The Architecture of the LAPPS implementation for ATM systems
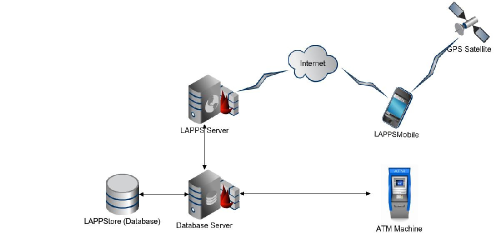
Figure 3 shows, the components that are being used in the LAPPS. The server side application (LAPPSServer), client application and Pin generating device are the components of this system. Section 3.2 elaborates in what respect LAPPS uses these components in its various layers of security.
To be able to use the system the user has to have a smart phone that runs Android platform.
The components of the system:
-
•
”lappStore” is the main database of the LAPPS system. The allocated passwords and user information are stored here.
-
•
LAPPSMobile is the client application that the user can request passwords from. This application is developed on the Android platform and has to have the GPS functionality.
-
•
The LAPPSServer application replies to the requests from LAPPSMobile application, only if the authentication information is correct.
3.1.1 How a user would use ”LAPPS for ATMs”?
-
•
User has to generate an 8 digit number from the Pin generating device by using his/her fixed password and the Credit/Debit card.
-
•
Then by staying no more than 20 meters away from the desired ATM that user intends to use, he/she can request for a password from the LAPPSMobile. And also may be asked to insert the 8 digit pin before the application sends a request to the server.
-
•
If the authentication details are correct then the server may reply with a password and the ID of the ATM that the password is allocated to. Else ways it will send back an error message.
- •
3.2 LAPPS Layer mapping to the ”LAPPS for ATM” implementation
The following pointers will construe how the security layers of LAPPS have been implemented in to ”LAPPS for ATM ” implementation.
3.2.1 User specific/Oriented
In a table called ”allocation” in the lappStore, the LAPPSServer stores the generated passwords with its allocated user and the ATM machine ID. So that the password will only be allocated to one user.
3.2.2 Dynamic
The passwords are not predefined. It is generated on demand as clients request. If LAPPSServer has authenticated the user, then the password will be generated.
3.2.3 Location Awareness
3.2.4 Time Awareness
A password is only available for just 5 minutes after it has been generated. If the user has not used the password on its allocated ATM, it will be expired.
3.2.5 Two-Factor Authentication
Before a user requests for a password, they will be asked to enter an 8 digit number. This has to be obtained from a Pin generating device by using the user’s ATM card and their fixed password.
3.3 The components of ”LAPPS for ATM”
The configuration information of all of the following components have
been stored in properties files, in ”.txt” format. On that account if the
information changes in the future the user is able to reconfigure the
software without having to change the code.
Such files may contain.
-
1.
The URL of the database.
-
2.
The name of the database.
-
3.
The URL of the server.
-
4.
The PORT number of the database management system.
-
5.
The PORT number that the server is passively waiting/listening for connections from the clients.
-
6.
The user names and the passwords for the database with different access permissions.
3.3.1 The lappStore (Database)
The database has been implemented on ”PostgreSQL”
[17] database management
system. The reason for using this particular piece of software is that
it is open-source and the powerful PostGIS [15]
spatial database extension for PostgreSQL. This extension follows
Simple Feature Access for, SQL specification from Open Geospatial Consortium (OGC).
The database contains four tables. They are:
-
•
user:
This table stores the information about users in the system. A row of this table contains the user ID, registration ID, name, hashed fixed password. Passwords are hashed using SHA2-512 algorithm. -
•
password:
The hashed passwords are stored in this table with their expiry time. Passwords are hashed using SHA2-512 algorithm. - •
-
•
allocation:
An allocation contains a password, a user, an ATM ID and a Boolean flag that can toggle to be true if the password has been used, otherwise it is false (default). Since a user is allowed to use a password once, if this value is ’true’ then the password is unusable. There will be one row in this table for every allocation (For sometime).
This database has been designed so that a minimum amount of data will be stored, to keep the database less ponderous. To keep the database clean, there is are triggers devised into the database.
The triggers trigger every time a user inserts a record in to the allocation table. One trigger deletes the allocation rows that the expiry time of the passwords have been exceeded and the other deletes the rows that their password allocation has been already used. The expired and used information in the ’allocation’ table is useless because they will not be used by the LAPPSServer in anyway after they had its use. Although the passwords still will be stored in the ’password’ table, because they are used by LAPPSServer to generate unique passwords.
The idea is that to keep this table clean as possible so that the transactions can be performed somewhat faster.
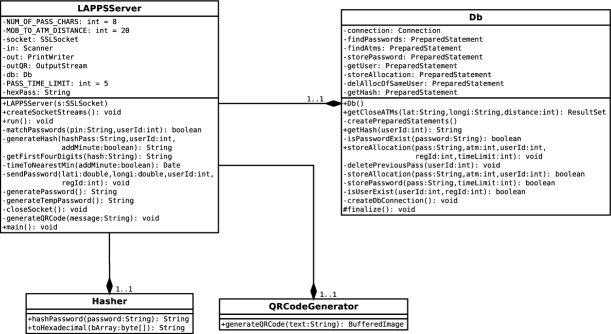
3.3.1.1 Database design
:
Figure 4 shows a diagram of the design of lappStore database.
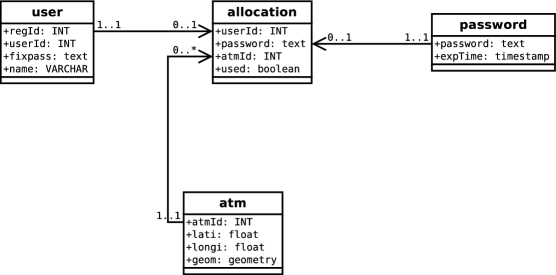
The database contains four tables. Namely they are user, allocation, password and atm. The relationships between them have been shown using the black lines that connects the class boxes. The classes that have been connected by a line with an arrow at the end are the foreign keys that refer to the corresponding columns at the other end of the relationship/line. For example ”password” column in the ”allocation” table is a foreign key of the ”password” column in the ”password” table, and so on. Hence the type of the foreign key column and the corresponding column are the same.
The multiplicity factors of the tables shows in figure 4 that a user can only have one allocation at a time (0..1) but an allocation will always have a user (1..1). A password can only have one allocation (0..1) but an allocation will always have a password (1..1). An allocation will always have an ATM (1..1) but an ATM may have zero or many allocations (0..*).
3.3.1.1.1 user Table
:
As the name suggests, the user table contains the information that is
relevant to the users of the LAPPS system. It is assumed that all of
these attributes of the users have been allocated and filled by the
bank.
Column description:
-
•
regId - The registered ID of the user’s mobile application.
-
•
userId - The ID of the user (Primary Key).
-
•
fixpass - The fixed password that has been allocated by the bank to the user, when they sign up with the bank.
-
•
name - The name of the individual.
The current implementation allows users to have one application registered per person. It is assumed that the users have already registered their applications when they sign up with the bank. The regId is stored in the users LAPPSMobile application instances.
3.3.1.1.2 atm Table
All of the ATM machines that belong to the system has to be in this table. There should be one record per each ATM that is registered with the system. The LAPPSServer uses the information in this table to calculate the distance between the users and the ATMs.
Column description:
-
•
atmId - The unique ID of the ATM (Primary Key)
-
•
lati - The latitude geographical information of the ATM.
-
•
longi - The longitude geographical information of the ATM.
-
•
geom - The geographical information of type ”Spatial Reference System Identifier (SRID) ” 27700.
To create this special ’geom’ column a special command had to be
used from the PostGIS library [15]. As parameters of
this function you can parse the ”schema name”, ”table name”, ”column name”,
”SRID”, type, dimension etc.
How this geometry column was added to the ’atm’ table as follows.
SELECT AddGeometryColumn(’public’, ’atm’, ’geom’, 27700, ’POINT’, 2);
To calculate the column values of type SRID 27700 the author has used the following command that iterates through all of the rows in the ’atm’ table and updates the ’geom’ column.
UPDATE atm SET geom=PointFromText(’POINT(’|| lati||’ ’|| longi || ’)’, 27700);
The ’PointFromText’ function converts the received SRID 4326 (lati, longi) value to SRID 27700 type value and stores it in the ’geom’ column.
More information on spatial distance calculation will be discussed in the section 3.3.3.6.
Other parts of this database are triggers that are in service to
keep the database less bulky. These triggers fire after every time a record has been added to the table.
Trigger 1: Deletes the rows that are expired by time.
The pseudo code of the triggers:
BEGIN
DELETE FROM allocation as a USING password AS  pass WHERE
a.password=pass.password AND pass.expTime <= CURRENT_TIMESTAMP;
RETURN NULL;
END
Assume that the are allocations. Each password has got its expiry time associated with it. The trigger function iterates through all allocation records and deletes the records that are where is the current time. After the trigger has been fired we can say that,
Trigger 2: Deletes the passwords that have been used.
The pseudo code of the triggers:
BEGIN
DELETE FROM allocation WHERE used=true;
RETURN NULL;
END
If that the are allocations. The trigger iterates through all allocations and deletes the allocation records that the ’used’ column of it has been assigned to the value true. Furthermore, after the trigger has been fired we can say that,
3.3.1.1.3 password Table
:
All the passwords that have been generated, are stored in this table
with its corresponding expiry date and time.
Column description:
-
•
password - The password (Primary Key).
-
•
expTime - The expiry time of the password.
The expiry time of the passwords have been calculated by the server. The server adds 5 minutes to the current time and then stores the value in the expTime column along with each generated password.
3.3.1.1.4 allocation Table
:
This table contains all of the allocations that are alive on time. One allocation has got the lifetime of 5 minutes. A trigger will delete the expired rows. Ideally all of the passwords that are in this table, are only unused allocations since the used allocations will be deleted by one of the triggers. Of course there is a time window before the triggers have been fired, where the used or expired allocations still will be in this table.
Initially every time LAPPS has successfully generated a password, a
record will be added to this table. A user will have just one record
in this table at a time, since LAPPSServer makes sure that a user can have only one allocation/Password at a time.
Column description:
-
•
userId - The ID of the user that the password has been allocated to(Foreign key).
-
•
password - The allocated password (Foreign key).
-
•
atmId - The ID of the ATM that the password has been allocated to (Foreign key).
-
•
used - Boolean flag; true if the password has been used, false otherwise.
3.3.2 Pin Generating Device
Users have to use this device to generate an 8 digit pin number before they request for a dynamic password. A user may insert their Credit/Debit card in to the Pin generating device and insert his/her fixed password. Using the card and password an 8 digit password may be generated.
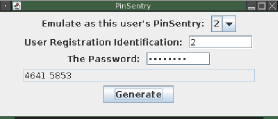
How a user would use the application?
-
1.
Select the user’s register ID from the drop down selection menu.
-
2.
Enter the user’s registration ID.
-
3.
Enter the user’s fixed password
-
4.
Click the ’Generate’ button.
-
5.
Finally the generated password will be generated on the screen.
Although the users enter all of their authentication information in this application, a real Pin generating device, does not prompt the user to insert this information. Instead this information apart from the user’s fixed password, is obtained from the user’s Credit/Debit card when it is being inserted into the device. For that reason only for the testing and debugging purposes the above design has been used. Besides the project’s emphasis is on the algorithm that is being used to generate the pin numbers.
3.3.2.1 Algorithm
:
Firstly the following algorithm generates a hexadecimal value
, assuming that the byte array that has been returned by the
SHA2-512 hashing algorithm, has been converted to hexadecimal. If all
possible time values are , given a time stamp of the current time
rounded to the nearest minute is we can say that . The is rounded to the nearest minute since it removes added
complications to the algorithm by the ”Seconds” fraction of the time
stamp, when the server authenticates the pin number (More on pin number
authentication in section 3.3.3.7.1). We assume that are parties who are registered with
LAPPS. denotes the ’s unique identity. implies the fixed password of .
Secondly loop through the characters of and retrieve the first four characters that are where denotes digits from 0 to 9. Reverse the hexadecimal string and then again carryout the same procedure to find the final four digits of the eight digit number.
Every minute this pin number will change due to how hash functions work with the salted time stamp. Which means that the pin numbers that are being generated by using this technique will only be valid for around a minute or two (Further discussion is in section 3.3.3.7.1).
It is highly unlikely that someone would be able to guess or crack this password, using today’s computational power within this limited time frame. The added salts make it even harder.
3.3.2.2 Software Design
:
The software consists of two classes Hasher and the PinSentry. Figure 6 shows a class diagram of these two classes.

The PinSentry class creates all the Graphical User Interface for the users to insert their authentication information and to display the generated pin numbers. The static methods in the Hasher class has been used by the PinSentry class to generate the hash values and to convert them to Hexadecimal values.
As shown in figure 6, a Pinsentry has a Hasher (1..1).
Hasher uses Java’s inbuilt libraries to hash the strings. In particular the ”java.security.MessageDigest” class. The PinSentry class may only produce a pin number only if the given authentication information were correct. Although do not forget that even if the PinSentry device allowed the users to enter invalid fixed passwords, because the inserted fixed password completely depends on the pin number generation, the server will deny the pin numbers that are generated with invalid pin numbers.
3.3.3 LAPPS Server
The server application has been developed using the Java technology. This Java daemon listens on a port in the host computer until a client connects to it. The current implementation only waits for ”GETPASS” requests. Though more services can easily be adapted to the server in future (More on section 3.3.3.3). When the client sends a ”GETPASS” request to the server with it’s authentication information and location information, the server daemon will reply with a password only if the authentication information is correct.
3.3.3.1 Software Design
:
Figure 7 shows a diagram of design of the LAPPS Server.
LAPPS server is a daemon service that is preferably running on a server machine. Which means that powerful hardware is needed to handle the number of incoming requests from the clients. The current client application is designed for the Android platform. The LAPPS server is able to handle ”GETPASS” requests from the clients as described in the beginning of the 3.3.3 section.
Figure 7 illustrates the relationships between the classes. LAPPSServer class has an instance of the Db class, a Hasher and a QRCodeGenerator (1..1).
The most befitting way to elucidate the relationships of the bare mechanisms inside the LAPPSServer is to analyse it’s work flow. So the following section 3.3.3.1.1 unravels the inside code mechanisms of the LAPPSServer which responds to requests that it receives (described in the protocol section 3.3.3.4) by the client applications.
3.3.3.1.1 The server’s work flow
-
1.
The LAPPSServer waits passively for client requests.
-
2.
The client connects to the server. Then the server will be passively waiting for requests from the clients.
-
3.
Client application sends a ”GETPASS” request to the server with other geographical and authentication information (More on password requests in section 3.3.3.3).
- 4.
-
5.
If the 8 digit number does not match then an error message will be sent back to the client encoded in to a QR Code(More on error messages in section 3.3.3.3).
-
6.
If the 8 digit number is correct then, LAPPSServer checks if there are any Automated Teller Machines that is less than 20 metres away from the user. (More on finding the nearest ATMs in section 3.3.3.6
- 7.
-
8.
Then a random unique password is created that has not been generated before (More on password generation in section3.3.3.5)
-
9.
The generated password is hashed using SHA2-512 one way hash function. The returned byte array from the function is then converted to Hexadecimal. This is done so this value will be stored in the database as a substitute to storing the password in plain text. Accordingly the security of the passwords strengthened.
-
10.
If there is an allocation record that belongs to the same user already in the database, then the server deletes it before storing the new allocation into the table, as one user is allowed to have only one active allocation/password at a time (More on storing allocations in section 3.3.3.2).
-
11.
The generated password and the closest ATM are allocated to the user by storing a record in the ’allocation’ table with the generated password, the ID of the ATM, the ID of the user, the registration ID of the user’s application and the expiry time of the allocation (More on storing allocations in section 3.3.3.2).
- 12.
-
13.
Then this respond message is encoded in to a QR code, which in size vary according to the size of the message (More on QR code generation in section 3.3.3.8).
-
14.
Finally the QR code with the generated password and the ID of the allocated ATM is sent back to the client.
3.3.3.2 Allocating new passwords
:
Let be all active allocations that are in the database. is a user that owns an allocation. This user may only have one and only allocation at a time in the ’allocation table’. Such that:
Consequently before allocating a new password the LAPPSServer queries the database to ensure that there will not be another active allocation in the database. If there is already a valid allocation, the sever deletes it before storing the new allocation/password in to the database. How this can be achieved is presented in the following pseudo code of a SQL query.
DELETE FROM allocation WHERE userId=<USER_ID>
Then to store the new allocation the server executes an SQL command. The following pseudo code shows how this is done.
INSERT INTO allocation(userId, password, atmId, used)
VALUES(<USER_ID>, <GENERATED_PASSWORD>, <ALLOCATED_ATM>, false)
3.3.3.3 Communication between the server and client
:
The communication between the client and the server is carried out by
using TLS over TCP/IP sockets. The reason for using TCP/IP sockets is
the low overhead when transferring data over. The TLS layer will
encrypt the data since the data being transferred are private and
confidential.
Java JDK comes with a tool called ”keytool” that can be used to generate key stores and to export them to certificates. In this project the author has used the ”keytool” to create the key stores. This tool can be used to generate key stores for debugging purposes. A commercial certificate that is signed by a certificate authority (CA) can be created by buying certificates from a well known certificate authority such as ”Verisign” and importing/signing your certificates by the bought certificate.
After a secured connection has been established the client and the server uses the following messaging techniques to communicate with each other.
The client application sends ”GETPASS” requests to the server to request dynamic passwords to be able to use on ATMs.
An example of a ”GETPASS” request.
GETPASS 8 digit pin userID reg ID
latitude longitude
If the request is valid the server generates a password and finds
and designates this password to the nearest Automated Tailor Machine
to the user. Finally it creates a response message by concatenating
this information.
A response message of successful transaction looks like as follows.
SUCCESS: atm_id password
And a response/error message of unsuccessful transaction looks like as
follows.
FAIL: The Error message
The LAPPSServer has been coded so that new mechanisms can be easily
implemented in the future. It has been achieved by modularising the code
that deals with divergent request messages. Alternately the
encapsulated code makes the program code easy to read.
The following pseudo code shows how this is done in the LAPPSServer class. To demonstrate how code that deals with new request codes can be added, the following code contains a dummy block of code that deals with ”HELP” requests.
while (true) {
  if (connection.hasRequests()) {

/****Deals with GETPASS requests***/
   if (connection.next().equals("GETPASS")) {
      recieveInformation();
      if (matchPasswords() && hasATMs()) {
        sendPassword();
      } else {
        sendErrorMessage();
      }
   }
/**********************************/

/****Deals with "HELP" requests***/
   if (connection.next().equals("HELP")) {
     //Add code to deal with "HELP" requests.
   }
/**********************************/

   // Code for handling other request codes can be added here
}
3.3.3.4 The LAPPS Protocol
:
A successful transaction will undertake following steps to successfully retrieve a password from the LAPPS Server as shown in ”figure 8”.
-
1.
Client establishes a TLS over TCP/IP Connection to the server.
-
2.
Server responds with an Acknowledgement message to the client.
-
3.
Client sends a ”GETPASS” request to the server with the additional information.
-
4.
If the authentication information are correct then the server responds with a password with the ID of its allocated ATM.
-
5.
Client closes the connection.
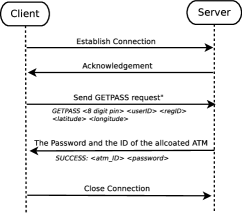
If the server is unable to send the acknowledgement message, the client would not carry out any other requests. Since this message ensures the client that it is open for any requests from the client.
3.3.3.5 Password generation
:
A character in a password is generated by;
-
1.
Store the valid characters in an array.
-
2.
Then by using a random number generator, generate a random number that is no greater than the size of the array.
-
3.
Finally get the character that the subscript value of it is equal to the generated random number.
-
4.
This procedure is carried out eight (The number of characters in the password) times.
-
5.
Finally To make the generated password unique, the server queries the ”password” column in the ”password” table and look for pre-generated passwords. If the password already exists, then another password is generated and compared until it generates a password that does not exist in the database. Although this adds a high overhead on the password generation process as the database grows.
The length of the password can easily be variable as easily as changing an Integer variable in the LAPPSServer class.
The pseudo code of the SQL query that looks for existing matching passwords in the ’password’ column.
SELECT password FROM password WHERE password=<generated_password>
If this query returns a Result Set then this password already exists in
the database.
More suggestions on password generation:
To make the sequence of characters even more random, the array can be shuffled former to the selection. Although this will add an overhead when generating a password.
3.3.3.6 Finding the nearest Automated Tailor Machine
:
The author has used PostGIS extension to calculate the distances between two points in spatial surfaces as it allows programmers to manipulate spatial objects in PostgreSQL databases.
In the table called ”atm” contains the location information of all of the ATMs that belongs to the system. The location information are stored as ’Geometry’ typed instances.
The geometrical information that is retrieved are likely to be in the format of World Geodetic System (WGS) 1984 system. The SRID of this is ’4326’. The geometrical instances are stored in the type of SRID 27700 since the author lives in England, United Kingdom. Because depending on where the objects are geographically located the SRID changes.
-
•
Name : OSGB 1936 / British National Grid
-
•
Code : EPSG::27700
-
•
Type : ProjectedCRS
-
•
Area Description: United Kingdom (UK) - Great Britain - England and Wales onshore, Scotland onshore and Western Isles nearshore; Isle of Man onshore.
Having got these locations stored in the database, to find the nearest ATM machine to the user the server follows the following procedure.
All of above steps can be done by using one query.
To calculate the distance the author has used the st_distance_sphere() function of PostGIS [15].
The author used two variations of the query that had two widely different performance levels.
The first query was a simple query that calculates the distance from the given user’s geographical location (latitude, longitude) and the all other ATMs in the database. Then it orders the result by the distance and finally retrieve the first row which is the closest ATM to the user. The SQL query is as shown below.
SELECT atmId, st_distance_sphere(PointFromText(’POINT(latitude longitude)’,
27700), geom) AS Distance
From atm
order by distance
limit 1;
This is not the optimum solution. This query calculates the distance for every ATM in the database which can easily be millions in real life. So due to this issue there will be an unacceptable overhead when executing this SQL query.
The SQL query that is currently implemented in LAPPSServer is the following.
SELECT atmId, st_distance_sphere(PointFromText(’POINT(latitude
longitude)’,27700), geom) AS distance
FROM atm
WHERE geom && expand(PointFromText(’POINT(latitude longitude)’,
27700), 20) AND st_distance_sphere(PointFromText(’POINT(latitude longitude)’,
27700), geom) < 20
order by distance
limit 1;
This query creates a bounding box of 20 metres around the interest point (User’s location) and filters the rows that fits in this box. Then it calculates the exact distances to the user location, orders the points by their distance to the user and finally selects the first row/point.
The author has found this query very efficient that it performs much faster than the first query.
3.3.3.7 Authenticating users
:
The server authenticates the users by checking the validity of the 8
digit pin number, the ID of the user and the registration number.
Let be the received unique identification of the user and the is the identification of in the database, is the received 8 digit pin number that has been received by and is the calculated 8 digit number by the LAPPSServer (More on calculating the 8 digit number in section 3.3.2.1) if is the received registration number of and the stored registration number of in the database, we can say that only if and and that is authoritative.
The registration number is assigned to the particular instance of the LAPPSMobile android mobile application. When registers his/her mobile device with the user account, this field will be allocated.
3.3.3.7.1 Algorithm to authenticate 8 digit number
:
To check if the 8 digit number is correct. The server uses the
same algorithm as the Pin generating device. The author has described how this
is done in section 3.3.2.1. Server is capable of
calculating the same algorithm independently since the user ID and the
corresponding fix password are stored in the lappStore database.
The server calculates the same algorithm using the current time stamp rounded to the nearest minute. But when the server does this, the rounded minute might be different to the one that the Pin generating device has been used. For an instance, if the user has generated a pin number at ”12.30:45” then server calculates the pin number at ”12.31:15”, the rounded time stamp of the server will be 12.31:00 where as the Pin generating device has used ”12.30:00” when calculating the password. For that reason, if the generated 8 digit number of does not match it will generate another pin number using but rounding up the time stamp after removing a minute in milliseconds from the time stamp. To make the following notation simple and clear denotes the authenticated users. Such that,
The first attempt to authenticate:
The second attempt to authenticate if the first attempt was unsuccessful:
Finally if is still then the received password request is
not approved.
In other words, if the received pin number is correct it will match with one of the two pin numbers that is generated by salting two different time stamps.
3.3.3.8 QR Code Generation
:
QRCodeGenerator class uses the ”com.google.zxing” library to create QR codes the a given string. In particular an instance of QRCodeWriter class has been used to perform the encoding of the strings. Alternately the encode() method returns a QR code of type ’BufferedImage’ with the given string encoded in it.
Conventionally there is a fixed size to the QR codes that applications generate, that specified by the developer. But the speciality of this piece of code is that it generates the QR codes that only fits the string that is supplied. So it will not produce large QR codes when only a fraction of it has been used. This is important because small QR codes are beneficial when transferring them over networks.
A QR code with a ”SUCCESS” message (section 3.3.3.3) encoded inside is about the size of a ’29 x 29’ pixel image. An average size of a QR code with a ”FAIL” message (section 3.3.3.3) coded inside is about the size of a ’33 x 33’ pixel image. These images are very small so that they can be transferred over the networks efficiently. Although the performance of the system can be dramatically improved if the messages are passed as text, the added QR code functionality makes it more enjoyable.
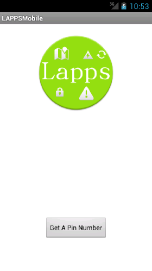
3.3.4 LAPPSMobile
This mobile application is the only way of requesting passwords from the LAPPS Server. This application is designed for the mobile phones that run Android platform. The application requires access to the Internet and geographical location information.
As described in section 3.3.3.4, this application sends ”GETPASS” requests to the server with other authentication and location information, to retrieve a password.
Additionally, this application is capable of understanding the message codes that are sent by the server. Currently there are only two error codes. they are ”SUCCESS” and ”FAIL”. The author has elucidated these two codes in section 3.3.3.
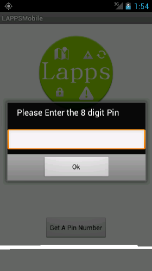
If the application receives a message with a ”SUCCESS” code, it will print out a message as shown in figure 9c.
The following figure 9 shows the screen shots of the completed LAPPSMobile Application.
3.3.4.1 Software Design
:
A class diagram of the software design of the LAPPSMobile application is shown below in figure 10
The application can be compiled and has been tested on android 2.2, 2.3.3, 3.2 and 4.03 platforms. The application seem to function very well in all of these platforms.
The application requires following permissions to be able to get access to the resources to be able to function substantially. The permissions are programmed in XML language in the AndroidManifest.xml file in the application.
<uses-permission android:name="android.permission.ACCESS_FINE_LOCATION" />
<uses-permission android:name="android.permission.ACCESS_COARSE_LOCATION" />
<uses-permission android:name="android.permission.INTERNET" />
<uses-permission android:name="android.permission.ACCESS_NETWORK_STATE" />
The first line permits the access to the location information using the GPS receiver of the mobile device. The Second line allows access to the location information using Wifi, Cell-ID etc., to the mobile application. Final two lines grant the access to the Internet and the state of the network respectively.
3.3.4.1.1 The work flow of the LAPPSMobile Application
:
-
1.
When the application starts, the LAPPSMobile application acquires a TLS over TCP/IP connection to the LAPPSServer. If the attempt to connect to the server is not successful a message is being displayed on the screen. When the user taps on the ”Get a Pin Number” button (Figure 9a) it will try to reconnect to the LAPPSServer in the occasions that it is not connected.
-
2.
When the user taps on the ”Get A Pin Number” button the application prompts the user to enter an 8 digit number (Figure 9b) only if the application can retrieve location information. If the GPS information is unobtainable then a message is being displayed on the screen (More on retrieving GPS information in section 3.3.4.1.4).
-
3.
After the user has tapped on the ”Ok” button the location information, ID of the user, registered ID of the application and the inserted 8 digit number is sent to the server.
-
4.
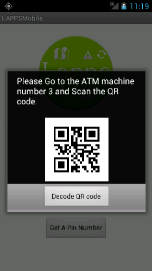
If the authentication is successful then the LAPPSServer sends a QR code with the allocated password and the ID of the ATM encoded.
-
5.
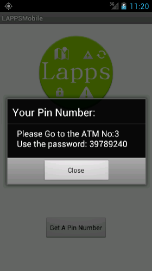
The received QR code is displayed on the screen with the ID of the ATM machine that the user and the password have been allocated to (Figure 9c). Ideally the user is able to scan the QR code on the correct ATM and log in to the machine. The second option is to tap on the ”Decode QR code” button so that the QR code will be decoded (More on decoding QR code in section 3.3.4.1.3) and the password and the ID of the ATM is presented in the next window (Figure 9d).
-
6.
Finally the connection closes when the user exits from the application.
3.3.4.1.2 How LAPPSMobile handle response messages
:
There are currently two types of respond messages. They are ”SUCCESS” messages which are successful responds and ”FAIL” messages which are responds that are sent back for unsuccessful requests. Comparatively to the way LAPPSServer has been coded to handle request messages (in section 3.3.3.3) the LAPPSMobile has been coded in consideration of that it is easily adaptable for future changes as well as the clarity of the code itself. A pseudo code of the code is shown below. To demonstrate how a newly introduced response message (NEW_RESPOND) can be handled a dummy code block has been added to the pseudo code.
while (true) {
  if (connection.hasRespond()) {

/****Deals with "SUCCESS" requests***/
   if (connection.next().equals("SUCCESS:")) {
      displayQRCode();
   }
/**********************************/

/****Deals with "FAIL" response messages***/
   if (connection.next().equals("FAIL:")) {
      displayErrorMessage();
   }
/**********************************/


/****Deals with "NEW_RESPOND" response messages***/
   if (connection.next().equals("NEW_RESPOND:")) {
      handleResponse();
   }
/**********************************/

   // Code for handling new response codes can be added here
}
3.3.4.1.3 Decoding the QR codes
:
After the application has been received the QR code, LAPPSMobile uses
and instance of the ”com.google.zxing.qrcode.QRCodeReader” class from
the ”Zxing” library to decode the received QR code. The ”Zxing” class
”RGBLuminanceSource” has been added supplementary to the existing
”com.google.zxing.qrcode” library. This file is licenced under the
Apache License, Version 2.0 [4]. The
”RGBLuminanceSource” has been used as a ”LuminanceSource” when converting the
”Bitmap” typed QR code to type of ”BinaryBitmap”.
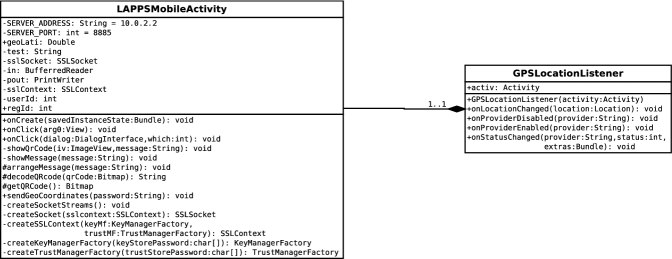
3.3.4.1.4 GPSLocationListener class
:
The LAPPSMobileActivity class contains an instance of the GPSLocationListener class. This class is a type of ”LocationListener” which updates the user’s location persistently and stores them in two latitude and longitude variables in the ”LAPPSMobileActivity” class. Additionally it notifies the main application when the location information is obtainable and unobtainable.
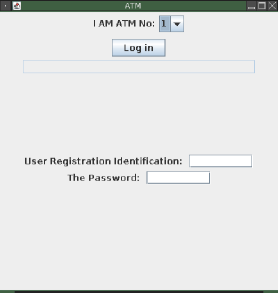
3.3.5 ATM emulator
The LAPPSMobile is able to request for passwords and LAPPSServer is capable of generating passwords. One of the important aspect of this project is to authenticate and to prove that the generated passwords ensures the security measures that LAPPS claims to comply.
3.3.5.1 Software Design
:
The following class diagram shows the design of the software program.
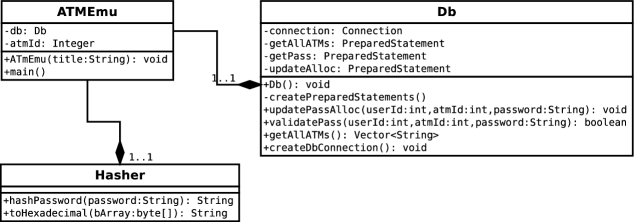
The diagram above shows the attributes and the functions in the classes and it suggests the relationships between them. ATMEmu class contains instances of Hasher and Db classes (1..1).
3.3.5.1.1 How a user would use the ATM emulator
:
-
1.
User selects the ATM machine that their password has been allocated to. This resembles the user using the allocated ATM machine to use the received password.
-
2.
Then user enters their Identification number(ID). This resembles the user inserting their Credit/Debit card to the allocated ATM
-
3.
Finally the user enters their fixed password and clicks on the ”Log In” button.
-
4.
If all of the authentication information is correct then a message is shown on the screen. Alternatively if the information is not correct an error message is shown.
3.3.5.1.2 The work flow of the ATM emulator
:
-
1.
ATMEmu creates the Graphical User Interface when it starts.
-
2.
After a user has entered the authentication information, it authenticates these information by querying the lappsStore database (Pseudo code of the query in section 3.3.5.1.3). Because the password has been stored in the database as hashed using SHA2-512, ATMEmu validates this password by creating a hash value of the inserted password and comparing it with the value that is stored in the database. To accomplish this the ”hashPassword()” method in the Hasher class has been used (More on password authentication in section 3.3.5.1.3).
-
3.
If the password is not authoritative then an error message is shown on the screen.
-
4.
If the user has successfully logged in, ATMEmu stores the value ”true” in the ”used” column in the corresponding row in the ”allocation” table. This indicates that the password has been used.
3.3.5.1.3 Authenticating Password
:
To authenticate the password that is being inserted in to the ATM Emulator, it queries the lappStore database to validate if there is a predefined allocation to the particular ATM that belongs to the particular user. Then the inserted password is matched against the password that is stored in the database. Finally it checks if the password’s expiry time has been passed and it has not been used. If all of the above parameters are positively ticks then one record will be returned.
The following pseudo code of a SQL query shows how this is done.
SELECT atmId
FROM allocation AS a,password AS p
WHERE a.atmId=<ATM_ID> AND a.userId=<USER’s ID> AND
a.password=<Inserted_password AND a.password=p.password
AND p.expTime > CURRENT_TIMESTAMP AND a.used=false;
If the above SQL query returns a record then it is confirmed that the inserted password is authoritative.
If the password is correct then it means that the user will log in to the ATM. Hence it has to be noted immediately in to the database. This is done by using a SQL query and it is demonstrated by the following pseudo code.
UPDATE allocation SET used=true WHERE atmId=<ATM_ID
AND userId=<USER’s ID> AND password=<PASSWORD>
4 Performance of LAPPS
In this section the author looks at the performance of the LAPPS Server. To carry out the test runs he has used an Intel(R) Core(TM)2 Duo CPU P8600 @2.40GHz CPU with L2 3072 KB of cache. The laptop has got 4 GB of RAM and using Ubuntu Linux 11.10.
To send request to the server in this experiment he has used the Android emulator that comes with the Android SDK [7], to run the LAPPSMobile application. The server, Pin generating device and the client (Android emulator) were running on the same machine.
Table 1 shows the performance measures of LAPPS in different test cases, that the author has gathered after performing 80 runs per each test case. The median total response time of LAPPS is 56 milliseconds, despite the fact that all programs were running in the same computer for testing so that the processing power has been distributed between all programs. Table 1 shows that the median time that has taken to authenticate an 8 digit pin number was about 1 millisecond and it is 1% of its total response time. Similarly, to find the nearest ATM to the user and to generate a new unique password, 1 millisecond has been taken in both cases and both measured times are 1% of their total response times. To generate a QR code for a response message, the median time that LAPPS has taken was 3 milliseconds. This is 5% of its total response time. Finally time wise the most expensive action in the process of responding to user requests was storing allocation records in to the database. In median time, it has taken 39 milliseconds, that is 69% of its total response time.
We can conclude that the current LAPPS implementation is fairy quick although the performance evaluation could have carried out in a better environment for better results. This can be added as a further task on this project.
5 Evaluation
The Location Aware Password Protection system is an architecture that adds five assorted layers around passwords that is generated by traditional password protection systems. These layers have been designed to harden the traditional password protection systems. In section 2 the author has expounded how these layers work. The main advantage of these layers is that according to the user’s desire, the layers can be added or removed. The main speciality of the whole LAPPS architecture is that the passwords can be allocated to geographical locations, so that a password will only be valid in it’s allocated geographical area. Also the password can only be allocated to one geographical area, even though you can choose to customise the ”Location Awareness” layer so that you can allocate the password in to varied geographical areas. Though these layers harden the passwords there still are drawbacks. These are discussed in section 2.7. LAPPS allows one password only to be used once, by storing a Boolean value in the ’used’ column in the ’allocation’ table, if one has been used. A password’s active time has been restricted by storing the expiry time in the database, so that only if the current time is less than the expiry time, the password is usable. The Pin Sentry device introduces a second authentication factor that hardens the security.
The current implementation of LAPPS has been implemented to harden the password security systems in Automated Tailor machines. Though it has not been tested on a real ATM network yet. Section 3.2 demonstrates how the LAPPS layers have directly been implemented into a real world software application. Section 3.3 goes through more technical details on how these components of ”LAPPS for ATMs ” have been implemented.
6 Project Planning
I have started planning my project very early. As early as June 2011; just after I have finished the second year I have had a meeting with my supervisor regarding my allocated project ”Live video stream over cloud”. After a couple of discussions I was given the opportunity to deliver my own project proposal that is relative to my interest areas. Since ”Computer Security” is one of my interest areas, I have proposed a project idea and we named it ”Location Aware Password Protection System”.
Through out the project planning, designing and the implementation processes I have regularly noted the changes, new findings, achievements and etc. in my logbook, and the finished milestones and task had been marked in the gantt chart. The log book has been regularly marked by Prof. Kun after every meeting that we did once every two weeks.
Since the day I came up with the LAPPS idea (07/09/2011), I have researched about the theoretical values of the technologies that is relevant to the subject area. This helped me to gain a better understanding of the topic. At first the project scenario was just based on the security of ATMs. After 19/09/2011 I have started looking in to more technical details that could be imperative for the implementation of the project, as well as the more theoretical sides. The background research gained me more confidence about the plausibility of implementation of the project that has to be done in a limited time period. At this stage I was quite confident about the project idea and the implementation, and I had planned to finish off the project during the December holiday in 2011/2012.
On 27/11/2011 I started the design of the software with a draft design of the database. The initial idea of the project has been subject to continuous minor changes over time. For instance, according to the newly evolved project idea, the password that will be generated by LAPPS had to have a time frame that it will be valid for. Consequently the design of the database had to be changed. This was done on 03/01/2012. There were three main components in the software system and by this time I had already started the development of all of the components together. Since all of the components have to work together, testing had been carried out along side with the software development. I was quite happy that I stared the implementation very early so I would be able to get on with other university work with less pressure when the university starts. The changes that my supervisor proposed and the ones that I have decided to change, I happily accepted and put in to the design because they only made the project better and more interesting.
To keep the project on track and manage the code, I have used the ”git” version control system. This has made my work easier to manage and to keep track of. Every time I have applied a significant change to the code, I have committed the changes to the ”git” local repository. Additionally I submitted comments along with the commits so I have a description of what I have done corresponding to the commits. The daily progress had been noted on the log book. The research I have been doing during the summer and the first semester helped to choose the technologies and tools to implement the software.
During the implementation, there were easier problems than some of the others and there were more difficult problems than many others. It is fair to say that this project is fairly a complicated one. One of the challenges that I had to face during the development was that I had problems with implementing TLS mechanism to the socket connections in the Android application. I only had the problem when I compiled this code for the Android 2.2 framework. As a solution I carried on my development under the Android 4.03 framework. Hence I was able to carry out the development of the project until I had found an alternative to the bug I had under the Android 2.2 framework. I was able to complete the implementations of all of the components before the first meeting with my supervisor on 26/01/2012. The effort payed off at the end because I had a good feed back about the finished project, from Prof. Kun.
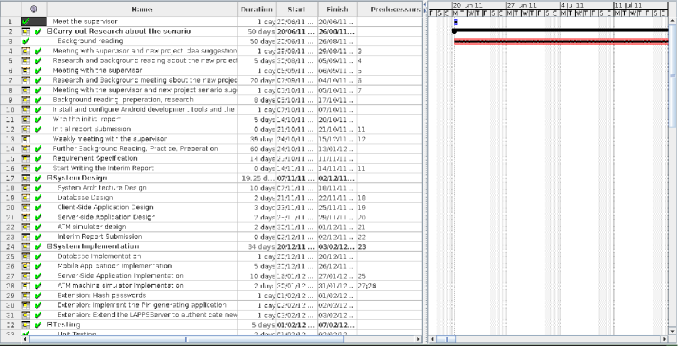
Having completed the proposed password protection system, after few discussions with my supervisor I decided to extend the project considering that I had plenty of time left. After the first extension the passwords that are stored in the database are no longer stored as plain text, now database only holds the hashed values of the passwords, consequently I had to program ATM Simulator and the LAPPSServer to work with the hashes. Secondly I have introduced a Pin generating device software to the software system. So that all users are required to supply the 8 digit number that is generated by this device software when they request for a password. Consequently I have changed LAPPSMobile Android application, the database and the LAPPSServer application to work with the 8 digit pin number and to authenticate these digits. All of the these had been completely implemented by 22/02/2012. Figure 13 and 14 shows the project task breakdown and gantt charts.
Looking back at all of the phases in the project, I think I did well in terms of time management of the project. Hence I had extra time to extend, test and modify the software among many other assignments and coursework at the University. There were many changes that I have carried out during the implementation such as I have decided to change the Database Management System (DBMS) to PostgreSQL so that I was able to use the PostGIS software program. So I had to adapt to its SQL syntax for queries and triggers. The whole process of learning Android development feels like an adaptation from general Java programming to Android. Although I was enjoying every bit of it. In the project I have learnt so many things such as Project Planing, about TLS/SSL keys and certificate generation, Android application development, PostgreSQL DBMS and git version control system. I believe with the experience I have gained during this project I will be able to do a better job next time I will be involved in a project.
7 Summary
In this thesis the author has introduced an architecture that is designed to consolidate conventional password protection systems. LAPPS architecture can be adopted to the traditional password protection systems easily without having to comprehensively replace old systems. These layers make the traditional passwords safe enough to protect private and confidential information considering the threats that have been reported for the last decade. Additionally these layers are customisable to the user’s needs. The signature value of LAPPS is the location awareness.
The ”LAPPS for ATMs ” implementation is an example of how this architecture can be endorsed into a software application. Section 5 shows how the objectives 1.4 of the project have been achieved. We have seen the performance of LAPPS in different test cases in section 4. Finally section 6 discloses how the author has manged the time during the project.
References
- [1] L. Ali, H. Jahankhani, and H. Jahankhani, “Enhancing security layers: a review of the accessibility in additional security devices used by the banking industry,” in Proceedings of World Conference on Educational Multimedia, Hypermedia and Telecommunications 2009, G. Siemens and C. Fulford, Eds. Honolulu, HI, USA: AACE, June 2009, pp. 4246–4254. [Online]. Available: http://www.editlib.org/p/32097
- [2] R. Allen and A. Pickup, Two-Factor Authentication, 2007, pp. 113–119.
- [3] D. Anthony, D. Kotz, and T. Henderson, “Privacy in location-aware computing environments,” Pervasive Computing, IEEE, vol. 6, no. 4, pp. 64 –72, oct.-dec. 2007.
- [4] “Apache license, version 2.0,” The Apache Software Foundation, January 2004. [Online]. Available: http://www.apache.org/licenses/LICENSE-2.0
- [5] A. Beresford and F. Stajano, “Mix zones: user privacy in location-aware services,” in Pervasive Computing and Communications Workshops, 2004. Proceedings of the Second IEEE Annual Conference on, march 2004, pp. 127 – 131.
- [6] I. F. Cruz, R. Gjomemo, B. Lin, and M. Orsini, “A location aware role and attribute based access control system ∗,” Department of Computer Science - University of Illinois at Chicago.
- [7] The official site for Android developers, Google. [Online]. Available: http://developer.android.com/sdk/index.html
- [8] M. Hazas, J. Scott, and J. Krumm, “Location-aware computing comes of age,” Computer, vol. 37, no. 2, pp. 95 – 97, feb 2004.
- [9] S. Helal, B. Winkler, C. Lee, Y. Kaddoura, L. Ran, C. Giraldo, S. Kuchibhotla, and W. Mann, “Enabling location-aware pervasive computing applications for the elderly,” in Pervasive Computing and Communications, 2003. (PerCom 2003). Proceedings of the First IEEE International Conference on, march 2003, pp. 531 – 536.
- [10] D. V. Klein, “A survey of, and improvements to, password security,” 1990.
- [11] N. Marmasse and C. Schmandt, “Location-aware information delivery with commotion.” Springer, 2000, pp. 157–171.
- [12] N. Michalakis, “Location-aware access control for pervasive computing environments,” 2003.
- [13] J. Nord, K. Synnes, and P. Parnes, “An architecture for location aware applications,” in Proceedings of the 35th Annual Hawaii International Conference on System Sciences (HICSS’02)-Volume 9 - Volume 9, ser. HICSS ’02. Washington, DC, USA: IEEE Computer Society, 2002, pp. 293–. [Online]. Available: http://dl.acm.org/citation.cfm?id=820747.821324
- [14] C. Patterson, R. Muntz, and C. Pancake, “Challenges in location-aware computing,” Pervasive Computing, IEEE, vol. 2, no. 2, pp. 80 – 89, april-june 2003.
- [15] P. Ramsey, PostGIS manual, Refractions Research Inc, 2005.
- [16] The Geodesy Subcommittee of the Geomatics Committee of the International Association of Oil and Gas Producers, EPSG Geodetic Parameter Registry, OGP Geomatics Committee, 2011. [Online]. Available: http://www.epsg-registry.org/
- [17] The PostgreSQL Development Team, PostgreSQL 8.0.26 Documentation, PostgreSQL Global Development Group. [Online]. Available: http://www.postgresql.org/docs/8.0/static/tutorial.html
Appendix A Appendix

| Test Case | Median Time (ms) | % from total response time |
|---|---|---|
| Total response time | 56 | 100 |
| Pin number authentication | 1 | 1 |
| Generate unique password | 1 | 1 |
| Find closest ATM | 1 | 1 |
| QR code generation | 3 | 5 |
| Store allocation | 39 | 69 |