The Optical System for the Large Size Telescope of the Cherenkov Telescope Array
Abstract:
The Large Size Telescope (LST) of the Cherenkov Telescope Array (CTA) is designed to achieve a threshold energy of 20 GeV. The LST optics is composed of one parabolic primary mirror 23 m in diameter and 28 m focal length. The reflector dish is segmented in 198 hexagonal, 1.51 m flat to flat mirrors. The total effective reflective area, taking into account the shadow of the mechanical structure, is about 368 m2. The mirrors have a sandwich structure consisting of a glass sheet of 2.7 mm thickness, aluminum honeycomb of 60 mm thickness, and another glass sheet on the rear, and have a total weight about 47 kg. The mirror surface is produced using a sputtering deposition technique to apply a 5-layer coating, and the mirrors reach a reflectivity of 94% at peak. The mirror facets are actively aligned during operations by an active mirror control system, using actuators, CMOS cameras and a reference laser. Each mirror facet carries a CMOS camera, which measures the position of the light spot of the optical axis reference laser on the target of the telescope camera. The two actuators and the universal joint of each mirror facet are respectively fixed to three neighboring joints of the dish space frame, via specially designed interface plate.
1 Introduction
The optical system of the Large Size Telescope (LST) is an active optical system that is made up of an extensive reflective surface and an Active Mirror Control (AMC) system. The optics is composed of one parabolic primary mirror and one flat focal surface. The focal length () of the parabolic dish is 28 m and its diameter () is 23 m, thus the ratio is . The parabolic shape is selected because it is isochronous and the arrival time information of Cherenkov light signals is used to suppress the background. The reflective surface is made of segmented mirror facets and each facet is actively aligned with actuators, which constitute the AMC system.
2 Mirror Facets
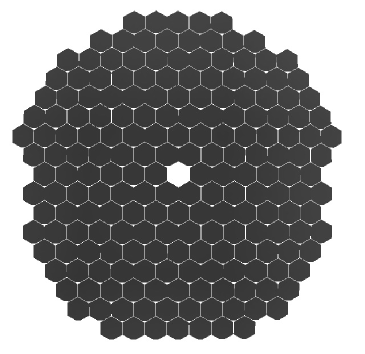
The 23 m diameter reflector of LST is a segmented mirror telescope consisting of hexagonal facets that measure 1510 mm flat to flat. The mirror facets are mounted at the nodes of the telescope dish. They are arranged according to the measured characterization of each mirror (i.e. focal length and PSF) following the parabolic profile of the dish. Each facet has a spherical profile with a specific focal length that depends on its position in the reflective surface. The facet at the centre of the reflector will not be installed because that part falls under the shadow of the camera. Instead, this space is left free for the calibration devices. 198 mirror facets can be installed with the configuration shown in Figure 1-(left). The total effective reflective area, taking into account the shadows of the mechanical structures (e.g., the photo-sensors camera, mast, etc.), is about 368 m2.
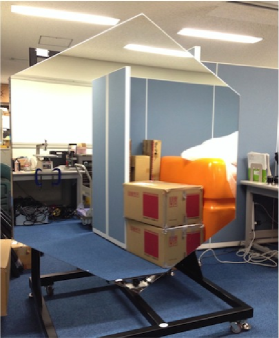
The mirrors are manufactured using the cold slump technique [1]. The mirror facets are fabricated by the Japanese company with a sandwich structure consisting of a soda-lime glass sheet, aluminum honeycomb and another glass sheet. The mirror’s core is made of aluminum honeycomb because it provides an incredibly high strength-to-weight ratio. Several small slits are made in the internal cells of the aluminum honeycomb panel, which allow air and any water which enters to freely move inside. Two drainage holes are included at the bottom of the mirror, so the water accumulated in its internal structure can be expelled. This solution prevents stationary water in the honeycomb cells freezing during winter and destroying the mirror structure. One corner has a cut-out (hole) of about 10 cm from the edge to install a CMOS camera for the AMC system (see Figure 1-right). The reflective layer of the glass mirror is coated on the surface with a protective multi-coat layer of chromium (Cr), aluminum (Al), silicon dioxide (SiO2), hafnium oxide (HfO2) and again SiO2. All five layers are produced using a sputtering deposition technology inside a vacuum chamber. The sputtering method has the advantage of making the coating stronger (providing longer lifetime than that of normal mirrors with evaporation coating).
The mirror facets are evaluated for both the optical and the mechanical points of view. The radius of curvature and PSF of each mirror facet were measured at ICRR Kashiwa in Japan, using a Phase Measuring Deflectometry (PMD) method [2]. The optical performance of the first prototypes of 29 mirror facets were measured using the PMD device. The PSF is defined by “D80”, which is a diameter containing 80% of the total reflected light. The curvature radii of all 29 prototype mirror facets meet the requirement (56–58.4 m)222The focal length of the mirror facet is a half of the curvature of radius., while 5 mirror facets out of 29 have a PSF larger than the requirement ( mm)333This value is the PSF when using a point light source from a distance of a curvature of radius of the mirror (at ). The PSF for parallel light corresponds to a half of this value., and have therefore been rejected. The manufacturing company () has already identified the reasons for these failures, and the manufacturing process has been improved.
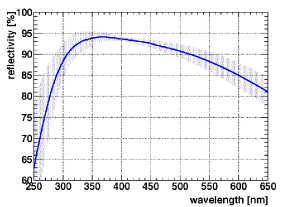
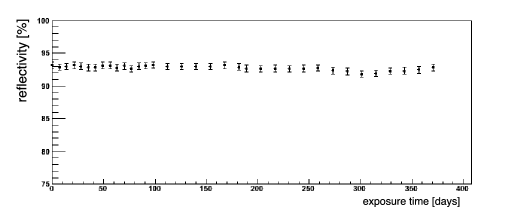
The reflectivity of the 29 prototype mirrors was measured in the wavelength range from 250 nm to 650 nm. Figure 2 shows the reflectivity spectrum in this range, averaged over the 29 samples. The spectrum reaches 94% at its peak of 370 nm and keeps more than 90% reflectivity between 310 nm and 510 nm. Thus, the simple average reflectivity from 300 nm to 550 nm corresponds to 92.1%, well above the requirement. Light scattered from the surfaces of small mirror samples with the same five-layer sputtering coating has been measured using the CTA Mirror Test Facility in Olomouc, Czech Republic. These measurements have shown that the percentage of scattered light is very low, at less than 1%. Even after some durability tests, such as abrasion and climate chamber tests, the scattering component did not increase by more than 1%. Several small mirror samples with the five-layer coating have been exposed at CTA candidate sites as well as some locations in Japan to check the durability of the mirror coating. The sample which has been exposed in Ibaraki, Japan, is being regularly monitored every one or two weeks. It has been exposed for about one year (as of now, in 2015 June), the reflectivity was only degraded by about 1% even in the UV range (at 370 nm shown in Figure 2-right).
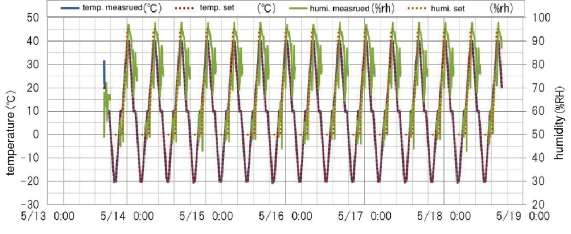
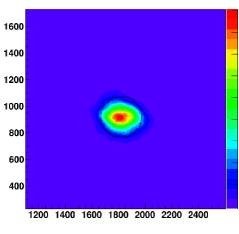
The mechanical qualities of the mirror facets are studied with extensive environmental cycling, which entails considerable variations of the temperature, humidity and external conditions such as might be expected at the CTA sites. Temperature cycle tests were performed for 25 days in total using a climate chamber in Matsudo, Japan, for several mechanical mirror samples444The mechanical samples have the exact same mechanical structures with the final design of the mirror, but no reflective layer was coated on the surface. and a few real mirrors. The tests were performed in a dry (no humidity control) condition for 10 days and in damp conditions (with suitable humidity control) for 10 and 5 days in total. Inspection of the mirrors after all the tests revealed no problems with the glue or mirror structure. Figure 3-(left) shows records of temperature and humidity during the last 5 days of the tests. During the test, the temperature was changed from C to C with 15 cycles over 5 days. Figure 3-(right) shows the image of a point source of light obtained at the 2f position after the mirror had undergone temperature cycling. The result showed no degradation in the PSF, which has a D80 of 29 mm at 56.04 m, consistent with the value measured before the temperature cycle test.
3 Active Mirror Control System
The purpose of the AMC system is to correct for the deformations of the dish and camera support structure that affect the alignment of the mirrors with the camera and change the focal distance.
3.1 Actuator
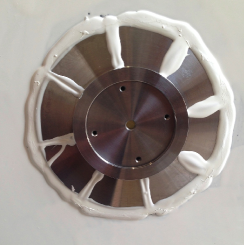
The two actuators and the universal joint of each mirror facet are respectively fixed to three neighboring main joints of the dish space frame, via special plates, called “Interface Plates” (see details in the next section). Two mounting points include actuators, while the third has a fixed support. In order to minimize the mechanical stress on the mirror, one actuator has only one degree of freedom (single gimbal), whereas the other one has two degrees of freedom (double gimbal) (Figure 5). All three points have an universal joint where they are fixed to the mirror, which are connected to stainless steel pads glued on the rear of the mirror facet (Figure 5).
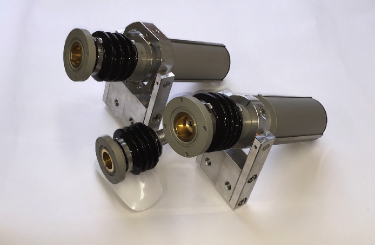
The actuators for the LST have been designed by the University of Zurich based on the MAGIC AMC by the ETH Zurich. The developments and validations of the actuators have been performed by the University of Zurich and the University of Tokyo. The actuators for LST are required to have a maximum moving force and survival force respectively of greater than 700 N and 9000 N. The actuator consists of the linear movement attached to a spindle which moves a nut connected to a piston, thus transforming rotation into translation. The piston position is read out by a set of Hall sensors and a magnetic angular encoder that ensure absolute safe positioning in case of power-cut. The actuators are self-locking, so idle power consumption is dramatically reduced and an UPS is not needed for either the actuator or the controller. The actuators use industry standard high efficiency 24VDC power supplies. An IP67 rated plug on the actuator side allows easy and fast connecting and disconnecting. All the cables are UV, ozone and ammonia resistant, and they are water-proofed and suited for a temperature range of C to C. The actuators support commands such as moving to an absolute position or by a given number of steps. The commands are sent from the control PC using the wireless communication standard IEEE 802.15.4, which is adopted in applications that require a low data rate, long battery life and secure networking. Each actuator has an unique 64-bit MAC address, linked to a serial number printed on its casing. Any individual actuator is addressed by its unique address or by broadcast commands. The broadcast mode allows commands to be sent simultaneously to all the actuators in a given network ID (e.g. move all the mirrors to a specific position, previously stored in the internal look-up table, according to the elevation angle of the dish). The upload of the look-up tables and even the firmware upgrades can also be realized via wireless, so no physical access to the hardware is required in most occasions.
3.2 CMOS camera
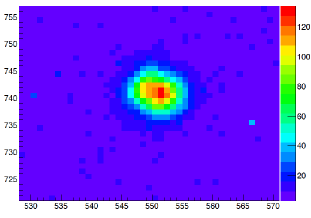
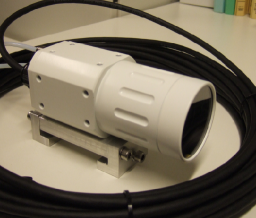
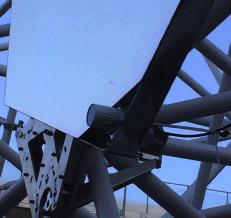
The reference of each mirror direction is defined by the spot of the Optical Axis Reference Laser (OARL), whose wavelength is in the near infrared region. Each mirror facet carries a CMOS camera, which measures the position of the light spot of the OARL on the target of the telescope camera in order to identify the current mirror direction with respect to the optical axis. A commercial product, Imaging Source (DMK 42AUC03), has been selected for the CMOS camera. The CMOS camera has imaging pixels with a 8-bit grayscale dynamic range. The camera is equipped with a lens of 25 mm focal length, leading to a for the field of view of the camera. Therefore, one pixel size is about 30 arc-second, corresponding to 4.2 mm on the LST focal plan at 28 m. Figure 6-(left) shows an example of the spot image of the near infrared laser taken with the CMOS camera at a 28 m distance in the dark condition inside a building. The laser has its beam divergence of mrad (at 1 m), 3 mW, and 785 nm. The laser spot on the screen was illuminated from a 28 m away. Based on 100 spot images, the accuracy of the spot positional determination was estimated at 0.052 pixels, corresponding to 1.6 arc-second. Each CMOS camera and lens are packed into an IP68 case with a transparent face (Figure 6-middle) and mounted in the cut-out corner of a mirror as shown in Figure 6-(right). The camera is connected with a board computer via a Gigabit Ethernet cable.
3.3 AMC mirror alignment
The correct position of the OARL in an image of each CMOS camera is measured during the initial alignment and stored in a database. During the telescope operations, the AMC alignments will be performed in two steps. When the telescopes move to a new observation target, the mirrors will be adjusted based on look-up tables, which store the correct position of each mirror according to the elevation angle. However, the look-up tables are pre-defined and do not consider all the deformations of the telescope structure. More precise mirror alignments with fine tuning will be performed in a basis of the OARL position captured by the CMOS camera on each mirror facet. The AMC computers analyze the images and calculate a right position for each actuator. The method allows to adjust several facets together and complete the adjustments in a short time without disturbing the data-taking. The alignment is periodically performed in cycles of a few minutes while tracking the source.
4 Interface plate
An “Interface Plate” connects three mounting joints, each from a different mirror, to a single main joint. This interface is very complex because it must be stiff also under dynamic loads like wind gusts, and at the same time, it has an adjustable mechanism for connecting the three mounting joints, whose relative position changes depending on the mirror’s location on the dish. Figure 7 shows the design of the plate. The plate is supported by the six surrounding tubes to distribute the stresses as much as possible. Hereafter, the verification of the mechanical stiffness of both options is presented.
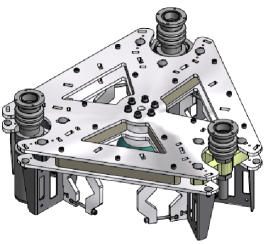
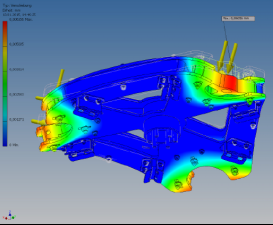
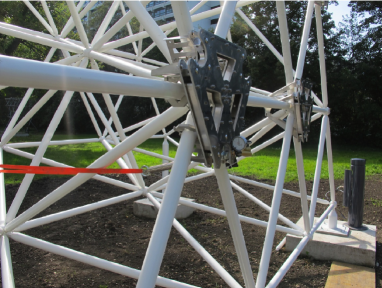
A Finite Element Analysis (FEA) simulation has been done for the case of a symmetric load. Three loads of 250 N each have been applied along z axis in correspondence of the three corners where the actuators are connected. The results are shown in Figure 8. The maximum displacement occurs in the same regions where the loads are applied and it is . The interface plates were installed on the bottom of the test structure.555The test structure is a segment of the LST dish (roughly 1/8 of the final structure) assembled in the garden of the Max-Plank Institute for Physics in Munich. An external load, measured by a dynamometer, was applied with an adjustable belt, as shown in Figure 8. A load of 500 N was applied at one corner of the interface plate under test from the rear of the structure (nearly horizontally) to check its stiffness under extreme wind condition facing the dish. Note that a load of 500 N is basically double what every actuator is subjected to in the presence of a wind of 70 km/h, which is more testing than the worst condition during normal operation. Moreover, the asymmetry of the applied load is also extreme and assures that the study is very conservative. The displacements of the interface plates were measured with a gauge fixed to a nearby tube. The measured displacements of the plate at the fixation points were about 30 m. The displacements were caused by not only the deformation of the plate itself but also the deformation of the space frame structure. Additional FEA simulation was performed to estimate the displacements including the space frame structure in the same conditions of the field test. The results were consistent with the measurements.
The next study will optimize how to clamp the interface plates on carbon-fiber-reinforced plastic (CFRP) tubes, as the test structure is made of steel tubes. Some small modifications in the clamping mechanism could be necessary to ensure that CFRP surface is not damaged.
5 Summary
The LST optics is composed of one parabolic primary mirror 23 m in diameter and 28 m focal length. The reflector dish is segmented in 198 hexagonal, 1.51 m flat to flat mirrors. The surface and reflectivity were measured for the first 29 prototype mirrors, and temperature cycle tests were also performed for a few mirrors. The AMC system will actively align mirrors during the operation by actuators. Each mirror facet carries a CMOS camera with a lens of 25 mm focal length which measures the position of the light spot of the optical axis reference laser on the target of the telescope camera. The two actuators and the universal joint of each mirror facet are respectively fixed to three neighboring main joints of the dish space frame, via interface plate. The mechanical stiffness of the plate were verified by both FEA simulations and field tests.
6 Acknowledgement
We gratefully acknowledge support from the agencies and organizations listed under Funding Agencies at this website: http://www.cta-observatory.org/, especially the supports by JSPS, ICRR. U. Tokyo, Max-Planck-Society, BMBF, U. Hamburg, CNPq, FAPERJ, FAPESP, and U. Zurich.
References
- [1] Pareschi G., Canestrari R. et al. 2008, “Glass mirrors by cold slumping to cover 100 m2 of the MAGIC II Cherenkov telescope reflecting surface”, Proceedings of the Society of Photo-Optical Instrumentation Engineers (SPIE) Conference Series, vol.7018, p.70180W
- [2] Knauer, M. C., Kaminski, J., & Hausler, G. 2004, “Phase measuring deflectometry: a new approach to measure specular free-form surfaces”, Proceedings of the Society of Photo-Optical Instrumentation Engineers (SPIE) Conference Series, vol.5457, p.366