A torsion balance for probing a non-standard force in the sub-micrometre range
Abstract
We report the performance of an instrument that employs a torsion balance for probing a non-standard force in the sub-micrometre range. High sensitivity is achieved by using a torsion balance that has a long torsional period, strong magnetic damping of all vibrational motions and a feedback system that employs an optical lever. In torsion balance experiments, the distance fluctuations during measurements and the accuracy to which the absolute distance is determined are crucial for determining the sensitivity of the balance to a macroscopic force in the sub-micrometre range. We have estimated the root mean square amplitude of the distance fluctuation to be 18 nm by considering the effects due to seismic motions, tilt motions, residual angular fluctuations and thermal fluctuations. We have also estimated the error of the absolute distance to be 13 nm and the statistical error of the force to be N by measuring the electrostatic forces. As a result of this systematic study, we have evaluated the sensitivity of the balance to both a non-standard force and to the Casimir force.
pacs:
04.80.-y, 07.10.Pz, 11.25.Mj, 12.20.Fv1 Introduction
Quantum electrodynamics predicts that creation and annihilation of particle-antiparticle pairs constantly occur in vacuum and this microscopic phenomenon results in a macroscopic force between conductors, called the Casimir force [1]. We have focused on the fact that the existence of a macroscopic force that lies outside the standard model or Newtonian gravitational law should produce deviations from the Casimir force. Some exotic models which assume the existence of extra spatial dimensions or new particles predict non-standard forces in the range which the Casimir force is dominant [2]–[14]. In order to probe such unknown forces, we have developed an instrument to search for deviations from the exact Casimir force.
The Casimir force, as predicted by standard quantum electrodynamics, between a flat conductor and a spherical conductor is expressed as
| (1) |
where is the distance between the conductors, is the Dirac constant, is the speed of light and is the radius of the spherical lens.
When calculating the Casimir force between real metals, corrections for the properties of the metals (such as finite conductivity, nonzero temperature and roughness of their surfaces) must be taken into account. Accurate computations can be performed for the finite conductivity and the roughness corrections (see the review paper [15]), however, four different models for the nonzero temperature correction have been proposed [16]–[23]. Of these four models, two of them have been discounted on the basis of experimental measurements [24] while the discrepancy between the nonzero temperature correction calculated using the remaining two models is much smaller than experimental accuracy. Thus, the existence of a non-standard force can be demonstrated by searching for deviations between theoretical and experimental Casimir forces.
In the last decade, various experimental demonstrations of the Casimir force have been reported. Small devices [25]–[31] such as atomic force microscopes or micro-electro-mechanical systems have frequently been used to measure the Casimir force ever since Lamoreaux measured the Casimir force using a torsion balance [32]. Torsion balances have several advantages over other devices for probing non-standard forces. These include a high sensitivity to macroscopic forces, since a torsional period of the order of 1000 s is attainable, and the capability of using massive materials in torsion balance experiments. This latter advantage is significant since many models predict that the non-standard force is approximately proportional to the mass densities of the conductors [37], in addition, the sensitivity to the Casimir force is proportional to the radius of the spherical lens. On the other hand, special care must be taken to ensure that the distance between the conductors remains constant when using torsion balances. This is not only because torsion balances are sensitive to disturbances such as seismic motions and ground tilts, but also because distance fluctuations produce large systematic errors as a result of the strong dependence of the Casimir force on distance. Various noises, including thermal noise and detection noise, have been reported in torsion balance experiments [33]–[36], however, there has never been a quantitative estimation of the extent to which seismic motions and ground tilts affect measurement of a macroscopic force in the sub-micrometre range.
In this paper, we report the performance of an instrument that uses a torsion balance to search for non-standard forces in the sub-micrometre range. A feedback system with an optical lever is employed to keep the torsion angle fixed enabling us to measure the macroscopic force in the sub-micrometre range stably. We estimated the statistical errors in measuring the dependence of the force on the distance by measuring electric forces. We then estimated the distance fluctuations due to seismic motions, tilt motions, residual angular fluctuations and thermal fluctuations. In addition, the accuracy in determining the absolute distance was estimated by measuring electric forces. The effects of distance fluctuations and the error in determining the absolute distance are treated as systematic errors. Finally, we estimate the sensitivity to the Casimir force and the non-standard force from this systematic study.
2 Instrument
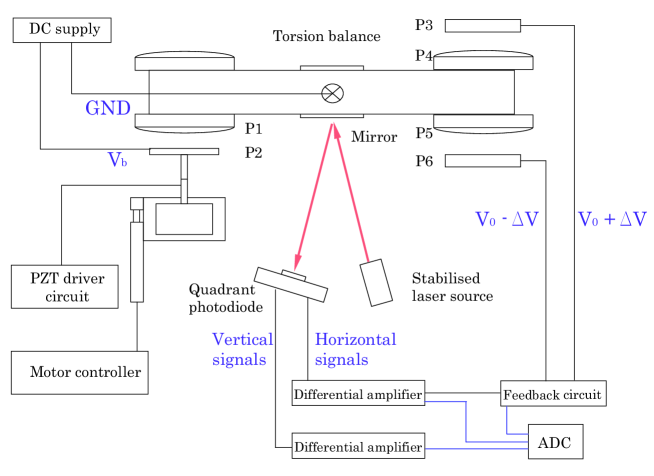
The instrument is designed to measure the dependence of the force on the distance by controlling the distance. An optical lever is used to measure the torsion angle, and a feedback system is employed to keep the torsion angle constant. The instrument is shown in figure 1 and consists of a torsion balance, plates for producing a macroscopic force, a feedback system, a distance controller and a vacuum chamber.
2.1 Torsion balance
The torsion balance is a bar, which is made of high-purity (99.999) copper and is suspended above the centre of gravity by a tungsten wire of diameter 60 m and length 400 mm. The wire was annealed in vacuum by passing a current of 400 mA through it while the load of the bar was applied, in order to relieve the residual internal stress. The torsional period was 165 s and the torsion constant of the wire was N m/rad. All vibrational motions of the torsion balance were damped using eddy current effects produced by placing a strong permanent magnet 2 mm beneath the torsion balance. This leads to the quality factor of the torsional mode of 2.5. The angular fluctuation of the torsion balance was measured to be 10 rad/ at a frequency of 1 mHz. This angular fluctuation is equivalent to a force having a root mean square amplitude of 4 pN, which is sufficiently small to measure the Casimir force.
2.2 Plates for producing a macroscopic force
A spherical lens P1 and a flat plate P2 are used to produce a macroscopic force. We utilize optical lenses made of BK7 glass as substrates for both plate P1 and plate P2. Plate P1 has a diameter of 40 mm, a thickness of 5 mm, a radius of curvature of 207 mm and the root mean square amplitude of its surface roughness was measured to be 22 nm. Plate P2 has a diameter of 30 mm, a thickness of 2 mm and the root mean square amplitude of its surface roughness is nominally less than 10 nm. These surfaces were metalized by evaporation coating a chromium layer with a thickness of 20 nm and then evaporation coating a gold layer with a thickness of 1 m. Plate P1 was electrically grounded using the bar and the wire. A bias voltage can be applied between plates P1 and P2.
2.3 Feedback system
A feedback system is employed to measure macroscopic forces using a null method. The feedback system is shown in figure 1 and consists of a torsion balance, an optical lever, analog feedback circuits and two plates used as actuators (P3 and P6). The torsion angle of the torsion balance is detected using an optical lever, and the signal is then fed back to the torsion balance by applying electric forces in order to compensate for the deflection of the torsion angle.
In the optical lever, laser light is incident onto a flat mirror which is attached to the centre of the torsion balance, and the reflected light is detected using a quadrant photodiode. The torsion angle can be obtained by reading out the difference between the horizontal signals of the quadrant photodiode. However, when the torsion balance undergoes pendulum-like motion due to disturbances such as seismic motions and ground tilts, the distance between plates P1 and P2 varies and the angle between the wire and the ground changes. The tilt angle of the wire can also be obtained by reading out the difference between the vertical signals of the quadrant photodiode. The output coefficient of the quadrant photodiode in both the horizontal and vertical directions is 2.3 mV/rad.
A helium-neon laser was used as the light source for the optical lever. The beam from the laser was split into two beams using a polarizing beam splitter, and the intensities of the p and s polarization components were measured using photodiodes. The intensity of the laser light was stabilized by controlling the temperature of the laser cavity so that the intensities of the two polarization components were equal. This stabilization results in an angular sensitivity of rad/ at 1 mHz.
In the feedback system, the signal of the torsion angle is integrated, filtered and then converted to the feedback voltage in the analog feedback circuit. When voltages and are applied to plates P3 and P6, respectively, where is the bias voltage, an electric force proportional to acts on the torsion balance. The feedback response was adjusted to give a unity gain frequency of approximately 0.04 Hz and a quality factor of the closed loop of 2.5. Measuring the feedback voltage enables us to detect forces acting on plates P1 and P2. A feedback voltage of 1 mV is equivalent to a force of N acting between them.
2.4 Distance controller
The position of plate P2 is controlled coarsely using a motorized stage and finely using a piezo translator (PZT). The relationship between the displacement and the voltage applied to the PZT was calibrated. The displacement of the PZT is 11.0 m when a bias voltage of 100 V was applied. The PZT is used only along calibrated routes since their responses exhibit hysteresis and non-linearity. The direction of plate P2 can be controlled using a manual - stage having a precision of 0.2 mrad before measurements to ensure the spherical lens and the plate are aligned.
2.5 Vacuum chamber
The torsion balance, plates P1–P6 and the motorized stage are set in a vacuum chamber. The chamber is evacuated using an oil-free scroll pump and a turbo-molecular pump prior to taking measurements. A pressure of the order of 0.1 Pa was maintained during measurements.
3 Measurements
In order to estimate the sensitivity to a macroscopic force in the sub-micrometre range, measurements were performed in two different locations, Tokyo and Esashi. The laboratory in Tokyo is located in a basement of a building while the laboratory in Esashi is located in a tunnel in a mountainside. A typical spectrum of the seismic motion in Esashi was measured to be m/ at 1 Hz, which is much smaller than that ( m/ at 1 Hz) in Tokyo. The transfer functions from seismic motions or ground tilts to the distance between plates P1 and P2 were measured in Tokyo by taking advantage of the large seismic motions and ground tilts that occur there. On the other hand, calibrations of the instrument and measurement of the electric forces were performed in Esashi.
3.1 Noise estimation
We measure the force dependence on the distance between plates P1 and P2 by varying the distance in constant step intervals. For each step, we use an averaging time of 400 s and a dead time of 200 s. The fluctuations in the distance between the plates during the averaging time give rise to systematic errors in the force since the Casimir force is a non-linear function of distance. Here we estimate the distance fluctuations due to seismic motions, ground tilts, angular fluctuations and thermal fluctuations.
First of all, the distance fluctuations due to seismic motions are estimated as follows. It is assumed that the centre of mass of the torsion balance has translational motion with an amplitude of caused by translational seismic motion . By defining and solving the equation of motion for , the distance between plates P1 and P2 is given by
| (2) |
where is the quality factor of the translational motion and is the resonant frequency of the translational motion. Let be the transfer function defined as . The tilt of the instrument is simply given by , where is the length of the wire. Therefore the transfer function is given by
| (3) |
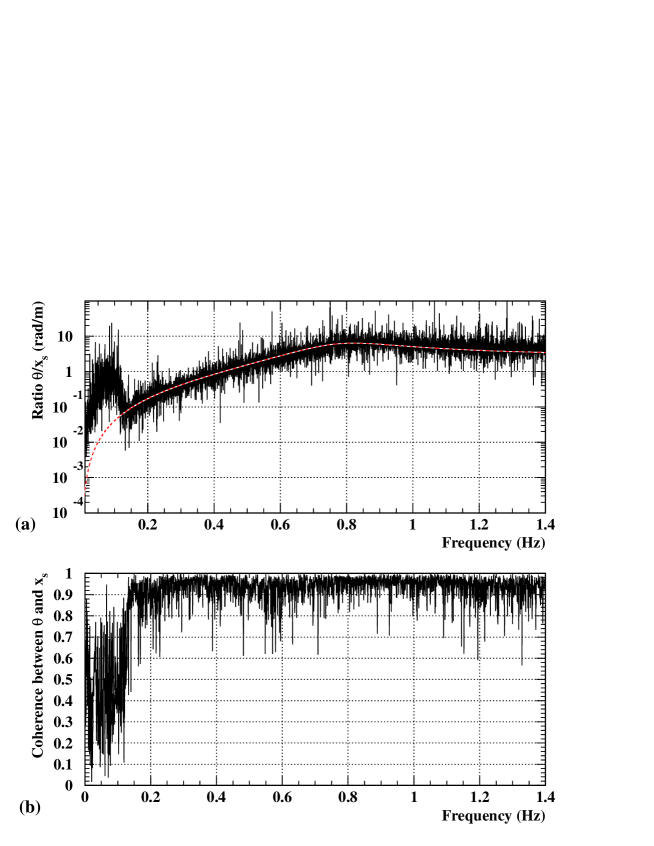
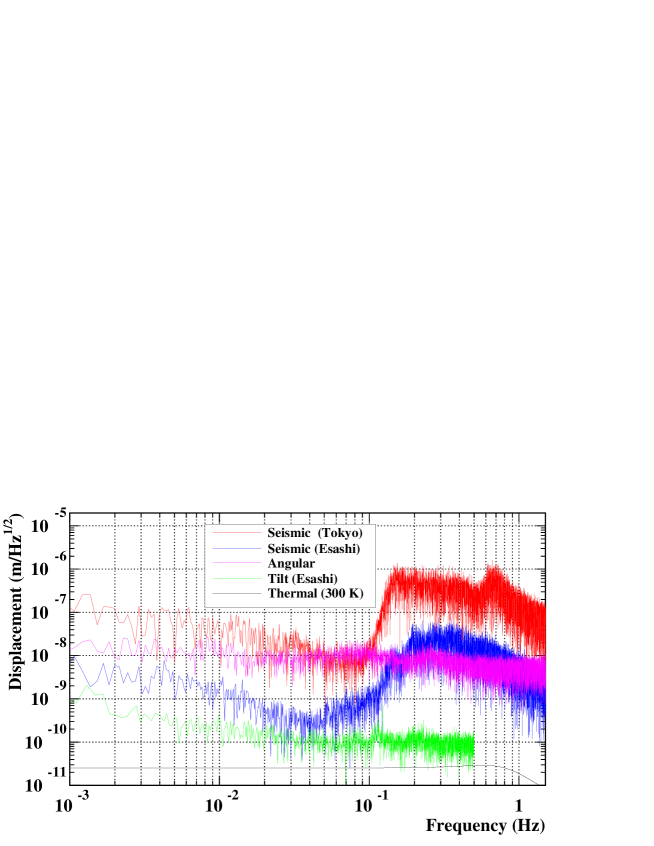
In order to estimate the validity of the above model, we measured the translational seismic motion and the tilt angle of the wire simultaneously in Tokyo. The ratio of the translational seismic motion to the tilt angle of the wire is compared with the transfer function in figure 2. This figure shows that the ratio is consistent with the transfer function in the frequency range between 0.1 and 1.4 Hz, in which the coherence is as high as . In the frequency range below 0.1 Hz, we confirmed that the coherence is low since the detection noise of the optical lever is larger than the signal of the tilt. Thus the transfer model in equation (3) can be used to estimate the distance fluctuations due to seismic motions. We then estimate the spectra of the distance fluctuations due to seismic motions in Tokyo and Esashi, assuming that is set to unity by controlling the position of the damping magnet. The results are shown in figure 3.
Ground tilts also cause the distance between plates P1 and P2 to fluctuate. We measured the ground tilts and estimated the distance fluctuations due to this effect in Esashi and Tokyo. The laboratory in Tokyo was located in the basement of a building and in this location the daily variation in the ground tilt had an amplitude of a few rads. The laboratory in Esashi was located in a tunnel and in this location the ground tilt had an amplitude of several tens of nrads with a period of half a day and we confirmed that this ground tilt was caused by the earth tide. The amplitude of the ground tilt in Esashi was two orders of magnitude smaller than that in Tokyo. The estimated spectrum of the distance fluctuation between plates P1 and P2 due to the ground tilt is shown in figure 3. The distance fluctuation due to the ground tilt in Esashi is smaller than that due to seismic motions, and is negligible for measurements of the Casimir force.
The thermal fluctuations of the tilt angle of the wire must be taken into account, since measurements were done at room temperature (300 K). The thermal fluctuation of the distance between plates P1 and P2 is given by
| (4) |
where is the mass of the torsion balance, is the Boltzmann constant and is the temperature. As shown in figure 3, the thermal fluctuations of the distance at 300 K are one to three orders of magnitude smaller than those due to seismic motions in Esashi, and thus it cannot be a dominant noise source.
While a feedback system is employed to keep the torsion angle fixed, angular fluctuations dominantly caused by the noise of the optical lever still remain. Figure 3 shows that the fluctuations in the distance due to the residual angular fluctuation are dominant in the frequency range from 1 mHz to 0.1 Hz in Esashi.
By integrating these estimated spectra over the range from 1 mHz to 1 Hz, the root mean square amplitude of the distance fluctuations due to all effects in Esashi was determined to be = 18 nm.
3.2 Sensitivity
First, we estimate the sensitivity to macroscopic forces by measuring the electric force which was intentionally applied between plates P1 and P2. This electric force was used as a reference since the dependence of the electric force on distance can be calculated with high accuracy. If a bias voltage is applied between a flat plate and a spherical lens having a radius of curvature of , the electrostatic force is expressed as
| (5) |
where is the contact potential difference and is the dielectric constant. The electric contact potential difference between two metallic surfaces is caused by the different work functions of different metals or the distribution of surface charges. If the bias voltage is varied with an amplitude of at a certain distance (), the variation in the electrostatic force is given by
| (6) |
In a similar way, if the distance is varied with a constant step at a constant bias voltage (), the variation in the electric force is given by
| (7) |
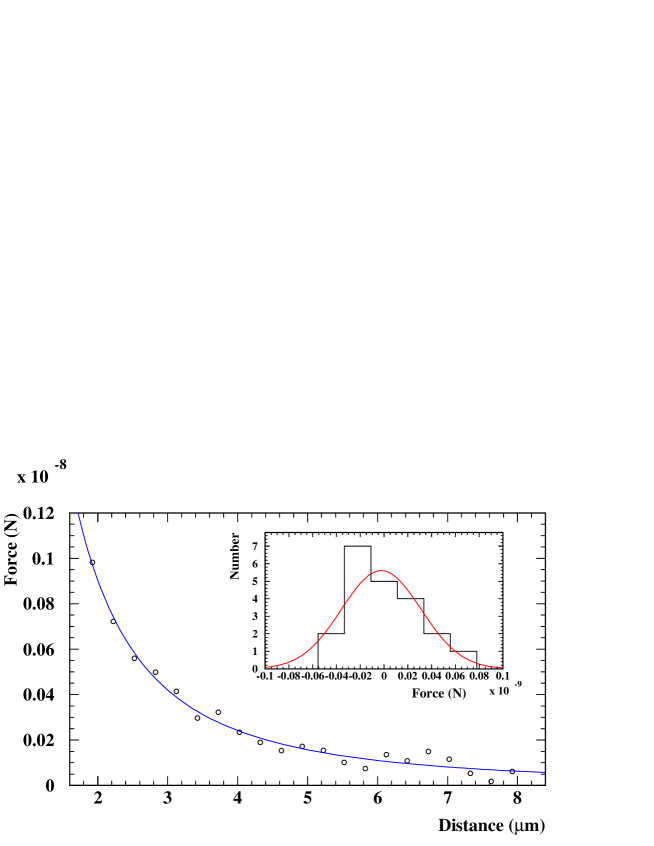
In order to determine the absolute distance between plates P1 and P2, we measured when the bias voltage was changed in steps of 10 mV at a certain distance. By fitting the data to equation (6) with fitting parameters and , we obtained mV and m. We then measured by bringing plate P2 close to plate P1 with a constant step of 0.3 m from 8.1 m, as shown in figure 4. The absolute distances between plates P1 and plate P2 were determined from and the voltages applied to the PZT. The standard deviation between the data and equation (7) was determined to be N.
@ @
We treated the error in the absolute distance and the distance fluctuations during measurements as systematic errors. In the case when the variation in the Casimir force is measured at m with m, the systematic error of the force propagated from the error of the absolute distance nm is given by
| (8) |
Furthermore we estimated the systematic error of the force due to the distance fluctuations during measurements, by using the Monte Carlo method. Assuming the distance fluctuations follow a Gaussian distribution with a standard deviation of = 18 nm, the systematic error of the force is estimated to be N at m. In the case when is measured 100 times at the distance, the statistical error of the force is estimated to be N, which is smaller than the systematic error due to the error of the absolute distance.
Since these errors might be correlated, we conservatively estimate the total error of the force to be N. This means that variations in the Casimir force can be measured with a relative error of 6 at = 1.0 m, including systematic errors.
Now, the sensitivity to a non-standard force is estimated by assuming that the potential of the non-standard force is parameterized by the Yukawa potential as follows:
| (9) |
where is Newton’s constant, and are the densities of the two materials, is the distance between the materials, is the strength of a non-standard force with respect to Newtonian gravity and is the range parameter. In this case, the non-standard force between a spherical lens and a flat plate when is approximately given by
| (10) |
where is a geometrical form factor, () is the density of the th layer and () is the thickness of the th layer [37]. In our configuration, is the density of BK7, is the density of chromium, is the density of gold, is the thickness of chromium and is the thickness of gold.
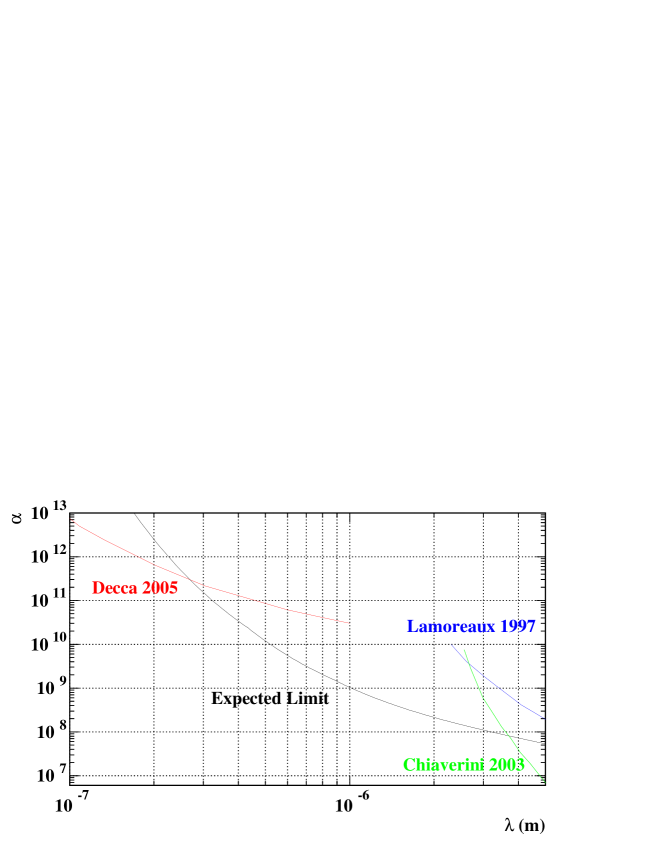
If the variation in the non-standard force , when the distance is changed with a constant step , is measured and if the non-standard force is lower limited by the force error , then the parameter is limited as
| (11) |
When the data are measured 100 times at each distance =0.8, 1.1, 1.4 and 1.7 m with m, the total error of the force is estimated to be and N, respectively. The upper limit to the non-standard force is estimated from equation (11) and is shown in figure 5.
4 Conclusions
We have developed an instrument that employs a torsion balance for probing a non-standard force in the sub-micrometre range. High sensitivity is achieved by using a torsion balance that has a long torsional period, strong magnetic damping of all vibrational motions and a feedback system that employs an optical lever. We have estimated the distance fluctuations due to seismic motions, tilt motions, residual angular fluctuations and thermal fluctuations. The estimations indicate that the seismic motion is the most dominant noise source of the distance fluctuations even for the stable site at Esashi. The root mean square amplitude of the total distance fluctuation was estimated to be 18 nm. An error in the absolute distance of 13 nm was obtained by measuring the dependence of the electric force on the bias voltage. We also estimated the statistical error to be N by measuring the dependence of the electric force on distance. From this systematic study, we conclude that the Casimir force can be measured with a relative error of 6 at m and the instrument could be used to obtain a stringent limit on the non-standard force in the 0.3–3.7 m range.
References
References
- [1] Casimir H B G 1948 Proc. Kon. Nederl. Akad. Wet. 51 793
- [2] Rubakov V A and Shaposhnikov M E 1983 Phys. Lett. B 125 136
- [3] Rubakov V A and Shaposhnikov M E 1983 Phys. Lett. B 125 139
- [4] Visser M 1985 Phys. Lett. B 159 22
- [5] Antoniadis I 1990 Phys. Lett. B 246 377
- [6] Lykken J 1996 Phys. Rev. D 54 3693
- [7] Arkani-Hamed N, Dimopoulos S and Dvali G 1998 Phys. Lett. B 429 263
- [8] Arkani-Hamed N, Dimopoulos S and Dvali G 1999 Phys. Rev. D 59 263
- [9] Randall L and Sundrum R 1999 Phys. Rev. Lett. 83 4690
- [10] Kehagias A and Sfetsos K 2000 Phys. Lett. B 472 39
- [11] Arkani-Hamed N and Dimopoulos S 2002 Phys. Rev. D 65 052003
- [12] Antoniadis I, Dimopoulos S and Dvali G 1998 Nucl. Phys. B 516 70
- [13] Chacko Z and Perazzi E 2003 Phys. Rev. D 68 115002
- [14] Dimopoulos S and Giudice G 1996 Phys. Lett. B 379 105
- [15] Bordag M et al2001 Phys. Rep. 353 1
- [16] Bostrom M and Sernelius B E 2000 Phys. Rev. B 61 2204
- [17] Bostrom M and Sernelius B E 2000 Phys. Rev. Lett. 84 4757
- [18] Svetovoy V B and Lokhanin M V 2000 Phys. Lett. A 280 177
- [19] Genet C et al2000 Phys. Rev. A 62 012110
- [20] Bordag M et al2000 Phys. Rev. Lett. 85 503
- [21] Klimchitskaya G L and Mostepanenko V M 2001 Phys. Rev. A 63 062108
- [22] Geyer B et al2003 Phys. Rev. A 67 062102
- [23] Bezerra V B et al2004 Phys. Rev. A 69 022119
- [24] Decca R S et al2005 Ann. Phys. 318 37
- [25] Mohideen U and Roy A 1998 Phys. Rev. Lett. 81 4549
- [26] Harris B W, Chen F and Mohideen U 2002 Phys. Rev. A 62 052109
- [27] Chan H B et al2001 Science 291 1941
- [28] Decca R S et al2003 Phys. Rev. Lett. 91 050402
- [29] Decca R S et al2005 Phys. Rev. Lett. 94 240401
- [30] Ederth T 2000 Phys. Rev. A 62 062104
- [31] Bressi G et al2002 Phys. Rev. Lett. 88 041804
- [32] Lamoreaux S K 1997 Phys. Rev. Lett. 78 5
- [33] Boynton P E 2000 Class. Quant. Grav. 17 2319
- [34] Newman R 2001 Class. Quant. Grav. 18 2407
- [35] Lambrecht A et al2005 Class. Quant. Grav. 22 5397
- [36] Lamoreaux S K and Buttler W T 2005 Phys. Rev. E 71 036109
- [37] Bordag M et al1998 Phys. Rev. D 58 075003
- [38] Chiaverini J et al2003 Phys. Rev. Lett. 90 15