The Mid-Infrared Instrument for JWST, II: Design and Build
Abstract
The Mid-InfraRed Instrument (MIRI) on the James Webb Space Telescope (JWST) provides measurements over the wavelength range 5 to 28.5 m. MIRI has, within a single ‘package’, four key scientific functions: photometric imaging, coronagraphy, single-source low-spectral resolving power (R 100) spectroscopy, and medium-resolving power (R 1500 to 3500) integral field spectroscopy. An associated cooler system maintains MIRI at its operating temperature of <6.7 K. This paper describes the driving principles behind the design of MIRI, the primary design parameters, and their realisation in terms of the ‘as-built’ instrument. It also describes the test programme that led to delivery of the tested and calibrated Flight Model to NASA in 2012, and the confirmation after delivery of the key interface requirements.
Keywords: Space vehicles: instruments; instrumentation: photometers; instrumentation: spectrographs
1 Introduction
MIRI was the first of the JWST’s main science instruments to be delivered to the NASA Goddard Spaceflight Center in the spring of 2012. That delivery marked a major milestone in the work of the consortium of European and US institutes (Rieke et al., 2015a, hereafter paper I) that had designed and built MIRI over a period of more than 10 years. This paper describes the overall instrument design and the development approach. It thereby provides the potential user of MIRI and its data with an insight into the engineering solutions that shape its operation and performance.
The MIRI instrument is the only mid-infrared instrument for JWST. To support a full range of investigations, it therefore provides four key scientific functions, whose detailed implementation is described elsewhere: 1) photometric imaging in nine wave-bands between 5 m and 27 m over a 2.3 square arcminute field of view (Bouchet et al., 2015, Paper III); 2) low spectral resolving power (R 100) spectroscopy of compact sources between 7 and 12 m (Kendrew et al., 2015, Paper IV); 3) coronagraphy in 4 wave-bands between 10 m and 27 m (Boccaletti et al., 2015, Paper V); and 4) medium spectral resolution (R 1500 to 3500) integral field spectroscopy over a 13 square arcsecond field of view between 5 and 28.5 m (Wells et al., 2015, Paper VI). Each of these capabilities, coupled with the large, cold, aperture of JWST will provide a significant advance. To design all of them into a single instrument required novel designs and pushed manufacturing tolerances to the limits. In this paper we present the common design features of MIRI that support and enable these functions, and discuss how they were integrated into the delivered Flight Model.
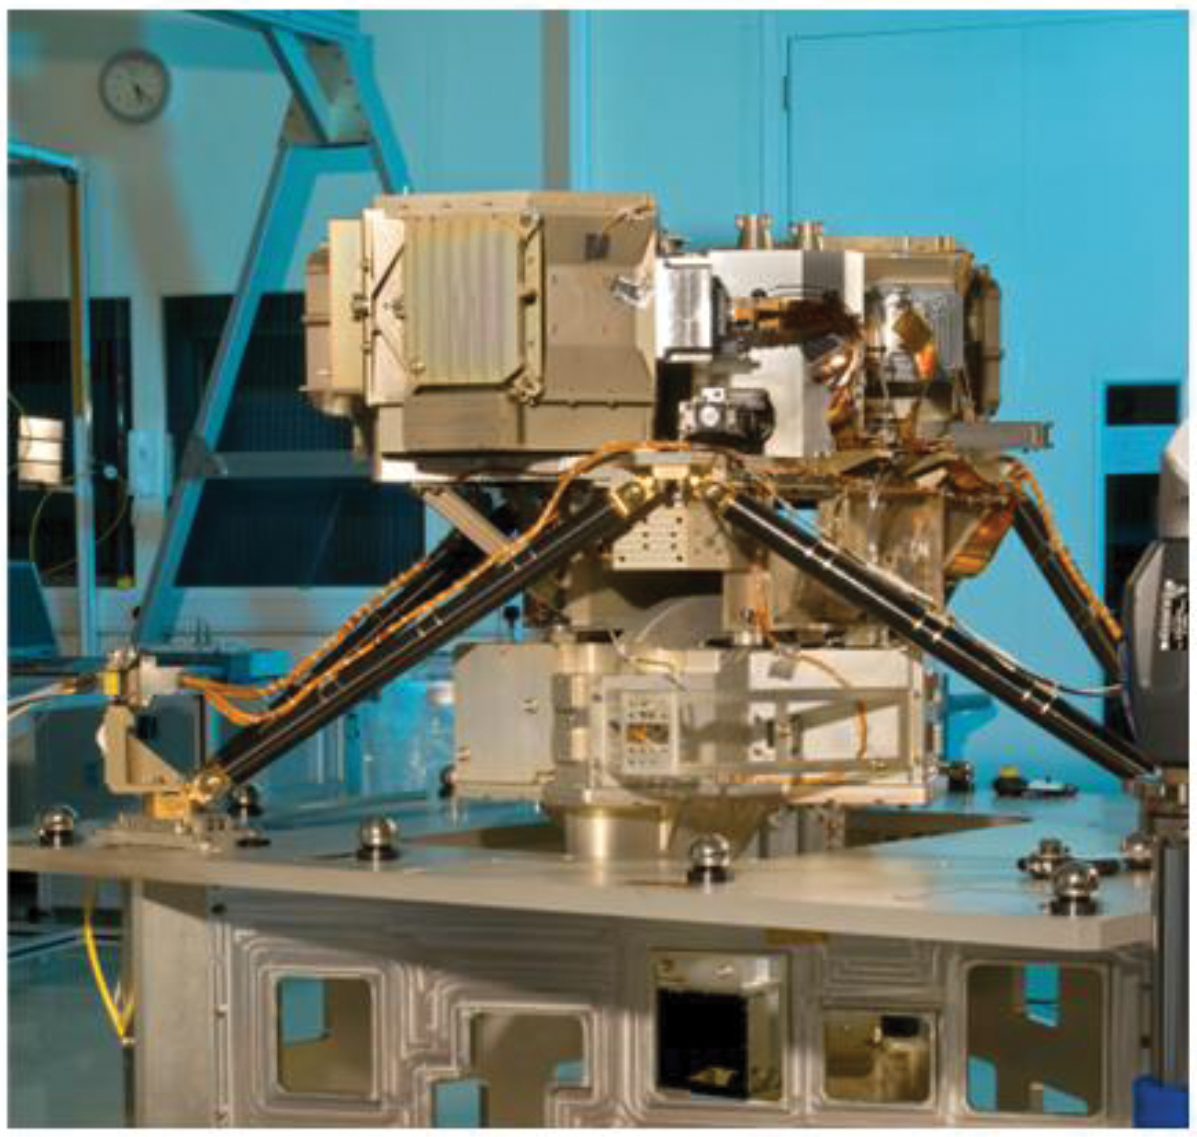
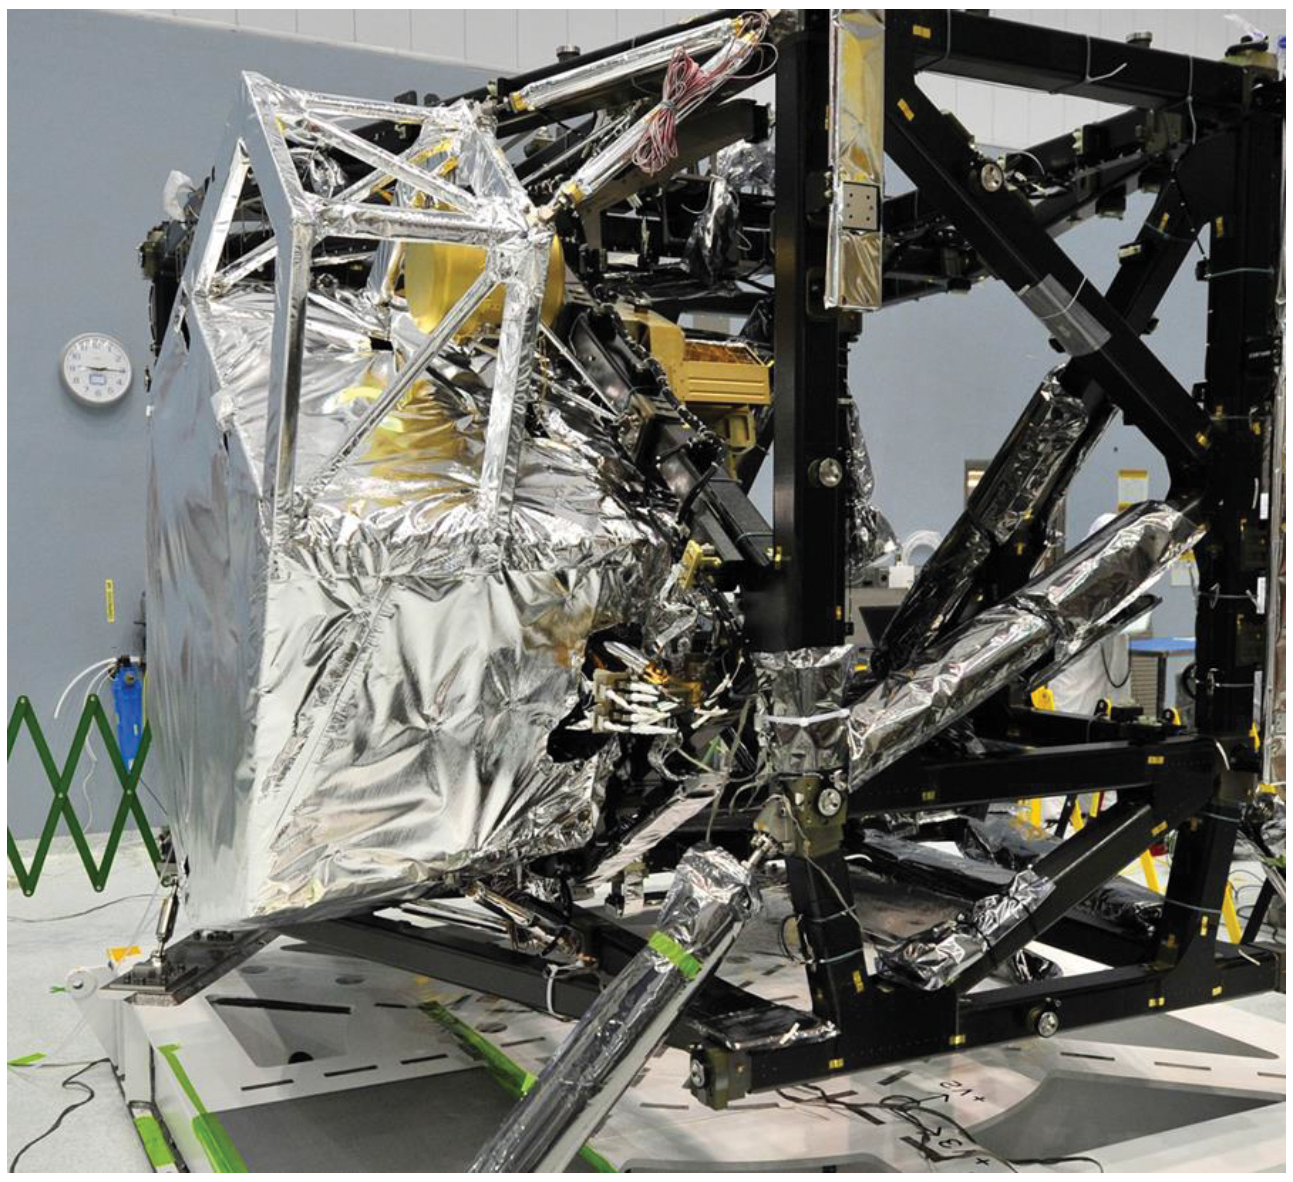
A total of three models of the MIRI instrument hardware were built, including the Flight Model (FM) shown in Figure 1 and the subject of this paper and the accompanying ones. The Verification Model (VM) was fully operational (though with reduced imager and spectrometer functionality), and was built to de-risk the opto-mechanical concepts and assembly integration and verification programme. The first model, the Structural and Thermal Model (the STM), was built to be thermally and mechanically representative of the FM, to enable early validation of the thermal design and structural integrity. The STM has subsequently been enhanced with a representative focal plane so that it can be used in the development of the MIRI cooler.
2 Instrument architecture
MIRI comprises two main components with associated assemblies: the MIRI Optical Bench Assembly (OBA) (Section 2.1) and the MIRI cooler system (Section 5.2), which are operated via separate modules of the MIRI Flight Software running on the JWST Science instrument command and data handling system (ICDH).
2.1 Optical Bench Assembly
The OBA consists of the optics module (the OM, shown in Figure 1), the electrical control and data handling boxes associated with MIRI, which are maintained at 300 K in the separate ISIM Electronics Compartment (IEC; ISIM Integrated Science Instrument Module), and the necessary interconnecting harnesses.
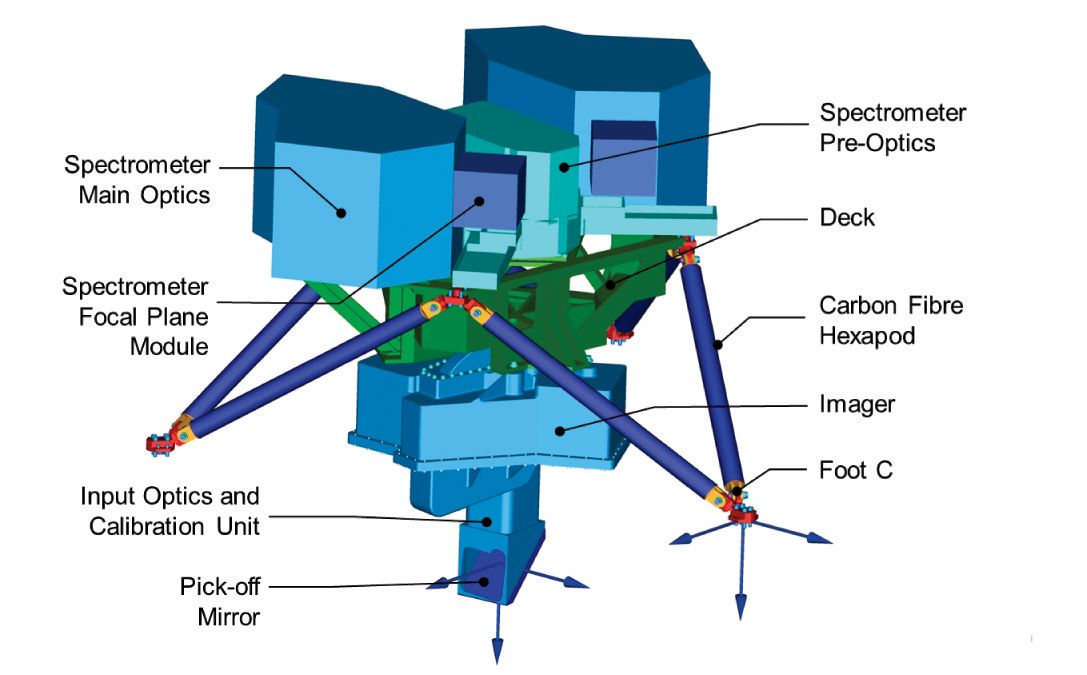
To combine the science functions into a single package and facilitate an easier assembly, integration and verification program, a modular optical design was chosen where lower level assemblies could be manufactured and their performance verified prior to being brought together in the complete instrument. This approach also enables parallelism and flexibility in the build, test and qualification flow but places stringent requirements on the ‘systems engineering’ component of the project, with interfaces between sub-systems needing to be defined, controlled and monitored carefully at all stages. The design solution resulted in the OM being split among four main optical modules (subsystems), as shown in Figure 2a and listed as follows,
-
•
Interface Optics and Calibration (IOC)
-
•
Mid-infrared imager (MIRIM), interfacing to one Focal Plane Module (FPM) with its detector array. MIRIM encompasses the imager, low resolution spectroscopy and coronagraph modes of the instrument.
-
•
Spectrometer Pre-Optics (SPO)
-
•
Spectrometer Main Optics (SMO) interfaced to two FPMs with detector arrays; the SPO and SMO constitute the Medium Resolution Spectrometer (MRS).
These modules were integrated onto a single structure, the Deck. The completed OM is mounted to the JWST ISIM via a carbon fibre reinforced polymer (CFRP) hexapod mounting system (the black rods in Figure 1). This hexapod thermally isolates the OM from ISIM, which is passively cooled to about 40 K, while supporting it against the mechanical loads encountered during launch (Jessen et al., 2004).
The MIRI optics take full advantage of state-of-the-art large-format mid-infrared detector arrays. Three focal plane modules (FPMs) with 1024 X 1024 pixel Si:As IBC detector arrays (Rieke et al. 2015b, Paper VII and Ressler et al. 2015, Paper VIII) interface to the OM, with one array dedicated to imaging, coronagraphy, and low resolution spectroscopy, and the other two used in the medium resolution spectrometer. The FPMs attach to the outside of the optics modules, mating two flat surfaces (with locating fixtures) to provide robust and accurate alignment onto the outputs of the instrument optics.
2.2 Thermal and Cryogenic Considerations
MIRI is the only instrument that must be cooled below the temperature achieved by passive cooling of the ISIM to optimise the detector performance and reduce the thermal background below the detector dark current. The design was developed with thermal constraints as a key driver. The optics module is maintained at a temperature below 7 K by the cooler system. Because of its well understood structural and thermal behaviour, aluminium alloy was used to make the supporting structure of the deck and the four optical subsystem modules. The reflective optical surfaces are also of aluminium to simplify the thermo-mechanical design and for the stability of alignment during cool down. This approach had been proven for other flight and ground based instruments in the mid and far-IR (e.g., IRS and MIPS on Spitzer, SPIRE and PACS on Herschel, VISIR on ESO-VLT, Michelle on Gemini/UKIRT) but has been taken to higher levels of precision in MIRI. The instrument optical subsystems and the FPMs are built and aligned at room temperature, and remain aligned when cooled. The designs of both the imaging and spectrometer channels were implemented using the minimum number of low power cryogenic mechanisms (section 6) to minimise the heat load to the cooler.
3 Optical Design
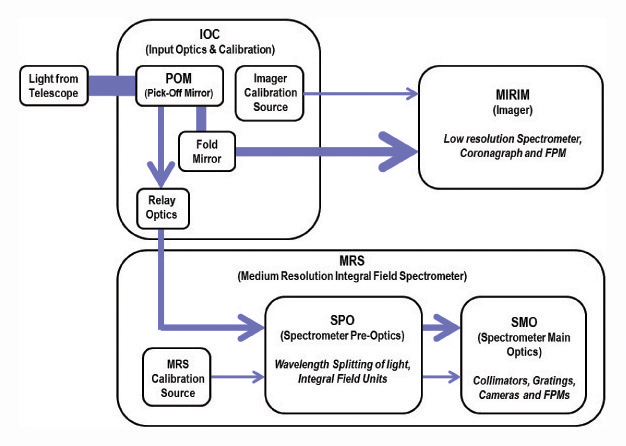
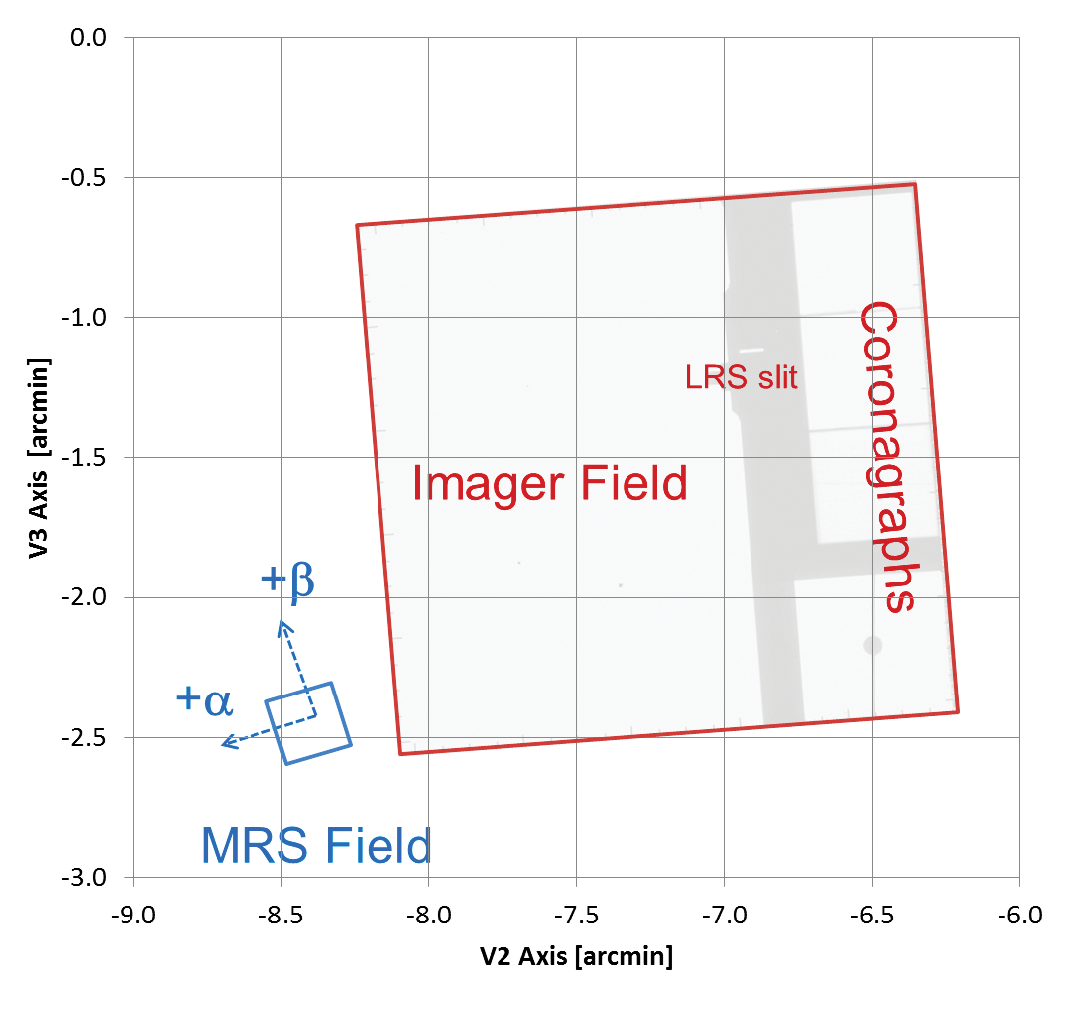
The optical paths through the instrument are shown schematically in Figure 2b. Both the Imager and Spectrometer channels are fed from a single pick-off mirror in the IOC. The region of the focal plane intended for MIRIM is then selected by a fold mirror close to the telescope focal plane, with light intended for the MRS allowed to pass on through the deck. The positions of the fields in the V2, V3 coordinate system relative to the JWST telescope boresight at V2 V3 0 are shown in Figure 3.
3.1 Imager, Coronagraphs, and Spectrometers
Inside MIRIM, the field of view (FOV) is partitioned into three functional areas; imager, coronagraph and low-resolution spectrometer as indicated in Figure 3, enabling all science functions to be supported by a single detector array and a single wheel mechanism. The light is collimated and, at the pupil image formed by the collimator, the single wheel holds the filters for the imager and coronagraphs, a prism assembly for the low resolution spectrometer, a blank for dark current measurements and a pupil imaging lens. This entrance focal plane is imaged onto the detector using a 3-mirror anastigmat camera with separate areas of the detector being dedicated to the imaging, coronagraphy and spectroscopy functions. A full description of MIRIM can be found in Paper III.
The MRS (Paper VI) provides diffraction limited integral field spectroscopy over the whole wavelength range from 5 to 28.5 m. It consists of two modules shown in Figure 2b – the SPO, which splits the incoming light both spatially, to form an entrance slit for the grating spectrometer, and spectrally into 4 channels, each of 3 sub-bands, that are dispersed and imaged onto the detectors in the SMO. The wavelength range is divided into the 4 channels using dichroic mirrors in the SPO; the channels have separate dedicated integral field units and the spectra from each of the 4 channels occupy half of one of the 2 MRS detectors. Each channel is split, by a dichroic chain, into 3 sub-bands that are observed sequentially by rotation of just two mechanisms that carry both the wavelength sorting dichroics and the dispersion gratings in a very compact and efficient configuration.
3.2 Design considerations
The limited space allocated to MIRI, plus the need to keep the instrument overall as compact as possible to minimise the radiative heat load on the outer envelope, resulted in the use of relatively fast optical beams. These optics are designed to operate without vignetting and to meet image quality requirements in the presence of up to 4% pupil shear (i.e., the mis-alignment of the telescope exit pupil and the instrument entrance pupil in units of their diameter) and 2mm of focus offset, tolerances that became requirements for the optical alignment strategy.
A tolerance analysis showed that MIRI would not need a focus mechanism, so long as tight alignment tolerances were maintained to place the focus position onto the detector and to position MIRI onto the telescope. The design solution to ensure the detector surface was placed correctly was to measure both sides of the flat interface plane and then machine a dedicated “shim surface”. The detector surface position was measured both warm and at cryogenic temperatures to support this approach. To place the output of the optics correctly, an alignment budget was created that gave pupil shear and focus allocations to the sub-systems (IOC, MIRIM, SPO, SMO); to each of the interfaces between these sub-systems and the deck; and to the ISIM-MIRI hexapod mount. These budgets were set with the intention of achieving an overall focus within 1mm and pupil shear of no more than 2% for MIRI. The imager and spectrometer were also required to be confocal, which was achieved via the mechanical alignment of the subsystems to the deck. The all aluminium structure means that all sub-system interfaces are direct between mounting pads on each surface, fixing 1 lateral and 2 angular degrees of freedom, with dowels defining the other 2 lateral and 1 angular degrees of freedom. The tolerances on these mechanical interfaces and Monte Carlo analysis showed that alignment within budget was possible without recourse to a measure-adjust-measure cycle.
3.3 Alignment into JWST
The optical alignment of MIRI with respect to the telescope requires that the position and orientation of the entrance focal plane and the entrance pupil coincide with the focal surface and exit pupil of the telescope, respectively. Achieving this accurately is key to the scientific performance of the instrument. The positions of the telescope focal surface and exit pupil are well-defined with respect to the telescope optical elements and the mechanical interface between MIRI and the ISIM. However, these definitions are for the in-orbit environment of cryogenic temperature and zero gravity. The design of MIRI needed to take into account the offsets that will occur to the system from the warm as-built conditions found in a terrestrial lab.
On cooling, the distances between the CFRP leg to deck mounting points decrease by the integrated CTE (coefficient of thermal expansion) of aluminium, and the legs shorten by the integrated CTE of CFRP. Analysis showed that the leg/deck interface points would move towards the MIRI/ISIM interface by 0.49 mm on cooling and by only 20 microns when gravity is reduced to zero. At the same time, cooling of the optical bench causes the pickoff mirror (POM) to move towards the leg/deck interface.
The optical design model of MIRI was used to find by analysis the warm position and orientation of the POM that simultaneously placed the telescope focal plane at the MIRI entrance focal plane and the MIRI entrance pupil and telescope exit pupil at the same location when the system is cooled to its operating temperature. This warm position of the POM was used to inform the design of the IOC and to define the nominal warm positions of the MIRI entrance focal plane and entrance pupil. These were used for alignment verification during the room temperature construction of the optical subsystems and their integration into the OM.
Prior to delivery to NASA the overall alignment of MIRI was checked at room temperature using a NASA supplied reference system called the ASMIF which reproduced both the mechanical and optical interfaces within the ISIM and hence ultimately to the telescope. A series of measurements of pupil shear and focus were made, before and after vibration and cooling to operating temperature, using the references built into MIRIM. The data show that, with measurement uncertainties of 0.35%, the MIRI contribution to pupil shear is 1% and there is no discernable change with changing gravity vector. Focus measurements demonstrated that the MIRI focus is within 0.5 mm of the nominal position. The relative alignment between the entrance pupils of the MRS and MIRIM was measured at cryogenic operating temperature by scanning a point source across one quadrant of the MIRI pupils and correlating the resulting pupil maps to the as-built optical design models of the MRS and MIRIM. No measureable offset between the imager and spectrometer pupils was found. The warm pupil measurements were repeated after delivery using the same fixture to verify that there had been no unexpected issues arising from the transfer. Pupil shear and focus of MIRI relative to the nominal position within ISIM have subsequently been measured at NASA Goddard at cryogenic operating temperature, confirming the warm measurements. All of these results comfortably meet the targets set in the alignment budgets (§3.2) to have no significant impact on the performance of MIRI.
The excellent alignment of MIRI determined during test, and the end-end performance discussed in Papers III, IV, V, and VI demonstrate the success of the opto-mechanical approach to the MIRI optical design and alignment.
3.4 Stray light control
Careful attention has been paid to stray light control. The fine steering mirror (FSM) within the telescope optics is surrounded by a cold stop that provides the defining cold baffle around the primary mirror. Cold pupil stops are provided within each of instrument modules. They are slightly over-sized to avoid vignetting at the FSM stop even in the presence of a small level of pupil shear, so they provide an additional level of stray light rejection without affecting the optical path. Papers III and VI describe the straylight suppression features within the MIRIM and the MRS.
3.5 On-Board Calibration
Stable sources of illumination are needed on-board MIRI for calibration of the instrument’s response close in time to an astronomical observation. The requirement is to achieve high signal to noise in a short exposure time to derive high spatial frequency flat fields (pixel-pixel gain matrix) and for the source to be sufficiently stable that it can be used to monitor relative detector gain between observations of standard stars. The illumination should therefore be smooth on a spatial scale larger than one pixel and stable for timescales of tens of days.
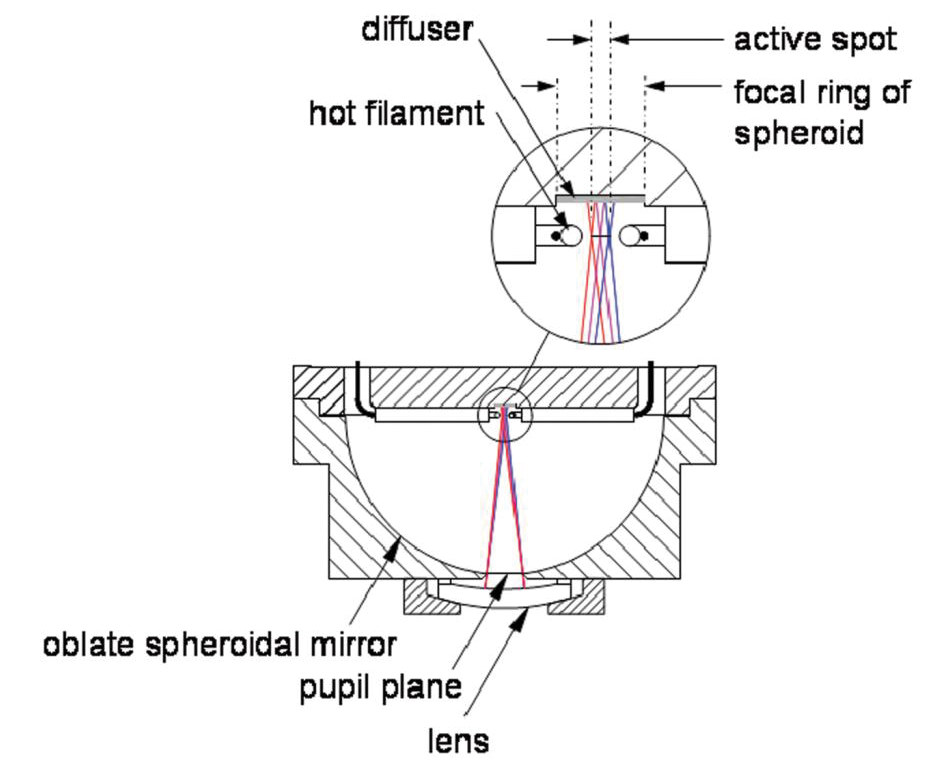
Identical calibration sources are provided for both the imager and the spectrometer (Glasse et al. 2006). One source is mounted in the spectrometer pre-optics and light is injected into the spectrometer optics via a hole in a folding flat mirror. For the imager the source is mounted in the IOC and light injected via a small relay mirror.
Figure 4 shows the source design. Pseudo blackbody radiation is produced by miniature tungsten filament lamps and is rendered uniform by a diffusing surface within an integrating sphere. There are two filaments in each sphere for redundancy. To avoid the steep fall-off at short wavelengths in the blackbody spectrum, the filament must emit with an effective temperature of at least 500 K. In practice the operating temperature is restricted to less than 1000 K to maximise the filament lifetime.
The long-term stability of the MIRI internal calibration sources was verified during the Flight Model (FM) campaign. The relative flux and repeatability of the source current were measured on eight occasions spread over a period of 46 days. Prior to each measurement the detector was annealed to ensure the results were not affected by its previous history (e.g. latents, image persistency or other detector issues, Ressler et al 2015, Paper VIII). Signals through the flight filters called F560W, F1130W, F1800W, and F2100W (respectively at 5.6, 11.3, 18, and 21 m, Bouchet et al 2015, Paper III) were measured, to provide a good representation of the wavelength range covered by the MIRI imager.
The relative flux from the source was defined as
where t is the measurement number, and is the measured average flux in DN/s within a single photometry region (three boxes of 100x100 pixels2 and one of 200x200 pixelsusing clean areas of the detector). The standard deviation of the relative flux value over time ranged from 0.411% to 0.270 % depending on the filter. These values were afterwards corrected to account for variations in the MIRI Instrument Control Electronics (ICE) calibration source drive current, where the corrections were derived from the accurately sampled current values recorded in telemetry. This correction has been implemented in the Flight Software as an autonomous adjustment, to be applied to the source current once after every switch on.
The final, corrected, calibration source relative flux stability was found to range from 0.039 % to 0.203 % on a per filter basis, over a 46 day period. This compares very favourably with the accuracy of absolute flux calibration using standard stars which is estimated to be about 1 %.
4 Mechanical Design
4.1 Mechanical Configuration and Requirements
The MIRI OM is of isothermal construction with the Deck and the optical subsystems all constructed in aluminium alloy and thermally coupled together by bolted interfaces. The combination of this all-aluminium assembly with a simple and efficient CFRP hexapod provided a well understood structure, which could be specified and built to warm dimensions and whose offsets at cryogenic temperatures and under zero-gravity could be accurately predicted.
The main driving requirements for the structure as defined at the outset of the programme are listed in Table 1. Sizing of the Deck and the Hexapod elements was driven by these requirements.
The deck is a ribbed and pocketed structure designed to support the various elements with the least expenditure of mass, maximum stiffness, maximum stability and lowest technological risk. It is machined in four parts from aluminium alloy 6061. The support for the spectrometer is made as a single part, carrying interfaces for the two Spectrometer Main Optics modules, the Spectrometer Pre Optics and the Hexapod. It is bolted onto the ”lower deck” structure that carries interfaces for the Cooler 6K Heat Exchanger, the Imager and the Input Optics and Calibration assembly plus some ancillary items. Two struts bolted to this lower deck help to support the wider side extensions to the spectrometer part. The Deck is highly lightweighted and the pocketing is such that there is significant mass only in the regions where the subsystem interface pads locate. The Deck provides the stiffness between the Hexapod apices and was qualified early in the programme using the Structural Thermal Model (STM).
4.2 Hexapod Design and Test
The hexapod struts were manufactured from Carbon Fibre Reinforced Plastic (CFRP), which has a favourable combination of strength and low thermal conductivity at cryogenic temperatures. In practice, the hexapod design is stiffness limited, with the driving goal being to minimise the thermal cross section whilst maintaining a margin on the first frequency requirement. The second important design driver for the hexapod struts is buckling. High stiffness and high buckling resistance is achieved by having a high Young’s modulus in the axial direction of the strut. This implies a lower cross section to achieve the first eigenfrequency, a key requirement in Table 1. The chosen design solution for the hexapod is six struts of length 405mm, diameter 35.5mm and 1.2mm wall thickness. This sizing avoids buckling under the design load and maintains a damage-tolerant wall thickness (Jessen et al., 2004).
The characteristics of the (T300) fibre used in the hexapod are well documented and their use has significant space heritage. This high strength fibre was preferred over a high modulus fibre due to its lower sensitivity to micro-cracking when cycled to cryogenic temperatures. The resin system is L20/SG. The hexapod strut end fittings and brackets are made from invar for thermo-elastic compatibility with the CFRP.
The Hexapod struts went through an extensive test campaign at strut level to qualify the manufacturing process and confirm strut performance. The performance of the Hexapod and Deck to provide the required alignment stability and withstand expected launch loads was verified by the Flight Model test campaign.
4.3 Assembly and Alignment
As described in sections 3.2 and 3.3 the internal alignment of MIRI and the alignment into JWST are achieved by mechanical design and tolerances. To meet the required alignment performance the majority of the structural parts and the mirrors are constructed of two compositionally similar, heat treatable aluminium alloys, 6061 and 6082. Structural and optical components were thermally aged to ensure adequate dimensional stability through subsequent temperature cycling. The optical subsystem modules were mounted on the Deck using bolted and dowel-pinned interfaces. The Deck was machined to a surface flatness of 20m throughout and the dowel hole location tolerances ranged from 25m for the IOC to Deck interface to 90m for the SMO to Deck interface. We note that no optical misalignments have been seen during testing of the MIRI Flight Model.
Repeatable mechanical location of MIRI with respect to test and flight interfaces was achieved by means of 6 quarter inch dowel pins, 2 at each hexapod ‘foot’. For the flight interface to ISIM, these pins locate in a hole and a slot per foot on the ISIM side of the interface.
Conventional practices dictate that ground support equipment to handle the instrument should not occupy flight interfaces. However, transportation (which is the most severe environment seen) was carried out using appropriately protected flight interfaces. This was because of the need to control mass and the presence of an assembled, alignment critical and unconstrained friction locked hexapod. (For all other purposes there are lifting brackets on the Deck conveniently close to the centre of mass). To avoid accidental damage to the hexapods, a system of ‘tie rods’ was employed to support their feet when the instrument was not mounted at its mechanical interface. The tie rods incorporate length adjustment such that the foot positions could be micro-adjusted to accommodate manufacturing tolerance differences among the various test, flight and transport equipment interfaces that the instrument would be mounted to. This system resulted in the overall pupil shear and focus measurements reported in section 3.3.
4.4 Mechanical Loads
The sine loads dictated the design case for the semi-kinematic MIRI OM, as there are structure resonances in the range 50 to 100 Hz. Notching of these input loads during test was essential to protect the flexures in the end fittings from damage. The vibration test approach and results are described in detail in Sykes et al.,2012.
The random vibration levels specified at the MIRI instrument interface are relatively low, but nevertheless, attention must be paid to the critical subassemblies during test to ensure that subassembly specifications are not locally exceeded during instrument test. In particular, the mechanism vibration tests were heavily notched. The notched subassembly test inputs became constraints on the instrument level test as secondary notch limits.
As a basis for interface design and primary notching, limit loads were specified. The MIRI vibration test was a force limited test, meaning that acceleration input was controlled such that the measured force at the interface would not exceed a predetermined maximum. The maximum was set by direct reference to the design load for sine vibration, or by reference to the NASA semi-empirical method (Scharton 1997), in the case of random vibration. By this method the launch loads were verified to be enveloped without the excessive over testing that would result from applying nominal vibration inputs through the main structural resonances.
5 Thermal Design
5.1 Overview
MIRI is the coldest instrument on the observatory. The detectors themselves (Papers VII and VIII) must be held at a nominal temperature of 6.7 K with a temperature stability range of 20mK over a 1000 second exposure. The deck and optics must be held at a temperature below 15.5 K with a stability within a 1K band to avoid background radiation at long wavelengths that would impact the system sensitivity. It was decided to cool the whole deck and modules attached to it to 7K, near the detector temperature, to remove temperature gradients and therefore possible sources of mis-alignment on cooling.
The total heat load from the OM to the cooler heat-exchanger stage during nominal operation must not exceed 46.5 mW. The nominal time-averaged dissipations internal to the OM are determined to be 10.46 mW by correlation of measurements with the MIRI thermal and operating models, leaving about 36 mW maximum for conductive and radiative loads.
To isolate the OM from heat generated in the ISIM that might undermine its thermal design, the OM is enclosed within a cooled shield at a temperature of around 23 K (Figure 5). The OM is conductively isolated from the ISIM by the hexapod struts visible in Figure 1, which are attached to the ISIM conductive interface, having a temperature of about 40 K. The OM and shield are cooled actively by couplings to the 6 K stage and the 23 K Heat exchanger stage assembly of the MIRI-dedicated cryo-cooler, which is described below.
5.2 Cooler
The cooling to the detectors, OM, and thermal shield is provided by a 6 K/18 K hybrid mechanical cooler, provided by Northrop Grumman Aerospace Systems in collaboration with JPL. The system is a further development from the NASA Advanced Cryocooler Technology Development Program (ACTDP), which achieved a breakthrough in cooler efficiency while achieving heat lifts of 30 mW from 6K and 150 mW from 18K (Ross 2004).
The MIRI Cooler System uses helium as the working fluid and consists of a three stage Pulse-Tube (PT) Pre-cooler that reaches 18 K and a fourth 6 K stage, which is a Joule-Thomson (JT) cooler111A JT cooler works on the familiar principle of allowing compressed gas to expand as it passes through an orifice. Pulse tube coolers (e.g., Radebaugh 2000) produce an oscillating flow through an orifice, or more commonly through a thermal matrix called a regenerator. In the high pressure part of the cycle, warm gas is driven into a reservoir, where it exchanges its heat. In the low pressure part, the gas flows back through the regenerator and cools it, allowing heat to be removed from the object being cooled.. These two temperatures are made available to the instrument through heat exchangers. It is characteristic of JT devices that their heat lift decreases substantially with increasing precooling temperature. Therefore, a valve bypasses the JT expander to allow the initial cooldown of the instrument by the pulse tube stages. At 18K, the bypass valve is closed and cooling by the JT expander continues to 6K. This crossover is termed the “pinch-point” because it is the temperature where there is a minimum in overall heat lift capability.
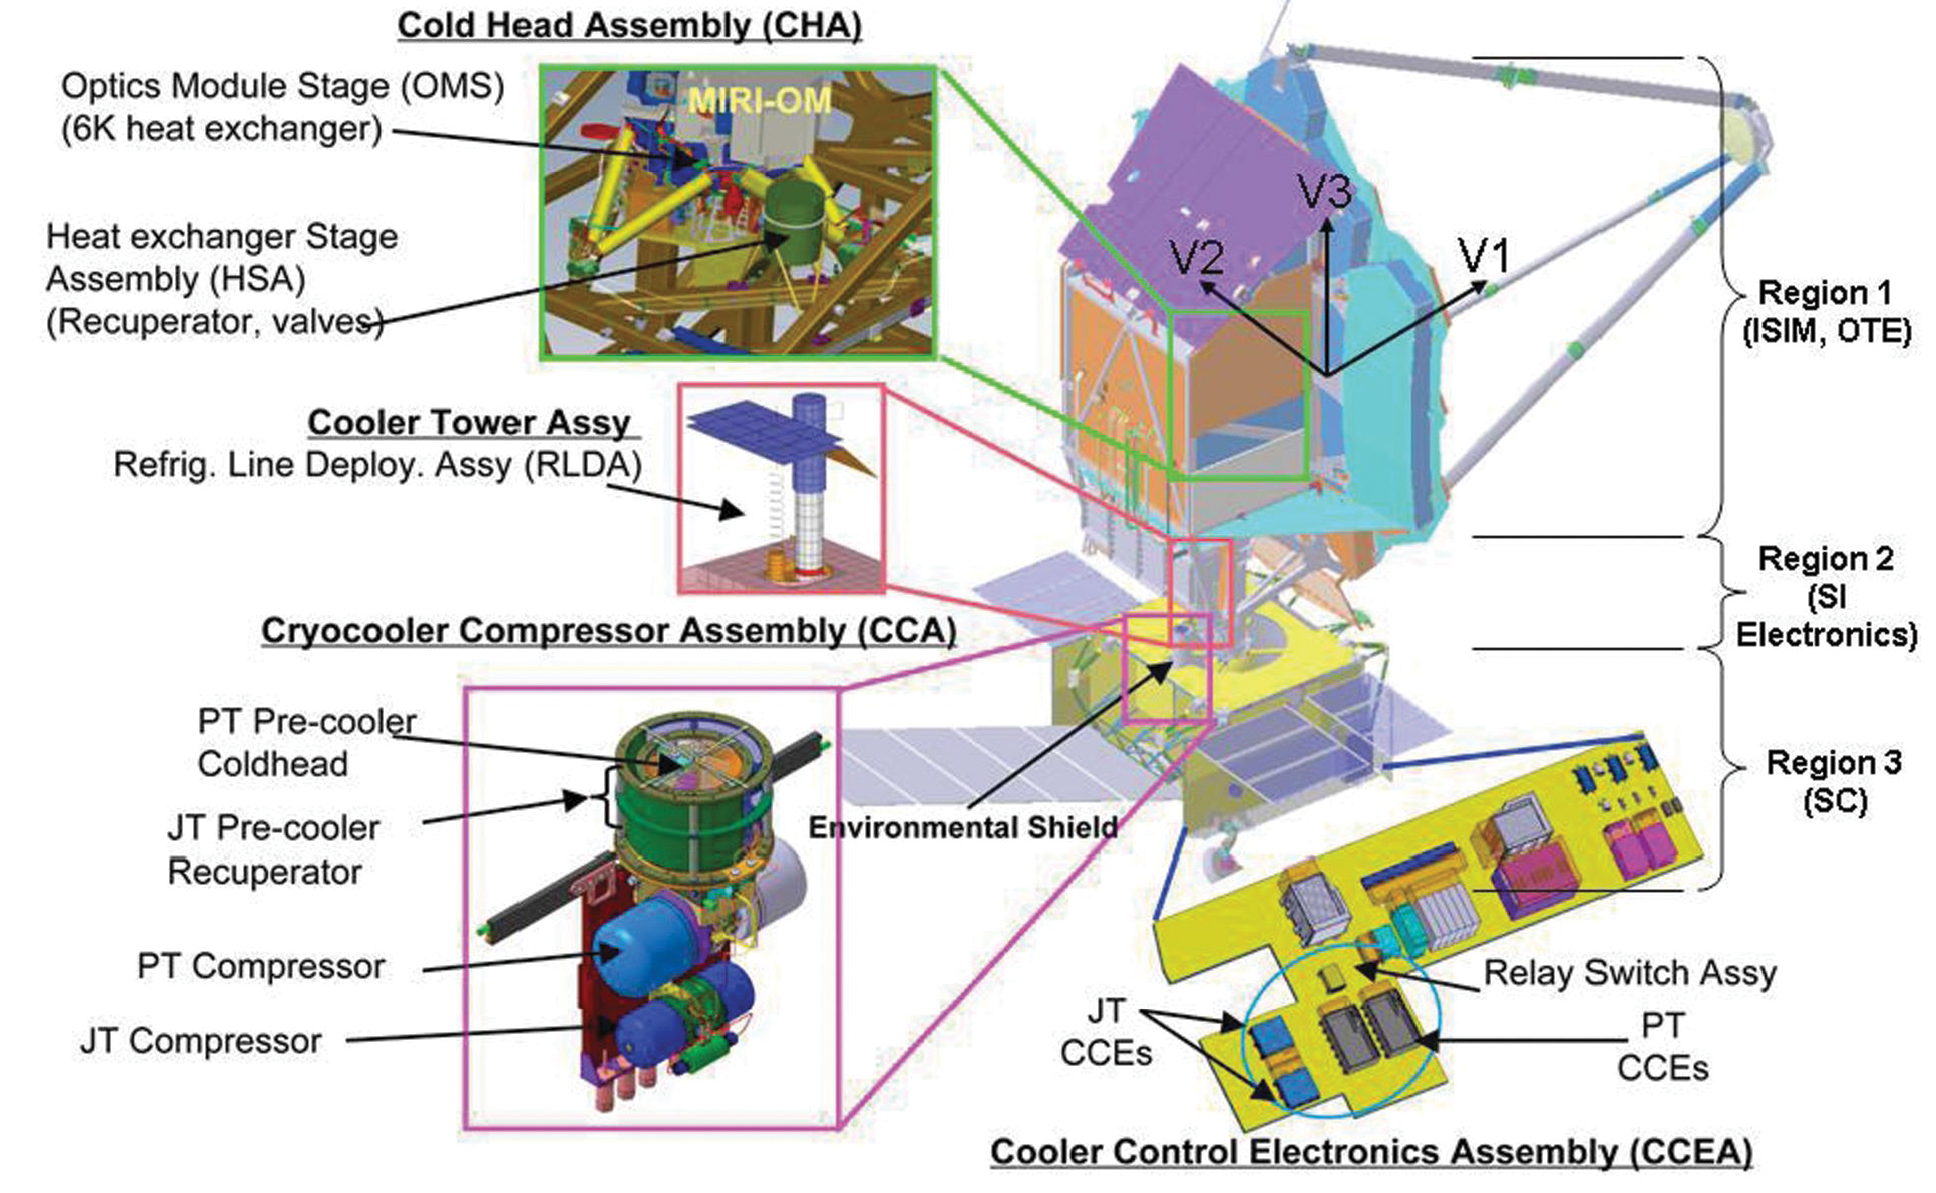
The cooler system architecture is made particularly challenging since the cooler spans the length of the JWST observatory (Figure 6). The Cooler Compressor Assembly (CCA) is in the JWST Spacecraft Bus and is at room temperature, while the Cold Head Assembly (CHA) is mounted on the ISIM structure near the MIRI OM. Both the compressors (PT and JT) are driven by the block-redundant Cooler Control Electronics Assembly (CCEA) which is located in JWST Spacecraft Bus.
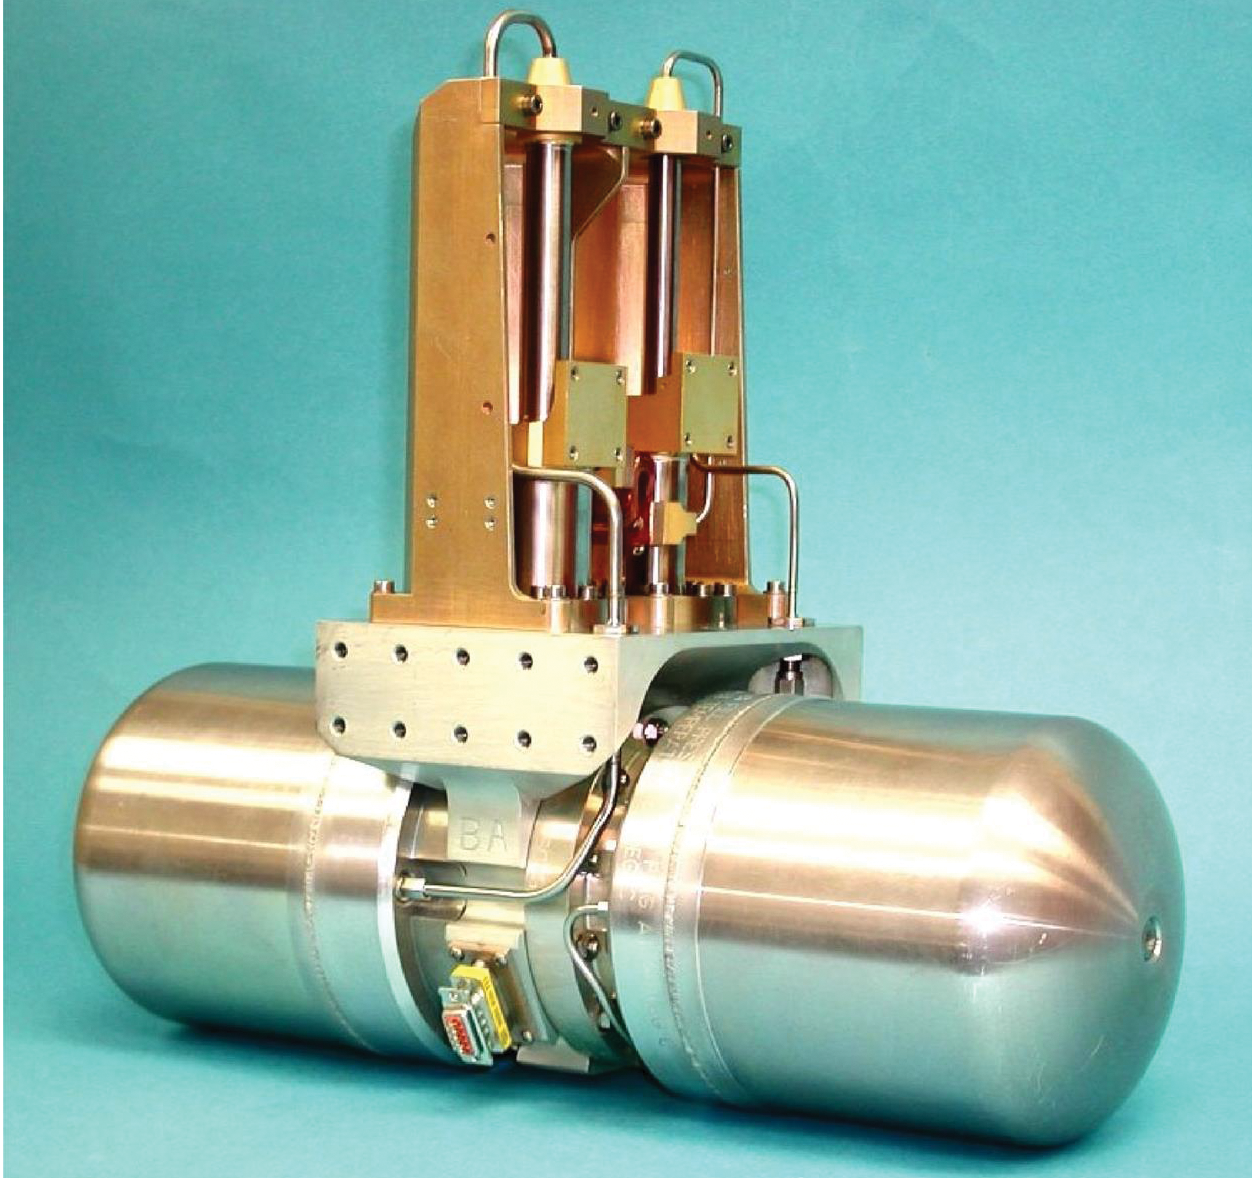
The CCA consists of the PT-Pre-cooler, the PT and JT Compressors (see Figure 7), plus a radiation shield for the various stages of the pre-cooler. It also supports the stowage structure for the Refrigerant Line Deployable Assembly (RLDA) that runs through the observatory to carry the working fluid from the CCA to the CHA and back. Finally, it includes the structural element that mounts to the spacecraft bus for launch and provides thermal interface to the JWST heat rejection system. The refrigerant lines are supported by thermally isolating line supports. The CCEA provides the drive to the compressors and also implements the functions of thermal control, compressor vibration reduction, telemetry generation, and heater and valve control. The CHA contains the Joule Thomson constriction and has the cryogenic valve that affords switching between the Pre-cooler mode and the JT-Cooling mode during the MIRI optical system cool-down. Another valve bypasses more of the cold assembly to allow warming the cooler lines for decontamination.
A flight-like CHA was delivered in the spring of 2013. It, along with a ground support equipment pre-cooler, successfully supported the cool-down and operations of the MIRI OS during the ISIM Cryovac1 Test (CV1-RR). The flight CCA and the CCEA are currently in development.
The MIRI cooler system operations will be verified and validated through a series of acceptance test programs followed by a MIRI End-to-end test where a full complement of flight-like cooler hardware will be tested along with thermally representative MIRI hardware (the STM, summarised in section 1). The End-to-end test will include a flight-like MIRI Thermal Shield, which is also cooled by the MIRI pre-cooler.
5.3 Conductive isolation
The CFRP hexapod is one of two main conductive paths between the MIRI OM and the ISIM. The conductance of each strut is about 0.02 mW/K at a mean temperature of 10 K increasing to about 0.06 mW/K at a mean temperature of 40 K (Shaughnessy et al. 2007). Table 2 summarises the main conductive and radiative heatloads between the MIRI OM and the ISIM or Shield calculated from the correlated thermal model.
Electronic harnesses and a purge pipe also provide paths for conductive heat loads. Harness loads are managed by: (1) minimizing of the number of wires required, (2) definition and control of the effective thermal length of the harness between the ISIM heat-sink and the OM deck, and (3) selection of low thermal conductivity materials for construction of the harness (manganin, phosphor bronze and stainless steel). The purge pipe (which is primarily needed to maintain a clean and dry environment for the wheel lubricants to allow their operation during non-vacuum test activities), is constructed from stainless steel, sized to minimize the conducted load, whilst allowing the required volumetric flow rate to provide a suitable positive pressure in the instrument.
5.4 Radiative isolation
With the exception of the optical aperture and access for the cooler heat exchanger, the outer surface of the OM is covered with Single and Multi-Layer Insulation (SLI and MLI) blankets. The SLI is used around the six struts to minimize the conducted heat load from the warmer ISIM. The SLI also encloses harnesses and the purge-pipe that are attached to the struts.
There are two issues regarding MLI for MIRI. First, at low temperatures the thermal isolation achievable is small (e.g., Spradley et al. 1990). Nonetheless, it was decided to encase the OM in MLI both for the thermal gain and as a protective measure for its low-emissivity surfaces. Second, the skin depth of aluminium at a wavelength of 400 m (by Wien’s Displacement Law, corresponding to a temperature of 7K) is about 0.1 m. Therefore, the 1000 Å (0.1 m) aluminium coating on typical blanket materials can be somewhat transmissive to thermal radiation originating from MIRI and the cold ISIM environment. Consequently the MLI blankets were constructed using Kapton having a 5000 Å (0.5 m) deposition of aluminium on one side. Eight layers are inter-leaved with crinkled double aluminized Mylar to inhibit conductive heat transfer (net spacers are not used as they are a source of particulate contamination).
5.5 Thermal control
The detectors are thermally isolated within the FPMs and cooled using a thermal strap of high purity copper from the mount for the detector arrays to a thermal connector on the FPM housings. From this connector, another strap runs approximately 0.5 m from the FPMs to the interface point near the 6 K heat exchanger. This section of strap is constructed from two 2 mm diameter pure (99.999%) aluminium wires that are clamped into specially designed end-fittings to maximize interface conductance. The FPM strap has been sized to allow heating the detectors to keep them warmer than the OM during cool-down (for contamination control), and to permit annealing cycles where the detector temperature is raised briefly to 15 K.
5.6 Contamination Control
As a consequence of the MIRI being colder than the rest of JWST, particular attention was paid in the design to contamination control. There is natural protection from the thermal isolation until the MIRI cooler is activated. Once that occurs, the instrument cools below its surroundings and contaminants from them can collect. Models of the expected JWST outgassing indicate that in the worst case, without protection, a 1.5m layer of water ice along with various organic contaminants that are still volatile at 40K could accumulate on exposed MIRI optical surfaces that are at 7K. These considerations led to a design with a contamination control cover (CCC) just inside the optical train after the pick-off mirror, which is thermally isolated from the rest of the optics and can be decontaminated by heating. The first cold surface is most vulnerable; the long path of the IOC protects optics further down from transported contaminants when the CCC is open. The CCC design is discussed in section 6.
The Pick-Off Mirror (POM) is the coldest exposed optical surface within the ISIM. It is thermally isolated within the OM structure and fitted with redundant heaters to allow it to be warmed if necessary to drive off contamination (solid N2, O2, H2O, CO2) that may stick to the mirror. Before the POM heater is activated the CCC is closed to ensure contaminants do not freeze out onto the sensitive internal surfaces.
5.7 Thermal Model Verification and On-Orbit Prediction
A cryogenic test facility was developed at the Science and Technology Research Council’s Rutherford Appleton Laboratory to simulate the environment of the ISIM, including the 40 K radiative environment specified at that time (i.e excluding the Thermal Shield described above) and the conductive interface with the OM and the 6 K heat-exchanger (Shaughnessy & Eccleston 2009). A three-month cryogenic test was undertaken on the Flight Model OM to verify and calibrate its performance and to assess the thermal sub-system. Two phases of dedicated thermal tests provided steady-state and transient data for validating thermal models. A close correlation of heat load and temperatures was made to the steady-state data. Heat loads were correlated to within 0.5 mW of measurements and temperatures were correlated to well within 100 mK of measurements.
The nominal steady-state heat load predicted with the correlated model is 33.8 6 mW. This shows a margin of 6.7 mW from the requirement of 46.5 mW, demonstrating that the cooler sub-system will be able to cool and maintain the OM at the required operating temperature.
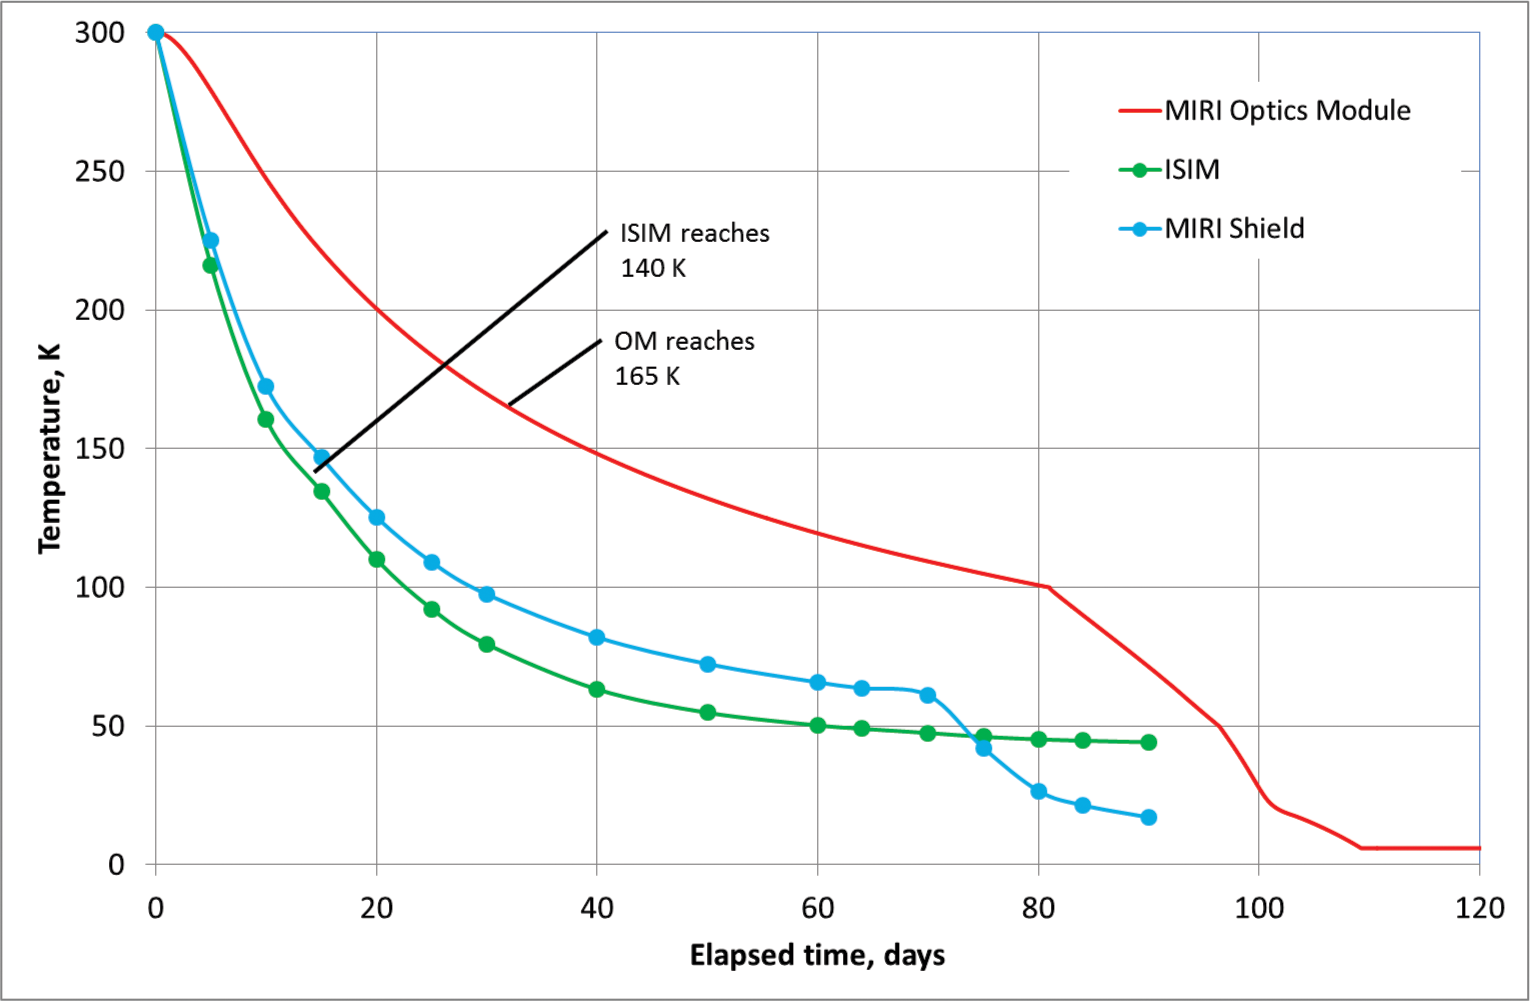
The in-orbit cool-down prediction using this correlated model is presented in Figure 8. In the model, the ISIM boundary temperatures follow specified profiles, shown in the figure. The temperature of the MIRI shield shown is also interface data for the cooldown prediction and includes the response of the shield to the pre-cooler. The OM is cooled passively until it reaches approximately 100 K, at which point the cooler is activated. A temperature-dependent cooler heat lift was provided for analysis. To demonstrate margin on the requirement, the effective heat lift in the model was reduced by 25%.
The analysis predicts that it takes about 110 days for the OM to reach operational temperatures. The cooler is activated after about 80 days. The inflection in the OM temperature just past 100 days marks the transition through the pinch-point. For contamination control, the OM critical optical elements are required to remain above 165 K until the ISIM is 140 K or below. The analysis confirmed that the OM cool-down lags that of the ISIM and cools below 165 K about 15 days after the ISIM passes 140 K.
6 Mechanism Design
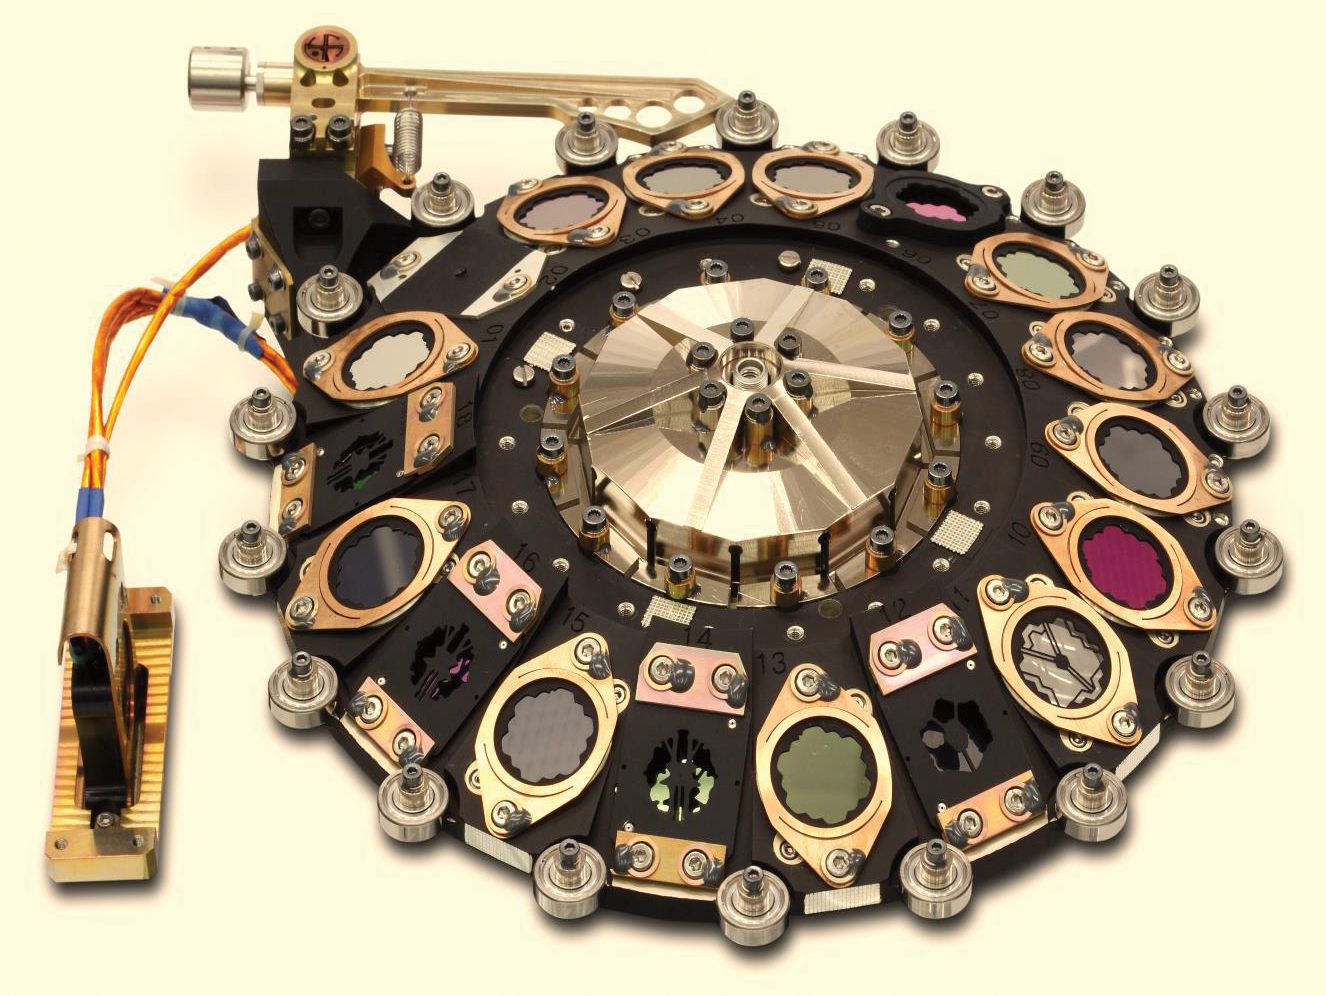
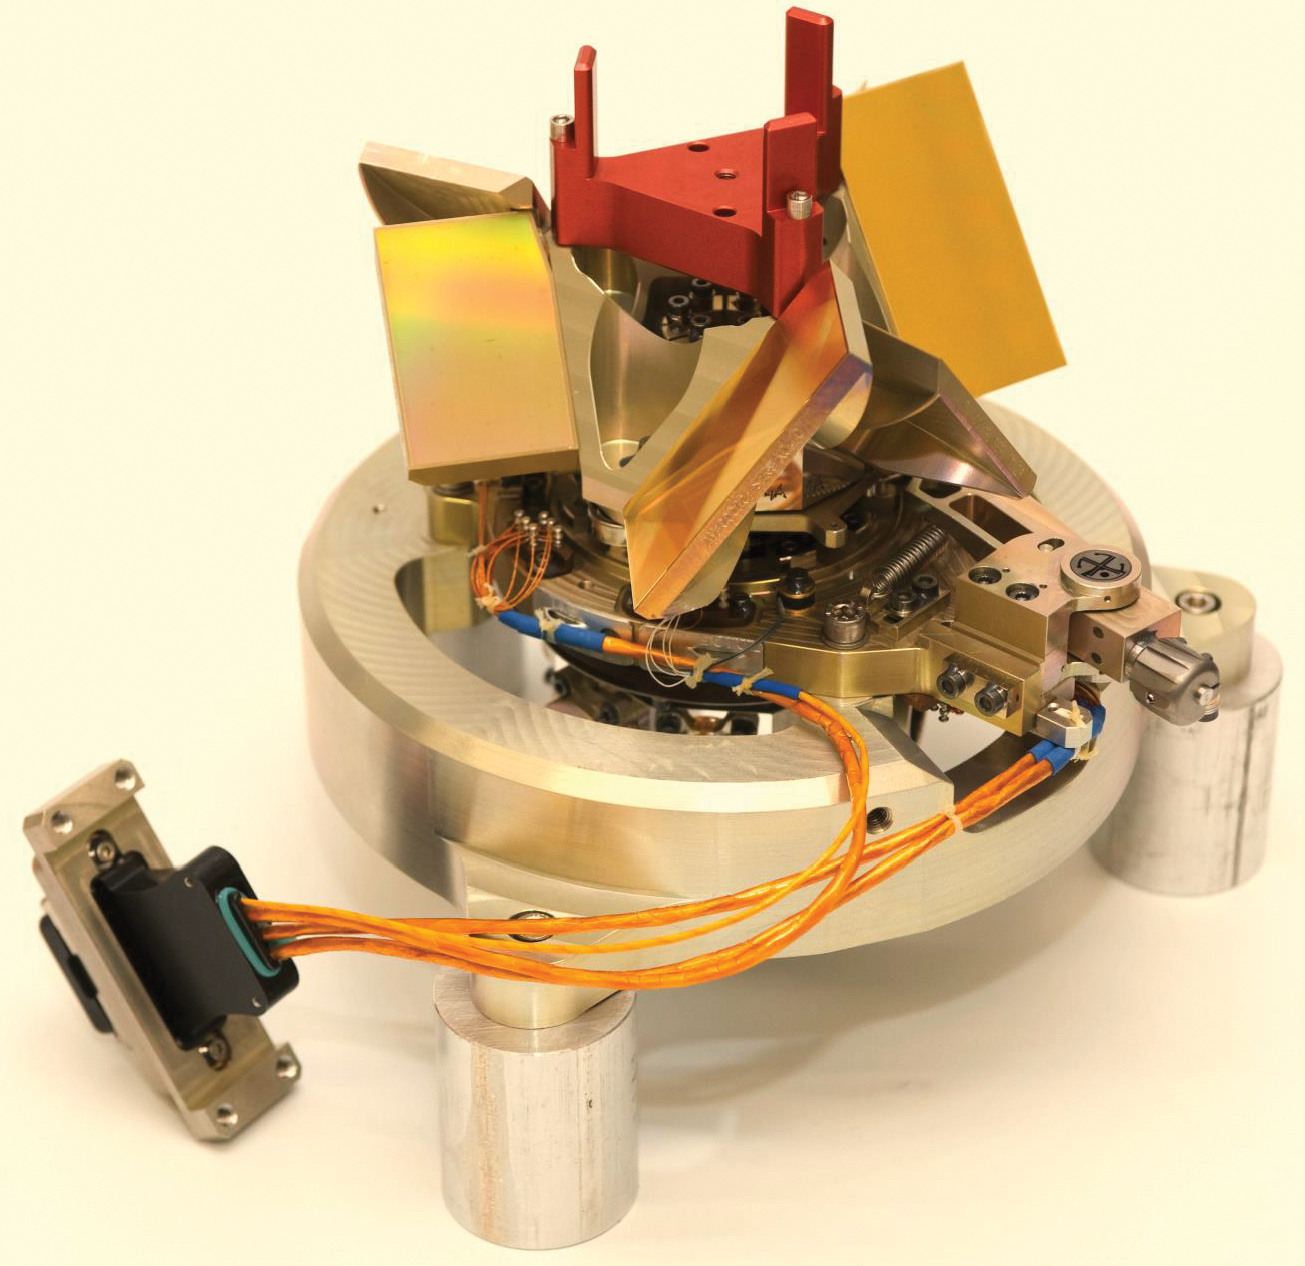
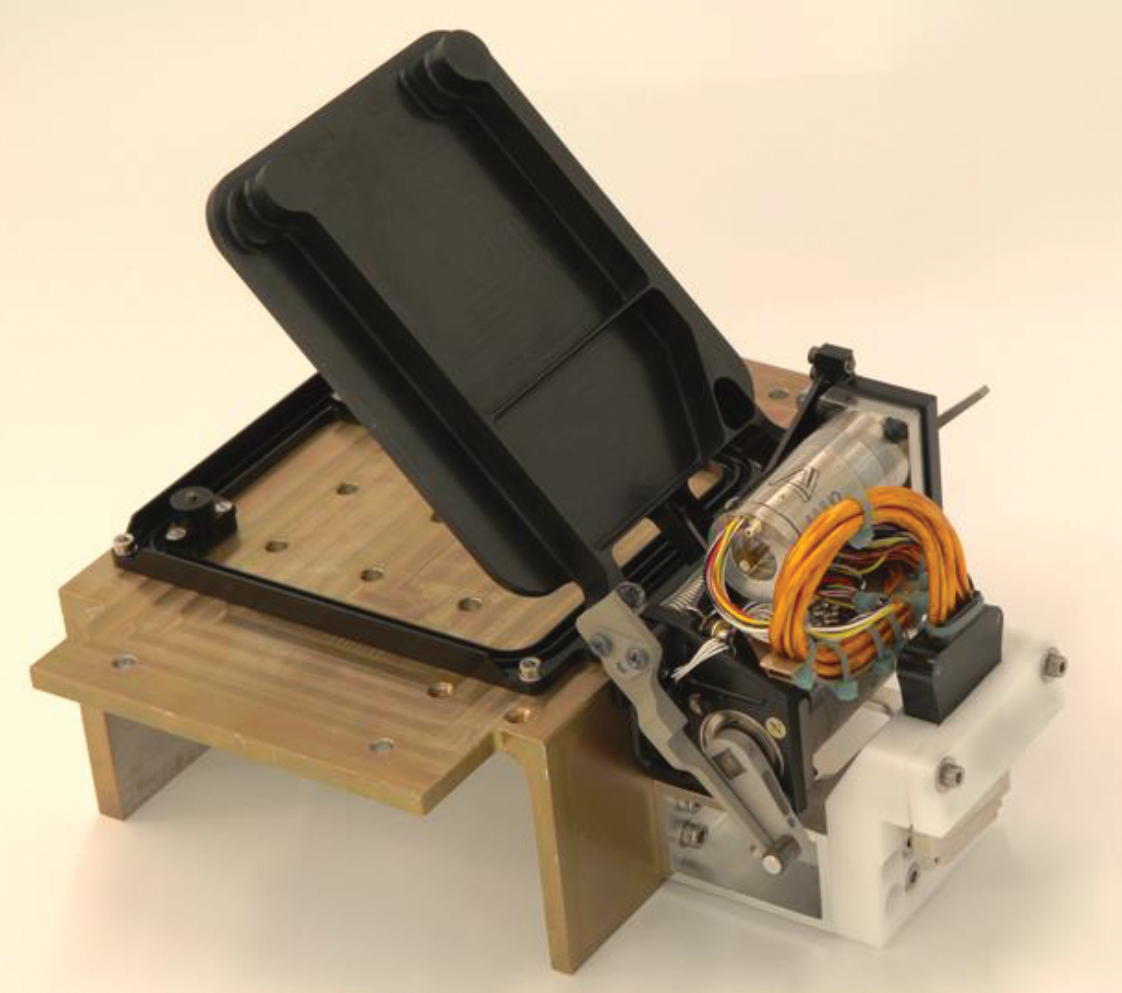
The MIRI Optical System contains four cryo-mechanisms: (1) an 18 position filter wheel assembly (FWA), mounted in the imager (see Figure 9); (2) two combined grating/dichroic wheels (DGA-A and DGA-B) with three positions each (see Figure 10) in the spectrometer; and (3) the contamination control cover (CCC) at the entrance of the optical path of the instrument (Figure 11).
The wheel and grating mechanisms lie at the heart of MIRI science operations. The filter wheel assembly is required to achieve a high positional accuracy and repeatability to enable precise alignment of the coronagraph pupil stop. The tight repeatability requirement for the dichroic-grating wheels is derived from the need to move a wheel to select a new wavelength range without recalibrating the wavelength scale.
The wheel and grating mechanisms are all based on the same principle: the wheel bodies are pivoted in a central combined bearing and retained in their optical position by a ratchet system. A brushless (and gearless) central torque motor is used to operate the wheel in an open loop drive. This requires only relatively simple but robust drive electronics. In addition it minimizes the number of harnesses from the warm electronics to the cryogenic part of the instrument and thus the conducted heat load. The chosen wheel design guarantees high precision and highly reliable positioning of the optical elements while using low driving power – in particular zero power during science operation – and therefore low heat injection into the cooled MIRI instrument (more details can be found in Krause et al. 2010).
Operating the wheels from one position to the next adjacent position takes 8 seconds in total. This includes 500 milli-seconds for motor acceleration and deceleration, 3 seconds of settling by the ratchet system and 4 seconds to complete a final position sensor readout to crosscheck that the correct position has been reached. The final positioning accuracies are 1 arcsec for the FWA and 3 arcsec for the DGAs.
Since no wheel angle feedback is available during the movement, the precise characterization of the mechanisms and their motors was fundamental to minimize heat load and maximize the reliability of the mechanism movements over their lifetime (Detre et al. 2012). This has been achieved and proven over several test campaigns.
The Contamination Control Cover (CCC, Glauser et al. 2008) is a door mechanism located in the Input Optics between the MIRI pick-off mirror and the first fold mirrors (see Figure 11). The CCC was introduced to protect the instrument against molecular contaminants outgassing from nearby structures after launch, during ISIM cool down, or during any ground based test campaign. With its contact-free labyrinth seal, the CCC also closes the instrument in an optical sense, blocking any stray-light. Since the CCC operates at the same temperature as the rest of the instrument, it is also suitable to provide a dark environment for internal calibration measurements.
The CCC uses two identical redundant stepper motors that lever the cover towards its open position, while two redundant springs push it towards the closed position. The qualification of this mechanism has shown that the design is highly robust and reliable (Glauser et al. 2008). The molecular throughput has also been measured (Glauser et al. 2009) and shows perfect agreement with theoretical predictions.
7 Electronic Systems
The MIRI electronic systems split functionally into the electronics for the MIRI Cooler System that is described in section 5.2 and the MIRI Optical System electronics.
The MIRI Cooler Control Electronics Assembly (CCEA) is a set of independent and dedicated electronics assemblies, which control and drive the Cooler Thermal Mechanical Unit’s (TMU) two compressor assemblies - Pulse Tube (PT) and Joule Thomson (JT). These are based on heritage designs currently in other space flight applications and are capable of highly accurate temperature control over the temperature range from 4K to 15K. The Cooler Control Electronics (CCE) are single-string, but redundant at the box level to enhance reliability and meet the lifetime requirement, and there is a set of primary and redundant JT and PT CCEs for each compressor. A third electronics assembly, the Relay Switch Assembly (RSA), provides the switch to allow the use of either set of cooler electronics to drive the single TMU assembly. The RSA contains latching relays and accepts a pulse command from the spacecraft to effect switching from primary to redundant CCEs, or visa versa. One key function of each JT and PT CCE assembly is to convert, condition, switch, and distribute incoming SC primary bus power, and furnish it in the correct form to drive the various elements of the compressor assembly. Each CCE provides closed-loop control of various compressor and cold head functions, monitors the status of key performance and safety parameters, and communicates with the ISIM Command & Data Handling system host via a MIL-STD-1553B bus. Generally these control functions involve both analog and digital circuitry and supporting internal software, which also provides automated fault protection.
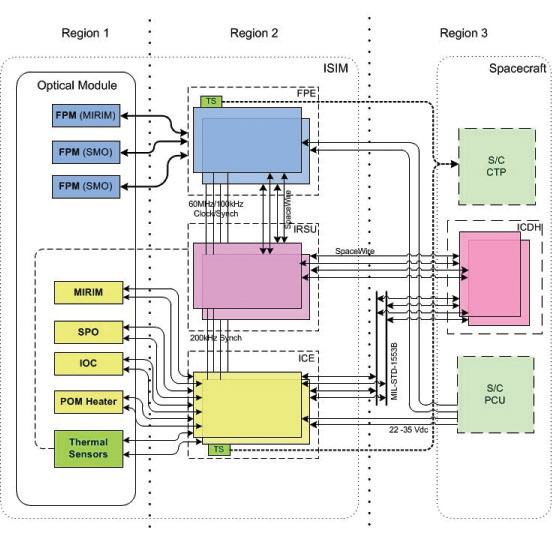
The MIRI Optical System electronical architecture is summarised in Figure 12. The operation of the instrument is controlled by the ISIM Control & Data Handling (ICDH) system via the two discrete electronic boxes; the Focal Plane Electronics (FPE) and the Instrument Control Electronics (ICE). The Spacecraft Power Conditioning Unit (PCU) supplies power directly to each of these units at a nominal voltage of 31V(DC). The FPE and ICE both operate at ambient temperatures ( 300K) and are mounted in a dedicated warm region of the ISIM referred to as the ISIM Electronics Compartment (IEC). In addition to the links to the ICDH there are eight spacecraft temperature monitoring sensors for when the instrument is switched off.
The Focal Plane System (FPS), comprising the detector, FPE and associated harness are described in detail in Paper VIII and so are not discussed further here.
The ICE controls the four mechanisms and two calibration sources discussed above, along with 15 temperature sensors and the decontamination heater. While the mechanisms, sources and sensors are mounted on the optical bench at 7 K, the ICE is maintained, along with other science instrument electronic boxes, in a separate section of the observatory at an operating temperature of 300 K. The wiring harness connecting the OM with the ICE uses phosphor bronze for wires with relatively high current ( 100 mA), whereas stainless steel is used for the low current sensor lines. The ICE has no internal processing capabilities and operates only via command from the JWST integrated science instrument module (ISIM) control and data handling module (ICDH).
The ICE is a fully redundant design with a modular architecture. It has two service modules; ‘DC/DC’ and ‘TM/TC & Scheduler’, and two application modules; ‘Motor control’ and ‘Conditioning.’ The modules are powered, interconnected and communicate via a back plane, which also allows for cross strapping of temperature sensors and non-redundant mechanism position sensors, to enable monitoring with either of the two redundant sides of the ICE.
The DC/DC module is responsible for the power supplies handling, accommodating the spacecraft primary power bus (an unregulated 22 to 35V power bus).
The TM/TC & Scheduler module interfaces with the ICDH via a 1553 bus and with the application modules via a proprietary media bus implemented on the back plane. As such, it receives telecommands, then translates and distributes these commands to the relevant application module. It also collects and formats telemetry data, which is then made available for the ICDH. Another function of this module is to drive the back plane relays to select the appropriate routing for the temperature and position sensors.
The Motor control module controls and monitors the drive currents and voltages for one (at a time) of the four MIRI mechanisms. The particular motor and voltage supply, (40 V nominal <10 K operation, 80 V room temperature operation) are selected in advance via relays; then the power amplifier controls the coil pair for the selected motor, activating the mechanism. To overcome an environmental failure case of the CCC sticking in the closed position, a special relay setting is available to allow the activation of the two CCC stepper motors at the same time, thereby doubling the opening torque.
The remaining control and monitoring functions of the ICE are provided by the Conditioning module. This module provides the current drive and control for the calibration sources and the decontamination heater. It monitors and provides telemetry data on the temperature and mechanism position sensors. Control of the DC/DC module, synchronisation, motor voltage selection and activation, is also provided in this module.
8 Controlling MIRI
The MIRI instrument relies on the ISIM to provide all command and control functions for the hardware. These services are provided by the ICDH, which consists of a single-board computer, some basic image processing modules, and several communications interfaces.
The communications links between the ICDH and the MIRI electronics boxes are shared with the other instruments. High-speed data links are provided to the MIRI focal plane electronics over a Spacewire bus, routed via the ISIM Remote Services Unit (IRSU). The ICE and CCE (Cryo-cooler Control Electronics) require relatively low data rates, and are linked via the ISIM 1553B bus. The ICDH has further links to the JWST observatory and spacecraft systems to allow it to receive commands, and to send science and engineering telemetry to the solid state recorder. Additionally the ISIM (and hence MIRI) receives all of its electrical power from the spacecraft.
The ISIM flight software (FSW) consists of multiple software modules, each of which has a distinct function. Generic services such as communications, timing and memory management are provided within the ‘core’ software, as these are required by all of the instruments. Each instrument has one or more dedicated modules for controlling its own functions, which were developed by the instrument teams. These modules use the services provided by the core ISIM software to communicate with the instrument hardware, and to send and receive information from the timeline or ground operator (via the spacecraft and observatory systems).
The MIRI software is split into two separate modules with distinct functions:
1. MIRI Optical System FSW:
-
•
Command and control the MIRI OBA hardware.
-
•
Operate the mechanisms, calibration sources and POM heater via the ICE.
-
•
Operate the detectors and their thermal control heaters via the focal plane electronics.
-
•
Monitor sensor data (e.g. temperatures) from the OBA.
-
•
Maintain OBA hardware safety during commanding of each item.
2. MIRI Cooler FSW:
-
•
Command and control the cooler system
-
•
Operate all cooler components via the CCE
-
•
Monitor sensor data (e.g. temperatures) from the cooler system
-
•
Maintain cooler hardware safety during operations.
MIRI can receive commands from the ground (via the spacecraft), or from on-board sources such as the science timeline or stored commanding (used for safety-critical actions). Early in-flight operations (such as instrument commissioning) and some regular engineering activities will be carried out by ground operators, normally by using ground scripts to send commands and to verify the telemetry.
Most in-flight MIRI operations will be conducted from the ISIM science timeline, and will be planned well in advance. The timeline will consist of a series of observations, each involving one or more instruments. The specification for each observation is translated on-board into a sequence of instrument and observatory operations (e.g. spacecraft pointings), while the MIRI commands are generated by dedicated on-board scripts for each observing mode. The science timeline execution system is capable of performing a sophisticated level of error checking, to ensure that constraints are enforced and that any errors reported by the instruments are handled appropriately.
Commands are processed in the same way irrespective of their origin, so that only a single interface is needed. Most MIRI commands are reasonably high level, and many of them correspond to individual instrument functions. For example:
-
•
Set cooler cold-head temperature (set-up the cooler in preparation for MIRI operations)
-
•
Move filter wheel (select the Imager filter required for an observation)
-
•
Switch on calibration source (in preparation for calibration measurements)
-
•
Start exposure (begin taking science data with the current detector settings)
The flight software modules are responsible for translating each command into appropriate instructions for the electronics boxes, and for ensuring that the commands are completed successfully. In addition to the high-level commands, there are lower-level commands to facilitate engineering operations and instrument troubleshooting. There are also many programmable options in the software that can be adjusted (e.g. operating temperature limits, time-outs etc.), so that any unexpected events during the mission can be dealt with as easily as possible. The flight software modules themselves can also be patched if necessary.
The MIRI and ISIM designs lead to various constraints and limitations on operations. Some of the more significant examples are listed below:
-
•
The three MIRI detectors can be operated individually or in parallel, but detector settings (e.g. bias voltages) cannot be altered while science exposures are in progress.
-
•
The MIRI mechanisms can only be operated individually (i.e. in a serial manner).
-
•
Read-out of virtually all engineering telemetry from the electronics occurs at a fixed cadence of 1 reading every 4 seconds. Sampling on a finer timescale is only possible for certain mechanism parameters or in engineering modes.
-
•
Science data read-out is not synchronised to engineering telemetry, and the start time of a science exposure cannot be controlled to better than the detector frame read-out time (typically about 3 s, but can range from ~0.1 s to ~27 s depending on the observing mode).
9 The Overall Test and Verification of the MIRI Optical System
The modular instrument design reduced risk for the flight model Assembly Integration and Verification (AIV) because it allowed a series of incremental qualification and performance verification tests to be performed at subsystem level. The three model approach (STM, VM, FM - structural/thermal, verification, and flight models respectively) proved to work well, with sufficient flexibility to accommodate problem solving throughout the programme. The main aims for the STM were to provide an early mechanical qualification of the Primary Structure, thermal model validation and to prove out the test facility prior to the VM test. The VM objective was to verify instrument optical performance at operating temperature sufficiently early to avoid major cost and schedule problems in the event of detected problems requiring extensive FM modifications. The VM testing was split into two campaigns, one to test the instrument optics with a very simple single point simulated JWST source and a second more extensive test using the MIRI Telescope Simulator, which also provided feedback to the design of the MTS and to the test plans and scripts for the Flight Model test campaign.
Following integration, the MIRI Flight Model was tested for 1600 hours during 2011 in the test chamber described in section 5.7 and in Shaughnessy & Eccleston 2009. This provided a background radiation environment that was a close analogue to the expected on-orbit environment, namely a near blackbody emission spectrum with an effective temperature of 40 K. This test campaign was therefore the best opportunity to measure the performance of MIRI prior to launch, especially in the areas of photometric calibration and straylight. Further, this test campaign was the only opportunity to study fully the spectral performance of the MRS before launch.
9.1 The MIRI Telescope Simulator
The MIRI Telescope Simulator (MTS) was the cryogenic optical system developed to generate the illumination sources for MIRI performance measurements. The MTS detailed design is described in Belenguer et al. (2008). In this section we summarise its major functions and describe the computational model (MTSSim) that was produced to predict its photometric output. At the heart of the MTS was a laboratory standard blackbody whose temperature could be selected in the range 100 K to 800 K. The collimated beam from this source passed through an adjustable iris diaphragm (to set the flux level), before reaching the MTS filter wheel. The wheel included a closed position to block the MTS hot source for background estimation; a clear position for broad band illumination; one long-wave pass filter and one short-wave pass filter for measurement of spectral leaks and four solid state Fabry-Perot etalons which provided a comb of spectral lines for the wavelength characterization and calibration of the MRS. The output beam from the filter wheel was then presented to an integrating sphere whose spatially uniform output was matched to the input of a Cassegrain telescope (the Main Optical System (MOS)). By inserting a pinhole (one of two mounted on a three axis moveable stage) at this input, the MOS was designed to reproduce the point spread function delivered by the JWST. The point sources could be moved to any point within the MIRI field of view with an absolute accuracy equivalent to 1 imager pixel, and a relative accuracy of better than 0.1 pixel for small displacements. With the pinhole mechanism driven out of the beam, flood illumination across the full MIRI entrance focal plane was obtained. An infrared LED source was included at the exit pupil of the MOS which could be scanned across one quadrant of the MIRI pupil to measure the relative centrations of the pupils associated with each of the MIRI optical sub-systems.
The absolute flux calibration of the MTS was determined by modelling its optical throughput. This throughput estimate was embodied in a computer simulation MTSSim, a program written in IDL to calculate the irradiance provided by the MTS at the MIRI input plane. MTSSim implemented a radiometric model of the MTS, with the hot source treated as a grey-body with an emissivity of 95%. No diffraction effects were considered, and the system losses were limited to those caused by non-unity transmittance of the optical elements, as determined from sub-system measurements. Crucial to the accuracy of the end-to-end transmission budget was the error in estimating the transmission of the integrating sphere, since this could only be determined by geometrical modelling. As discussed in Glasse et al. (2015) Paper IX, this uncertainty in the estimated efficiency of the MTS was regarded as consistent with the 55 % difference seen when using it as a flux standard for measuring the throughput of MIRI, as compared with measurements of MIRI’s sub-systems
9.2 Data Analysis
To provide a convenient reduction environment that was strictly configuration controlled and available to all of the international team, we developed the Data Handling and Analysis System (DHAS)(Morrison, 2011).
The DHAS was based on a C analysis section, with a flexible IDL user interface. It first converts the raw integration ramps to slopes, subtracting the dark signals and correcting for nonlinearity. It also incorporates the best known algorithms to correct non-ideal detector behaviour, such as the reset anomaly (commonly seen in infrared arrays; the first samples after a reset are offset from the rest) (see Paper VIII for more discussion of non-ideal array behaviour). It provides functions to display the resulting images and manipulate them, and also to organize the output of the MRS into a data cube
The DHAS essentially implements the prototype for a MIRI data reduction pipeline. In addition to the continued use for instrument test data (e.g., at ISIM level), it is also being used to test and validate algorithms for the more sophisticated data reduction pipeline under development at STScI. The DHAS is also the means by which ongoing experiments on latent images, subarrays, annealing optimization, and other aspects of MIRI operations are evaluated.
10 Summary
We have given a system level description of how MIRI provides its four key measurement functions to support a broad variety of JWST science objectives over the 5 to 28.5 m spectral range. Details of these functions are described in Bouchet et al. (2015), Kendrew et al., (2015), Boccaletti et al. (2015) and Wells et al. (2015), but all share a common architecture described in this paper. Opto-mechanical subsystems are mounted to an iso-thermal structure which is thermally isolated from the JWST observatory and maintained at its operating temperature by a dedicated cooling system. These subsystems interface with the focal planes that are described in Ressler et al., (2015) and Rieke et al. (2015). The MIRI Cooler, electrical system design, mechanisms and control software have been presented. We have shown how the delivered instrument has balanced the conflicting needs of thermal isolation against those of stiffness under the mechanical loads experienced during launch, low electrical power dissipation and limited mass and volume.
The control of molecular contamination is seen to be an important consideration for an instrument which will be at a significantly lower temperature than the rest of the observatory. The combination of a closeable cover and decontamination heaters are designed to allow scientific performance to be maintained throughout the JWST mission. The provision of on-board calibration sources complements this approach to contamination control by allowing all major radiometric functions of the instrument to be measured accurately and repeatably without recourse to any external support equipment.
Flight Model testing of the integrated Optical System before and after delivery to NASA has demonstrated it to meet its key mechanical, thermal and optical requirements. The success of the adopted approach for achieving the required alignment at cryogenic temperatures by designing and testing at ambient and cryogenic temperatures is notable. The timely and successful delivery to NASA was enabled by the inherent flexibility in the programme that was provided by our coupling a modular approach to the build and test of subsystems with the choice of a 3 model (STM, VM, FM) system level solution for the integrated construction, qualification and verfication of the instrument performance.
11 Acknowledgements
The work presented is the effort of the entire MIRI team and the enthusiasm within the MIRI partnership is a significant factor in its success. MIRI draws on the scientific and technical expertise of the following organisations: Ames Research Center, USA; Airbus Defence and Space, UK; CEA-Irfu, Saclay, France; Centre Spatial de Liége, Belgium; Consejo Superior de Investigaciones Científicas, Spain; Carl Zeiss Optronics, Germany; Chalmers University of Technology, Sweden; Danish Space Research Institute, Denmark; Dublin Institute for Advanced Studies, Ireland; European Space Agency, Netherlands; ETCA, Belgium; ETH Zurich, Switzerland; Goddard Space Flight Center, USA; Institute d’Astrophysique Spatiale, France; Instituto Nacional de Técnica Aeroespacial, Spain; Institute for Astronomy, Edinburgh, UK; Jet Propulsion Laboratory, USA; Laboratoire d’Astrophysique de Marseille (LAM), France; Leiden University, Netherlands; Lockheed Advanced Technology Center (USA); NOVA Opt-IR group at Dwingeloo, Netherlands; Northrop Grumman, USA; Max-Planck Institut fűr Astronomie (MPIA), Heidelberg, Germany; Laboratoire d’Etudes Spatiales et d’Instrumentation en Astrophysique (LESIA), France; Paul Scherrer Institut, Switzerland; Raytheon Vision Systems, USA; RUAG Aerospace, Switzerland; Rutherford Appleton Laboratory (RAL Space), UK; Space Telescope Science Institute, USA; Toegepast-Natuurwetenschappelijk Onderzoek (TNO-TPD), Netherlands; UK Astronomy Technology Centre, UK; University College London, UK; University of Amsterdam, Netherlands; University of Arizona, USA; University of Bern, Switzerland; University of Cardiff, UK; University of Cologne, Germany; University of Ghent; University of Groningen, Netherlands; University of Leicester, UK; University of Leuven, Belgium; University of Stockholm, Sweden; Utah State University, USA. A portion of this work was carried out at the Jet Propulsion Laboratory, California Institute of Technology, under a contract with the National Aeronautics and Space Administration.
We would like to thank the following National and International Funding Agencies for their support of the MIRI development: NASA; ESA; Belgian Science Policy Office; Centre Nationale D’Etudes Spatiales (CNES); Danish National Space Centre; Deutsches Zentrum fur Luft-und Raumfahrt (DLR); Enterprise Ireland; Ministerio De Economiá y Competividad; Netherlands Research School for Astronomy (NOVA); Netherlands Organisation for Scientific Research (NWO); Science and Technology Facilities Council; Swiss Space Office; Swedish National Space Board; UK Space Agency.
We take this opportunity to thank the ESA JWST Project team and the NASA Goddard ISIM team for their capable technical support in the development of MIRI, its delivery and successful integration.
We are grateful for the comments of the external referee which helped us to improve the clarity of high level description of the instrument in this paper.
References
- Banks et al. (2008) Banks, Kimberly, Larson, Melora, Aymergen Cagatay, & Zhang, Burt 2008, Proc. SPIE, 7017, 8
- Belenguer et al. (2008) Belenguer, T. Alcacera, M.A. Aricha, A. Balado, A., Barandiarán, J. Bernardo, A. Canchal, M.R. Colombo, M. Diaz, E. Eiriz, V. Figueroa, I. García, G. Giménez, A. González, L. Herrada, F. Jiménez, A. López, R. Menéndez, M. Reina, M. Rodríguez, J.A. Sánchez, A.2008, Proc. SPIE 7010, Space Telescopes and Instrumentation 2008: Optical, Infrared, and Millimeter, 701039
- Bouchet et al. (2015) Bouchet, P., et al., 2015, PASP, this volume, Paper III
- Boccaletti et al. (2015) Boccaletti. A., et al., 2015, PASP, this volume, Paper V
- Detre et al. (2012) Detre, Ö., Grözinger, U., Krause, O., et al., 2012, ‘The JWST MIRI FM wheel mechanisms characterisation for open loop drive’, SPIE 8450, 1Z
- Glasse A.C.H et al. (2006) Glasse, A., Lee, D., Parr-Burman, P., Hayton, D, & Mazy, E. 2006, SPIE, 6265, 100
- Glasse, A.C.H., et al. (2015) PASP, this volume, Paper IX
- Glauser et al. (2008) Glauser, A.M. et al., 2008. ‘A contamination control cover for the Mid Infrared Instrument of the James Webb Space Telescope.’, SPIE, Advanced Optical and Mechanical Technologies in Telescopes and Instrumentation. Edited by Atad-Ettedgui, Eli; Lemke, Dietrich. Proceedings of the SPIE, Volume 7018, article id. 70184L, 8 pp. (2008).
- Glauser et al. (2009) Glauser, A.M., Langer, U. & Zehnder, A., 2009. ‘Molecular conductance of a contact-free labyrinth seal used for the contamination control of a cryogenic space instrument. Measurement Science and Technology’, 20, p.5701.
- Jessen et al. (2004) Jessen, N.C., et al., 2004, ‘The CFRP Primary Structure Onboard the James Webb Space Telescope.’, Proc. SPIE5495, Astronmical Structures and Mechanisms Technology, 23
- Kendrew et al. (2015) Kendrew. S., et al., 2015, PASP, this volume, Paper IV
- Krause et al. (2010) Krause, O., Müller, F., Birkmann, S., et al., 2010), ‘High-precision cryogenic wheel mechanisms of the JWST/ MIRI instrument: performance of the fight models’, SPIE 7739, 37
- McCluney (1994) McCluney, W.R., 1994, ”Introduction to Radiometry and Photometry”, Ed. Artech House.
- Morrison (2011) Morrison, J. 2011, ”The data handling and analysis software for the Mid-Infrared Instrument (MIRI) on JWST”, ASP Conf. Prof., 442, 399
- Radebaugh (2000) Radebaugh, Ray 2000, SPIE, 4130, 363
- Rieke et al. (2015) Rieke, et al., 2015, PASP, this volume, Paper I
- Rieke et al. (2015) Rieke, et al., 2015, PASP, this volume, Paper VII
- Ressler et al. (2015) Ressler, et al., 2015, PASP, this volume, Paper VIII
- Ross (2004) Ross, R. G. Jr. 2004, ”A Study of the Use of 6K ACTDP Cryocoolers for the MIRI Instrument on JWST,” in Cryocoolers 13, ed. R. G. Ross, Springer; New York, p. 15.
- Scharton (1997) Scharton, T.D., 1997, ‘Force Limited Vibration Testing Monograph.’ NASA RP-1403.
- Shaughnessy et al. (2007) Shaughnessy B.M., Eccleston P., Fereday K. J., Canfer S. J., Nørgaard-Nielsen H.U., and Jessen N.C., 2007, ‘Thermal Conductivity Measurement Below 40 K of the CFRP Tubes for the Mid-Infrared Instrument mounting struts’, Cryogenics, Vol. 47, pp. 348-352.
- Shaughnessy & Eccleston (2009) Shaughnessy B. M., and Eccleston P., “Cryogenic Thermal Testing of the Verification Model Mid-Infrared Instrument (MIRI) Optics Module”, 2009, 39th International Conference on Environmental Systems (ICES), Savannah, SAE Technical Paper 2009-01-2410.
- Spradley et al. (1990) Spradley, I. E., Nast, T. C., & Frank, D. J. 1990, Adv. Cryo. Eng., 35, 477
- Sykes et al. (2012) Sykes, J., Eccleston, P.,& Laine. B. ”Qualification of the JWST MIRI Instrument Using Force Limited Vibration”, 2012, 12th European Conference on Spacecraft Structures, Materials & Environmental Testing, EUROPEAN SPACE AGENCE PUBLICATIONS ESA SP, 691; 159
- Wells et al. (2015) Wells. M., et al., 2015, PASP, this volume, Paper VI
| Parameter | Value |
|---|---|
| Initial mass budget for the OB | 103kg |
| Minimum eigenfrequency | 50 Hz |
| Design load (including qualification margin) | 18g |
| Temperature delta across struts | 7K - 35K |
| Maximum heat flow across struts | 6mW for 6 struts |
| Hexapod mass budget | 5kg |
| Total primary structure mass budget | 18kg |
| Component | Calculated Heatload (mW) |
|---|---|
| Conducted | |
| CFRP Hexapod | 7.6 |
| SLI on Hexapod | 3.7 |
| Purge Pipe | 0.7 |
| Harness | 5.8 |
| Radiative | |
| ISIM to OM | 4.7 |
| Shield to OM | 0.8 |
