Optimal self-assembly of finite shapes at temperature 1 in 3D
Abstract
Working in a three-dimensional variant of Winfree’s abstract Tile Assembly Model, we show that, for an arbitrary finite, connected shape , there is a tile set that uniquely self-assembles into a 3D representation of at temperature 1 in 3D with optimal program-size complexity (the program-size complexity, also known as tile complexity, of a shape is the minimum number of tile types required to uniquely self-assemble it). Moreover, our construction is “just barely” 3D in the sense that it only places tiles in the and planes. Our result is essentially a just-barely 3D temperature 1 simulation of a similar 2D temperature 2 result by Soloveichik and Winfree (SICOMP 2007).
1 Introduction
Self-assembly is intuitively defined as the process through which simple, unorganized components spontaneously combine, according to local interaction rules, to form some kind of organized final structure. While examples of self-assembly in nature are abundant, Seeman [22] was the first to demonstrate the feasibility of self-assembling man-made DNA tile molecules. Since then, self-assembly researchers have used principles from DNA tile self-assembly to self-assemble a wide variety of nanoscale structures, such as regular arrays [26], fractal structures [20, 9], smiling faces [19], DNA tweezers [27], logic circuits [16], neural networks [17], and molecular robots[12]. What is more, over roughly the past decade, researchers have dramatically reducing the tile placement error rate (the percentage of incorrect tile placements) for DNA tile self-assembly from 10% to 0.05% [20, 9, 2, 8].
In 1998, Winfree [25] introduced the abstract Tile Assembly Model (aTAM) as an over-simplified, combinatorial, error-free model of experimental DNA tile self-assembly. The aTAM is a constructive version of mathematical Wang tiling [24] in that the former bestows upon the latter a mechanism for sequential “growth” of a tile assembly starting from an initial seed. Very briefly, in the aTAM, the fundamental components are un-rotatable, translatable square “tile types” whose sides are labeled with (alpha-numeric) glue “colors” and (integer) “strengths”. Two tiles that are placed next to each other bind if both the glue colors and the strengths on their abutting sides match and the sum of their matching strengths sum to at least a certain (integer) “temperature”. Self-assembly starts from a “seed” tile type, typically assumed to be placed at the origin, and proceeds nondeterministically and asynchronously as tiles bind to the seed-containing assembly one at a time. In this paper, we work in a three-dimensional variant of the aTAM in which tile types are unit cubes and tiles are placed in a non-cooperative manner.
Tile self-assembly in which tiles may bind to an existing assembly in a non-cooperative fashion is often referred to as “temperature 1 self-assembly” or simply “non-cooperative self-assembly”. In this type of self-assembly, a tile may non-cooperatively bind to an assembly via (at least) one of its sides, unlike in cooperative self-assembly, in which some tiles may be required to bind on two or more sides. It is worth noting that cooperative self-assembly leads to highly non-trivial theoretical behavior, e.g., Turing universality [25] and the efficient self-assembly of squares [1, 18] and other algorithmically specified shapes [23].
Despite its theoretical algorithmic capabilities, when cooperative self-assembly is implemented using DNA tiles in the laboratory [20, 2, 21, 14, 26], tiles may (and do) erroneously bind in a non-cooperative fashion, which usually results in the production of undesired final structures. In order to completely avoid the erroneous effects of tiles unexpectedly binding in a non-cooperative fashion, the experimenter should only build nanoscale structures using constructions that are guaranteed to work correctly in non-cooperative self-assembly. Thus, characterizing the theoretical power of non-cooperative self-assembly has significant practical implications.
Although no characterization of the power of non-cooperative self-assembly exists at the time of this writing, Doty, Patitz and Summers conjecture [7] that 2D non-cooperative self-assembly is weaker than 2D cooperative self-assembly because a certain technical condition, known as “pumpability”, is true for any 2D non-cooperative tile set. If the pumpability conjecture is true, then non-cooperative 2D self-assembly can only produce simple, highly-regular shapes and patterns, which are too simple and regular to be the result of complex computation.
In addition to the pumpability conjecture, there are a number of results that study the suspected weakness of non-cooperative self-assembly. For example, Rothemund and Winfree [18] proved that, if the final assembly must be fully connected, then the minimum number of unique tile types required to self-assemble an square (i.e., its tile complexity) is exactly . Manuch, Stacho and Stoll [13] showed that the previous tile complexity is also true when the final assembly cannot contain even any glue mismatches. Moreover, at the time of this writing, the only way in which non-cooperative self-assembly has been shown to be unconditionally weaker than cooperative self-assembly is in the sense of intrinsic universality [5, 6]. First, Doty, Lutz, Patitz, Schweller, Summers and Woods [5] proved the existence of a universal cooperative tile set that can be programmed to simulate the behavior of any tile set (i.e., the aTAM is intrinsically universal for itself). Then, Meunier, Patitz, Summers, Theyssier, Winslow and Woods [15] showed, via a combinatorial argument, that there is no universal non-cooperative tile set that can be programmed to simulate the behavior of an arbitrary (cooperative) tile set. Thus, in the sense of intrinsic universality, non-cooperative self-assembly is strictly weaker than cooperative self-assembly.
While non-cooperative self-assembly is suspected of being strictly weaker than cooperative self-assembly, in general, it is interesting to note that 3D non-cooperative self-assembly (where the tile types are unit cubes) and 2D cooperative self-assembly share similar capabilities. For instance, Cook, Fu and Schweller [3] proved that it is possible to deterministically simulate an arbitrary Turing machine using non-cooperative self-assembly, even if tiles are only allowed to be placed in the and planes (Winfree [25] proved this for the 2D aTAM). Cook, Fu and Schweller [3] also proved that it is possible to deterministically self-assemble an 3D “square” shape using non-cooperative self-assembly with tile complexity (Rothemund and Winfree [18] proved this for the 2D aTAM). Furcy, Micka and Summers [10] reduced the tile complexity of deterministically assembling an square in 3D non-cooperative self-assembly to (Adleman, Cheng, Goel and Huang [1] proved this for the 2D aTAM), which is optimal for all algorithmically random values of . Given that it is possible to optimally self-assemble an square in 3D using non-cooperative self-assembly, the following is a natural question: Is it possible to self-assemble an arbitrary finite shape in 3D using non-cooperative self-assembly with optimal tile complexity?
Note that the previous question was answered affirmatively by Soloveichik and Winfree [23] for the 2D aTAM, assuming the shape of the final assembly can be a scaled-up version of the input shape (i.e., each point in the input shape is replaced by a block of points, where is the scaling factor). Specifically, Soloveichik and Winfree gave a construction that takes as input an algorithmic description of an arbitrary finite, connected shape and outputs a cooperative (temperature 2) tile set that deterministically self-assembles into a scaled-up version of and , where is the size of (i.e., number of bits needed to describe) the Turing machine , which outputs the list of points in . In the main result of this paper, using a combination of 3D, temperature 1 self-assembly techniques from Furcy, Micka and Summers [10] and Cook, Fu and Schweller [3], we show how the optimal construction of Soloveichik and Winfree can be simulated in 3D using non-cooperative self-assembly with optimal tile complexity. Thus, our main result represents a Turing-universal way of guiding the self-assembly of a scaled-up, just-barely 3D version of an arbitrary finite shape at temperature 1 with optimal tile complexity.
2 Definitions
In this section, we give a brief sketch of a -dimensional version of the aTAM along with some definitions of scaled finite shapes and the complexities thereof.
2.1 3D abstract Tile Assembly Model
Let be an alphabet. A -dimensional tile type is a tuple , e.g., a unit cube with six sides listed in some standardized order, each side having a glue consisting of a finite string label and a non-negative integer strength. In this paper, all glues have strength . There is a finite set of -dimensional tile types but an infinite number of copies of each tile type, with each copy being referred to as a tile.
A -dimensional assembly is a positioning of tiles on the integer lattice and is described formally as a partial function . Two adjacent tiles in an assembly bind if the glue labels on their abutting sides are equal and have positive strength. Each assembly induces a binding graph, i.e., a “grid graph” (sometimes called the adjacency graph) whose vertices are (positions of) tiles and whose edges connect any two vertices whose corresponding tiles bind. If is an integer, we say that an assembly is -stable if every cut of its binding graph has strength at least , where the strength of a cut is the sum of all of the individual glue strengths in the cut.
A -dimensional tile assembly system (TAS) is a triple , where is a finite set of tile types, is a finite, -stable seed assembly, and is the temperature. In this paper, we assume that and . An assembly is producible if either or if is a producible assembly and can be obtained from by the stable binding of a single tile. In this case we write (to mean is producible from by the binding of one tile), and we write if (to mean is producible from by the binding of zero or more tiles). When is clear from context, we may write and instead. We let denote the set of producible assemblies of . An assembly is terminal if no tile can be -stably bound to it. We let denote the set of producible, terminal assemblies of .
A TAS is directed if . Hence, although a directed system may be nondeterministic in terms of the order of tile placements, it is deterministic in the sense that exactly one terminal assembly is producible. For a set , we say that is uniquely produced if there is a directed TAS , with , and .
2.2 Complexities of (scaled) finite shapes
The following definitions are based on the definitions found in [23]. We include these definitions for the sake of completeness.
A coordinated shape is a finite set such that is connected, i.e., the grid graph induced by is connected. For some , we say that a -scaling of , denoted as , is the set . Intuitively, is the coordinated shape obtained by taking and replacing each point in with a block of points. Here, the constant is known as the scale factor (or resolution loss). Note that a -scaling of an actual shape is itself a coordinated shape.
Let and be two coordinated shapes. We say that and are scale-equivalent if , for some . We say that and are translation-equivalent if they are equal up to translation. We write if is translation-equivalent to , for some . Note that the three previously defined relations are all equivalence relations (see the appendix of [23]). We will use the notation to denote the equivalence class containing under the equivalence relation . We say that is the shape of . While is technically a set of coordinate shapes, we will abuse the notation and say that it represents the size of coordinate shape , i.e., .
We will now define the tile complexity of a 3D shape. However, we will first briefly define Kolmogorov complexity of a binary string , relative to a universal Turing machine . We say that the Kolmogorov complexity of relative to is , where, for any Turing machine , denotes the number of bits used to describe , with respect to some fixed encoding scheme. In other words, is the smallest program that outputs (see [11] for a comprehensive discussion of Kolmogorov complexity).
Relative to a fixed universal Turing machine , we say that the Kolmogorov complexity of a shape is the size of the smallest program that outputs some as a list of locations, i.e., . Beyond this point, we will assume is a fixed universal Turing machine and therefore will be omitted from our notation.
The 3D tile complexity at temperature (often referred to as program-size complexity) of a shape at temperature is
3 Main theorem
The main theorem of this paper describes the relationship between the quantities and . This relationship is formally stated in Theorem 3.1. Note that the main result of [23] describes the relationship between and , where (see [23]) is the tile complexity of the 2D shape at temperature 2. In this section, assume that is an arbitrary finite shape.
Theorem 3.1.
The following hold:
-
1.
-
2.
Lemma 3.1.
.
Proof.
Soloveichik and Winfree [23] showed that , which still holds when is replaced with , for any . ∎
The main contribution of this paper is the following lemma, the proof of which mimics the proof of from [23]. We give the details of the proof here for the sake of completeness.
Lemma 3.2.
.
Proof.
Let be a program (Turing machine) that outputs a list of points contained in some coordinated shape . We develop a temperature 1 3D construction that takes as input and outputs a TAS such that uniquely produces an assembly whose domain is some shape and . This construction is discussed in Section 4.
Now suppose that is the smallest Turing machine that outputs the list of points in some coordinated shape . In other words, is such that . Let be the TAS produced by our construction, when given as input. Observe that, for any TAS in which the shape uniquely self-assembles, we have . Then, for some constant , the following is true:
Thus, . ∎
4 Main construction
In this section, we give an overview of our main construction. Full details can be found in Sections 6 and 7.
4.1 Setup
Our construction represents a Turing-universal way of guiding the self-assembly of a scaled-up, just-barely 3D version of an arbitrary input shape at temperature 1 with optimal tile complexity. Therefore, we let be a fixed universal Turing machine over a binary alphabet, with a one-way infinite tape (to the right), such that, upon termination, contains the output – and only the output – of the Turing machine being simulated on its tape, perhaps padded to the left and right with bits (the tape alphabet symbol ) and the tape head is reading the last bit of its output. We also assume that, to the left of the leftmost tape cell, there is a special left marker symbol #, which can be read by but can neither be overwritten nor written elsewhere on the tape. In general, if is a Turing machine and is an input string such that , then, upon termination, leaves exactly a string of the form on its tape with its tape head reading the last bit of (# is eventually converted to a 0 bit). Our construction is programmed by specifying the program to be executed by .


The input to is a program , appropriately encoded as , using some fixed encoding scheme. The output of is used to guide the self-assembly of our construction. We assume is actually the concatenation of two programs and , where , the input to our construction, is a program that outputs the list of points in and is a fixed program (independent of ) that uses the output of as its input and builds a special Hamiltonian cycle of , along which there are three consecutive, collinear points. The seed block, which is described in the next subsection, is defined as the middle point of an arbitrarily chosen triplet of consecutive, collinear points of (by the way we construct , there is always at least one such triplet of points). We further assume that outputs – and only – as a sequence of pairs of bits, such that, , , and correspond to “no-move”, “left”, “right” and “straight”, respectively and possibly padded to the left with at least two no-moves and to the right with an even number of no-moves (see Figure 1 for an overview of how is constructed). Thus, satisfies .
4.2 Seed block
The (upper portion of what will eventually become the) seed block of our construction grows from a single seed tile and carries out the following three logical phases: decoding, simulation and output. These three phases are depicted in Figure 2 with vertical, zig-zag and diagonal patterns, respectively.

Decoding. The first phase is the decoding phase. In the decoding phase, the bits of are decoded from a -bits-per-tile representation to a -bit-per-tile representation (actually, we end up with a -bit-per-gadget representation, which is sufficient to maintain the optimality of our construction). To accomplish this, we use the 3D, temperature 1 optimal encoding scheme of Furcy, Micka and Summers [10]. When the decoding phase completes, the decoded bits of are advertised in a one-bit-per-gadget representation along the top of the optimal encoding region (the rectangle with the vertical lines in Figure 2).
Simulation. Once the bits of are decoded, the simulation phase begins. In this phase, is simulated on using a specialized temperature 1, just-barely 3D Turing machine simulation (the region with the zig-zag pattern in Figure 2). Our specialized Turing machine simulation, which is described in detail in Section 6, assumes an input Turing machine with (1) a binary alphabet, (2) a one-way infinite tape (to the right), the leftmost tape cell of which contains a special left marker symbol #, which can be read by but can neither be overwritten nor written elsewhere on the tape. We simulate in a zig-zag fashion, similar to the temperature 1, just-barely 3D Turing machine simulation by Cook, Fu and Schweller [3]. However, unlike that of Cook, Fu and Schweller, our simulation represents the contents of each tape cell of using a six-tile-wide gadget. This gives a more compact geometric representation of the output of and, as a result, simplifies the construction of the growth blocks (see Section 4.3).
By the definition of and and because of the compact geometry of our simulation of on , the output of the simulation phase, i.e., , is an even number of geometrically-encoded bits (each bit is represented by a six-tile-wide bit-bump gadget), possibly padded to the left and right with an even number of bits, such that each pair of bits corresponds to a move in the Hamiltonian cycle (not counting occurrences of the pair , which represents a no-move).
Output. In order to satisfy certain geometric constraints, which are required by the growth blocks, after the simulation phase of on is complete, the (final) output phase begins. In the output phase, we use a special, constant-size tile set to shift the geometrically-encoded bits of to the right, so that the bits of are in a right-justified position along the top of the seed block (the region with diagonal lines in Figure 2). For each right-shift, we add a pair of bits to the left, which ensures that the upper portion of the seed block will be wider than it is taller. After the output phase of the seed block, self-assembly of the first growth block, which is always to the north in our construction, as guaranteed by , begins from the left side of the top of the upper portion of the seed block (see the upward-pointing arrow in Figure 2).
Scale factor. Let and be the maximum horizontal and vertical extent, respectively, of the seed block after the decoding phase (the rectangle with vertical lines pattern in Figure 2) completes. From [10], we know that . Next, in the simulation phase, the tape grows to the right by two tape cells for each transition. Each transition is comprised of two rows of gadgets, which are wider than they are tall (six tiles versus four tiles). Also, we may assume that, during the simulation phase, is programmed to initially scan the input from left-to-right and then from right-to-left before beginning. Let and be the maximum horizontal and vertical extent, respectively, of the seed block after the simulation phase (the zig-zag pattern in Figure 2) completes. Then we have . Finally, in the output phase, as the output bits of the simulation phase are shifted to the right, two tape cells are added to the left for each shift. Each shift is comprised of two rows of gadgets, which, like the simulation gadgets, are wider than they are tall (six versus four). Therefore, let and be the maximum horizontal and vertical extent, respectively, of the seed block after the simulation phase (the diagonal pattern in Figure 2) completes. Then we have . From this we may conclude that the seed block, once completely filled in by the last growth block (see Figure 5a) will be a square. The scale factor of our construction is .
4.3 Growth blocks

Each growth block has a single input side, which reads the remaining moves in the Hamiltonian cycle and a single output side, which advertises the same remaining path but with its first move erased. This first move determines the position of the output side in relation to the input side. In this section, we assume that the input side of the growth block is its south side (the construction simply needs to be rotated for the three other possible positions of the input side). So, if the first (erased) move in the remaining path is a right turn, then the output side of the growth block is its east side. We describe the construction for this case here (see Figure 4). The “left turn” and “straight move” cases are described in Section 7. The overview figure for the growth blocks uses gadgets whose structure is explained in Figure 3. The constructions of the individual gadgets are described in the appendix.

The growth block starts assembling in its southwest corner and progresses in a zig-zag pattern. The first row of gadgets, moving from left to right, starts by copying all of the leading no-moves, of which there are exactly two in Figure 4 but generally many more. Once the first actual move is found, a set of gadgets specific to its type is activated. In the case of a right turn, all of the moves are shifted by one position to the right (and the first move is replaced by a no-move). The last move in the remaining path is advertised at the bottom of the output (or east) side of the block. Then the construction switches direction and moves from right to left, simply copying the shifted path, which completes the first iteration. In each subsequent iteration, the left-to-right pass shifts the whole path to the right by one position and advertises one more move on the output (or east) side. In addition to the right shift, each zig-zag iteration moves a diagonal marker by one position to the right, starting from the southwest corner. Once this diagonal marker reaches the east side of the block, the top row, moving from right to left, can complete the block. Note that in this case, the remaining path is not advertised on the west nor the north sides. If the first move in the remaining path were a straight move, the remaining moves would not be shifted but simply copied at each iteration and eventually advertised on the north side of the block. If the first move in the remaining path were a left turn, then the remaining moves would be shifted to the left and advertised on the west side instead. In other words, for a straight move, Figure 4 would have smooth east and west sides, with bit-bumps along its north side and for a left move, Figure 4 would have smooth east and north sides, with bit-bumps along its west side. Section 7 describes these two cases.
4.4 Putting it all together


After the final growth block completes, the remaining portion of the seed block, i.e., its lower portion, is assembled. Note that, up until this point, the seed block is not a square. However, the horizontal extent of the upper portion of the seed block defines the scale factor of our construction. This scale factor is dominated by running time of on , which is the sum of the running times of and . The final growth block fills in the remaining portion of the seed block by initiating the assembly of a sequence of single-tile-wide, vertically and uncontrollably assembling paths that are inhibited only by existing portions of the seed block (see the explosion icons in Figure 5a). Thus, the final, uniquely-produced terminal assembly of our construction is an assembly made up of blocks of tiles, where each block is mapped to some point in . Figure 5 gives a high-level overview of how all of the major components of our construction work together.
5 Conclusion
In this paper, we develop a Turing-universal way of guiding the self-assembly of a scaled-up, just-barely 3D version of an arbitrary input shape at temperature 1 with optimal tile complexity. This result is essentially a just-barely 3D temperature 1 simulation of a similar 2D temperature 2 result by Soloveichik and Winfree [23]. One possibility for future research is to resolve the tile complexity of an arbitrary shape at temperature 1 in 2D, i.e., what is the quantity ?
Acknowledgement
We thank Matthew Patitz for offering helpful improvements to the presentation of our main construction.
References
- [1] Leonard M. Adleman, Qi Cheng, Ashish Goel, and Ming-Deh A. Huang, Running time and program size for self-assembled squares, STOC, 2001, pp. 740–748.
- [2] Robert D. Barish, Rebecca Schulman, Paul W. Rothemund, and Erik Winfree, An information-bearing seed for nucleating algorithmic self-assembly, Proceedings of the National Academy of Sciences 106 (2009), no. 15, 6054–6059.
- [3] Matthew Cook, Yunhui Fu, and Robert Schweller, Temperature 1 self-assembly: Deterministic assembly in 3d and probabilistic assembly in 2d, Proceedings of the 22nd Annual ACM-SIAM Symposium on Discrete Algorithms, 2011.
- [4] Matthew Cook, Yunhui Fu, and Robert T. Schweller, Temperature 1 self-assembly: Deterministic assembly in 3D and probabilistic assembly in 2D, SODA 2011: Proceedings of the 22nd Annual ACM-SIAM Symposium on Discrete Algorithms, SIAM, 2011.
- [5] David Doty, Jack H. Lutz, Matthew J. Patitz, Robert T. Schweller, Scott M. Summers, and Damien Woods, The tile assembly model is intrinsically universal, Proceedings of the 53rd Annual IEEE Symposium on Foundations of Computer Science, FOCS 2012, 2012, pp. 302–310.
- [6] David Doty, Jack H. Lutz, Matthew J. Patitz, Scott M. Summers, and Damien Woods, Intrinsic universality in self-assembly, Proceedings of the 27th International Symposium on Theoretical Aspects of Computer Science, 2009, pp. 275–286.
- [7] David Doty, Matthew J. Patitz, and Scott M. Summers, Limitations of self-assembly at temperature 1, Theoretical Computer Science 412 (2011), 145–158.
- [8] Constantine Evans, Crystals that count! physical principles and experimental investigations of DNA tile self-assembly, Ph.D. thesis, California Institute of Technology, 2014.
- [9] Kenichi Fujibayashi, Rizal Hariadi, Sung Ha Park, Erik Winfree, and Satoshi Murata, Toward reliable algorithmic self-assembly of DNA tiles: A fixed-width cellular automaton pattern, Nano Letters 8 (2007), no. 7, 1791–1797.
- [10] David Furcy, Samuel Micka, and Scott M. Summers, Optimal program-size complexity for self-assembly at temperature 1 in 3D, DNA 21: 21st International Conference on DNA Computing and Molecular Programming, 2015, to appear.
- [11] M. Li and P. Vitányi, An introduction to Kolmogorov complexity and its applications (Third Edition), Springer Verlag, New York, 2008.
- [12] Kyle Lund, Anthony T. Manzo, Nadine Dabby, Nicole Micholotti, Alexander Johnson-Buck, Jeanetter Nangreave, Steven Taylor, Renjun Pei, Milan N. Stojanovic, Nils G. Walter, Erik Winfree, and Hao Yan, Molecular robots guided by prescriptive landscapes, Nature 465 (2010), 206–210.
- [13] Ján Manuch, Ladislav Stacho, and Christine Stoll, Two lower bounds for self-assemblies at temperature 1, Journal of Computational Biology 17 (2010), no. 6, 841–852.
- [14] Chengde Mao, Thomas H. LaBean, John H. Relf, and Nadrian C. Seeman, Logical computation using algorithmic self-assembly of DNA triple-crossover molecules., Nature 407 (2000), no. 6803, 493–6.
- [15] P.-E. Meunier, M. J. Patitz, S. M. Summers, G. Theyssier, A. Winslow, and D. Woods, Intrinsic universality in tile self-assembly requires cooperation, Proceedings of the 25th Annual ACM-SIAM Symposium on Discrete Algorithms (SODA), 2014, pp. 752–771.
- [16] Lulu Qian and Erik Winfree, Scaling up digital circuit computation with DNA strand displacement cascades, Science 332 (2011), no. 6034, 1196.
- [17] Lulu Qian, Erik Winfree, and Jehoshua Bruck, Neural network computation with DNA strand displacement cascades, Nature 475 (2011), no. 7356, 368–372.
- [18] Paul W. K. Rothemund and Erik Winfree, The program-size complexity of self-assembled squares (extended abstract), STOC ’00: Proceedings of the thirty-second annual ACM Symposium on Theory of Computing, 2000, pp. 459–468.
- [19] Paul W.K. Rothemund, Folding DNA to create nanoscale shapes and patterns, Nature 440 (2006), no. 7082, 297–302.
- [20] Paul W.K. Rothemund, Nick Papadakis, and Erik Winfree, Algorithmic self-assembly of DNA Sierpinski triangles, PLoS Biology 2 (2004), no. 12, 2041–2053.
- [21] Rebecca Schulman and Erik Winfree, Synthesis of crystals with a programmable kinetic barrier to nucleation, Proceedings of the National Academy of Sciences 104 (2007), no. 39, 15236–15241.
- [22] Nadrian C. Seeman, Nucleic-acid junctions and lattices, Journal of Theoretical Biology 99 (1982), 237–247.
- [23] David Soloveichik and Erik Winfree, Complexity of self-assembled shapes, SIAM J. Comput. 36 (2007), no. 6, 1544–1569.
- [24] Hao Wang, Proving theorems by pattern recognition – II, The Bell System Technical Journal XL (1961), no. 1, 1–41.
- [25] Erik Winfree, Algorithmic self-assembly of DNA, Ph.D. thesis, California Institute of Technology, June 1998.
- [26] Erik Winfree, Furong Liu, Lisa A. Wenzler, and Nadrian C. Seeman, Design and self-assembly of two-dimensional DNA crystals., Nature 394 (1998), no. 6693, 539–44.
- [27] Bernard Yurke, Andrew J Turberfield, Allen P Mills, Friedrich C Simmel, and Jennifer L Neumann, A DNA-fuelled molecular machine made of DNA, Nature 406 (2000), no. 6796, 605–608.
6 Appendix: Turing machine simulation
In this section, we describe our Turing machine simulation.
6.1 Notation for figures
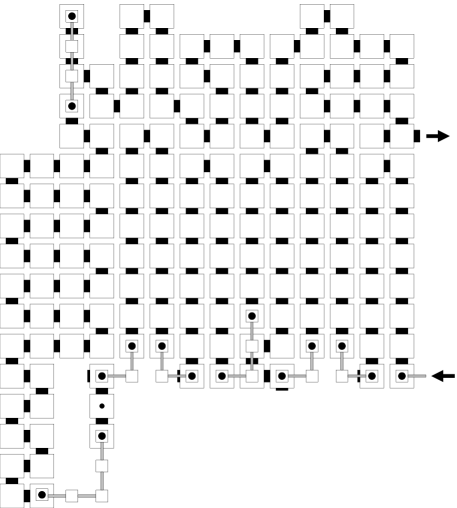
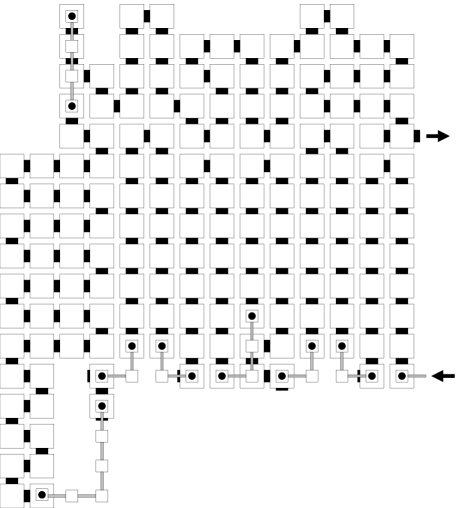
In the figures of the gadgets, we use big squares to represent tiles placed in the plane and small squares to represent tiles placed in the plane. A glue between a tile and tile is denoted as a small black disk. Glues between tiles are denoted as thick lines. Glues between tiles are denoted as thin lines. This convention is also used in Section 7.
In what follows, we assume that the glues on each tile are implicitly defined to ensure deterministic assembly.
6.2 Overview

Our Turing machine simulation assumes an input Turing machine , such that, has a one-way infinite tape (to the right), the leftmost tape cell of which contains a special left marker symbol #, which can be read by but can neither be overwritten nor written elsewhere on the tape (the left marker symbol is added by our construction so that it is left of the leftmost input bit). We further require that begins with its tape head reading the leftmost bit of the input word and halts with its tape head reading the rightmost bit of output.
We simulate on in a zig-zag fashion, similar to Cook, Fu and Schweller [4], where each transition in our simulation is carried out by a pair of rows of gadgets. First, a row of gadgets assembles left-to-right, followed by a row of gadgets that assembles right-to-left. Right-moving transitions are performed in the former whereas the latter handles left-moving transitions.
Our simulation differs from that of Cook, Fu and Schweller in the following way: we represent the contents of each tape cell with one six-tile-wide gadget (Cook, Fu and Schweller represent each tape cell with a non-constant number of gadgets, depending on the size of the transition function of ). Consequently, in our construction, and unlike in Cook, Fu and Schweller, the transition function of is stored in the glues of the tiles. Also, since the tape may grow unbounded, we must store the position of the tape head geometrically. Therefore, in our construction, each tape cell gadget, in addition to storing its binary value using a bit-bump, also stores whether or not the tape head is reading that cell in a similar kind of bit-bump (the tape head is either reading this cell or not). This approach has a more compact geometric representation of the output, which is more convenient for our purposes.
The first phase in the simulation is preprocessing. In the preprocessing phase, each input bit is augmented with a bit indicating whether or not the tape head is reading that bit, where 0 (1) represents the absence (presence) of the tape head. The preprocessing gadgets assemble from right-to-left. After the preprocessing phase completes, the transition phase begins.
During the transition phase, the computation of on is simulated according to the transition function of , which is encoded into the glues of our simulation. The gadgets that implement the transition phase automatically grow the tape to the right by two tape cells in each time step. The tape is expanded to the left by one tape cell in the preprocessing phase of the simulation. Then, in the last step of the transition phase, one additional tape cell is added to the left if there is an even number of input bits.
The last phase of the simulation is post-processing, in which the output bits are shifted to the right. In this phase, the tape does not expand to the right, but is expanded to the left by two tape cells for each shift. Note that, in this phase, each shift is carried out in two steps. First, a row of gadgets, assembling left-to-right, shifting all the tape cells over to the right by one (gadget) position. Then, a row of gadgets, assembling right-to-left, copying the (binary values of the) just-shifted tape cells up and, after growing the tape to the left by two tape cells, restarts another left-to-right-assembling shift row. The shifting is complete when the geometrically-encoded bit that represents the position of the tape head reaches the rightmost tape cell. The last row of post-processing gadgets assembles from right-to-left and erases the tape-head-indicator, leaving only the binary value of the tape cell.
When the post-processing phase completes, thus completing the simulation of on , the number of bits along the top of the simulation assembly is even. This is because: (1) the preprocessing phase computes the parity of the length of the input, which causes an appropriate number of tape cells to be added to the left immediately before the output phase begins, (2) the transition phase grows the tape to the right by two tape cells for each transition, and (3) the post-processing phase grows the tape to the left by two tape cells for every shift operation. Moreover, because of the way the tape is expanded in the transition and post-processing phases, the completed simulation of on is wider than it is tall.
We use the following notation: For and , if and if , i.e., gives the direction will move in when in state reading bit .
6.3 Input

The input to the simulation is a sequence of appropriately-spaced, geometrically-encoded bits (bit-bumps), where a bump in the () plane represents the bit 0 (1). Figure 8 gives an example of an input sequence.

6.4 Preprocessing

The first phase in our Turing machine simulation is preprocessing. In this phase, the input bits are read from right-to-left and copied toward the north by bit-reading gadgets. Each input bit is augmented with another (geometrically-represented) bit, which indicates whether or not the tape head is currently reading that cell. The tape cell that contains the first input bit receives a 1 bit, so as to indicate that the tape head is currently reading the first bit of input. The rest of the tape cells receive a 0 bit. The gadgets that carry out the preprocessing phase compute the parity of the length of the input. If there is an even number of input bits, then two additional tape cells are added to the left. If there is an odd number of input bits, then only one additional tape cell will be added to the left. Technically, in either case, only one additional tape cell is added to the left by the preprocessing stage (this additional tape cell logically contains the left tape marker symbol , which is geometrically encoded). However, the leftmost tape cell gadget will encode the parity of the length of the input and, in the case of even parity, an additional 0 bit will be added in the post-processing phase of the simulation.
 (a) Pre_rightmost_0: the last input bit is 0.
 (b) Pre_rightmost_1: the last input bit is 1.
 (a) Pre_middle_0
 (b) Pre_middle_1
 (a) Pre_leftmost_even_0
 (b) Pre_leftmost_even_1
(c) Pre_leftmost_odd_0
 (d) Pre_leftmost_odd_1
6.5 Simulation (left-to-right)

All the gadgets in this subsection have names that start with LR because they all assemble in a left-to-right fashion. These gadgets are indicated in Figure 13.
6.5.1 Move the tape head
 (a) LR_0_0: For each transition of the form , where , create one of these gadgets with input glue and output glue .
 (b) LR_0_1: For each transition of the form , where , create one of these gadgets with input glue and output glue .
 (c) LR_1_0: For each transition of the form , where , create one of these gadgets with input glue and output glue .
 (d) LR_1_1: For each transition of the form , where , create one of these gadgets with input glue and output glue .
 (a) LR_from_left_0: Receive the tape head from the left (now reading a 0). For each , create one of these gadgets with input glue and output glue if and otherwise. We will use the notation to indicate that the next move is to the left, but the previous move was to the right (thus, the left move must wait until the next transition).
 (b) LR_from_left_1: Receive the tape head from the left (now reading a 1). For each , create one of these gadgets with input glue and output glue if and otherwise.
6.5.2 Copy
The gadgets in this subsection are shown in Figure 16.
 (a) LR_copy_no_state_0: Copy a 0 bit that is not being read by the tape head. For each and , create one of these gadgets with input glue and output glue .
 (b) LR_copy_no_state_1: Copy a 1 bit that is not being read by the tape head. For each and , create one of these gadgets with input glue and output glue .
 (c) LR_copy_with_state_0: Copy a 0 bit that is being read by the tape head. For each , create one of these gadgets with input glue and output glue .
 (d) LR_copy_with_state_1: Copy a 1 bit that is being read by the tape head. For each , create one of these gadgets with input glue and output glue .
6.5.3 Grow the tape
The gadget in this subsection is shown in Figure 17.

6.6 Simulation (right-to-left)

All the gadgets in this subsection have names that start with RL because they all assemble in a right-to-left fashion. These gadgets are indicated in Figure 18.
6.6.1 Guess a bit
Since the tape head indicator bit is to the left of the tape cell value indicator bit in each gadget, we use generic bit-guessing gadgets to first guess the value of a tape cell, before determining whether the tape head is reading that tape cell.
The gadgets in this subsection are shown in Figure 19.
 (a) RL_guess_0: Guess a 0 bit.
 (b) RL_guess_1: Guess a 1 bit.
6.6.2 Move the tape head
 (a) RL_0_0: For each transition of the form , where , create one of these gadgets with input glue and output glue .
 (b) RL_0_1: For each transition of the form , , create one of these gadgets with input glue and output glue .
 (c) RL_1_0: For each transition of the form , , create one of these gadgets with input glue and output glue .
 (d) RL_1_1: For each transition of the form , , create one of these gadgets with input glue and output glue .
 (a) RL_from_right_0: Receive the tape head from the right (now reading a 0). For each , create one of these gadgets with input glue and output glue .
 (b) RL_from_right_1: Receive the tape head from the right (now reading a 1). For each , create one of these gadgets with input glue and output glue .
6.6.3 Copy
 (a) RL_copy_no_state_0: Copy a 0 bit that is not being read by the tape head. For each and , create one of these gadgets with input glue and output glue .
 (b) RL_copy_no_state_1: Copy a 1 bit that is not being read by the tape head. For each and , create one of these gadgets with input glue and output glue .
 (c) RL_copy_with_state_0: Copy a 0 bit that is being read by the tape head. For each and , create one of these gadgets with input glue and output glue .
 (d) RL_copy_with_state_1: Copy a 1 bit that is being read by the tape head. For each and , create one of these gadgets with input glue and output glue .
 (a) RL_copy_leftmost_even_no_halt: The leftmost tape cell. Do not grow the tape to the left but propagate the parity of the length of the input by blocking the deep dent to the south in the plane.
 (b) RL_copy_leftmost_odd_no_halt: The leftmost tape cell. Do not grow the tape to the left but propagate the parity of the length of the input by blocking the deep dent to the south in the plane.
 (a) RL_copy_leftmost_even_halt: The leftmost tape cell and in a halting state (the input state is ). The length of the input was even, so add one additional tape cell to the left and terminate the transition phase of the simulation (recall that the Pre_leftmost gadgets always added one additional tape cell to the left).
 (b) RL_copy_leftmost_odd_halt: The leftmost tape cell and in a halting state (the input state is ). The length of the input was odd, so do not add an additional tape cell to the left and terminate the transition phase of the simulation.
6.7 Post-processing
In the post-processing stage, all of the bits of the gadgets, starting from the leftmost tape cell, to the tape cell that contains the tape head (including the bit contained in this gadget), are shifted to the right most position on the tape cell. The basic idea is that bits are shifted to the right in a zig-zag fashion, similar to how the diagonal signal is shifted to the right in the growth blocks (see Section 7). Bits are shifted in left-to-right-assembling shift rows, where as bits are copied in right-to-left-assembling copy rows. Although many of the gadgets in this subsection are similar to those defined the previous subsections, we list them here for the sake of completeness.


 (a) LR_no_state_0_0: Accept a 0 bit from the left and shift a 0 bit to the right.
 (b) LR_no_state_0_1: Accept a 0 bit from the left and shift a 1 bit to the right.
 (c) LR_no_state_1_0: Accept a 1 bit from the left and shift a 0 bit to the right.
 (d) LR_no_state_1_1: Accept a 1 bit from the left and shift a 1 bit to the right.
 (a) LR_send_state_0_0: Accept a 0 bit from the left and shift a 0 bit, which is currently read by the tape head, to the right.
 (b) LR_send_state_0_1: Accept a 0 bit from the left and shift a 1 bit, which is currently read by the tape head, to the right.
 (c) LR_send_state_1_0: Accept a 1 bit from the left and shift a 0 bit, which is currently read by the tape head, to the right.
 (d) LR_send_state_1_1: Accept a 1 bit from the left and shift a 1 bit, which is currently read by the tape head, to the right.
 (a) LR_receive_state_0_0: Accept a 0 bit, which is currently being read by the tape head, from the left and shift a 0 bit to the right.
 (b) LR_receive_state_0_1: Accept a 0 bit, which is currently being read by the tape head, from the left and shift a 1 bit to the right.
 (c) LR_receive_state_1_0: Accept a 1 bit, which is currently being read by the tape head, from the left and shift a 0 bit to the right.
 (d) LR_receive_state_1_1: Accept a 1 bit, which is currently being read by the tape head, from the left and shift a 1 bit to the right.

 (a) RL_guess_0: Guess a 0 bit.
 (b) RL_guess_1: Guess a 1 bit.
 (a) RL_copy_no_state_0: Copy a 0 bit that is not currently being read by the tape head.
 (b) RL_copy_no_state_1: Copy a 1 bit that is not currently being read by the tape head.
 (c) RL_copy_state_0: Copy a 0 bit that is currently being read by the tape head.
 (d) RL_copy_state_1: Copy a 1 bit that is currently being read by the tape head.

 (a) LR_right_receive_state_0: Receive a 0 bit, which is currently being read by the tape head, into the rightmost position.
 (b) LR_right_receive_state_1: Receive a 1 bit, which is currently being read by the tape head, into the rightmost position.
 (a) Two_to_one_no_state_0: Erase the tape head bit-bump from a gadget that represents a 0 bit that is not currently being read by the tape head.
 (b) Two_to_one_no_state_1: Erase the tape head bit-bump from a gadget that represents a 1 bit that is not currently being read by the tape head.
 (c) Two_to_one_state_0: Erase the tape head bit-bump from a gadget that represents a 0 bit that is currently being read by the tape head.
 (d) Two_to_one_state_1: Erase the tape head bit-bump from a gadget that represents a 1 bit that is currently being read by the tape head.

7 Appendix: Growth blocks
In this section, we provide details of our construction for the growth blocks. For all gadgets described in this section, we assume that the input side of the growth block to which the gadget belongs is its south side. Therefore, for completeness, we have to build three additional copies of each gadget, naemly after a 90-degree, a 180-degree, and a 270-degree rotation, respectively. Throughout this section, we assume that the glues on each tile are implicitly defined to ensure deterministic assembly.
7.1 Gadgets used by all three types of growth blocks
Recall that the assembly of each growth block starts in its bottom-left corner. The gadgets in this section all assemble from left to right on the bottom row of the growth block until the first actual move of the remaining path (that is, the moves in the Hamiltonian cycle that have not been performed and erased by previous growth blocks) is found. Each move in the Hamiltonian path (as well as each one of the leading no-moves) is encoded in two bits, each of which takes up 6 consecutive tiles. Therefore, most gadgets in this construction are 12 tiles wide. However, the “edge gadgets” (i.e., those on the left and right edges of the growth block) take up two additional tiles.
Figure 37 depicts the BL (for “bottom-left”) gadget whose assembly is initiated by the only output glue in the top-left corner of the previous growth block, or the seed block if the current block is the first growth block in the Hamiltonian cycle. The BL gadget, like most gadgets in this subsection, is 6 tiles high. However, this gadget is the only gadget in our growth-block construction that is 26 tiles wide, since it encodes two no-moves, which we assume are always present at the beginning of the Hamiltonian cycle and it is an edge gadget. This gadget advertises two no-moves on its top edge and its output glue encodes the fact that the first actual move in the remaining path has not yet been found. Finally, this gadget also advertises a diagonal marker in the rightmost no-move on its top side. This diagonal marker will be shifted to the right by later gadgets in order to guarantee that each growth block has a square shape.

Figure 38 depicts the gadget that copies all of the additional no-moves that are included in front of the Hamiltonian cycle. Since this gadget detects two geometrically-encoded 0 bits on its bottom side, it also advertises a no-move on its top side. Its input and output glues encode the fact that the first actual move in the remaining path has not yet been found.
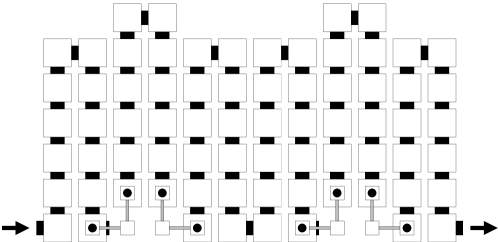
Figure 39 depicts the gadget that finds the first move in the remaining path. This gadget erases this first move by advertising a no-move on its top side, since this move is being implemented in the current growth block. Its output glue, as well as all of the input and output glues in the remaining gadgets will encode the type of move (straight, left or right) that this gadget detects.
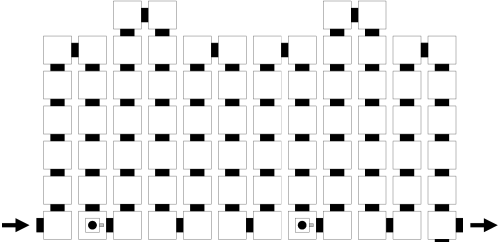
a) The first move is a straight move
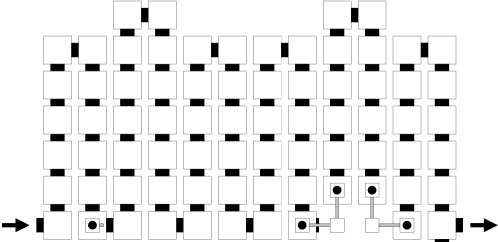
b) The first move is a left turn
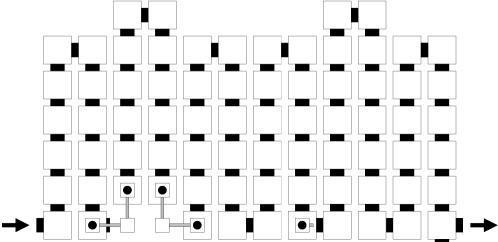
c) The first move is a right turn
7.2 Growth block with a straight move
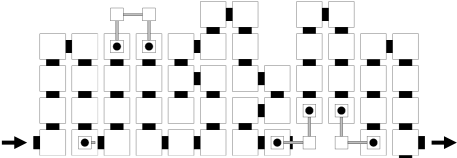
The set of gadgets described in this section take over after the first_move gadget and assemble to complete the growth block in the case where the first move in the remaining path is a straight move. Figure 40 depicts the overall construction for such a block.

7.2.1 Gadgets used in the bottom row of straight-move blocks
Figure 41 depicts the bottom-row gadget that copies all of the remaining moves, except for the first one, which was erased by the first_move gadget, and the last one, which is handled by the next gadget (see Figure 42). This gadget simply advertises on its top side the move that is geometrically encoded on its bottom side. Recall that its output glue encodes the type of the first move and therefore the type of the growth block as a whole. Even though this information is encoded in the glues of all remaining gadgets, we will not repeat that fact in the following descriptions.
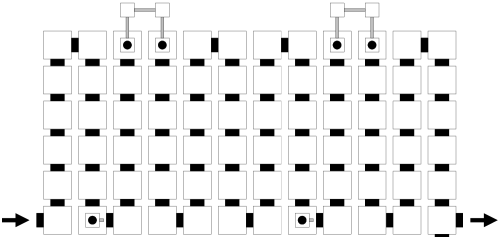
a) The current move is a straight move
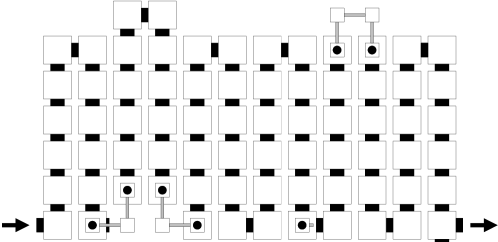
b) The current move is a right turn
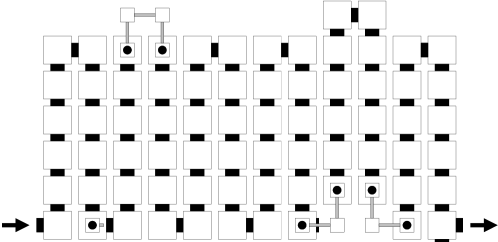
c) The current move is a left turn
Figure 42 depicts the bottom-row gadget that detects the right edge of the block or, equivalently the last move in the remaining path. This BRuturn gadget, which appears in the bottom-right corner of the block, concludes the left-to-right assembly of the bottom row and initiates the right-to-left assembly of the next row of gadgets. Since the current block is a straight move, the right edge of the block is a straight line. The top side of this (copy) gadget advertises the move that it decodes on its bottom side. While Figure 42 shows a left turn being copied, two similar gadgets are needed for the cases where the last move is a right turn or a straight move. This gadget is differentiated from the Bcopy gadget by the one-tile deep dent in its bottom-right corner that is the marker we use for the right edge of the block and the reason why we use two extra tiles on the edge gadgets.
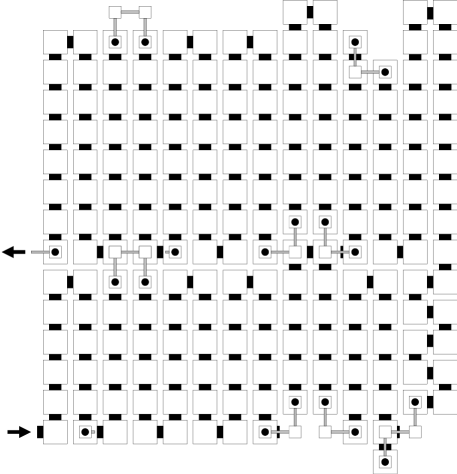
Note that some of the gadgets described in this section, even though they have different names, are really different configurations of the same gadget in that they are identical in the first “half” of the gadget and then take different paths based on a geometric feature that is detected later on during the assembly of the gadget. For example, the before_first_move and first_move gadgets are really configurations of the same gadget that differ based on whether a no-move or an actual move is detected, respectively. Similarly, the BRuturn and Bcopy gadgets are really configurations of the same gadget that differ based on whether the right edge marker is detected or not, respectively. In fact, the same is true for all four of the previous gadgets, since the first move is detected in the same gadget as the edge marker in the last growth block. This observation applies to other groups of gadgets in this section.
7.2.2 Gadgets used in the right-to-left rows of straight-move blocks
Figures 43 and 44 depict the gadget that copies the remaining moves (or the leading no-moves) of the Hamiltonian cycle, one at a time, in right-to-left order. This gadget has four configurations, namely one for each type of move (or no-move) being copied. This gadget also detects that the current move is not positioned on the bottom-left to top-right diagonal of the current block.
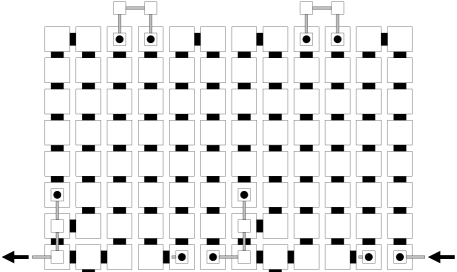
a) The copied move is a straight move
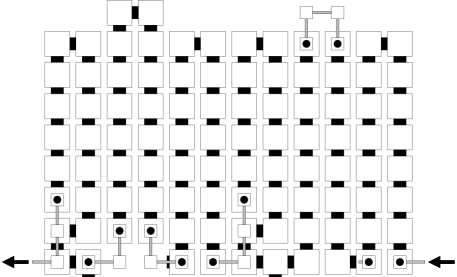
b) The copied move is a right turn
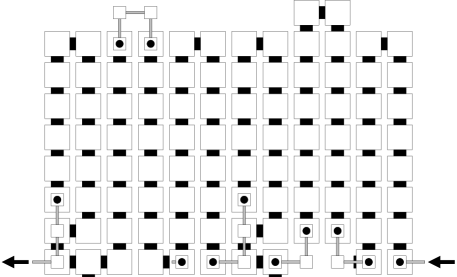
c) The copied move is a left turn
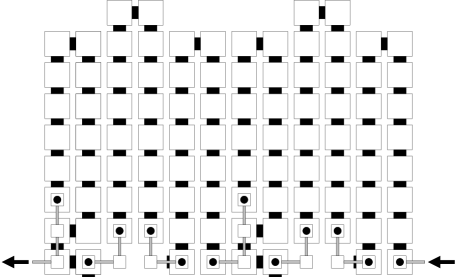
d) There is no move to copy
Figures 45 and 46 depict the gadget that acts like the previous gadget but also detects that the current move is positioned on the bottom-left to top-right diagonal of the current block and therefore also advertises the diagonal marker on its top side.
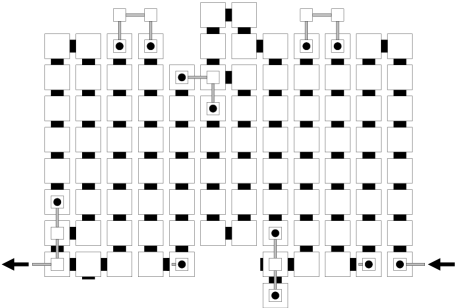
a) The copied move is a straight move
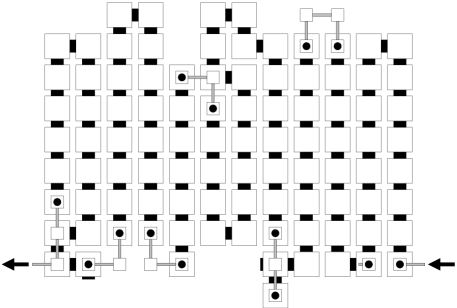
b) The copied move is a right turn
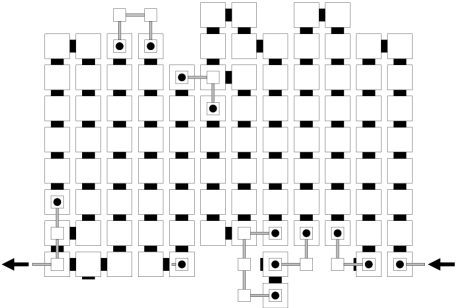
c) The copied move is a left turn
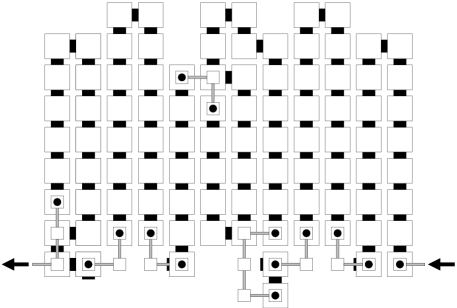
d) There is no move to copy
Figures 47 and 48 depict the “uturn” gadget that is the counterpart on the left edge of the block to the gadget depicted in Figure 42. This gadget concludes the assembly of the current right-to-left row and initiates the assembly of the next left-to-right row of gadgets. Since the current block is a straight move, the left edge of the block, and thus of this gadget, is a straight line. The top side of this (copy) gadget advertises a no-move since the move on the left edge of any block is always a no-move. The reason this gadget has two configurations is because the BL gadget has a different top side than all of the other gadgets on the left edge of the block (this is needed to accommodate the case where the current block is a left turn block). Figure 47 depicts the Luturn gadget that assembles right above the BL gadget, while Figure 48 depicts the Luturn gadget that assembles in all higher rows of the block. Since the BL gadget has a deeper, two-tile-high dent in its top-left corner than all other gadgets on the left edge of the block (whose dent in their top-left corner is only one tile high), the gadgets in Figures 47 and 48 have slightly different configurations in their bottom-left corners.
7.2.3 Gadgets used in the left-to-right rows of straight-move blocks
Figure 49 depicts the gadget that copies the moves and no-moves, one at a time, from left to right between the edges of the block, as long as the current move is not located on the bottom-left to top-right diagonal of the block.
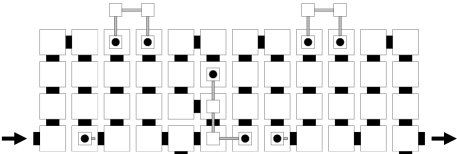
a) The copied move is a straight move
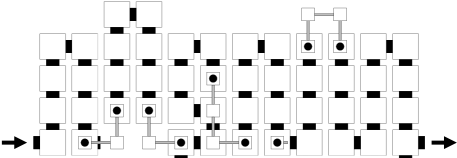
b) The copied move is a right turn
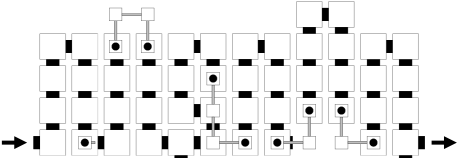
c) The copied move is a left turn
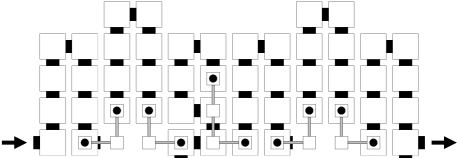
d) There is no move to copy
Figure 50 depicts the gadget that behaves like the previous one but also detects the diagonal marker in the current position. This gadget not only copies the current move to its top side but also encodes in its output glue the fact that the diagonal marker was just detected.
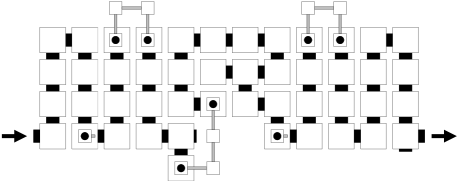
a) The copied move is a straight move
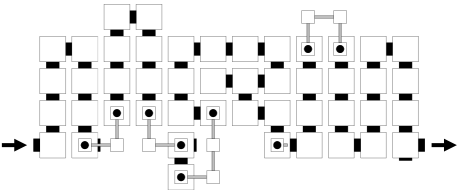
b) The copied move is a right turn
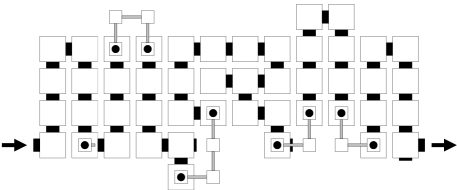
c) The copied move is a left turn
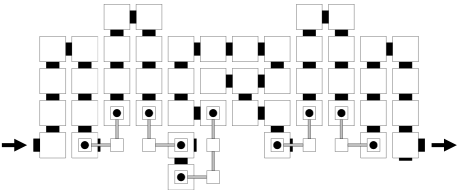
d) There is no move to copy
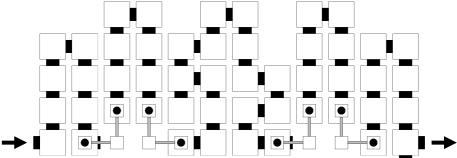
Figure 51 depicts the gadget that not only copies the current move but also advertises the diagonal marker on its top side. Therefore this gadget, together with the previous one, makes sure that the diagonal marker is shifted by one gadget position to the right in each left-to-right row.
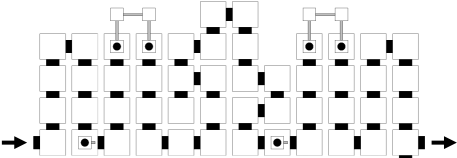
a) The copied move is a straight move
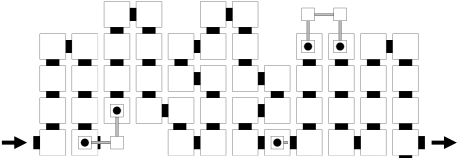
b) The copied move is a right turn
c) The copied move is a left turn
d) There is no move to copy
Figure 52 depicts the Ruturn gadget that detects the right-edge marker and thus terminates the current left-to-right row of gadgets and initiates the next right-to-left row. The only difference between this gadget and the one shown in Figure 42 is that the latter belongs to the bottom row of the block and is thus two tiles higher.
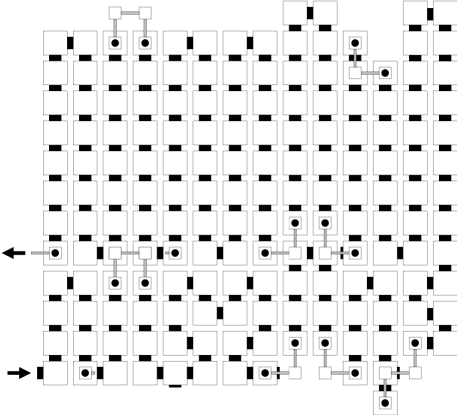
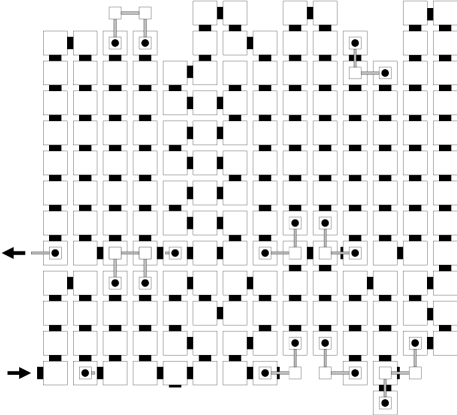
Figure 53 is similar to the previous gadget except that its input glue binds to the output glue of the DDcopy_right gadget. Therefore, this gadget must advertise the diagonal marker on its top side, thereby detecting the fact that the diagonal marker has reached the right edge of the block. As result, the next “uturn” gadget that will bind to the top side of this gadget will “know” to initiate the last, topmost row of the current block (see next subsection).
While the last two figures show a left turn being copied (as the last move in the Hamiltonian cycle), two similar configurations are needed for each gadget for the cases where the last move is a right turn or a straight move.
7.2.4 Gadgets used in the topmost row of straight-move blocks
Figure 54 depicts the top-right “uturn” gadget that is identical to the one in Figure 52, except that it is two tiles higher (since it belongs to the topmost row) and its output glue encodes the fact that the topmost row needs to be constructed.
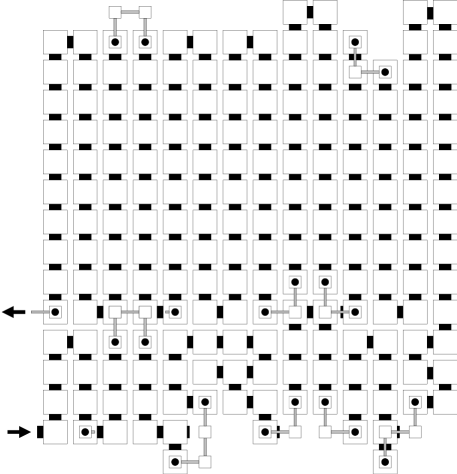
We omitted figures for the topmost row, copy-left gadget (called Tcopy_left in Figure 40) since it is almost identical to the copy_left gadget shown in Figures 43 and 44 (it is two tiles higher and its input and output glues encode the fact that it belongs to the topmost row).
Figure 55 depicts the last gadget in the construction of a straight move. This gadget assembles in the top-left corner of the current block and has an output glue on its top side that will initiate the assembly of the next growth block.
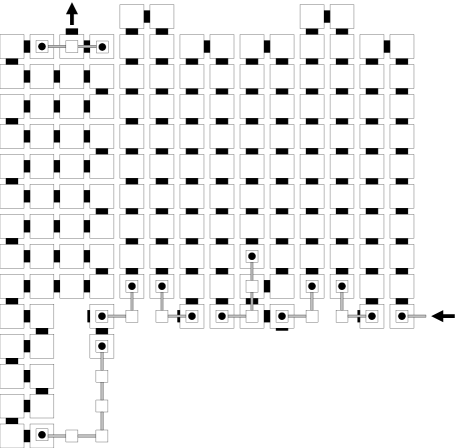
7.3 Growth block with a left turn
The set of gadgets described in this section take over after the first move gadget and assemble to complete the growth block in the case where the first move in the remaining path is a left turn. Figure 56 depicts the overall construction for such a block.

This set of gadgets differs from the one for the straight move in two essential ways.
First, the moves in the remaining path need to be copied from the bottom side to the left side of the block. This is accomplished by replacing the copy_left gadget with a shift_left gadget, whose generic function is depicted in Figure 57. Figure 58 depicts two of the many possible configurations for the shift_left gadget.

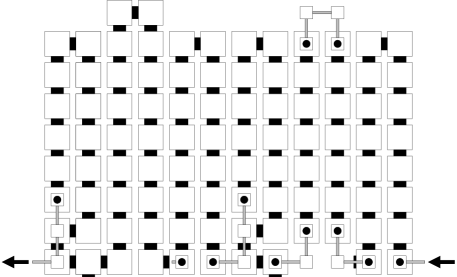
a) Configuration in which a is a left turn, b is a right turn, and the diagonal marker is absent
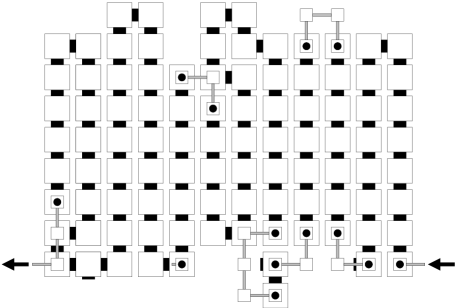
b) Configuration in which a is a left turn, b is a right turn, and the diagonal marker is present
Second, left turn blocks differ significantly from the other kinds of blocks on their left edge. They must not only advertise the remaining path on this edge, they must also allow for the current block’s output glue (the one that will initiate the assembly of the next growth block) to be put in place at the bottom of the left edge after the current block is completely assembled. To achieve this goal, all of the gadgets on the left edge of left turn blocks have been built as follows. Figures 59, 60 and 61 show how the “Luturn” gadgets now contain a one-tile-wide vertical path that is left empty until the top-left gadget has completed. Finally, Figure 62 shows how the top-left gadget not only completes the topmost row, as usual, but also leaves a dent at the top of the left side of the current block (to mark the right edge of the next growth block) and then builds a one-tile-wide path of tiles (shown in light gray) that will position the current block’s output glue to initiate the assembly of the next growth block.
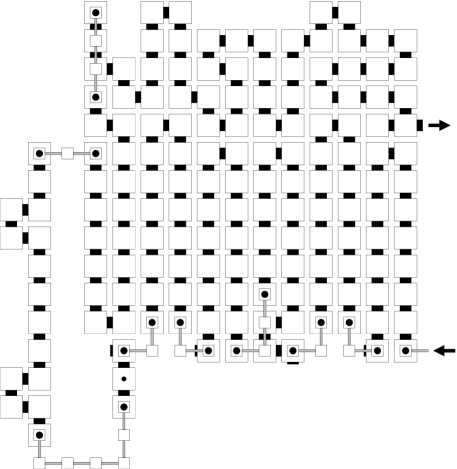
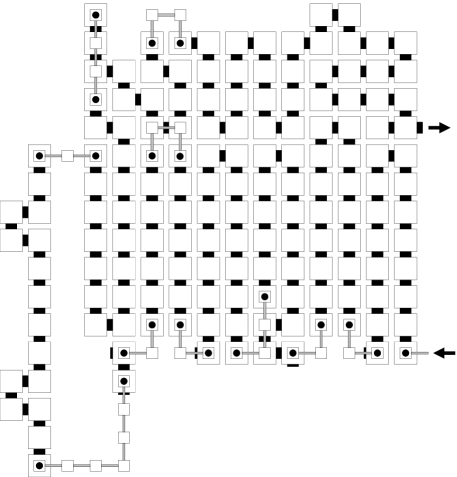
a) There is no move to copy
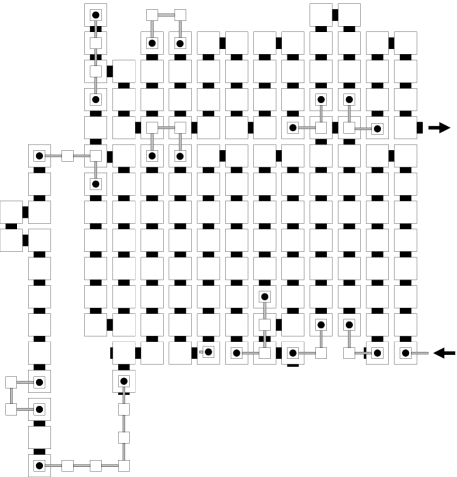
b) The copied move is a left turn
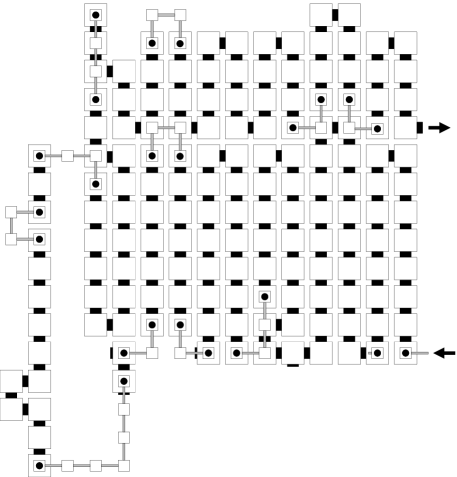
c) The copied move is a right turn
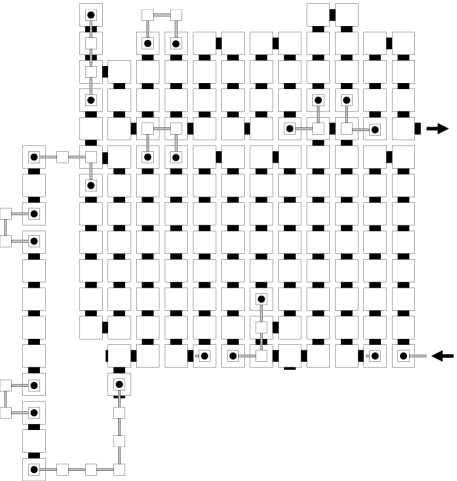
d) The copied move is a straight move
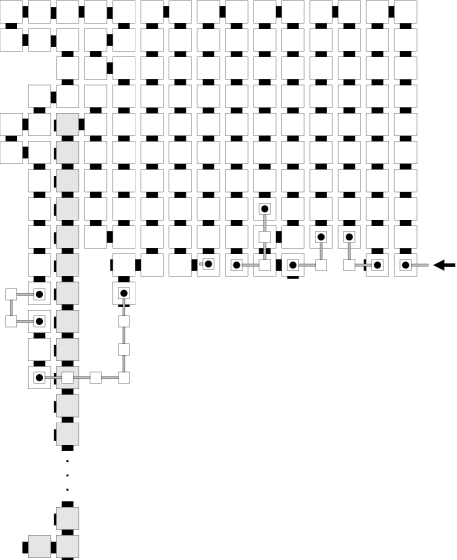
7.4 Growth block with a right turn
The overall construction for this type of growth block is shown in Figure 4 in the main body of this paper. We omit figures for the individual gadgets in this type of block because they are similar to the gadgets for the straight-move block, except that the remaining path is advertised on the right side instead of the top side and thus the copy_right gadgets are replaced with shift_right gadgets which, in turn, are similar to the shift_left gadgets in the left-move blocks (see Figures 57 and 58).
7.5 Last growth block
Recall that the growth block corresponding to the last move in the Hamiltonian cycle encodes a move toward the seed block that will complete it as a full square. This last growth block is distinguished from all other growth blocks in its bottom row, when the first move in the remaining input path is found on the right edge of the block.
We omit figures for this set of gadgets since they only differ from the gadgets for the regular left, right or straight moves in their topmost row. This last row of the last block simply needs to be a straight line in which each tile contains an output glue that will bind to a single filler tile. This filler tile will assemble with copies of itself in a comb-like structure with teeth of variable length defined by the number of filler tiles it takes to “bump” into the existing seed block assembly, as shown in Figure 5 in the main body of this paper.