The MaNGA Integral Field Unit Fiber Feed System for the Sloan 2.5 m Telescope
Abstract
We describe the design, manufacture, and performance of bare-fiber integral field units (IFUs) for the SDSS-IV survey MaNGA (Mapping Nearby Galaxies at APO) on the the Sloan 2.5 m telescope at Apache Point Observatory (APO). MaNGA is a luminosity-selected integral-field spectroscopic survey of 104 local galaxies covering 360-1030 nm at . The IFUs have hexagonal dense packing of fibers with packing regularity of 3 m (RMS), and throughput of 960.5% from 350 nm to 1 m in the lab. Their sizes range from 19 to 127 fibers (3-7 hexagonal layers) using Polymicro FBP 120:132:150 m core:clad:buffer fibers to reach a fill fraction of 56%. High throughput (and low focal-ratio degradation) is achieved by maintaining the fiber cladding and buffer intact, ensuring excellent surface polish, and applying a multi-layer AR coating of the input and output surfaces. In operations on-sky, the IFUs show only an additional 2.3% FRD-related variability in throughput despite repeated mechanical stressing during plate plugging (however other losses are present). The IFUs achieve on-sky throughput 5% above the single-fiber feeds used in SDSS-III/BOSS, attributable to equivalent performance compared to single fibers and additional gains from the AR coating. The manufacturing process is geared toward mass-production of high-multiplex systems. The low-stress process involves a precision ferrule with hexagonal inner shape designed to lead inserted fibers to settle in a dense hexagonal pattern. The ferrule inner diameter is tapered at progressively shallower angles toward its tip and the final 2 mm are straight and only a few micron larger than necessary to hold the desired number of fibers. Our IFU manufacturing process scales easily to accommodate other fiber sizes and can produce IFUs with substantially larger fiber counts. To assure quality, automated testing in a simple and inexpensive system enables complete characterization of throughput and fiber metrology. Future applications include larger IFUs, higher fill-factors with stripped buffer, de-cladding, and lenslet coupling.
Subject headings:
IFU1. Introduction
The goal of the integral-field unit (IFU) development project described here is to enable an environmentally unbiased integral-field spectroscopic survey of 10,000 local galaxies selected to have a roughly flat stellar mass-distribution between 109 and 1012 M⊙ for the SDSS-IV project MaNGA (Mapping Nearby Galaxies at APO; Bundy et al., 2015). The survey has no other selection criteria but luminosity and redshift, and in particular no selection on apparent size or inclination. The galaxies are to be sampled with near-integral spatial coverage to between 1.5 and 2.5 half-light radii, , with physical sampling of 1–2 kpc. The spectra are required to reach a depth equivalent to S/N of 5 per pixel ( Å) measured through a 2′′ diameter fiber aperture at 1.5 . This enables measurements of gradients in stellar and gas composition as well as kinematics. A spectral resolution equivalent to km s-1 ensures dynamical mass measurements for the bulk of the sample. The MaNGA survey and its rationale are described in detail in Bundy et al. (2015).
The broader context of the MaNGA IFU development concerns the cost-performance trades of a purely fiber-based IFUs contrasted to other approaches to integral-field spectroscopy (IFS) involving traditional, grating-dispersed spectrographs. Other, more costly approaches include mirror-based slicers, lenslets, or lenslet-coupled fibers. Compared to even a decade ago, when optical fibers with exquisite broad-spectrum transmission in sizes relevant to astronomical application were widely in use (e.g., Fabricant et al., 2005), costs are now lower for high-precision machining of small components (e.g., wire electric discharge machining, EDM), and improvements continue in anti-reflection (AR) coating. These developments enable affordable ways to assemble fibers into arrays that are nearly perfect in both their metrology and throughput. When properly handled and fed with suitably fast beams (within a factor of two of their numerical aperture), entropy increase–focal ratio degradation (FRD)–is minimal. While fiber-based IFUs will never achieve 100% filling factor without lenslet coupling or significant sacrifice in throughput and cross-talk, from a survey perspective truly integral spatial coverage in a single exposure is not necessarily the salient metric. Further, with improvements in fiber metrology, mis-alignment losses in lenslet coupling can be minimized in future instruments where truly integral coverage is at a premium.
This paper contains a complete description of the design, fabrication, and the lab as well as on-sky performance of the fiber IFUs used for MaNGA in SDSS-IV. In the following section (2) we provide an overview of the existing spectrograph and fiber plug-plate systems. This serves as a boundary condition for our IFU design. Based on this analysis and survey design requirements, in section 3 we give a description of the fiber harnesses, including the custom fiber draw (3.1), ferrule design and fiber mapping (3.2), components and assembly of the fiber pseudo-slit (3.3 and 3.4), AR coating (3.5) and cabling strain relief (3.6). Section 4 contains a description of the hardware metrology, including the fiber test-stands developed and used for our analysis. Section 5 provides a description of as-built performance. The summary and conclusions are given in section 6.
2. System Overview
The IFU fiber feed system is designed to couple to the legacy SDSS hardware including the Sloan 2.5 m telescope and spectrograph corrector optics (Gunn et al., 2006), the BOSS spectrographs and spectrograph-telescope mounting (Smee et al., 2013), fiber cartridges, guider system, and plug-plate system (York et al., 2000) at Apache Point Observatory (APO). The two BOSS spectrographs, each with two spectral channels, achieve a spectral resolution of in the blue and in the red using a 2′′ fiber diameter. The resolution varies linearly with wavelength between 1370 at 360 nm and 2280 at 600 nm in the blue channel and between 1780 at 600 nm and 2990 at 1050 nm in the red channel111There is a degradation of spectral resolution for nm due to an increase in optical aberrations, but to the red limit of the spectrograph..
2.1. Existing Cartridge System
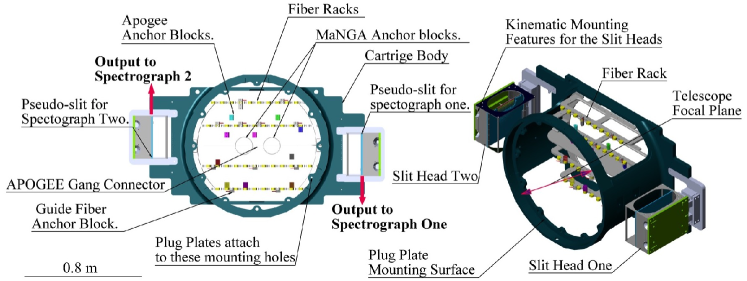
SDSS fiber cartridges (Fig. 1) allow positioning of fibers on astronomical sources by plugging steel ferrules (holding the fibers) into holes in aluminum plug plates, custom drilled for every targeted field. Each plate is mounted into a cartridge, plugged with fibers, and bent to follow the shape of the curved focal plane over the 3 degree field of view. This plug plate and cartridge system–existing infrastructure, proven to be cost-effective and reliable through SDSS-I, II, & III (York et al., 2000)–is continuing to be used in SDSS-IV. The existing cartridge systems is remarkably flexible, serving to map the telescope focal plane to all survey spectrographs at APO in SDSS-IV, namely BOSS (Smee et al., 2013) and APOGEE (Wilson et al. in prep).
From the focal plane, the fibers extend 0.7 m to anchor blocks providing support and strain relief to the sheathing protecting the fibers. From there, the fibers feeding the BOSS spectrographs (including MaNGA) extend to two slit heads where they are terminated on V-groove blocks mounted onto the slit plates. Each slit head, in turn, inserts into one of the two BOSS spectrographs once the cartridge is mounted to the telescope by clamping to the Cassegrain port. The clamps pull the cartridge to 3 kinematic registration points for accurate placement of the plate to the focal plane. Similarly, each slit head is independently registered to the two spectrographs by a similar mechanism that pulls the slit head into kinematic pads inside the instruments. Physical limitations of the building that houses the plugging and racking facility allows for 17 cartridges, any 10 of which can be used on a given night. Six of these cartridges are populated with MaNGA IFUs, to be prepared with plates and plugged during daytime for use on the telescope during the following night. Exchanging a cartridge for another on the telescope can be completed in 10 min. In SDSS-IV, MaNGA shares these six cartridges with the APOGEE-2 survey at APO. This enable both surveys to co-observe.
2.2. Design Considerations
Our IFU design is restricted to bare-fiber systems similar to those currently found on the WIYN (Barden et al., 1998; Bershady et al., 2004, 2005), Calar Alto 3.5 m (Kelz et al., 2006), McDonald 2.7 m (Hill et al., 2008; Fabricius et al., 2008), and AAO (Croom et al., 2012) telescopes. Lenslet arrays, for example, while providing truly integral spatial coverage, are difficult to implement with the existing telescope and spectrograph beam speeds.
The hardware described in this paper overcomes the challenges of trying to interface an integral field unit (IFU) system to the existing SDSS survey infrastructure while accommodating the science requirements laid out in Yan et al. (2015a). We work within the constraints of an f/5 telecentric telescope feed over a curved focal surface and an f/4 spectrograph collimator (values that work well with the SDSS-I/II/III single-fiber plug system). We maintain the spectral resolution at (60 km/s), the velocity scale, , associated with the lowest-mass galaxies we want to survey. This corresponds to a fiber size of 120 m core diameter, or 2′′ on sky. This scale is a good compromise between spatial resolution (given the typical seeing), target density on the sky, apparent size of the targets, and exposure time per plate for galaxies at . The apparent size distribution of the targets then motivates a variety of IFU sizes to guarantee most efficient use of the fibers over the course of the survey. Packing densities with active-core fill-factors of within the IFUs are needed to obtain complete and uniform spatial coverage with a reasonably small number of sub fiber-diameter telescope dithers Law et al. (2015a). This coverage ensures uniform Nyquist-limited PSF reconstruction and resolution. To achieve such fill-factors, we require a custom draw of fiber minimizing clad and buffer thickness while maintain high throughput to 1050 nm. Finally, the available detector real-estate and crosstalk between neighboring fibers limits the total number of fibers we can arrange along the slit to per spectrograph.

2.3. Slit Density
Choosing the acceptable spacing between V-grooves, “slit density,” was a major design decision balancing the total number and size of our IFU complement with the fidelity of our extracted spectral signal. Based on (i) an initial analysis of BOSS calibration data and (ii) measurements of derived properties (e.g., rotation curves) from simulated data cubes with deferent amounts of crosstalk, this design trade warranted fabrication of proto-type single-fiber and IFU hardware for further testing. Data taken using these hardware were analyzed (1) to confirm consistency in levels of crosstalk with the BOSS calibration data; (2) to compare scientific analysis of the same galaxies observed during the test-run data using IFUs with different slit densities; and (3) to understand the impact of fiber spacing on spectrophotometric calibration.
| fibers | Separation | Center | Center | Edge | Edge |
|---|---|---|---|---|---|
| (m) | Red | Blue | Red | Blue | |
| 1000 | 266.0 | 0.006(0.30) | 0.007(0.30) | 0.032(0.45) | 0.002(0.17) |
| 1300 | 204.6 | 0.031(0.20) | 0.035(0.20) | 0.099(0.35) | 0.018(0.13) |
| 1500 | 177.3 | 0.061(0.10) | 0.067(0.10) | 0.158(0.25) | 0.041(0.07) |
| 1700 | 156.5 | 0.091(0.02) | 0.100(0.02) | 0.220(0.10) | 0.075(0.01) |
Values are in %; parenthetical values are the fraction of peak flux where profiles cross.
Using BOSS sparse plug data (flats taken with only every 4th fiber plugged) we simulated data with different slit densities ranging from the current BOSS configuration allowing 1000 fibers total to 1700 fibers total corresponding to the physical limit for a 150 m OD fiber. The results are summarized in Table 1, which gives the crosstalk (in %) for each fiber separation in the two spectrograph arms at the center (best case) and the edge of the field (where aberrations are strong): In the worst case (1700 fibers, red edge) we expect 22% crosstalk (16% for 1500 fibers). Parenthetical values give the percentage of peak flux where neighboring profiles cross. In all other cases this study indicates crosstalk levels below 10%. As a comparison, the crosstalk between neighboring fibers on the sky due to the focal-plane PSF (i.e., from atmospheric smearing) is 6% given the median seeing at APO (the mapping from IFU to the slit ensures that fibers adjacent on the slit are also adjacent on the sky). In terms of the effect on MaNGA’s science goals, extensive simulations of the measurement of abundance patterns, abundance gradients, velocity fields and extracted velocity curves, and velocity dispersion fields show that the majority of science cases do not suffer from slit crosstalk levels as high as 20%. The conclusion is that a density corresponding to 1500 fibers would be acceptable, given experience with other IFU systems, which generally tolerate and are able to correct for higher levels of crosstalk.
Based on the above analysis, we designed and fabricated IFU and single-fiber harnesses with slit spacings varying between 266 m, 204 m, and 177 m. These prototype hardware were otherwise similar to the final production hardware we describe below. During test runs in December 2012 and January 2013 using this prototype hardware, we collected stellar calibration as well as galaxy data. The stellar data was used to test PSF reconstruction, and at the same time provide a measure of post-extraction crosstalk between fibers. The adapted version of the BOSS pipeline does account for and subtract crosstalk. The remaining level of crosstalk between neighboring fibers after subtraction is less than 3%, and 5% at the edges of the field.
Overall, we find the simulations very reliably predict the actual measured profile in the test data. We conclude that for the galaxy IFUs a configuration of 1500 fibers total spaced at 177 m giving raw crosstalk levels of 20% in the worst case and 10% over most of the field yields the most efficient survey. Cross-talk subtraction during data reduction and extraction reduces the level to less than 5% (worst case) which is less than the cross-talk introduced between neighboring fibers in the telescope focal plane during normal seeing conditions.
To confirm that these cross-talk levels do not impact our scientific requirements, we observed the same galaxy with bundles of different slit fiber spacing. One observation used a 127-fiber IFU bundle with a third each of the fibers mapped into to 260, 204 and 177 m V-groove spacings on the slit. A second observation targeted the same galaxy with a 127-fiber IFU where all fibers map uniformly to 204 m V-groove spacing. Both data sets were processed by the MaNGA pipeline, capable of handling the different groove spacings. Stellar and gas kinematics plus a comprehensive set of spectral line indices were estimated from the extracted spectra and compared. Differences in estimated velocities, velocity dispersions and absorption line indices are less than 3% across the central regions of the IFU bundle, with a maximum of 5% at the edges, with no discernible systematics introduced by the differences in the V-groove spacings.
However, analysis of stars observed in single fibers and IFUs led us to conclude that accurate spectrophotometric calibration in the presence of differential atmospheric diffraction and fiber diameters comparable to the seeing required observations through ’mini-bundles,’ or 7-fiber IFUs (Yan et al., 2015b). In order to accurately reconstruct the PSF location to determine the flux amplitude at each wavelength it was found that a fiber spacing of 204 m was desirable to further reduce corrected cross-talk levels to below 1%. Consequently, the final design of our fiber pseudo-slit consists of 177 m spacing for IFUs and their associated sky fibers, and 204 m spacing for the calibration bundles and their associated sky fibers. In addition, gaps of 246 m were placed between fiber groups arranged in blocks containing between 21 and 39 fibers (see 3.3) to permit measurements of the wings of the PSF and scattered light. The block separation was determined based on experience with the BOSS fiber system to allow for 624 m between fiber edges at the ends of two adjacent blocks. The net effect of these considerations resulted in slightly less than 1500 fibers per cartridge in our final design.
3. IFU and Harness Design
A fiber harness is a grouping of fibers and their associated mounting hardware that transfer the light from the telescope focal surface to the BOSS spectrographs. We show an overview of the components of a MaNGA fiber harness in Fig. 2, which measure 1.7 m in length. Depending on the SDSS survey configuration using the BOSS spectrographs, 31 to 50 harnesses are included in each cartridge for each survey, with each harness containing between 20 and 135 fibers. For MaNGA cartridges (shared with the APOGEE-2 survey) there are 21 MaNGA harnesses feeding the BOSS spectrographs and 10 single-fiber APOGEE harnesses feeding the APOGEE spectrograph.
In addition to the fibers, a harness consists of cabling and anchor points to protect and attach them within a cartridge, fiber ferrule terminations for plugging into plates at the telescope focal plane, and fiber V-groove termination blocks which are grouped together to form pseudo-slits feed the spectrograph collimators.
MaNGA terminates 1423 fibers into 21 harnesses of six different types. The larger number of fibers are accommodated with a tighter spacing within the V-grooves that populate the spectrographs’ pseudo-slits as discussed in the previous section. The six harness types contain between 21 and 135 fibers, depending on the IFUs they contain. The fibers are terminated into V-groove blocks (between one and four, depending on the total number of fibers). The V-groove blocks (see 3.3) come in different sizes to accommodate the different harness fiber counts so that harnesses do not share V-groove blocks. Five of the six harness types contain single IFUs intended for galaxy targets, with 19, 37, 61, 91, or 127 fibers plus associated sky fibers (2, 2, 4, 6, and 8 respectively). The sixth harness type contains three mini-IFUs (“mini-bundles”) of seven fibers each plus three associated sky fibers; these are used for observing standard stars for spectrophotometric calibration. MaNGA terminates each IFU and each sky fiber into its own, separately pluggable ferrule. The total number of pluggable ferrules is 121, consisting of 17 galaxy IFUs, 12 calibration mini-bundles, and 92 sky fibers. These map to 44 V-groove blocks split between two spectrographs.
Each harness is capable of being plugged into any location on the focal plane. The sky fibers associated with the harness may plug within a 14′ radius of their associated IFU. This is done to keep the plugging tractable and to maintain locality of sky sampling. Based on our analysis of extant BOSS data and results gathered from engineerings runs using proto-type MaNGA hardware, we determined that sky-subtraction (Law et al., 2015a) requires sampling over the full slit, as well as local sampling on the sky and on each V-groove block. Two sky-fibers are placed at the edge of the V-groove block. In the calibration mini-bundles a third sky-fiber is placed one groove in from the end. This third sky fiber is then adjacent to one sky fiber and one IFU fiber.
Walking through the components of a fiber harness from left to right in Fig. 2, the ferrules are the part of the harness that engages with the plug plate and contains the polished fiber input surface. The central ferrule contains the IFU fibers packed into a hexagonal array. Sky ferrules each contain a single fiber terminated in their center.
The IFU transition is 280 mm back from the front of the ferrule where the sky fibers and IFU fibers meet to transition into a single fiber bundle. The length of this transition was determined to be necessary for ensuring that sky fibers could be plugged around the IFU and not fall out during operations. Shorter lengths led to plugging difficulties and dropped fibers in lab tests. Longer lengths are workable but become unruly during plugging operations. The transition length sets the 14′ patrol radius for sky fibers around their IFU.
The V-groove block transition is located 860 mm back from the IFU face. This is where the fibers break into their V-groove block groups and enter a smaller cross-section jacket for the transition into the slit plate. The slit-plate transition occurs roughly 260 mm from the V-groove termination. The detailed routing (described below) ensure that the bare fibers are well protected and mechanically stable. Smaller harnesses, such as those for the 19 and 37 fiber IFUs as well as the mini-bundles, only contain one V-groove block, so this transition simply acts to reduce the size of the fiber jacketing. The large IFUs contain from two to four V-groove block branches. V-groove blocks contain between 21 and 39 fibers, with the maximum number limited by the fiber spacing and the overall size of the block, which we limit to under 8 mm. The latter restriction keeps defocus at the spectrograph input focal surface below 2 m for an f/4 beam, given the flat polished exit surface of the V-groove blocks and the spherical collimator 1264 mm radius of curvature. With the exception of the mini-bundles where there are three bundles (and 3 sky fibers) on a single V-groove block, no IFUs share V-groove blocks.
3.1. Fiber Selection
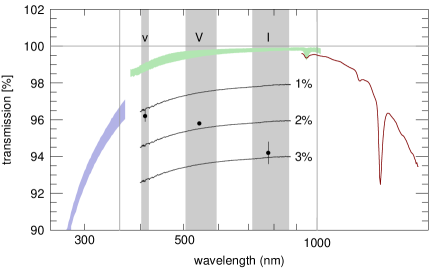
The only vendor with proven, high-performance fiber suitable for astronomical application in the visible and NIR is Polymicro. Their best product is FBP, a step-index fused-silica fiber with 0.22 NA, low attenuation between 275 and 2100 nm, low focal-ratio degradation (FRD), and polyimide buffer. Estimates of fiber attenuation provided by the vendor, corresponding to the 1.7m length of the MaNGA harnesses, are compared in Fig. 3 with our laboratory measurements of as-built harness transmission.

Existing BOSS fiber cartridges use Polymicro FBP 120:170:190 (core:clad:buffer diameter) fiber. The active core is 2′′ on sky. The median seeing at Apache Point Observatory is 1.1′′, 70 m at the focal plane, so larger core sizes than 120 m significantly under-sample the PSF. The spectrograph also is designed to be critically sampled for this fiber-core diameter, delivering a monochromatic FWHM at the detector of 45 m 3 pixels. The camera-collimator focal ratios demagnify the fiber image by a factor of 2.67, and between 18 and 30 m of the monochromatic FWHM is contributed (in quadrature) by optical aberrations (Smee et al., 2013). Larger fiber sizes would degrade spectral resolution; smaller fibers would be under-sampled and only marginally improve the monochromatic FWHM while collecting less light. These considerations led us to retain the BOSS fiber core size of 2′′.
However, the BOSS fibers have thick cladding and buffer. Because optimizing the packing density is a design goal, we worked with Polymicro to design a fiber with 120 m core that minimized cladding and buffer thickness while guaranteeing, respectively, (1) total internal reflection in our band-pass and (2) adequate protection in laboratory handling during assembly and routine use on the telescope. We identified an existing form to draw 120:132:150 m diameter core:clad:buffer fiber using the broad-spectrum FBP glass recipe and polyimide buffer. Identifying and using an existing form made the product affordable.
We have adopted this FBP 120:132:150 product for both prototyping and production. Polymicro demonstrated this FBP fiber product yielded the same low-attenuation within 350-1000 nm as their standard product (Fig. 3). We subsequently verified its high throughput and excellent FRD properties in the lab and on sky. The live-core fill factor reached by this fiber in our ferrules is 56%, as discussed below.
With this custom form, Polymicro committed to delivering an outside diameter (OD) tolerance of 150 m 5 m. We requested and received verification of this by way of the draw tower measurements, which take final outside diameter measurements at a cadence of 1 measurement/m as the fiber is drawn. We found that while the final diameter of the fiber will fall within a band of 5 m for a given draw the diameter is stable at the 1 m level. Our specific draw of fiber has an outside diameter of 151 m 0.5 m for the full 29 km draw length. This was a critical discovery that allowed for significant improvement in packing regularity discussed further in § 3.2.3 below.
3.2. Ferrule Design
3.2.1 IFU Shape
We have chosen a hexagonal IFU shape as a natural cylinder-packing geometry that also approximates the characteristic shape of galaxies on the sky. While there is a wide range of apparent ellipticity in galaxy light distributions, the mean ellipticity is such that sampling with a near-circular geometry places a relatively small fraction ( 30%) of fibers off-source. Random variations in ellipticity distributions, field-to-field, make elongated bundle sizes intractable for efficient use of fibers in targeting, particularly because position-angle variations cannot be accommodated without risking fiber-stress, ensuing FRD and light loss. More importantly, in cases where sources are very elongated, i.e., highly-inclined disks, early results from SAMI (Sydney-Australian-Astronomical-Observatory Multi-object Integral-Field Spectrograph; Croom et al., 2012) have shown potential for detection of gas outflows from star-forming disks, one of MaNGA’s science objectives. For all of these reasons, we expect our choice of densely packed, hexagonal fiber IFUs will serve MaNGA well. This choice of packing discretizes the number of possible fibers per IFU,
where is the number of hexagonal rings or layers beyond the central fiber. The first several values for for = 1 .. 8 are 7, 19, 37, 61, 91, 127, 169, 217.
3.2.2 EDM-Enabled Tapered Hexagonal Bore
The primary method for building bare-fiber IFUs has been a mold-release process pioneered for DensePak on the WIYN 3.5m telescope (Barden et al., 1998), and subsequently adopted for SparsePak (Bershady et al., 2004) and PPak (Kelz et al., 2006) on the WIYN and Calar Alto 3.5m telescopes, respectively. With this method fibers are individually placed into a mold of a known shape and potted with epoxy before polishing. This method yields IFUs of exceptional fiber regularity but suffers from two drawbacks. First, there is often a significant lower performance in the edge fibers that are in contact with the mold (Bershady et al., 2004). This can be mitigated (e.g., Kelz et al., 2006) by including sacrificial edge fibers, acting as stress buffers for the live fibers in the interior of the IFU. Another alternative is to pack fibers in an array of micro-tubes (Arribas et al., 1991). This also mitigates mold-induced stress but decreases packing density as well. More significantly, these approaches to building IFUs are very labor intensive. Given shear quantities of IFUs to be constructed for MaNGA the mold or tube-form methods were considered a secondary option.
A newer method of building densely packed bundles was developed by Bland-Hawthorn et al. (2010) for use on the AAO spectrograph. Here, fibers are stripped of their polyimide buffer, and the cladding is etched down to a minimal size. The fiber bundles are then slid into a glass tube of circular cross-section, which in turn slides into a aluminum ferrule for protection. The entire assembly is then potted with a soft silicone glue which fills the interstitial area between fibers. These so-called “Hexabundles” derive their name from a version where the fibers are lightly fused at one end such that their active cores take on a hexagonal shape. This process is able to achieve very high fill ratios of 84%, although not without some costs in both FRD and robustness of the design (Croom et al., 2012; Bryant et al., 2014). The process for construction is also rather involved with wet chemical work needed for stripping the cladding and etching the buffer. While the packing density is very high, the packing ends up being irregular, which we find in simulations (Law et al., 2015b) is a detriment for image reconstruction.
Using the Hexabundle fabrication method as a template, we attempted to improve the concept in terms of fiber packing regularity and performance, albeit at the sacrifice of packing density, through a modification of the manufacturing technique. Principally we changed the packing form from a circular to a hexagonal cross-section to improve packing, and retained the (minimal) fiber buffer to improve performance. The trick in the procedure proved to be integrating the fibers into a single ferrule design where the fibers themselves are pushed into a stainless steel sleeve and glued in place. This was possible through use of a wire electro-magnetic discharge (EDM) machine at U. Washington capable of handling EDM wire thickness as small as 100 m. With this thickness wire we were also able to produce stainless steel ferrules of arbitrary internal size and shape for our 151 m OD fibers. Hexagonal cross-sections proved to be the ideal shape to produce a well ordered hexagonal packing inside the IFU.
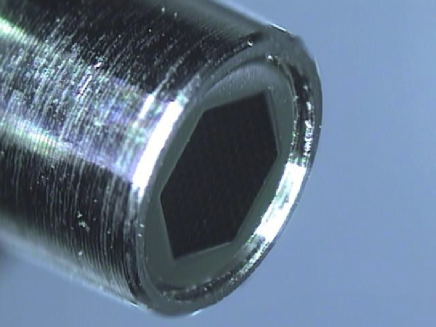
The key aspect of our design is to facilitate the natural packing and ordering of the fibers within the ferrule by implementing a taper that serves as a funnel for the fibers. We started with a simple 45 degree cone at the back of the ferrule, funneling the fibers towards a set of progressively narrower hexagonal tapers finally ending in a 2 mm section of strait hexagonal bore which acts as the gluing interface for the fibers (Fig. 4). This novel tapered design was proven in the lab at U. Washington and U. Wisconsin as well as by our assembly vendor (C Technologies, referred to as C-Tech) to provide easy and reliable fiber insertion with extremely tight tolerances. One item worth noting is that the application of alcohol into the ferrule during insertion served as an excellent lubricant and provided additional surface tension to naturally form the fibers into a hexagonal pattern. As we discuss below, we have achieved better than 3 m RMS in relative location of the fibers from an ideal packing while not inducing any measurable FRD above and beyond what is observed in single-fiber ferrules (see § 4.5).
The ferrules themselves can be built to arbitrary size with only minor changes to the coding of the EDM machine, enabling us to produce our 6 ferrule sizes with one set of tooling and several variations of manufacturing code. The final ferrules can be made for under $300 USD each to 3 m precision at a near 100% pass rate through quality assurance. The assembly of the ferrule end of the IFU then takes merely a few minutes (followed by curing and subsequent polishing).
3.2.3 Packing Regularity
| # IFU fibers | Clearance† | Hex Size | |
|---|---|---|---|
| total | diagonal | (mm) | (mm) |
| 7 | 3 | 0.003 | 0.413 |
| 19 | 5 | 0.005 | 0.675 |
| 37 | 7 | 0.007 | 0.937 |
| 61 | 9 | 0.009 | 1.199 |
| 91 | 11 | 0.011 | 1.461 |
| 127 | 13 | 0.013 | 1.723 |
† The clearance is the amount by which the ferrule hexagon is oversized relative to the nominal size taken up by the fibers assuming perfect packing.
| IFU Size | Packing Error (m) | |
|---|---|---|
| (# fibers) | 50% | 90% |
| 7 | 1.1 | 1.8 |
| 19 | 2.0 | 3.8 |
| 37 | 1.5 | 2.7 |
| 61 | 3.6 | 6.3 |
| 91 | 2.7 | 5.1 |
| 127 | 4.2 | 7.3 |
Simulations of cube reconstruction of MaNGA-like observations suggested that a regularity requirement of 5 m RMS fiber positional error would be needed to adequately reconstruct images within data cubes and to keep degradation in the delivered FWHM and axial ratio of a point-like source below 10% (Law et al., 2015b)
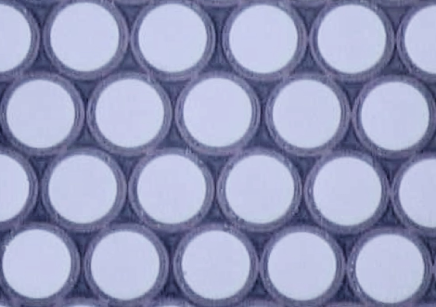
During early development, sets of 19 and 127 fiber ferrules with different IDs from 5 m to 25 m of wall clearance were built to conduct packing tests (see Fig. 5 for an image of one of our proof-of-concept early IFUs). IFU ferrules with 19 fibers and wall clearances down to 5 m packed with ease and showed a much higher level of regularity than expected. Similarly the smallest 127-fiber ferrule with a wall clearance of 10 m packed with little resistance. A key feature in our ability to achieve such small clearances inside the IFU was the prior knowledge of the fiber diameter to within 1 m. This allowed us to dramatically reduced the needed clearance by custom building the ferrules to match the fiber draw on hand. Another key feature, which allowed for very tight manufacturing tolerances was the use of EDM manufacturing methods discussed above that allowed for control of the ferrule internal clearance to within 3 m.
Manufacturing of prototype IFUs showed that fibers have a tendency to group themselves together inside the slightly over-sized hexagonal aperture in a tight array that is offset to one side of the ferrule, thereby preserving better than expected packing density and regularity (see Fig. 5). Prototype ferrules which had a wall clearance of 6 m for the 19 fiber ferrules and 15 m for the 127 fiber ferrules showed extremely good fiber regularity of between 2 and 4 m RMS. The global position offset of the pattern was larger at around 20 m for the 127 fiber IFU. This global offset can be attributed to the fiber biasing to one side of the ferrules and to the offset of the inscribed hexagon in the OD of the ferrule. This offset is measured as part of our metrology quality assessment described below, and is accounted for in the data reduction pipeline (Law et al., 2015a).
Table 2 gives the final ferrule ID tolerances of the production ferrules. These values yield exceptional packing regularity while being easy to assemble. The exact value used for the ferrules is adapted to match the exact OD of the fiber used in production based on measurement and documentation of the fiber OD during the fiber draw.
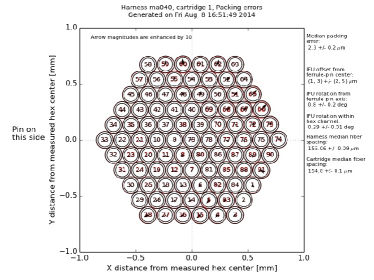
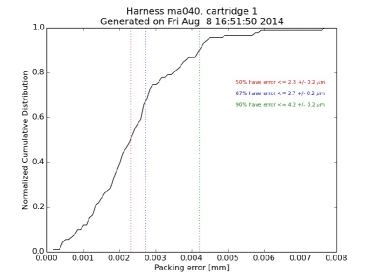
Table 3 shows the packing error associated with the first cartridge build completed in January of 2014, and Fig. 6 shows the metrology data for a typical IFU. Not surprisingly, there is a slight trend towards higher positional error in the packing regularity as the bundle size increases. This is due to the larger assembly clearances, although even the largest size bundle perform better than the goal of 5 m RMS fiber positional accuracy. Finally, Fig. 7 shows closeup images of our IFUs.
3.2.4 Fill Factor
The size and fill-factor of our IFUs are optimized for our target selection (Wake et al., 2015) that enables our science goals of achieving coverage out to 1.5 to 2.5 , sufficient S/N to measure stellar composition gradients and kinematics, and the acquisition of a large sample of 10,000 galaxies. For example, more sparsely spaced fibers can be grouped into wider-field IFUs to sample galaxies with larger apparent size, at the sacrifice of either radial coverage or S/N per pointing on the galaxy. More widely spaced fibers also make PSF characterization (and therefore data-cube reconstruction) more difficult. For these reasons, well-informed by simulations, we concluded that the most desirable IFU configuration was one where the fibers were as closely spaced as possible (Law et al., 2015b) Concerns over durability (fibers are physically handled daily in operations) and throughput uniformity eventually lead us to leave the buffer intact. Even with the intact buffer, our IFUs reach a fill factor of 56%.
| IFU Size | Sky fibers | IFUs | ||||
|---|---|---|---|---|---|---|
| fibers | rings | corner (′′) | flat (′′) | per IFU | per cart | |
| 7 | 1 | 7 | 6 | 1 | 12 | |
| 19 | 2 | 12 | 10.4 | 2 | 2 | |
| 37 | 3 | 17 | 14.7 | 2 | 4 | |
| 61 | 4 | 22 | 19.0 | 4 | 4 | |
| 91 | 5 | 27 | 23.3 | 6 | 2 | |
| 127 | 6 | 32 | 27.7 | 8 | 5 | |
3.2.5 Size Distribution
The IFU complement is optimized in its size distribution given our science goals, available slit real estate, and the natural apparent size and redshift distributions of target galaxies.
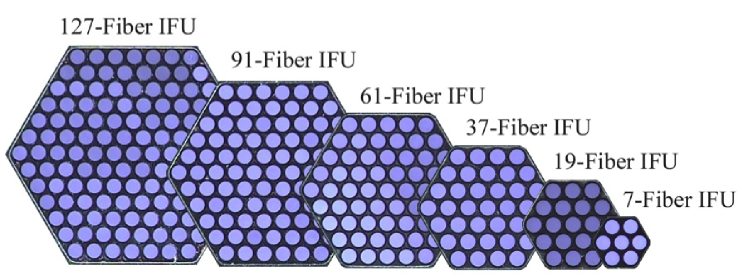
An iterative process of sample design was then conducted to determine the most optimal distribution of the IFU sizes to match with the above mentioned goals. An upper limit of 127 fibers/IFU was implemented as the largest size IFU available primarily because larger IFUs would be costly in terms of total sample size for the survey. The optimal distribution was then based on best matching of the available sized IFUs 19, 37, 61, 91, and 127 to the 1.5 coverage minimum for 7 degree2 fields tiled over the Sloan imaging data base. A closeup image of an IFU of each size is shown in Fig. 7. A full description of this optimization process is presented in Wake et al. (2015). The results of sample selection lead to a single-cartridge complement summarized in Table 4. Angular sizes of the IFUs are measured as edge-to-edge distances of the active cores assuming a plate scale of 60 m per arcsec. The total fiber count is 1423. Of these, 92 are dedicated to sky, 84 are used for spectrophotometric calibration in 12 seven-fiber IFUs, and 1247 fibers are spread between 17 IFUs.
To populate the slit optimally, we set the gap between the edge fibers of neighboring v-groove blocks to 624 m (see 2.3) to allow for characterization of the wings of the fiber light profile as well as for obtaining a handle on scattered light across the CCD. This sets the distance between the V-groove blocks themselves to 313 m. We also limited how far out on the slit we were willing to go to keep aberrations and hence cross talk to the limits determined above and limit the amount of vignetting. We then ran optimizations of the slit area to determine the distribution of IFU fibers between both slits to match best with the optimal complement to cover our galaxy sample determined by Wake et al. (2015).
3.2.6 Fiber Mapping
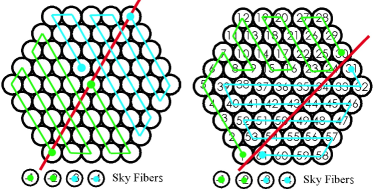
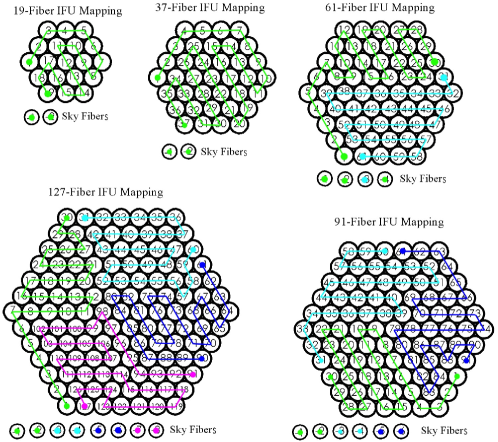
Several considerations made a deterministic mapping of fibers between the 2-dimensional distribution in the IFU and the 1-dimensional distribution in the V-groove blocks along the spectrograph slit a critical aspect of the design. To localize crosstalk at the telescope focal surface at the spectrograph input, we required fibers adjacent on the slit were also adjacent in the IFU. To avoid potential systematic errors along the slit or within the bundle to be mistaken for properties of the observed source, we eliminated spiral mapping patterns.
A more subtle consideration was the effect of the galaxy light on the sky fibers. In the telescope focal plane, sky fibers are free to be plugged within a 14′ radius of their associated IFU. At the spectrograph input, the sky fibers associated with each IFU are placed on either end of the IFUs V-groove blocks. As noted above, this enables us to sample sky both local to the IFU input on sky and in the spectrograph. The effect of an estimated 20% (worst case) cross-talk between fibers means source signal from the one adjacent galaxy fiber could be significant. To keep the sky signal from being overwhelmed by bright fibers (e.g., the centers of some galaxies), we designed a mapping that always places source fibers from the outer most ring of the IFU where the target galaxy surface-brightness will tend to be lowest at the end V-groove blocks adjacent to the sky fibers. We further considered that highly-inclined disk galaxies can have high signal even out to 1.5 , thereby potentially degrading some of the sky fibers due to cross talk. In order to mitigate this risk we implemented a mapping that, while appearing somewhat chaotic, ensures no two sky fibers paired in a single V-groove block are in line with each other across the central axis of the IFU (Fig. 8). This allows any single V-groove block to have at least one sky fiber unaffected by bright areas of the galaxy–at least for axisymmetric systems–while still meeting all of our other mapping requirements. Figure 9 shows the mapping between IFUs and their V-groove blocks chosen to satisfy these considerations.
3.2.7 Protective Rings
Each IFU and sky fiber is handled on a daily basis by the plugging staff at APO. Their task is to plug the IFUs into the field plates during the day for use at night. Plugging technicians plug up to 9 cartridges per day with 421 individual ferrules for MaNGA-APOGEE cartridges; or up to 1000 individual ferrules for an eBOSS cartridge. Due to volume, plugging must be quick and efficient. It is expected that the face of the IFU ferrule will come into incidental contact with the aluminum plug plate during normal operations. IFU fibers take up a significantly larger area of the ferrule face and become more susceptible to damage during plugging operations than the single fiber ferrules used in past SDSS projects. In lab simulations of plugging, damage could be seen on the fiber faces after 150 plugging cycles, half the expected plugging cycles during the survey lifetime for a single IFU. By 150 plugging cycles damage consisted primarily of aluminum chips bonding to the surface of the fibers. Full failure of the AR coating and scratching of the fiber faces did not occur until 550 cycles, almost two times the expected plugging cycles for the survey.
Field testing showed significantly more damage to the fiber faces than from lab tests, however, becoming significant after just 20 plugging cycles. Lab conditions were significantly more gentle than mountain conditions, likely due to the presence of abrasive dust and sand in the air at APO. This prompted us to design a mechanical buffer to protect the optical surface of the ferrule. Because this optical surface must be be free and clear of mechanical obstructions during polishing and coating, we settled on a protective ring, pressing onto the outside diameter of the polished, AR-coated ferrule, and standing 100 m above the polished surface. The ring acts as a bumper to prevent contact of the fiber faces with the plug plate during plugging operations. Fig. 10 shows a closeup image of a ferrule with protective ring. This addition becomes the last step before final performance verification and the fiber assemblies are integrated into the cartridge.
The ferrule ring is a thin section of 303 stainless steel custom machined tubing that presses onto the ferrule with a 9 m interference fit. The ring is built to be significantly thinner than the IFU ferrule wall to insure the majority of the deflection in the press fit goes into the ring and not the IFU ferrule where it could cause FRD. Finite element analysis (FEA) was conducted on the 127 fiber IFU ferrule, which has the thinnest wall, to determine the deflection at the ferrule inner diameter (ID). At the tolerance extremes of the components, the displacement at the ID boundary is less then 2.5 m. The principal stresses at the ID of the ferrule were low, generally less than 15 KSI; the ratio of stress in the ring relative to stress in the ferrule ID was seen to be 4:1 indicating that the ring was absorbing the majority of the press-fit deformation.
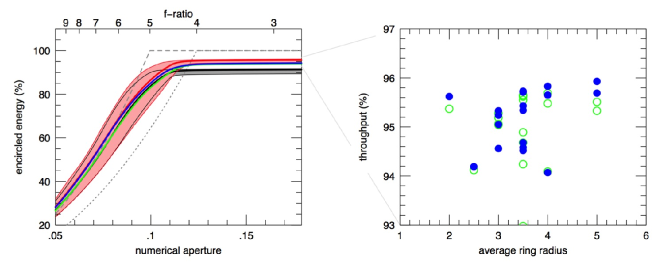
Lab tests confirmed that the ring-pressing does not change the throughput or FRD properties of either 19 or 127-fiber ferrules (Fig. 11). Measurements of the fiber output far-field light profile (shape and amplitude) were made before and after the addition of the press fit rings using equipment described in § 4.5. The results showed no significant difference after the addition of the press-fit rings.
Further lab life-time testing also confirmed that the protective rings eliminated damage to the surface of the IFU after more than 500 plugging cycles. Despite prior differences between lab and field testing, given that damages seem to come primarily from the interaction of the face of the IFU with the surface of the plug plate, we anticipate the protective rings will reduce damage in the field as well. The rings can be removed easily should the IFUs unexpectedly require re-polishing after a period of service.
3.2.8 Plug-Plate Interface
Fiber location in the telescope focal surface must be accurate and repeatable in position (to 0.2”), rotation (3), and focus (% degradation of the PSF delivered by the atmosphere and telescope). Since fibers are positioned on the telescope focal surface with a plug-plate system, plugging must also avoid damage to the plate or ferrule. We achieve all these requirements through design features in our plug plates and ferrules, setting tolerances that balance placement precision with ease of plugging, and a detailed accounting of the error stack-up ensured in practice by quality-assurance measurements of as-built components.
A plug plate consists of a 0.787 m diameter disk of 3.2 mm thick 6061-T6 aluminum drilled with precision holes to a positional accuracy of 9 m RMS. The IFU, sky, guider, and calibration fibers are all plugged into these holes. Upon installation in the cartridge the plates are bent to match the shape of the focal surface of the telescope, which forms a dish 2.6 mm lower in the center than at the field edge (Gunn et al., 2006). This focal surface is non-telecentric. To ensure the fibers are aligned with the incoming ray bundle, the plug plate holes are drilled while bent over a mandrel with suitable curvature. The maximum angle which the vertex of a ray-bundle makes to the normal of the plate is found at 2/3 of the field radius, corresponding to 0.035 radians, or 2 degrees. The maximum vertex deviation is 35% of the half-angle input cone at f/5, and consequently the proper angling of the bore holes is important to avoid so-called non-telecentric FRD (Wynne, 1993).
| Error sources | Error (mm) | Measurement | |
|---|---|---|---|
| As-built | Measured | method | |
| Ferrule concentricity | 0.009 | 0.003 | Smartscope |
| Plugging OD tolerance | 0.004 | 0.004 | micrometer |
| IFU assembly clearance | 0.015 | 0.003 | SDSS test-stand |
| Plugging hole position | 0.009 | 0.005 | CMM |
| Radial hole clearance | 0.014 | 0.014 | none |
| Total RMS error | 0.024 | 0.016 | |

The on-sky orientation of the IFUs is set by a clocking pin in the IFU ferrules, matching a separate smaller hole drilled into the plug plate.
The focal distance of each ferrule is set by a shoulder on the ferrule which acts as a stop against the back side of the plate (see Fig. 4 and 12). In optimizing the focal distances we have considered the consequences of compensating for the non-telecentric beam and curved focal surface on the extended, but flat IFU surface. There are two issues here. The first concerns the simple fact that the IFUs have a flat surface. Clearly, the larger the IFU fiber surface the greater the deviation from the curved focal surface at the edge of the IFU. This is compounded by the requirement to telecentrically align the IFUs. In the worst case the IFUs must be tilted by 2 degrees with respect to the focal-surface normal for telecentric alignment. In this case the penalty in image quality degradation due to defocus in an f/5 is 0.25′′ for the larger IFUs (the edges of the IFU are 31 m above/below focus if the center is in focus), which meets our requirements.

The second focus issue concerns the proper pistoning of the ferrules when they are inserted into the plug-plate. The combination of plate curvature and hole angle (to provide telecentric alignment) modulates the contact-point between the plate back and the ferrule shoulder, and changes the plugging depth as a function of field position. A simple and effective way to mitigate this defocus is to put a slight taper on the shoulder forming the flange at the foot of the ferrule. By doing this, the diameter which determines the vertical intrusion (focus) is the diameter of the ferrule tip rather than the outer diameter of a contact surface, which can be smaller by a significant amount (see Fig. 13). Despite being a single point of contact at the lower side of the bore, the focus error can be reduced to the point where it is no longer significant relative to the seeing. At the edge of our largest IFU this translates to a 0.28′′ image degradation although the typical defocus is 0.16′′.
To determine acceptable ferrule clearance, a set of plates was built with different plugging interface tolerances. These were tested to balance the ability to achieve reliable plugging without excessive force on the ferrule while maintaining positioning and clocking accuracy in accordance with our requirements. An optimal plugging hole clearance of 20 m (diameter) with a larger clocking pin diametric clearance of 172 m was found to be the tightest practical tolerance acceptable for plugging. These clearance tolerances lead to positional errors of 22 m (0.37′′) with 3 degrees of rotational error.
The majority of the errors generated in building plates and IFUs are measurable post facto. For example, we can measure the as-built fiber positions in the IFUs as well as the plugging holes in the plate. Table 5 lists these errors. The first three lines give errors associated with the ferrule fabricated dimensions and the final placement of the fibers within the ferrule aperture. The “Ferrule concentricity” measures the centering of the hexagonal ID to circular (plugging) OD. The “IFU assembly clearance” is the offset of the as-assembled hexagonal array of finers with respect to the ferrule hexagonal ID (errors on individual fiber locations, given in 3.2.3, are part of this component). The fourth line gives the error associated with the location of the holes drilled in the plug-plates. “As-built error” refers to what we expect for fabricating tolerances. “Measured error” refers to how well we know the as-built dimensions after using the measurement-method given in the last column. The total RMS error refers to the uncertainty of where fibers will be placed on sky. As-built errors stack up to 22 m, or 0.37′′, but with our measurement process we will be able to reduce this to 12 m, or 0.2′′.
The above error budget is for a single plugging. Note that our measured error budget is dominated by the clearance between the plate and the plugging ferrule. This means that if we re-plug plates between two successive dark runs to complete a plate we increase the positional error budget by 30%. In other words, there will be 0.17′′ uncertainty (10% of a fiber diameter) in the IFU location, bundle to bundle, between two different pluggings of the same plate with the same IFUs. In addition to the positional error induced from repluggings a rotational error of 3 degrees due to slop in the IFU pin hole can also be accumulated. However, replugging of the same plate is rare (5%), since it is only necessary if a plate cannot be completed during a single dark run.

3.2.9 Sky Ferrule Design
Sky-fiber ferrules (Fig. 12) are nearly identical to BOSS and APOGEE ferrules (Smee et al., 2013, Wilson et al., in prep). The ID is reduced to accommodate MaNGA’s smaller 151 m OD fiber. By using the same overall ferrule design for the sky fibers we are able to use similar tooling and machine code for production and verification measurement, and keep the majority of holes on a MaNGA plate the same size as the APOGEE plugging holes, further reducing production costs. Sky ferrules plug into precision-drilled holes on the plug-plate with 25 m of diameter clearance. The shoulder of the ferrule sets field focus by registering on the bottom of the plug-plate.
3.3. V-Groove Blocks
Blocks come in five different groove (fiber) counts and two different groove spacings. Blocks are built to contain 21, 32, 33, or 39 fibers with 177 m spacing, from which any of the 5 harnesses can be built; and to contain 24 fibers with 204 m spacing for the mini-bundles. Each V-groove block consists of a 17-4 stainless steel base and lid, with a series of 90 deg (i.e., V-shaped) grooves machined into one side with a 100 m EDM wire. These are tiny, high-precision parts (5 mm in length along grooves, a total thickness 3 mm, and a width between 3.85 mm and 7.05 mm depending on fiber count). Several critical design elements are incorporated relative to the initial BOSS design based on lessons learned in APOGEE (Wilson et al., in prep), which was built after the original BOSS fiber system was completed. Modifications include the design of the V-groove mount to the slit-plate, and corrections to the fan-angle of the grooves to account for refraction at the fiber-air interface. Fig. 14 gives an overview of the V-groove block design.
Block thickness is larger than for BOSS to allow #000-120 taped holes for attachment to, and possible later removal from, the slit plate. The additional thickness of 1.25 mm or a total of 2.4 mm amounts to negligible light-loss from obstruction in the collimated beam of 1.5%, and enables much easier assembly and replacement. In comparison, the original BOSS slit blocks are affixed via epoxy.
The grooves fan out slightly so that the output beam of the fiber is matched to the spherical focal surface of the BOSS spectrograph’s collimator. The radius of curvature of the slit is 640.1 mm 222This value corresponds to of the as-built collimator, and deviates slightly from the value quoted in Smee et al. (2013), but the fibers in a block are polished flat. Taking into account the n=1.46 index of refraction of the fused-silica fiber requires a V-groove fan-angle of 0.0108 degrees for an end-spacing of 177 m (or a radius of curvature of 935.9 mm) for proper illumination of the collimator. Because of the flat block face the fibers do not all sit exactly on the focal surface. However, for the largest block this amounts to 5 m of defocus, or only 1.2 m of image blur in an f/4 beam, which is negligible compared to the 120 m fiber core diameter.
The alignment specifications on the V-groove blocks for tip, tilt and piston are satisfied through a combination of manufacturing tolerances on the V-groove blocks, the slit plate (see 3.4.1), and the installation procedures. The specifications and manufacturing tolerances for the V-groove blocks are given here; the total stack-up or slit assembly is discussed in 3.4.2.
The blocks are precision ground such that their flatness and perpendicularity ensures seating on the slit-plate that reduces out-of-plane (tip, or dispersion-axis) angular misalignment limited by the uniformity of the groove depth. The out-of-plane groove tilt is required to be <10 m across the 5 mm block length, or < 0.11 degree. This is the same specification as adopted by BOSS and APOGEE. For the BOSS collimator this requirement keeps the beam deviation at the collimator under 1%. The tip and tilt error for the plane of polish is 0.5 degree. This is controlled by tooling during polish at C-Tech. The alignment of the blocks in tilt and piston on the slit-head are determined during installation, as discussed below.
The end walls of the V-groove block, which retain the lid, and the groove peaks themselves are highly susceptible to damage from handling. In addition, any contamination in the V-grooves will lead to stress on the fibers when the lid is affixed, possibly leading to FRD and fiber mis-alignment in the groove. To minimize damage and contamination, the vendor of the V-groove blocks, Oxford University, developed a ”no touch” manufacturing method. Each V-groove blank is installed onto the EDM machine using a System 3R macro coin-and-part chucking system from Renishaw Inc. This system allows for the the V-groove block to be transitioned from the EDM that cuts the profile of the block, including the indexing surface, to the mill for addition of the tapped holes, and then back to the EDM for cutting the V-groves with no direct handling of the components by the machinist. Published chucking repeatability of this system induces a maximum error of 5 m. We find that the blocks are built to better than 3 m accuracy. A handling bar, attached after the threaded holes are added, is built to interface with visual measuring systems at Oxford and U. Washington so that full quality assurance can be conducted on the blocks without any direct handling. This manufacturing method has eliminated scrap due to handling and enabled us to mass produce high accuracy components at low cost.
3.4. Slit Plate Assembly
Every V-groove block in a cartridge is bolted onto one of two slit plates (12 total for all 6 cartridges), machined at U. Wisconsin. Each slit plate makes up the pseudo-slit of one of the two BOSS spectrographs. The plates act to align the blocks with the input focal surface of the spectrographs, and retain the first 300 mm of fiber so that the fiber and harness tubing do not interfere with the optical path. The primary challenges in the slit plate design and assembly include (1) minimizing the total thickness so that optical obscuration is minimized (the slit sits in collimated beam); (2) ensuring the plate and assembly process yield uniform fiber alignment so that the line-spread function (LSF) is also uniform (this is particularly important for sky-subtraction; see Law et al., 2015a; Yan et al., 2015a; yet (3) providing a means for attaching and unmounting harnesses should they need servicing.
3.4.1 Slit Plate Fabrication Tolerances
Slit plates are each machined from a single 6.3 mm thick cast aluminum 6061-T6 plate measuring 300 mm high by 240 mm deep shown in Fig. 15. Each plate contains T-shaped channels for each V-block set of fibers that help guide and retain the fibers while allowing for thermal expansion and ease of assembly. Slit plates also feature precision-machined mounting surfaces for the V-groove blocks. Front surfaces of the plates are angled at 45 degrees to minimize internal reflections entering the spectrographs.
To limit the amount of beam obscuration, the cross section of the plate in the area of V-groove block mounting is only 1 mm, the same as for the existing BOSS plates. (As discussed in 3.3, the vignetting is dominated by the V-groove blocks.) A key manufacturing concern is the variability of this surface due to its thinness, compounded by the large amount of material removed (84%) from the original cast aluminum plate. Deviation in the height () or tilt () of the surface, corresponding respectively to slit-position and input angle shifts in the spectral dimension, can lead to variations in the spectrograph LSF. These LSF variations would be superimposed on an otherwise smoothly changing LSF due to field-dependent aberrations in the spectrograph optics.
Alignment variations between blocks are of more concern than the total variation across the slit length. Our ability to accurately subtract sky with the highest precision requires interpolating between as many sky spectra as possible, sorted by some measure of their LSF and locality on the sky, as discussed in (Law et al., 2015a). Discontinuous changes in input angle or height from fiber to fiber or block to block translate into discontinuous changes in the LSF for sky fibers that are close together on the sky. To ensure the slit plates will not induce any large LSF variations, each plate is measured using a coordinate measuring machine (CMM) at U. Washington. The global threshold for displacement (i.e., deviations from a perfectly flat surface) in the spectral direction () is set at 100 m (displacements of 40 m along the slit are typical) with an allowable tilt in the spectral direction () of 0.1 degree between block mounting surfaces. Linear trends in () are removed by shimming the slit plate at the time of installation; higher order trends are negligible, resulting in an rms of 0.02 degree.
3.4.2 V-Groove Block Alignment
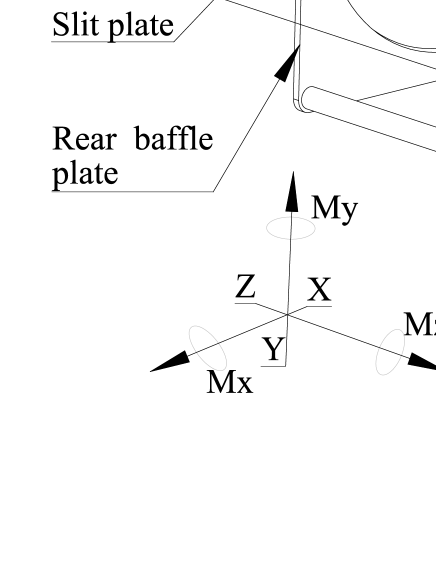
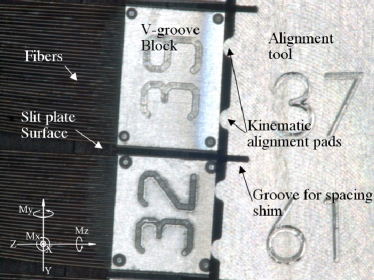
The final phase in the slit-plate assembly is the attachment and alignment of the V-grooves onto the slit plates. Two small 000-120 threaded holes on the bottom are used to attach the V-groove block to the slit plate. This allows a single IFU to be replaced and for its position to be adjusted without affecting other IFUs. A 303 stainless steel alignment tool is attached to the front of the slit plate by two locating holes. The alignment tool serves as the reference surface to which V-groove blocks are positioned in focus (Z), tip in the spatial direction (), and position (Y) along the slit. The V-groove block attachment screws are tightened to establish position and eliminate rotation in the spectral direction (X and , respectively), and to remove any yaw () in the blocks with respect to the spatial axis of the slit. Controlling these latter three degrees of freedom relies on the flatness of the V-groove block and slit plate surfaces, as discussed in 3.3 and 3.4.1, respectively.
Focus and tip are fixed by pushing the face of the V-groove block up against two kinematic indexing features on the face of the alignment tool. The tangent points of the kinematic features are on a surface with a 640.1 mm radius of curvature to position the fibers as closely as possible on the collimator focal surface. Since the V-groove block face is flat, at most two of the fibers can be perfectly focussed on this surface. To minimize defocus along the V-groove, every V-groove block contacts two of these features 1/3 and 2/3 along the face length of the block (Fig. 16). This configuration keeps the maximum defocus to 5 m which is negligible given the approximately f/4 exit beam of the fibers and their 120 m core diameter. The contact of the V-groove block with the kinematic features on the alignment tool is slightly below the fiber faces (to avoid fiber damage) but still on the same polished surface as the fibers. The position along the slit is controlled with 280 m shims built into the alignment tool that interlock with the gaps between the V-grooves to position them to within 25 m of their intended position. The nominal distance between neighboring V-groove blocks is 313 m.
Table 6 lists the accuracy of the as-built slit assembly. The accuracy achieved is close to that predicted by the tolerance analysis. The shift in X is slightly worse than anticipated although it has no effect on the performance of the instrument. The defocus of up to 8 m also has little effect corresponding to an increased images size of 2 m.
| Spectral | Focus | Tip in Fiber | Tip in Spectral | |
| Direction(X) | (Z) | Direction(Mx) | Direction(My) | |
| (mm) | (mm) | (degrees) | (degrees) | |
| Predicted | 0.045 | 0.018 | 0.28 | 0.035 |
| Measured | 0.060 | 0.008 | 0.05 | 0.05 |
3.4.3 V-Groove Ordering in the Pseudo-Slits
Because the total number of IFUs is odd, and because of the range of block lengths required for the different IFUs, some asymmetries in the layout of the slits is requred. Tables 7 and 8 give the order and description of IFUs along each of the two slits, and the amount of slit length used to accommodate each IFU. The location of the fibers for each IFU along the slit is given for the central fiber (in the slit) with respect to the optical axis. At 69 mm from the optical axis the collimator stop vignettes the beam by 5%. This location was used as a practical limit for the available slit length.
Considering the 138 mm of total slit length per spectrograph, our IFU complement, and fiber spacing, we attempted to optimize the slit layout with the following desiderata. First, all V-groove blocks associate with a single IFU were placed contiguously along the slit. Another priority was given to positioning the mini-bundles’ V-groove blocks as close to and along the slit length to best sample the slit with calibration standards. The design of the mini bundle is such that it can be swapped into the position of any 61 fiber IFU. This was done so that, if needed in the future, four more calibration mini-bundles could be added to each existing slit at the cost of two of the four 61-fiber IFUs. In order to allow for this swap, the two replaceable 61 fiber IFUs had to be placed at the ends of the slit, so that the individual mini-bundle V-groove blocks, which are significantly larger than the 32 fiber V-groove blocks used on the 61 fiber IFU, would fit on both sides when installed in place of the 32 fiber block from the IFU harness.
| IFU Type | Number of | Slit Position of | Slit Length |
|---|---|---|---|
| V-Groove Blocks | Central Fiber | Used | |
| (mm) | (mm) | ||
| 61 fiber IFU | 2 | 62.09 | 12.1 |
| 127 fiber IFU | 4 | 43.04 | 25.4 |
| Mini Bundle | 1 | 27.54 | 5.0 |
| 37 fiber IFU | 1 | 21.21 | 6.9 |
| 61 fiber IFU | 2 | 11.34 | 12.1 |
| 127 fiber IFU | 4 | -7.7 | 25.4 |
| 91 fiber IFU | 3 | -29.8 | 18.5 |
| Mini Bundle | 1 | -41.71 | 5.0 |
| 37 fiber IFU | 1 | -48.05 | 6.9 |
| 61 fiber IFU | 2 | -57.92 | 12.1 |
| 19 fiber IFU | 1 | -66.22 | 3.7 |
| IFU Type | Number of | Slit Position of | Slit Length |
|---|---|---|---|
| V-Groove Blocks | Central Fiber | Used | |
| (mm) | (mm) | ||
| 61 fiber IFU | 2 | 62.09 | 12.1 |
| 127 fiber IFU | 4 | 43.04 | 25.4 |
| Mini Bundle | 1 | 27.54 | 5.0 |
| 37 fiber IFU | 1 | 21.21 | 6.9 |
| 91 fiber IFU | 3 | 8.28 | 18.5 |
| 127 fiber IFU | 4 | -13.92 | 25.4 |
| 91 fiber IFU | 3 | -28.74 | 18.5 |
| Mini Bundle | 1 | -48.98 | 5.0 |
| 37 fiber IFU | 1 | -48.05 | 6.9 |
| 127 fiber IFU | 4 | -51.49 | 25.4 |
| 37 fiber IFU | 1 | -57.92 | 6.9 |
3.4.4 Stray Light Considerations
The MaNGA slit obscures mm of a 160 mm diameter beam, or 3.4% of the light, assuming a uniform beam profile. A rectangular baffle at the center of each collimating mirror masks the light which would be reflected onto the slit plate and V-groove block assembly, to minimize ghosting, scattering, and stray light. Because the baffle was designed for the somewhat thinner BOSS slit-plate assembly, there was some concern that ghosting from reflections might be present despite the majority of front-facing surfaces being angled at 45 degrees. Hence, the slit plate is anodized with a standard, unsealed, type-II black anodizing and subsequently coated with Aeroglaze Z306.
To quantify the effect of stray light and possible ghosting, we tilted the collimator through extreme angles in the spectral direction and obtained over-exposed arc-lamp frames.333Because each cartridge places the slits in a unique (but highly repeatable) location with respect to the BOSS spectrograph collimators, these mirrors can be actuated in tip, tilt, and piston to adjust the position of the spectra on the CCD. At the optimal tilt position of the collimator there was no detectable reflected light from the side of the slit plate or reflections from the front of the V-groove blocks, suggesting that the currently installed collimator central baffle works well for MaNGA’s slightly thicker slit assembly.
3.5. AR Coating
The Fresnel loss from each air-glass interface with the fused-silica (FS) fibers amounts to roughly 4% at visible wavelengths. Significant additional losses can come from surface-roughness, due to imperfect polishing, which leaves blemishes on physicals scales of order a wavelength (0.5 m). These imperfections also cause scattering that contributes to FRD. A common solution to both problems is to bond the fiber ends with optical gel to an AR-coated FS plate. This has the advantage of providing a protective cover, and in principle reduces the required level of fiber polish quality. However, the application on the small scale of our IFUs is mechanically challenging.
Another approach is to AR coat the fibers themselves. Direct coating has proven difficult in the past, however Cascade Optics has recently developed a high-performance, multi-layer coating process applied at temperatures and vacuum pressure levels that will not damage the IFUs (epoxies, polyimide fiber buffer, or fiber jacketing). Contamination from outgasing of harness material in the deposition chambers remains a challenge for guaranteeing the best possible performance, but delivered performance, as verified by testing witness samples and the harnesses themselves, demonstrates significant throughput gains.
Unlike most AR coating applications, the AR coating on the fibers covers the fiber faces, the epoxy of the IFU and v-groove termination, and the stainless steel surroundings, all of which have different thermal properties. Because of this CTE mismatch, less than optimal coating parameters were used, namely yet lower vacuum and substrate temperature. Our specification for the coatings are (1) to achieve a reflectivity of <1.5% in the wavelength range of 350-1000nm; (2) during coating, the maximum application temperature must not exceed 50 C, with a minimum pressure of 1e-3 Torr; and (3) during use, coatings must withstand temperature variations from -6 C to 21 C (500 cycles) and humidity variations from 0-100% RH (500 cycles) with no measurable change in optical properties. To test durability (adhesion), coated fiber cables were cycled 500 times and showed no signs of mechanical or optical degradation.

The reflectivity curve for a witness sample is shown in Fig. 17. The variations from batch to batch are at the 0.5% level between 350 and 950 nm. We find the mean throughput increases by 4.5% (absolute) from 911.1% to 95.80.3%. Both the increase in the mean throughput and the decrease in throughput variation is significant. We attribute the latter to the improvement in the surface smoothness (e.g., Eigenbrot et al., 2012).
Our measurements were made primarily at 550 nm (in a band-pass defined by the Johnson V filter). To verify the broad band-pass of the coating several fibers were measured at 420 nm and 800 nm in intermediate (Stromgren) and broad (Johnson I) filters, leading us to conclude that the throughput values from 420-800 nm are uniform (see Fig. 3). In summary, these AR coatings improve our harness throughput from 89-92% to 95-96% (4.5% gain in the mean) with manageable risk given our experience with life-time testing and thermal cycling.
3.6. Strain Relief and Stress Considerations
Fiber stress can lead to FRD-induced throughput loss, and arises in our system from three principle sources. The first is a combination of epoxy and polishing-induced damage and surface roughness at the fiber terminations. For this reason, the fiber is only attached to the assembly at the small glue joint at the ferrule tip and again at the V-groove block attached to the slit of the spectrograph. These contributions to fiber stress appear to be minimal, as indicated by our laboratory throughput measurements, due to the minimal glue length, careful handling, and AR-coating.
The second source of stress arises from the routing of the harnesses in the cartridge and their handling during plugging and storage. Fiber jacketing is attached to both sky and IFU ferrules with a glue joint on the back end of the ferrule. This acts as a strain relief to insure that load induced during plugging operations is not transmitted to the fiber. The fiber jacketing over the 0.7 m of the plugging length of the IFU is rugged PVC covered steel mono-coil tube. Inside of this tube all of the fiber are bundled into a soft Teflon tube, which slides easily inside of the mono-coil.
The third source of stress can arise due to CTE mismatch between the FS fiber and the harness jacketing. Differential changes in length over the 1.8 m harness between -6 C and 21 C are estimated to be no more than 2.4 mm. Roughly 45 mm of bare fiber extend between the end of the V-groove block jacketing and the back of the V-groove block. The jacketing and fiber are carefully routed in T-shaped slots in the slit-plate (3.4.1). This length is more than ample to decouple the low CTE fiber and high CTE jacketing.
4. Metrology
Metrology throughout the production process played an important role in the development of the IFUs and in their subsequent observational use. This included design-contingent measurements, such as the as-built OD of the fiber for fine tuning of the ferrule ID; measurements for quality-assurance and acceptance of components on a pass/fail basis, such as sky ferrule concentricity and V-groove blocks flatness; and ending with as-built measurements that are used in data reduction to better constrain the positional accuracy of the IFUs on sky. Metrology data used for data reduction must be readily available to the data reduction pipeline. To store and access all of this information, a database has been developed called mangaCore (Law et al., 2015a). This database includes all of the information derived during production.
4.1. Hex Ferrules
After machining the ferrules, we use a SmartScope video measuring system built by Optical Gauge Products, Inc., to measure all of the critical dimensions of the hexagon 10 times and ensure that they are within 3 m of the intended size. Non-complient ferrules are discarded. The rotation of the hexagon relative to the pin is also measured and recorded, as is the relative offset of the hexagon to the ferrule OD. Each ferrule is given a 4-digit serial number. All measurements are ingested into mangaCore and used in data reduction.
4.2. Sky Ferrules
Sky ferrules are measured in a similar way to the hexagonal ferrules. The most critical dimensions and uncertainties are as follows: ferrule ID, 0.154 0.004/0.003 mm; concentricity with respect to the OD, 0.013 mm; and ferrule plugging OD, 2.1540.003 mm. The resulting positional uncertainty in the sky fiber location from all error sources is accounted for when selecting targeted sky positions.
4.3. V-Groove Blocks
Several important dimensions of every V-groove block are also repeatedly measured to ensure that the blocks adequately position fibers with respect to the spectrograph. The groove spacing must be 0.1770.005 mm for the IFU block and 0.200.005 mm for the mini-bundles. Measurements of the V-groove positions at the back in addition to the front surface of the blocks can is used to ensure that the fan angle of the block is 0.0108 degrees. The height of the V-groove block above the indexing face is controlled to 2.5000.005 mm with a planarity requirement of 0.010 mm. As with the ferrules, automated analysis discards non-complient parts.
4.4. Plug Plates
The plug plate verification system is largely unchanged from earlier incarnations of SDSS. The positions of the IFU holes on the plates is measured on the Coordinate Measuring Machine (CMM) at U. Washington. Their positions are required to be within 12 m RMS of the designed location. The hole locations are then incorporated into mangaCore for use in data reduction.
4.5. Laboratory Measurements of IFUs
Three fiber test-stands are available to MaNGA for development and production. The first, referred to as TSW, is lab infrastructure at U. Wisconsin developed for fibers on the WIYN and SALT telescopes (Bershady et al., 2004; Crause et al., 2008), capable of measuring throughput and FRD (far-field profile) in a filtered band-pass with an adjustable input beam. This is a double-differential system that compares direct and fiber-fed output far-field beam images while simultaneously monitoring the filtered input source with a photo-diode. A slide enables rapid exchange of filters with minimal need to refocus between 400-800 nm. Recent addition of pellicles allow for near-field imaging of both input and output fiber surfaces. By measuring the far-field pattern it is possible to separate throughput and FRD signals. Results using this system have been shown in previous sections for the test-termination and prototype IFUs (Fig. 11). However, the system is manually operated and therefore time-consuming for making measurements on many fibers; it is also not designed for precision metrology measurements of the IFU face so it is not used for production validation of the MaNGA IFUs.
The second and third test-stands are identical units based on the heritage SDSS test-stands (Smee et al., 2013), one (TS1) intended for delivery to the vendor to determine performance compliance of fiber products before shipment, and the other (TS2) for verification at U. Wisconsin after AR-coating but before installation on the telescope.
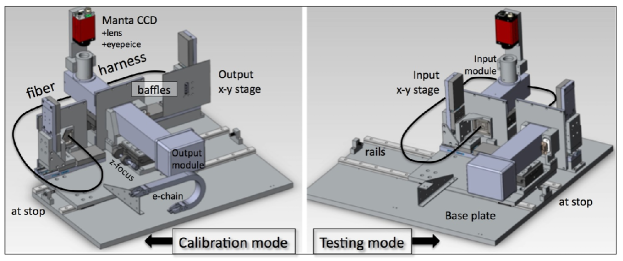
For SDSS-IV, the test stands were augmented to handle automated testing of all fibers in MaNGA via 4-axis, computer-controlled actuation of the fiber input and output mounts. In their modified configuration, the test stands serve two primary functions: (i) verification of throughput, with a requirement of 2% precision and external accuracy to avoid spurious rejection of harnesses for low performance at about the 4 level; and (ii) measurement of the as built position of each fiber and its mapping within the IFU head, with a precision requirement of relative fiber locations better than 2 m. For backward compatibility, the interface and automated control also handles single-fiber harnesses for other SDSS-IV experiments such as eBOSS and APOGEE-2. The new test-stand layout is shown in Fig. 18.
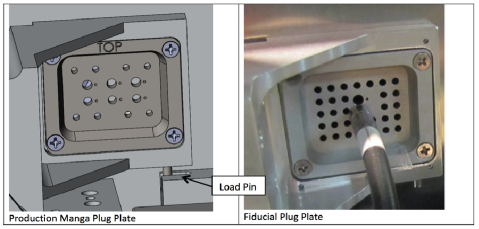
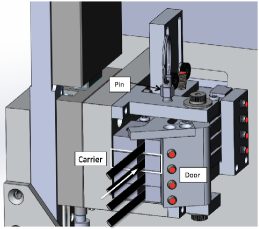
For testing, all fibers ferrules in a given harness are loaded manually into interchangable, miniature plug-plates that mount onto the x-y stage servicing the input module interface. The plug-plates, shown in Fig. 19, are 1.5 in 1.75 in in size, with active plugging regions of 0.75 in 1 in that enable the motorized stages to center each fiber on the input beam. One plate is configured for the MaNGA calibration harnesses, containing three, pinned mini-IFU ferrules and eight sky ferrues. A second plate covers all other harnesses, containing holes for a pinned IFU ferrule and up to 30 sky-fiber ferrules (to also accomodate eBOSS and APOGEE harnesses). At the output end of the system, the V-groove blocks are stacked vertically on a matching x-y stage that services the output module interface. To ensure the fiber exit surface is well aligned with the output module (parfocal with the input beam), each V-groove is mounted and aligned (in piston, tip and tilt) inside of a rectangular, aluminum carrier by the vendor; this carrier also serves to protect the termination during shipping, coating, testing, and installation. The mechanical alignment within the carrier takes advantage of the flat block surfaces and mounting taps. The mechanical alignment of the carriers in the output interface is ensured with precision stop surfaces and pre-loads in vertical and horizontal dimensions. Ferrule (input) and block (output) mechanical interfaces enable rapid and repeatable harness loading, and they establish nominal relative locations for all fibers in the two focal surfaces of the test-stand.
Like the Wisconsin test-stand, the SDSS test-stands are differential photometers, comparing a photo-diode measurement of the input beam signal (“calibration mode”) through the same optical path as the fiber output beam (“testing mode”). The stability of the input beam is monitored before and after each harness measurement.
To characterize the IFU metrology and also ensure accurate placement of the 50 m illumination spot onto the fiber face for throughput testing, fiber positions within the IFU and associated sky fibers are determined by back-illuminating the V-groove blocks of the harness with LEDs. Images of the fiber faces are taken with a camera mounted on the input module, adapting to the pellicle beam-splitter and eye-peice described in (Smee et al., 2013). The camera provides a 3.5 mm field of view sampled at 2.86 m, with distortions of 1.3% at the field edge, corrected using reference images of a calibration grid. This is sufficient to image our largest IFUs in their entirety and provide better than 1 m position estimates for every fiber.
Fiber positions are measured automatically from these images via several image transforms, illustrated in Fig. 20. The Hough transform serves to filter out contaminant signal in the derivative image, e.g., from the illumination spot, while the convolution enhances the central peak relative to the background. The fiber centers are determined from a peak-finding algorithm on this final (convolved) image. We find the fiber centering uncertainty to be m, well below our requirements.
The global location of the fibers within the IFU are determined relative to the ferrule hexagonal aperture, identified from a seprate image of the ferrule when front-illuminated with LEDs. This centration and clocking of this aperture with respect to the ferrule OD and pin are known from CMM measurements of each ferrule prior to harness fabrication, as described in Section 4.1. The error stack-up on the absolute fiber location within the ferrule is m in translation; the rotation of the hexagonal pattern with respect to the clocking pin is known to ; this is well below the 22 m translation uncertainty and rotational uncertainty in the ferrule plugging due to the required hole tolerances for the telescope plug plates (Section 3.2.8). The metrology information is saved under the serial number of a harness in mangaCore for later use in correcting the positional information in the data cube. An example of the metrology output plots can be seen in Fig. 6.
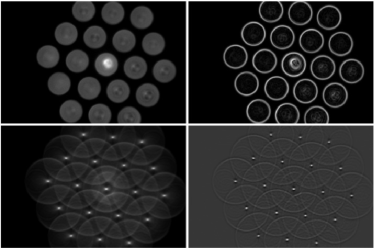
To measure throughput, once the location of every fiber is known, the 2-axis stage at the input interface positions the input illumination spot onto the center of every single fiber in a defined sequence. The stages are very accurate, with uncertainties of m for under 5 mm of travel, decreasing to nm on travel of order the fiber diameter. As each fiber is illuminated, a second 2-axis stage positions the output fiber blocks to peak up the emergent light signal reimaged onto, and measured by, a photodiode in the heritage output module. This signal is compared to the average signal from the direct beam measured just before and just after the fiber measurements. Sequences with direct-beam measurements that drift (before to after) by more than 1% are discarded, which rarely occurs when the lamp is allowed to warm up for a period of one hour. A fiber harness is deemed acceptable if all individual fiber throughput measurements are above 85% before AR coating. In practice we measure average throughputs of 96%0.5% after AR coating. The sequence also builds up a mapping table between the IFU and slit. An example of the throughput output plots can be seen in Fig. 21.
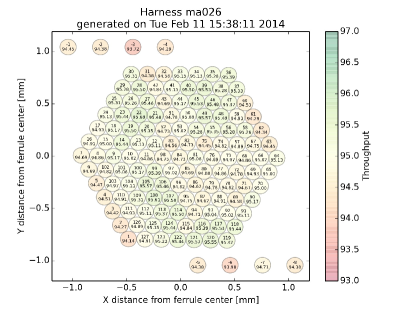
To anticipate the comparison of laboratory to on-sky thoughput measurements, several aspects of the SDSS test-stand are worth noting:
(1) The illumination spot is placed approximately at the center of every fiber. Compared to on-telescope coupling, this near-field illumination is more concentrated than the PSF in most seeing conditions, and less diffuse than dome-flats or sky. In principle this might lead to differences in mode-coupling that would yield throughput estimates in the lab unrepresentative of on-sky performance. However, we compared throughput measurments for different spot locations on several fibers, and didn’t not find discernable throughput variations.
(2) The throughput is measured for a specific input spectrum defined by the lamp temperature (3200 K at 100% output) and a BG38 filter for color-balance (located in the collimated beam of one-to-one reimaging optics in the output module) convolved with the photo-diode response function (Melles-Griot DSI 007). The lab measurements should be representative of values measured on telescope in the and bands.
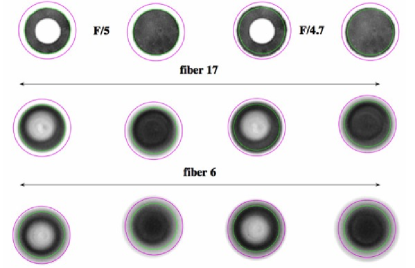
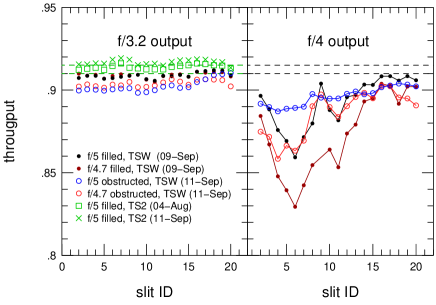
(3) The SDSS input modules inject a highly uniform, f/5 input beam into the fibers, matching the Sloan 2.5m telescope input f-ratio, but missing the telescope’s f/10 central obstruction. Our lab measurements also do not simulate the effects of non-telecentricity introduced by drill errors, hole tolerances, and plate-to-focal-surface mismatch (see § 5.2 below). Non-telecentricity may introduce an effective beam speed as fast as f/4.7. To investigate the impact of differences between light injection in the lab and on-telescope on system throughput, we re-measured the output beam profiles for one 19-fiber harness (MA053, uncoated) on TSW with an input pupil matching the Sloan 2.5m telescope (including the central obstruction), and then again for an f/4.7 input beam (with the same obstruction). Examples of the input and output far-field beams are shown in Fig. 22. The flux enclosed within f/4 output beam is % for a filled f/5 input beam, rising only slightly but with half the scatter to % when adding the central obstruction, and returning to % for an f/4.7 input beam with the same central obstruction. In short, the detailed input beam profile differences between the lab and on-telescope should have marginal impact on performance estimates for light emerging from fibers within f/4.
(4) We discovered that the output modules in TS1 and TS2 accept beam speeds as fast as f/3.2 0.03 (depending on up to 0.5 mm of defocus). Faster light is rejected by use of a field stop, but this is significantly faster than the f/4 acceptance of the BOSS spectrograph optics. Based again on our measurements with TSW, (compared to TS2 in Fig. 23), in the mean we find the percentage of light coming out of the fiber between f/4 and f/3.2 is 2% for a filled f/5 input beam; 1% for an f/5 input beam including an f/10 central obstruction; and 2% for an f/4.7 input beam including an f/10 central obstruction. Some fibers with the most FRD exhibit two to three times as much light at these fast output speeds, but in realistic conditions on telescope, the difference between lab and telescope throughput should be within 5%.
5. On-sky Performance
A primary constraint derived from the science requirements is that the instrument perform as well or better than the single-fiber BOSS system in both throughput and stability. This is driven by simulations conducted using BOSS data showing that BOSS-like performance would meet MaNGA’s objectives.
5.1. AR Coating Gains
The addition of an AR coating directly to the fiber faces on the IFU and V-groove terminations has been shown to be effective in both witness samples and laboratory testing of the fibers (see § 3.5). A second useful check of the coatings effectiveness was to test the transmission of the coated IFU fibers next to the uncoated BOSS fibers to verify the improvement in throughput. A sequence of flat fields was taken with a BOSS cartridge, and then while keeping the flat field lamps on, the same sequence was repeated with a MaNGA cartridge. To verify the stability of the flat field lamps, another set of exposures was taken with the BOSS cartridge after the MaNGA sequence. Each flat was bias subtracted and a pixel mask was applied. A mean fiber throughput was then generated for each flat field by summing up the total flux in the image and dividing by the number of fibers on the CCD. Over the roughly 30 minutes of testing, the lamps themselves were remarkably stable at less than 0.3% variability. The improvement seen from the AR coating on the IFUs as compared to the BOSS fibers is 6% in the blue camera and 4% in the red camera. This is well in line with what is expect from both reflectance curves of witness samples and from results seen in the SDSS test stand which suggested a 4% gain in throughput.
5.2. Detailed Throughput Measurements
The BOSS spectrographs accept light within an f/4 input cone from a properly aligned fiber on the slit. In an idealized instrument, the only losses in total throughput are attenuation in the fiber, 110 dB/km at 300 nm (0.5%; Fig. 3) and the Fresnel losses at the ends of the fiber. AR coating reduces these end losses to 1.5% (Fig. 17), suggesting a theoretical maximum throughput of 96.5% through at an output of f/4. Lab measurements (Section 4.5) reveal a throughput value of 960.5% into an f/3.2 aperture stop. Lab testing accounts for FRD caused by surface finish at both input and output, and stresses induced from epoxy at the ferrule and v-groove ends of the fiber harness.
The lab measurements do not account for stress induced FRD generated from bending, twisting, or pulling the fibers within the cartridge, input angular misalignment induced at the plug plate, misalignment at the slit, or contamination-induced throughput losses from operating in an imperfectly-controlled environment. To fully understand the throughput of the system in-use as compared to the laboratory measurements (Fig. 30), flat fields are used to generate relative throughput plots of fibers with respect to the best-performing fiber within a given cartridge. Figure 24 shows the fiber throughput distribution of fibers within a single cartridge. All of the single traces within this plot are normalized to the highest performing fiber within that set of flats, so this plot is only useful in understanding the throughput distribution within a cartridge and can not be used as a absolute comparison between lab measurements and on telescope measurements.
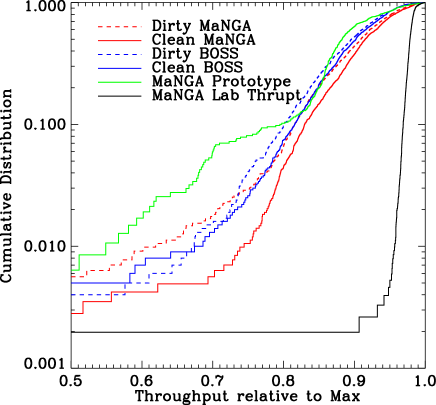
It is immediately obvious from Fig. 24 that there is a difference between the distribution of throughput values measured in the lab (solid black line), where 90% of the fibers achieve 96% of the throughput of the highest performing fiber, and the on-telescope measurement (solid red line) which suggests that 90% of the fibers perform within 83% of the best case. This significantly higher level of throughput variation is attributed to slightly higher FRD on the telescope (see Section 5.2.1), compounding beam pointing errors, vignetting in the spectrographs, residue contamination of the IFUs, and other unknown sources of losses. The breakdown of these additional losses is discussed in detaol below. It is worth pointing out that when the IFUs are clean, the level of throughtput variation between fibers is significantly lower than that found in clean BOSS single fiber ferrules (Fig. 24). When allowed to become contaminated the throughput variation between fibers becomes comparable to that found in the BOSS single fiber system. Cleaning methods discussed in section 5.2.5 reduce the level of contamination on the IFUs. The on-telescope performance of both the BOSS and MaNGA fibers has far less variability than the early prototype IFUs. Analysis of the prototype data clearly led to significant improvements in virtually all components of the MaNGA system.
5.2.1 Stress-Induced Focal Radio Degradation
In an attempt to quantify the stress-induced FRD that could be contributing to the higher variability in fiber throughput in the cartridge, an IFU harness in the lab was subjected to bending, and torsional loading in excess of what would be experienced in operation at the telescope. Typical bend radii within a cartridge are seen to be no smaller 2 inches in radius. A single bend within this stress state will induce an average FRD loss of 0.6% with an RMS at about the same level, the maximum loss seen was 2.65%. A more extreme bending case was evaluated to understand the upper limit in FRD a bend in the IFU cable could produce. This was done by tying a knot in the plugging section of the IFU cable (Fig. 26) with as small as a 0.5 inch bend radius. This exceedingly tight bend produced significantly higher losses of 3.5% on average with a maximum observed loss of 6%. Fig. 25 showes the throughput for all 39 fibers in the harness used for this test under 0.5 and 1 inch bend radius. Torsional loading had less of an effect on the throughput, a 360 degree rotation produced on average a 1% loss in throughput with a maximum loss of 1.6%. Somewhat surprisingly, torsional bends of 180 and 720 degrees produced similar averages and maximum throughput losses as the 360 degree test.
Given the layout of the cartridge and the positions the fibers are put into when plugged, it is conceivable to produce a few bends and two twists in the harnesses. Using these tests as a guide we estimate a contribution of typically % and a maximum of 6% to the total difference between lab and on telescope throughput.
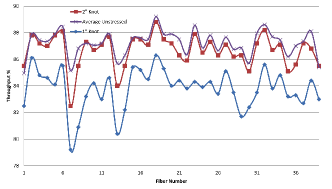
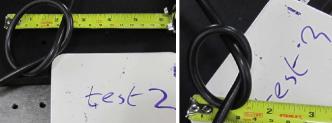
An independent test of the conjecture that stress-induced FRD in plugging contributes to the throughput losses can be obtained by realizing that these losses would be variable from plugging to plugging, while other sources of losses are static (at least on short time scales). Hence we look at the relative variablity of each fiber in sequences of flat fields taken with the same plate, but with the fibers removed and replugged in between each flat exposure (13 exposures total). The results are shown in Fig. 27. In quite good agreement to the lab analysis, we find that the mode of the distribuiton of variability is at 2.5% with the 68th percentile at 4%. The effect of this stress-induced component is shown as the magenta line in Fig. 30.


5.2.2 Slit Misalignment
While stress-induced FRD and vignetting does explain most of the difference in throughput between the lab measurements and the on-telescope measurements, it dose not explain all of the difference (see Fig. 30). Originally, beam angle both at the telescope focal plane and the spectrograph input was considered a prime suspect for the remaining variability. After further investigation this proved to not be the case. Variability on the slit plate angle seen from dummy builds as well as measured variations of production components show a maximum angular misalignment of 0.003 radians or 0.17 degrees (see 3.4.2). This alignment precision is confirmed by comparing the flux in arc line images taken with one of the two Hartman doors installed in the spectrographs closed. The difference in flux between the left Hartmann and right Hartmann image of the same line corresponds to first order to a pupil illumination difference due to misalignmet. These data suggest that the fibers are aimed correctly at the 0.14 degree level, in line with the mechanical measurements. If we assume a uniform beam profile coming out of the fibers at f/4 this will translate into a less than 0.1% throughput loss.
5.2.3 IFU Ferrule/Plate Misalignment
The IFUs can show up to 0.35 degrees of angular misalignment with respect to the chief ray at the telescope focal plane due to mechanical tolerances of the plate holes and ferrules (see § 3.2.8). When plugged, forces from the bent sheathing very likely push the ferrules from the neutral position to the extreme of motion allowed by the slightly oversized hole. When the ferrule and hole are at the extreme of the fabrication tolerance range, this will cause degradation of the output beam from f/5 to f/4.7 in the absence of any other sources of fiber-induced FRD simply because the fiber is a perfect azimuthal scrambler of the input beam. This geometrically induced faster output beam is often referred to as geometric FRD, but is exactly what is described by Wynne (1993) as non-telecentric FRD. At the fiber output, in our case at most 6% of the light is pushed beyond the f/4 acceptance cone of the collimator (§ 4.5; see also Murphy et al. (2008)). We cannot measure this effect directly in our hardware or data. We therefore simulate plug plates by randomly choosing ferrule-hole clearances using the measured ferrule and hole tolerances (Tables 2 and 5), calculating the resulting tilt of the ferrule, and using the measurements from § 4.5 and Fig. 23 to estimate the amount of light lost for each IFU. We generate 25 such realizations and add them fiber by fiber to the cumulative throughput distributions shown in Fig. 30. The range of results (peak-to-peak) is shown as the green shaded region which seems to lead to throughput values consistent with what we measure on the telescope (red solid line). Hence this effect seems to account for all of the remaining throughput losses.
5.2.4 Stability with Flexing and Gravity
MaNGA observations are divided into sets of 3 dithered 15-minute exposures. Under optimal observing conditions a single plate can reach the required S/N in two such dither sets, however, needing three exposure sets will be the common case. Because of constraints imposed by differential atmospheric refraction (DAR) on the hour angle range a plate can be observed at (Law et al., 2015b), the maximum time between calibration exposures is 90 minutes (a full description of MaNGA observing is given in Yan et al. (2015a) and Law et al. (2015b).)
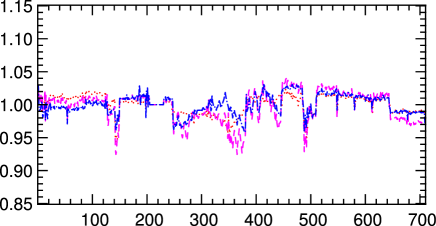
Because the IFU cables are significantly longer and heavier than the BOSS single fiber ferrules, there is concern over the potential for the changing gravity load during an exposure set due to rotator motion to cause throughput variability by inducing FRD in the fibers, instrument and telescope flexure, or possibly movements of the fibers themselves within their plugging hole. None of these causes could be easily simulated in the lab so tests were conducted on the telescope to characterize variability induced by changes in the gravity vector. With the telescope at the stow altitude of 30 degrees, we rotate the instrument through 270 degrees and take flat fields at four positions. Figure 28 shows the variability in throughput seen in this test. Not surprisingly, the largest effect on throughput can be seen at a 180 degree rotation. The variability over this large of a change in rotator angle can be as high as 3%. In practise, however, over a 90 minute observing window the maximum change in the gravity vector on the instrument is no larger than 19 degrees, which leads to less than 0.25% variability in throughput.
5.2.5 IFU Contamination
Contamination of the IFU fiber faces is also seen to be a significant effect on overall performance of the fiber system. In particular, extremely low performing fibers (80% throughput compared to the best fiber) are almost always attributable to contamination on the IFU face. While the site itself can be extremely dusty, particularly in the spring, the majority of the contamination of the MaNGA IFUs come from handling during plugging operations. Particulate contamination in the form of aluminum dust generated from the plug plate and environmental contamination such as pollen and gypsum have been observed on the faces of the IFUs (Fig. 29). Chemical contamination from finger oils and machine grease found on the cartridge handling system have also been found to be present and affect the amount and rate at which particles adhere to the IFU faces.
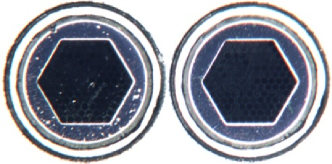
Contamination has been observed to build up after only a few pluggings and can cause a significant loss in throughput both in localized areas of the IFU leading to higher variability, and across the entire bundle leading to degraded overall throughput at about the 10% level (see before/after cleaning curves in Fig. 24).
In order to reduce throughput losses due to contamination a number of mitigation strategies aiming at better environmental control have been put in place. Pluggers are now required to wear cleanroom gloves when handling the fibers. Grease and dust contamination from equipment has been reduced through regular wipedowns of the equipment and the plugging lab. CO2 snow cleaning of the each plate after plugging is complete has been introduced to remove any dust prior to stowing the (covered) cartridge in the bay for later observations. Lastly, ultrasonic cleaning for one minute with immersion in pure methanol has been shown to remove all contamination from the surface and returns the IFUs to pristine condition. This procedure is now performed monthly on all fibers.
5.3. Throughput Summary
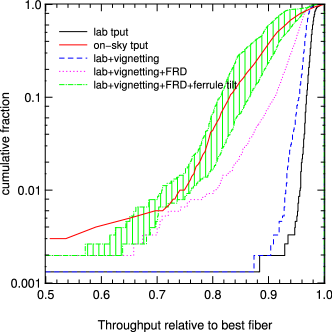
We show the breakdown of throughput losses due to various causes discussed in the sections above in Fig. 30. We take the throughput distribution of our fibers as measured in the lab and on-telescope (see Fig. 24) and compare it to the sum of FRD losses (Fig. 27), geometric FRD effects, and losses due to vignetting along the slit. We note that these effects explain the bulk of the losses seen between the lab measurements and the on-telescope data. Additional effects, such as fiber surface contamination (after cleaning), fiber/slit alignment issues, flexing in the spectrograph, must contribute only of the order of a few percent at most. All effects discussed in the above sections are equally affecting the MaNGA IFUs and the single-fiber BOSS system.
6. Summary and Outlook
We describe the design, manufacture, and performance of bare-fiber integral field units for the MaNGA survey (Mapping Nearby Galaxies at APO) within SDSS-IV at the Sloan 2.5 m telescope at Apache Point Observatory (APO). Our IFUs have hexagonal dense packing of fibers with packing regularity of 3 m (RMS), and throughput of 960.5% from 350 nm to 1 m in the lab. The IFUs for MaNGA range from 19 to 127 fibers (3-7 hexagonal layers). High throughput (and low focal-ratio degradation) is achieved via intact cladding and buffer, excellent surface polish, and direct application of multi-layer AR coating to the input (IFU) and output (slit) fiber surfaces. On-sky data illustrate the performance of this IFU design. In operations at Apache Point Observatory, the IFUs show only an additional 2.5% FRD-related variability in throughput despite repeated mechanical stressing during plugging and unplugging of plates, and achieve on-sky throughput 5% above the single-fiber feeds used in SDSS-III/BOSS, attributable to no worse FRD and the addition of the AR coating. The manufacturing process is geared toward mass-production of high-multiplex systems. The low-stress process involves a precision ferrule with hexagonal inner surface shape designed to lead inserted fibers to settle in a near-ideal dense hexagonal pattern. The ferrule inner diameter is tapered at progressively shallower angles toward its tip and the final 2 mm are straight and only a few micron larger than necessary to hold the desired number of fibers. This ferrule is made possible by the application of EDM fabrication processes. To assure quality, automated testing in a simple and inexpensive system enables complete characterization of throughput and fiber metrology. The IFU fabrication process described here uses 120:132:150 m core:clad:buffer fibers to achieve filling factors of 56%, but can be applied to other fiber sizes and larger numbers of fibers. Future applications of this IFU manufacturing process include much larger IFUs, and possibly higher fill-factors with stripped buffer, de-cladding, or lenslet coupling.
It is of broader interest to reflect here on several salient features of our design. The first concerns the trade-off between filling-factor and field coverage in the context of a specific survey sample and science goals. To cover a certain number of galaxies over a range of angular scales depends primarily on the total number of spatial apertures (e.g., fibers) of a given size, not how tightly they are configured. What drives our filling factor is, on one hand, the desire to maintain fidelity in the spatial sampling and reconstruction of the spectral image. On the other hand, we must match the angular scale of our IFUs with the surface-density of suitable targets. It is simply fortuitous that the fiber spacing required for image-reconstruction fidelity yields a good match to the telescope and spectrograph fields of view and the available targets; we have simply capitalized on this happenstance.
Directly related to fiber spacing scale is the consideration of spacing regularity. As we have shown, high-precision placement of fibers in a regular grid enables accurate image reconstruction without 100% fill-factor. In particular, this is the case even in the presence of differential atmospheric refraction, where for for wide-field survey applications atmospheric dispersion correctors are impractical or cost-ineffective. Our technical achievement in high-precision fiber IFUs will help future instruments interface with lenslet arrays and minimize A losses (entropy increase). These losses occur due to the necessity of over-sizing fibers to accommodate for alignment errors between the fiber input face and the pupil image formed by the lenslet, and the ensuant radial scrambling over the fiber run which fills the output fiber face.
References
- Arribas et al. (1991) Arribas, S., Mediavilla, E., & Rasilla, J. L. 1991, ApJ, 369, 260
- Barden et al. (1998) Barden, S. C., Sawyer, D. G., & Honeycutt, R. K. 1998, in Society of Photo-Optical Instrumentation Engineers (SPIE) Conference Series, Vol. 3355, Optical Astronomical Instrumentation, ed. S. D’Odorico, 892
- Bershady et al. (2004) Bershady, M. A., Andersen, D. R., Harker, J., Ramsey, L. W., & Verheijen, M. A. W. 2004, PASP, 116, 565
- Bershady et al. (2005) Bershady, M. A., Andersen, D. R., Verheijen, M. A. W., Westfall, K. B., Crawford, S. M., & Swaters, R. A. 2005, ApJS, 156, 311
- Bland-Hawthorn et al. (2010) Bland-Hawthorn, J., et al. 2010, in Society of Photo-Optical Instrumentation Engineers (SPIE) Conference Series, Vol. 7735, Society of Photo-Optical Instrumentation Engineers (SPIE) Conference Series
- Bryant et al. (2014) Bryant, J. J., Bland-Hawthorn, J., Fogarty, L. M. R., Lawrence, J. S., & Croom, S. M. 2014, MNRAS, 438, 869
- Bundy et al. (2015) Bundy, K., et al., 2014, ApJ, in press
- Crause et al. (2008) Crause, L., Bershady, M., & Buckley, D. 2008, in Society of Photo-Optical Instrumentation Engineers (SPIE) Conference Series, Vol. 7014, Society of Photo-Optical Instrumentation Engineers (SPIE) Conference Series
- Croom et al. (2012) Croom, S. M., et al. 2012, MNRAS, 421, 872
- Eigenbrot et al. (2012) Eigenbrot, A. D., Bershady, M. A., & Wood, C. M. 2012, in Society of Photo-Optical Instrumentation Engineers (SPIE) Conference Series, Vol. 8446, Society of Photo-Optical Instrumentation Engineers (SPIE) Conference Series
- Fabricant et al. (2005) Fabricant, D., et al. 2005, PASP, 117, 1411
- Fabricius et al. (2008) Fabricius, M. H., Barnes, S., Bender, R., Drory, N., Grupp, F., Hill, G. J., Hopp, U., & MacQueen, P. J. 2008, in Society of Photo-Optical Instrumentation Engineers (SPIE) Conference Series, Vol. 7014, Society of Photo-Optical Instrumentation Engineers (SPIE) Conference Series
- Gunn et al. (2006) Gunn, J. E., et al. 2006, AJ, 131, 2332
- Hill et al. (2008) Hill, G. J., et al. 2008, in Society of Photo-Optical Instrumentation Engineers (SPIE) Conference Series, Vol. 7014, Society of Photo-Optical Instrumentation Engineers (SPIE) Conference Series
- Kelz et al. (2006) Kelz, A., et al. 2006, PASP, 118, 129
- Law et al. (2015a) Law, D. R., et al. 2015a, ApJ, in prep
- Law et al. (2015b) Law, D. R., Bundy, K., Bershady, M. A., Drory, N., MacDonald, N., Wake, D. A., Weijmans, A.-M., & Yan, R. 2015b, ApJ, in prep
- Murphy et al. (2008) Murphy, J. D., MacQueen, P. J., Hill, G. J., Grupp, F., Kelz, A., Palunas, P., Roth, M., & Fry, A. 2008, in Society of Photo-Optical Instrumentation Engineers (SPIE) Conference Series, Vol. 7018, Society of Photo-Optical Instrumentation Engineers (SPIE) Conference Series
- Smee et al. (2013) Smee, S. A., et al. 2013, AJ, 146, 32
- Wake et al. (2015) Wake, D. A., Bundy, K., Bershady, M. A., Drory, N., Law, D. R., MacDonald, N., Weijmans, A.-M., & Yan, R. 2015, ApJ, in prep
- Wynne (1993) Wynne, C. G. 1993, MNRAS, 260, 307
- Yan et al. (2015a) Yan, R., Bundy, K., Bershady, M. A., Drory, N., Law, D. R., MacDonald, N., Wake, D. A., & Weijmans, A.-M. 2015a, ApJ, in prep
- Yan et al. (2015b) Yan, R., et al. 2014b, ApJ, in prep
- York et al. (2000) York, D. G., et al. 2000, AJ, 120, 1579