A Laser Interferometer
for the Undergraduate Teaching Laboratory
Demonstrating Picometer Sensitivity
Kenneth G. Libbrecht and Eric D. Black
Department of Physics, California Institute of Technology
Pasadena, California 91125
Abstract. We describe a laser interferometer experiment for the undergraduate teaching laboratory that achieves picometer sensitivity in a hands-on table-top instrument. In addition to providing an introduction to interferometer physics and optical hardware, the experiment also focuses on precision measurement techniques including servo control, signal modulation, phase-sensitive detection, and different types of signal averaging. After students assemble, align, and characterize the interferometer, they then use it to measure nanoscale motions of a simple harmonic oscillator system, as a substantive example of how laser interferometry can be used as an effective tool in experimental science.
1 Introduction
Optical interferometry is a well-known experimental technique for making precision displacement measurements, with examples ranging from Michelson and Morley’s famous aether-drift experiment to the extraordinary sensitivity of modern gravitational-wave detectors. With careful attention to various fundamental and technical noise sources, displacement sensitivities of better than m/Hz-1/2 have been demonstrated (roughly wavelengths of light) [1, 2, 3], and additional improvements are expected in the near future.
In the undergraduate laboratory, however, the use of optical interferometry as a teaching tool has not kept pace with the development of modern measurement techniques. Interferometer experiments in the teaching lab often stop with the demonstration of visible fringes followed by displacement measurement using basic fringe counting. We believe there is a substantial pedagogical opportunity in this area to explore modern precision measurement concepts using an instrument that is visual and tactile, relatively easy to understand, and generally fun to work with.
While there are numerous examples of precision laser interferometry in the literature [4, 5, 6, 7, 8], these instruments are somewhat complex in their design and are therefore not optimally suited for a teaching environment. Below we describe a laser interferometer designed to demonstrate precision physical measurement techniques in a compact apparatus with a relatively simple optical layout. Students place some of the optical components and align the interferometer, thus gaining hands-on experience with optical and laser hardware. The alignment is straightforward but not trivial, and the various interferometer signals are directly observable on the oscilloscope. Some features of the instrument include: 1) piezoelectric control of one mirror’s position, allowing precise control of the interferometer signal; 2) the ability to lock the interferometer at its most sensitive point; 3) the ability to modulate the mirror position while the interferometer is locked, thus providing a displacement signal of variable magnitude and frequency; 4) phase-sensitive detection of the modulated displacement signal, both using the digital oscilloscope and using basic analog signal processing.
In working with this experiment, students are guided from micron-scale measurement precision using direct fringe counting to picometer precision using a modulated signal and phase-sensitive signal averaging. The end result is the ability to see displacement modulations below one picometer in a 10-cm-long interferometer arm, which is like measuring the distance from New York to Los Angeles with a sensitivity better than the width of a human hair!
Once the interferometer performance has been explored, students then incorporate a magnetically driven oscillating mirror in the optical layout. Observation and analysis of nanometer-scale motions of the high-Q oscillator reveal several aspects of its behavior, including: 1) the near-resonant-frequency response of the oscillator; 2) mass-dependent frequency shifts; 3) changes in the mechanical Q as damping is added; and 4) the excitation of the oscillator via higher harmonics using a square-wave drive signal.
With this apparatus, students learn about optical hardware and lasers, optical alignment, laser interferometry, piezoelectric transducers, photodetection, electronic signal processing, signal modulation to avoid low-frequency noise, signal averaging, and phase-sensitive detection. Achieving a displacement sensitivity of 1/100th of an atom with a table-top instrument provides an impressive demonstration of the power of interferometric measurement and signal-averaging techniques. Further quantifying the behavior of a mechanical oscillator executing nanoscale motions shows the effectiveness of laser interferometry as a measurement tool in experimental science.
2 Interferometer Design and Performance
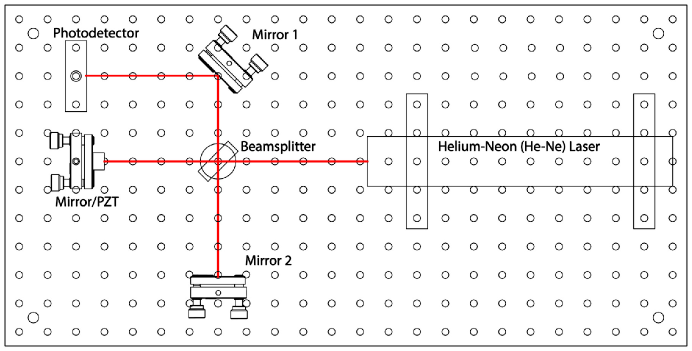
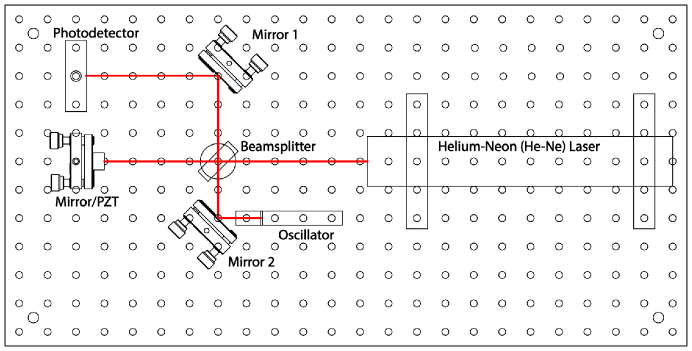
Figure 1 shows the overall optical layout of the constructed interferometer. The 12.7-mm-thick aluminum breadboard (Thorlabs MB1224) is mounted atop a custom-made steel electronics chassis using pliable rubber vibration dampers, and the chassis itself rests on pliable rubber feet. We have found that this two-stage seismic isolation system is adequate for reducing noise in the interferometer signal arising from benchtop vibrations, as long as the benchtop is not bumped or otherwise unnecessarily perturbed.
The Helium-Neon laser (Meredith HNS-2P) produces a 2mW linearly polarized (500:1 polarization ratio) 633-nm beam with a diameter of approximately 0.8 mm, and it is mounted in a pair of custom fixed acrylic holders. The Beamsplitter (Thorlabs BSW10) is a 1-inch-diameter wedged plate beamsplitter with a broadband dielectric coating giving roughly equal transmitted and reflected beams. It is mounted in a fixed optical mount (Thorlabs FMP1) connected to a pedestal post (Thorlabs RS1.5P8E) fastened to the breadboard using a clamping fork (Thorlabs CF125). Mirrors 1 and 2 (both Thorlabs BB1-E02) are mounted in standard optical mounts (Thorlabs KM100) on the same pedestal posts. Using these stout steel pedestal posts is important for reducing unwanted motions of the optical elements.
The Mirror/PZT consists of a small mirror (12.5-mm diameter, 2-mm thick, Edmund Optics 83-483, with an enhanced aluminum reflective coating) glued to one end of a piezoelectric stack transducer (PZT) (Steminc SMPAK155510D10), with the other end glued to an acrylic disk in a mirror mount. An acrylic tube surrounds the Mirror/PZT assembly for protection, but the mirror only contacts the PZT stack. The surface quality of the small mirror is relatively poor (2-3 waves over one cm) compared with the other mirrors, but we found it is adequate for this task, and the small mass of the mirror helps push mechanical resonances of the Mirror/PZT assembly to frequencies above 700 Hz.
The photodetector includes a Si photodiode (Thorlabs FDS100) with a 3.6mm x 3.6mm active area, held a custom acrylic fixed mount. The custom photodiode amplifier consists of a pair of operational amplifiers (TL072) that provide double-pole low-pass filtering of the photodiode signal with a 10-sec time constant. The overall amplifier gain is fixed, giving approximately an 8-volt output signal with the full laser intensity incident on the photodiode’s active area.
The optical layout shown in Figure 1 was designed to provide enough degrees of freedom to fully align the interferometer, but no more. The Mirror/PZT pointing determines the degree to which the beam is misaligned from retroreflecting back into the laser (described below), the Mirror 2 pointing allows for alignment of the recombining beams, and the Mirror 1 pointing is used to center the beam on the photodiode. In addition to reducing the cost of the interferometer and its maintenance, using a small number of optical elements also reduces the complexity of the set-up, improving its function as a teaching tool.
Three of the optical elements (Mirror 1, Mirror 2, and the Beamsplitter) can be repositioned on the breadboard or removed. The other three elements (the laser, photodiode, and the Mirror/PZT) are fixed on the breadboard, the only available adjustment being the pointing of the Mirror/PZT. The latter three elements all need electrical connections, and for these the wiring is sent down through existing holes in the breadboard and into the electronics chassis below. The use of fixed wiring (with essentially no accessible cabling) allows for an especially robust construction that simplifies the operation and maintenance of the interferometer. At the same time, the three free elements present students with a realistic experience placing and aligning laser optics.
Before setting up the interferometer as in Figure 1, there are a number of smaller exercises students can do with this instrument. The Gaussian laser beam profile can be observed, as well as the divergence of the laser beam. Using a concave lens (Thorlabs LD1464-A, f = -50 mm) increases the beam divergence and allows a better look at the beam profile. Laser speckle can also be observed, as well as diffraction from small bits of dirt on the optics. Ghost laser beams from the antireflection-coated side of the beamsplitter are clearly visible, as the wedge in the glass sends these beams out at different directions from the main beams. Rotating the beamsplitter 180 degrees results in a different set of ghost beams, and it is instructive to explain these with a sketch of the two reflecting surfaces and the resulting intensities of multiply reflected beams.
2.1 Interferometer Alignment
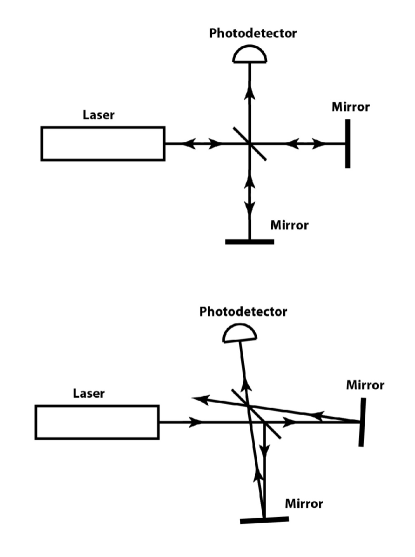
A satisfactory alignment of the interferometer is straightforward and easy to achieve, but doing so requires an understanding of how real-world optics can differ from the idealized case that is often presented. As shown in Figure 2, retroreflecting the laser beams at the ends of the interferometer arms yields a recombined beam that is sent directly back toward the laser. This beam typically reflects off the front mirror of the laser and reenters the interferometer, yielding an optical cacophony of multiple reflections and unwanted interference effects. Inserting an optical isolator in the original laser beam would solve this problem, but this is an especially expensive optical element that is best avoided in the teaching lab.
The preferred solution to this problem is to misalign the arm mirrors slightly, as shown in Figure 2. With our components and the optical layout shown in Figure 1, misaligning the Mirror/PZT by 4.3 mrad is sufficient that the initial reflection from the Mirror/PZT avoids striking the front mirror of the laser altogether, thus eliminating unwanted reflections. This misalignment puts a constraint on the lengths of the two arms, however, as can be seen from the second diagram in Figure 2. If the two arm lengths are identical (as in the diagram), then identical misalignments of both arm mirrors can yield (in principle) perfectly recombined beams that are overlapping and collinear beyond the beamsplitter. If the arm lengths are not identical, however, then perfect recombination is no longer possible.
The arm length asymmetry constraint can be quantified by measuring the fringe contrast seen by the detector. If the position of the Mirror/PZT is varied over small distances, then the detector voltage can be written
| (1) |
where and are the minimum and maximum voltages, respectively, and is the wavenumber of the laser. This signal is easily observed by sending a triangle wave to the PZT, thus translating the mirror back and forth, while is observed on the oscilloscope. We define the interferometer fringe contrast to be
and a high fringe contrast with is desirable for obtaining the best interferometer sensitivity.
With this background, the interferometer alignment consists of several steps: 1) Place the beamsplitter so the reflected beam is at a 90-degree angle from the original laser beam. The beamsplitter coating is designed for a 90-degree reflection angle, plus it is generally good practice to keep the beams on a simple rectangular grid as much as possible; 2) With Mirror 2 blocked, adjust the Mirror/PZT pointing so the reflected beam just misses the front mirror of the laser. This is easily done by observing any multiple reflections at the photodiode using a white card; 3) Adjust the Mirror 1 pointing so the beam is centered on the photodiode; 4) Unblock Mirror 2 and adjust its pointing to produce a single recombined beam at the photodiode; 5) Send a triangle wave signal to the PZT, observe with the oscilloscope, and adjust the Mirror 2 pointing further to obtain a maximum fringe contrast
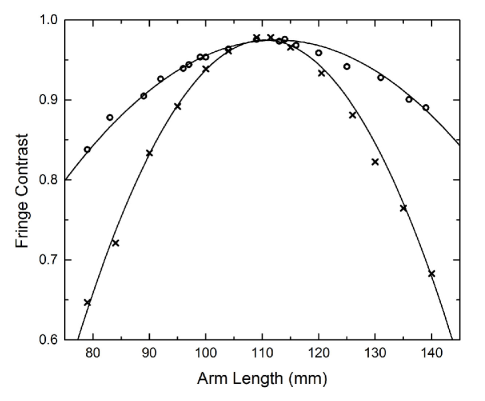
Figure 3 shows our measurements of as a function of the Mirror 2 arm length when the Mirror/PZT misalignment was set to 4.3 mrad and the Mirror/PZT arm length was 110 mm. As expected, the highest was achieved when the arm lengths were equal. With unequal arm lengths, perfect recombination of the beams is not possible, and we see that drops off quadratically with increasing asymmetry in the arm lengths.
As another alignment test, we misaligned the Mirror/PZT by 1.3 mrad and otherwise followed the same alignment procedure described above, giving the other set of data points shown in Figure 3. With this smaller misalignment, there were multiple unwanted reflections from the front mirror of the laser, but these extra beams were displaced just enough to miss the active area of the photodetector. In this case we see a weaker quadratic dependence of on the Mirror 2 position, and about the same when the arm lengths are identical.
We did not examine why is below unity for identical arm lengths, but this is likely caused by the beamsplitter producing unequal beam intensities, and perhaps by other optical imperfections in our system. The peak value of about 97% shows little dependence on polarization angle, as observed by rotating the laser tube in its mount. Extrapolating the data in Figure 3 to zero misalignment suggests that the laser has an intrinsic coherence length of roughly 15 cm. We did not investigate the origin of this coherence length, although it appears likely that it arises in part from the excitation of more than one longitudinal mode in the laser cavity.
The smaller 1.3-mrad misalignment produces a higher fringe contrast for unequal arm lengths, but this also requires that students deal with what can be a confusing array of unwanted reflections. When setting up the interferometer configuration shown in Figure 1, we typically have students use the larger misalignment of 4.3 mrad, which is set up by observing and then quickly eliminating the unwanted reflections off the front mirror of the laser. We then ask students to match the interferometer arm lengths to an accuracy of a few millimeters, as this can be done quite easily from direct visual measurement using a plastic ruler.
Once the interferometer is roughly aligned (with the 4.3 mrad misalignment), it is also instructive to view the optical fringes by eye using a white card. Placing a negative lens in front of the beamsplitter yields a bull’s-eye pattern of fringes at the photodetector, and this pattern changes as the Mirror 2 pointing is adjusted. Placing the same lens after the beamsplitter gives a linear pattern of fringes, and the imperfect best fringe contrast can be easily seen by attempting (unsuccessfully) to produce a perfectly dark fringe on the card.
2.2 Interferometer Locking
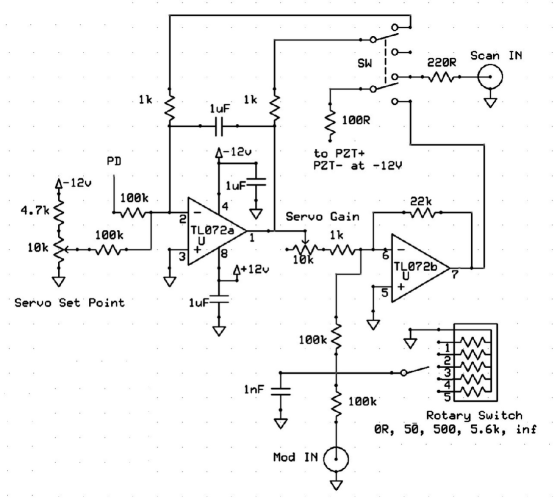
The interferometer is locked using the electronic servo circuit shown in Figure 4. In short, the photodiode signal is fed back to the PZT via this circuit to keep the signal at some constant average value, thus keeping the arm length difference constant to typically much better than The total range of the PZT is only about 1 m (with an applied voltage ranging from 0 to 24 volts), but this is sufficient to keep the interferometer locked for hours at a time provided the system is stable and undisturbed. Typically the set point is adjusted so the interferometer is locked at which is the point where the interferometer sensitivity is highest.
Note that the detector signal is easily calibrated by measuring on the oscilloscope and using Equation 1, giving the conveniently simple approximation
which is accurate to better than one percent. Simultaneously measuring and the voltage sent to the PZT via the Scan IN port (see Figure 4) quickly gives the absolute PZT response function .
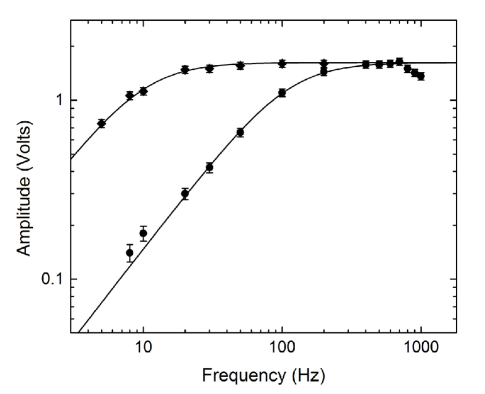
The PZT can also be modulated with the servo locked using the circuit in Figure 4 along with an external modulation signal. Figure 5 shows the interferometer response as a function of modulation frequency in this case, for a fixed input modulation signal amplitude. To produce these data we locked the interferometer at and provided a constant-amplitude sine-wave signal to the modulation input port shown in Figure 4. The resulting sine-wave response of was then measured using a digital oscilloscope for different values of the modulation frequency, with the servo gain at its minimum and maximum settings (see Figure 4).
A straightforward analysis of the servo circuit predicts that the interferometer response should be given by
where includes the frequency-dependent PZT response, is the modulation frequency, is the modulation voltage, and the remaining parameters (high gain), (low gain); seconds) can be derived from the servo circuit elements shown in Figure 4. Direct measurements yielded where this number was nearly frequency-independent below 600 Hz and dropped off substantially above 1 kHz. In addition, a number of mechanical resonances in the Mirror/PZT housing were also seen above 700 Hz. The theory curves shown in Figure 5 assume a frequency-independent for simplicity.
From these data we see that at low frequencies the servo compensates for the modulation input, reducing the interferometer response, and the reduction is larger when the servo gain is higher. This behavior is well described by the servo circuit theory. At frequencies above about 700 Hz, the data begin to deviate substantially from the simple theory. The theory curves in principle contain no adjustable parameters, but we found that the data were better matched by including an overall multiplicative factor of 0.94 in the theory. This six-percent discrepancy was consistent with the overall uncertainties in the various circuit parameters.
2.3 Phase-Sensitive Detection
Since the purpose of building an interferometer is typically to measure small displacement signals, we sought to produce the highest displacement sensitivity we could easily build in a compact teaching instrument. With the interferometer locked at its most sensitive point, direct observations of fluctuations in indicate an ambient displacement noise of roughly 1 nm RMS over short timescales at the maximum servo gain, and about 4 nm at the minimum servo gain. Long-term drifts are compensated for by the servo, and these drifts were not investigated further. The short-term noise is mainly caused by local seismic and acoustic noise. Tapping on the table or talking around the interferometer clearly increases these noise sources.
To quantify the interferometer sensitivity, we modulated the PZT with a square wave signal at various amplitudes and frequencies, and we observed the resulting changes in The environmental noise sources were greater at lower frequencies, so we found it optimal to modulate the PZT at around 600 Hz. This frequency was above much of the environmental noise and above where the signal was reduced by the servo, but below the mechanical resonances in the PZT housing.
With a large modulation amplitude, one can observe and measure the response in directly on the oscilloscope, as the signal/noise ratio is high for a single modulation cycle. At lower amplitudes, the signal is better observed by averaging traces using the digital oscilloscope, while triggering with the synchronous modulation input signal. By averaging 128 traces, for example, one can see signals that are about ten times lower than is possible without averaging, as expected.
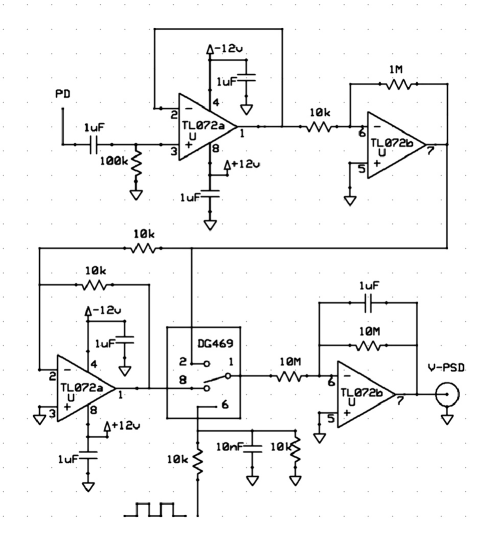
To carry this process further, we constructed the basic phase-sensitive detector circuit shown in Figure 6, which is essentially a simple (and inexpensive) alternative to using a lock-in amplifier. By integrating for ten seconds, this circuit averages the modulation signal over about 6000 cycles, thus providing nearly another order-of-magnitude improvement over signal averaging using the oscilloscope. The output from this averaging circuit also provides a convenient voltage proportional to the interferometer modulation signal that can be used for additional data analysis. For example, observing the distribution of fluctuations in over timescales of minutes to hours gives a measure of the uncertainty in the displacement measurement being made by the interferometer.
Our pedagogical goal in including these measurement strategies is to introduce students to some of the fundamentals of modern signal analysis. Observing the interferometer signal directly on the oscilloscope is the most basic measurement technique, but it is also the least sensitive, as the direct signal is strongly affected by environmental noise. A substantial first improvement is obtained by modulating the signal at higher frequencies, thus avoiding the low-frequency noise components. Simple signal averaging using the digital oscilloscope further increases the signal/noise ratio, demonstrating a simple form of phase-sensitive detection and averaging, using the strong modulation input signal to trigger the oscilloscope. Additional averaging using the circuit in Figure 4 yields an expected additional improvement in sensitivity. Seeing the gains in sensitivity at each stage in the experiment introduces students to the concepts of signal modulation, phase-sensitive detection, and signal averaging, driving home the averaging rule.
2.4 Interferometer Response
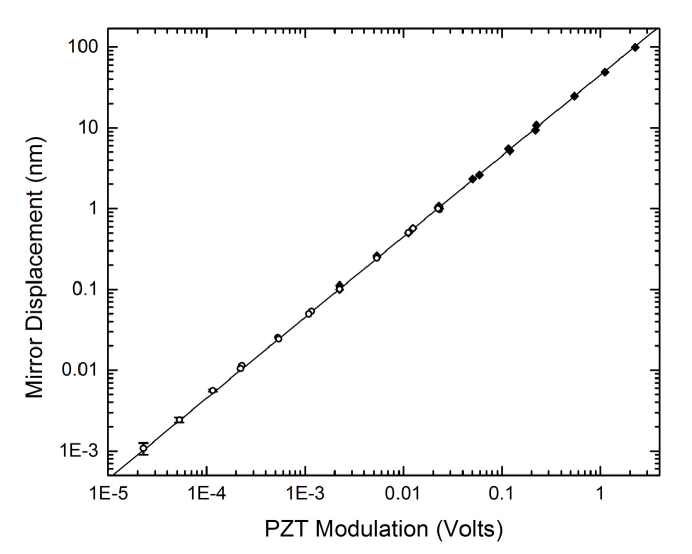
Figure 7 shows the measured interferometer response at 600 Hz as a function of the PZT modulation amplitude. When the displacement amplitude was above 0.1 nm, the modulation signal was strong enough to be measured using the digital oscilloscope’s measure feature while averaging traces. At low displacement amplitudes, the signal became essentially unmeasurable using the oscilloscope alone, but still appeared with high signal-to-noise using the output. The overlap between these two methods was used to determine a scaling factor between them. The absolute measurement accuracy was about 5% for these data, while the 1 displacement sensitivity at the lowest amplitudes was below 1 picometer. These data indicate that systematic nonlinearities in the photodiode and the PZT stack response were together below 10 percent over a range of five orders of magnitude.
3 Measuring a Simple Harmonic Oscillator
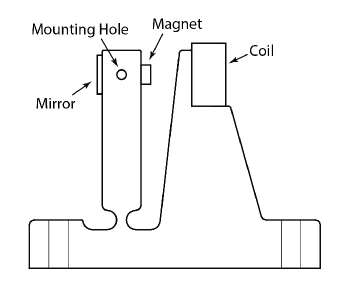
Once students have constructed, aligned, and characterized the interferometer, they can then use it to observe the nanoscale motions of a simple harmonic oscillator. The optical layout for this second stage of the experiment is shown in Figure 8, and the mechanical construction of the oscillator is shown in Figure 9. Wiring for the coil runs through a vertical hole in the aluminum plate (below the coil but not shown in Figure 9) and then through one of the holes in the breadboard to the electronics chassis below. For this reason the oscillator position on the breadboard cannot be changed, but it does not interfere with the basic interferometer layout shown in Figure 1.
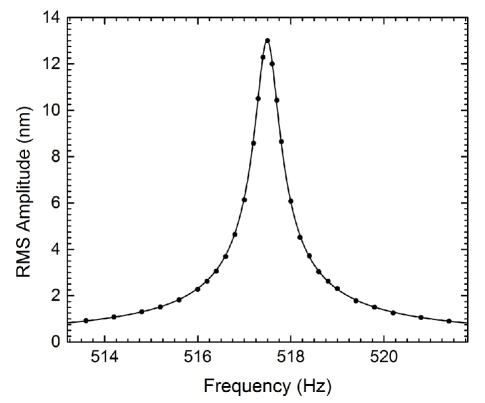
The oscillator response can be observed by viewing the interferometer signal together with the coil drive signal on the oscilloscope, and example data are shown in Figure 10. Here the coil was driven with a sinusoidal signal from a digital function generator with mHz absolute frequency accuracy, and the oscillator response was measured for each point by averaging 64 traces on the oscilloscope. Once again, using the drive signal to trigger the oscilloscope ensures a good phase-locked average even with a small signal amplitude. As shown also in Figure 7, sub-nanometer sensitivity is easily achievable using this simple signal-averaging method. The results in Figure 10 show that this mechanical system is well described by a simple-harmonic-oscillator model. Inserting a small piece of foam between the magnet and the coil substantially increases the oscillator damping, and students can examine this by measuring the oscillator with different amounts of damping.
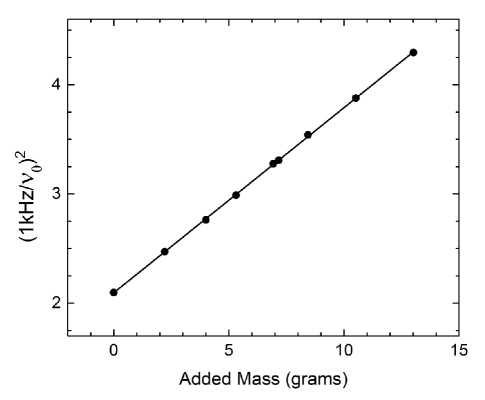
The tapped mounting hole behind the oscillator mirror (see Figure 9) allows additional weights to be added to the oscillator. We use nylon, aluminium, steel, and brass thumbscrews and nuts to give a series of weights with roughly equal mass spacings. Students weigh the masses using an inexpensive digital scale with 0.1 gram accuracy (American Weigh AWS-100). To achieve satisfactory results, we have found that the weights need to be well balanced (with one on each side of the oscillator), screwed in firmly, and no more than about 1.5 cm in total length. If these conditions are not met, additional mechanical resonances can influence the oscillator response.
The resonant frequency of the oscillator can be satisfactorily measured by finding the maximum oscillator amplitude as a function of frequency, viewing the signal directly on the oscilloscope, and an accuracy of better than 1 Hz can be obtained quite quickly with a simple analog signal generator using the oscilloscope to measure the drive frequency. The results shown in Figure 11 show that is proportional to the added mass, which is expected from a simple-harmonic-oscillator model. Additional parameters describing the harmonic oscillator characteristics can be extracted from the slope and intercept of the fit line.
As a final experiment, students can drive the coil with a square wave signal at different frequencies to observe the resulting motion. The oscillator shows a resonant behavior when the coil is driven at etc., and at each of these frequencies the oscillator response remains at Measurements of the peak resonant amplitude at each frequency show the behavior expected from a Fourier decomposition of the square wave signal.
In summary, we have developed a fairly basic table-top laser interferometer for use in the undergraduate teaching laboratory. Students first assemble and align the interferometer, gaining hands-on experience using optical and laser hardware. The experiment then focuses on a variety of measurement strategies and signal-averaging techniques, with the goal of using the interferometer to demonstrate picometer displacement sensitivity over arm lengths of 10 centimeters. In a second stage of the experiment, students use the interferometer to quantify the nanoscale motions of a driven harmonic oscillator system.
This work was supported in part by the California Institute of Technology and by a generous donation from Dr. Vineer Bhansali. Frank Rice contributed insightful ideas to several aspects of the interferometer construction and data analysis.
References
- [1] Keith Riles, “Gravitational waves: sources, detection, and searches,” http://arxiv.org/abs/1209.0667 (2012).
- [2] A. Villar, E. D. Black, et al., “Measurement of thermal noise in multilayer coatings with optimized layer thickness,” Phys. Rev. D 81, 122001 (2010).
- [3] E. D. Black, A. Villar, and K. G. Libbrecht, “Thermoelastic-damping noise from sapphire mirrors in a fundamental-noise-limited interferometer,” Phys. Rev. Lett. 93, 2411101 (2004).
- [4] John Lawall and Ernest Kessler, “Michelson interferometry with 10 pm accuracy,” Rev. Sci. Instr. 71, 2669-76 (2000).
- [5] Chen Chao, Zhihong Wang, and Weiguang Zhu, “Modulated laser interferometer with picometer resolution for piezoelectric characterization,” Rev. Sci. Instr. 75, 4641-45 (2004).
- [6] Marco Pisani, “A homodyne Michelson interferometer with sub-picometer resolution,” Meas. Sci. Technol. 20, 084008 (2009).
- [7] P. Kochert1 et al., “Phase measurement of various commercial heterodyne He–Ne-laser interferometers with stability in the picometer regime,” Meas. Sci. Technol. 23, 074005 (2012).
- [8] Winfried Denk and Watt W. Webb, “Optical measurement of picometer displacements of transparent microscopic objects,” Appl. Optics 29, 2382-91 (1990).
