Development of a confocal rheometer for soft and biological materials
Abstract
We discuss the design and operation of a confocal rheometer, formed by integrating an Anton Paar MCR301 stress-controlled rheometer with a Leica SP5 laser scanning confocal microscope. Combining two commercial instruments results in a system which is straightforward to assemble that preserves the performance of each component with virtually no impact on the precision of either device. The instruments are configured so that the microscope can acquire time-resolved, three-dimensional volumes of a sample whose bulk viscoelastic properties are being measured simultaneously. We describe several aspects of the design and, to demonstrate the system’s capabilities, present the results of a few common measurements in the study of soft materials.
pacs:
47.57.Qk, 83.85.Ei, 87.64.mkI Introduction
Complex fluids exhibit unique mechanical properties that are determined by the physicochemical details of their constituent components. One common example is a colloidal dispersion, where nano- to micrometer sized particles are suspended within a fluid – e.g. milk, paint and blood are all colloidal dispersions. The structuring of the fluid has two predominant effects: an enhancement of the fluid viscosity and, when the concentration of the dispersed material is high enough, the appearance of a frequency dependent elastic modulus. These characteristics are determined using rheology, the measurement science of quantifying the response of fluid based materials to an applied stress or strain.
Rheology techniques are classified into two main types known as bulk and micro, each having specific benefits and limitations. Bulk measurements often require relatively large sample volumes and, depending on the measuring system, can suffer from a somewhat limited range due to the inherent inertia of the tooling. The main advantage of bulk rheology is that the highly nonlinear mechanical behavior of soft materials can be directly determined. Passive microrheology utilizes the energy spectrum of thermal fluctuations and provides very localized structural information over a tremendous dynamical range that is limited only by the acquisition rate of the measurement.Dasgupta et al. (2002) The primary drawbacks of microrheology are understanding the implications of incorporating tracer particles and the limitations set by the magnitude of the thermal fluctuations; effectively, microrheology is limited to nearly homogeneous systems with very small elastic moduli. Overall, rheology is extremely powerful as a characterization tool for a broad class of biologically derived or chemically synthesized materials. However, in many instances where bulk- and micro- rheology are applied, information about the role of structure, either inherent or influenced by boundary conditions, are essentially unknowable. Limited access to structure results in a great deal of uncertainty about the microscopic origins of the mechanical response.
The first instruments specifically developed for optically quantifying the structural response of complex fluids to an externally applied shear stress were based on X-ray and neutron scattering. Panine et al. (2003); Sasa et al. (2010); Porcar et al. (2011) Scattering methods are particularly powerful for investigating average structural changes, such as conformational changes in protein networksWeigandt et al. (2009) and the bulk phase behavior of worm-like micelles.Liberatore et al. (2006) If the material is inherently disordered, which is the case for most soft and biological materials, scattering can only provide spatially averaged information that generally precludes details about localized structural rearrangements driven by thermal excitations and external stresses. A natural extension of the scattering approach is to directly measure the real space structural response of complex fluids under shear through the use of optical microscopy. This need has driven the development of new optical-rheology platforms with ever increasing sophistication and versatility.Bender and Wagner (1995); Cohen et al. (2004); Besseling et al. (2009); Basu et al. (2011); Paredes et al. (2011); Cheng et al. (2011); Boitte et al. (2013) Access to time-resolved, three-dimensional information is crucial for an accurate quantification of the microscopic structure that ultimately determines material properties; connecting macroscopic observables, such as shear and bulk moduli, to the relevant physical interactions and structure is a cornerstone of modern materials science.
The instrumentation challenge remains clear and open: provide a measurement device that combines high resolution, high magnification, real space, time resolved spatial information in three dimensions that is coupled with simultaneous high resolution mechanical deformations that can be easily reproduced by research groups. Precision measurements of the structure and mechanical properties of soft materials requires sub-micrometer spatial resolution and nanonewton-meter torque resolution. Luckily, devices that independently attain these levels of precision are commercially available.
The technology of fast laser scanning and spinning disk confocal microscopy techniques (LSCM or SDCM) has matured dramatically over the past twenty years. Innovations made to confocal microscopy, through commercial and academic partnerships, are providing unprecedented gains in imaging resolution at ever increasing acquisition speeds and at steadily decreasing costs.Hell (2003) Confocal microscopy has emerged as a powerful tool in soft materials physics,Lu et al. (2008) as it provides three-dimensional reconstructions of structures at sub-micrometer resolution. The principles of confocal microscopy are straightforward; by discriminating out of focus light, sharp two-dimensional images are “stacked” in the third dimension, providing time resolved volumetric data. These image volumes can then be rapidly analyzed at the sub-voxel level using advanced processing techniques.Crocker and Grier (1996); MPT There are many commercial implementations from all of the major microscopy companies, and a number of component built systems that are generally based on spinning disk platforms.
Concomitant to the advances of confocal microscopy, stress-controlled rheometer technology has also advanced, providing new standards for sensitivity and stability. Moreover, stress-controlled rheometers are ideally suited as development platforms due to the combination of low friction, feedback-controlled, inductive motors that provide precise torque and position encoders that measure displacements. In nearly all implementations, the the motor/encoder systems are integrated into the upper tool. This compact design is in contrast to strain-controlled platforms where one tool rotates to provide displacement, while the other tool responds to the stress that propagates through the sample. The single tool configuration provides the flexibility to incorporate versatile modifications of the static portion of the lower tooling.
What follows below is a detailed description of what is needed to reproduce our confocal rheometer system. A key component of our plan was to produce a functional device within a very short period of time with a limited amount of machine work. To attain this does require the use of a particular rheometer (Anton Paar MCR series) and therefore emulating this system with other devices may prove difficult. We do feel that this system can be reproduced using devices from other manufacturers if the specific guidelines we provide are transferred. We will discuss a number of design criteria that guided our development and a series of data that will help motivate the intended demand. We also quantify a few unavoidable limitations of these systems and confirm some of the capabilities through recent publications.Schmoller et al. (2010); Arevalo et al. (2011); Holland et al. (2012)
II Design Principles
The plates of shearing devices should remain parallel at a fixed gap throughout their entire range of motion, whether that corresponds to a full rotation for a rheometer or a maximum displacement for a linear shear stage. The limitations of these devices are set by the tolerances attainable through computer numerical control (CNC) machining methods; in most instances, CNC machining can attain precision. Most modern rheometers are produced within these specifications and therefore can reproducibly attain gaps to within while remaining functional and allowing easy interchange between tools. Tool runout and parallelity are dramatically compromised if the relative orientation of each tool is not maintained for all applications, leading to a reduction in the reliability of reported rheological data. Therefore, when developing a new rheological system, either with a top-down design using existing technology or a bottom-up design by assembling custom components, each new implementation must at least match these specifications.
We have chosen a top-down approach for constructing a confocal rheometer. The primary considerations for this decision were time and functionality. Having a working device within a year, from conception to implementation, was highly desirable and attainable. By using devices with guaranteed factory specifications, we could forgo years of engineering and benchmarking. Furthermore, commercial instruments potentially provide a more user friendly system, making training, operation, and collaboration simpler.
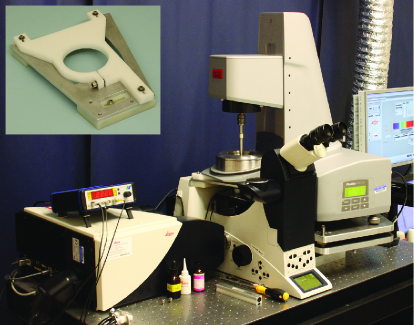
Our system, shown in Fig. 1, consists of an MCR301 stress-controlled rheometer from Anton Paar GmbH and an SP5 LSCM from Leica Microsystems; it was designed in collaboration with both companies. Optical access to the sample for the microscope is provided from below by a glass coverslip which also serves as the bottom plate for the rheometer. This coverslip is rigidly mounted to the rheometer via a metal cup; as a result, the two devices maintain autonomous functionality even when joined together.
The rheometer modifications made for this application do not dictate a choice of microscope manufacturer or confocal head style. However, if an attempt is made to duplicate this design using another rheometer manufacturer, care must be taken to match the mounting and tool specifications. Maintaining gap tolerance and tool runout are critical features for simultaneous rheology and visualization. We feel that if a microscope stage or any other independent platform is substituted for the bottom plate of the rheometer, the task of maintaining a gap on the order of across a tool diameter of becomes dramatically more difficult. In our design, we are able to machine fixed components at tolerances that are within the manufacturers specifications, providing us reliable gaps of m.
III System Components
III.1 Rheometer
The rheometer for the system was modified at the factory by Anton Paar to be compatible with our design. This primarily involved the relocation of the front control panel and removal of the lower front section of the rheometer; this provides unimpeded access below the lower tool platform. The result is a horizontal platform that accepts all standard and custom manufactured bottom plate accessories. These modifications, and the large distance from the tool rotational axis to the front of the rheometer body, provide sufficient clearance for the microscope when the two instruments are mounted next to each other.
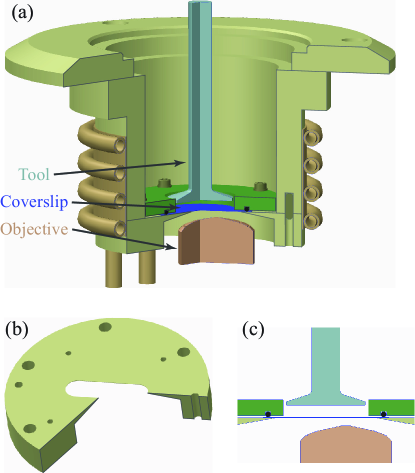
A custom stainless steel cup bolts to the rheometer platform and positions the bottom plate coverslip so that the platform does not interfere with the microscope; see Fig. 2(a). The cup consists of a factory-supplied mounting flange, a cylindrical section that bolts to the flange, and an interchangeable baseplate that bolts to the cylindrical section. The baseplate, an example of which is drawn in Fig. 2(b), registers the coverslip and has a slotted opening to provide optical access for the microscope. The underside of the baseplate is machined to a sharp edge around the perimeter of the slot; this allows a high magnification immersion objective to reach the coverslip, thus preserving its full working distance. A flat acrylic ring, fitted with a rubber O-ring, clamps the circular coverslip (40 mm in diameter) in place. A cross-sectional view of the sample region is shown in Fig. 2(c).
We use standard measuring system tools from Anton Paar. They must, however, be 150 mm in length in order to reach the coverslip. The cup assembly can accommodate tools, in either plate or cone geometries, with diameters of up to 25 mm.
The cup can be covered to limit evaporation from aqueous samples and is water tight so that biological samples can be immersed in media. A bath circulator flows heated or chilled fluid through copper coils that wrap around the cup to regulate the temperature of the entire cup and sample.
III.2 Microscope
The Leica confocal uses a standard DMI6000B inverted microscope with the upper illumination arm removed. The vertical () position of the objective is controlled by a piezo-based focusing attachment from piezosystem jena. It is important to take into account the further geometrical constraints that the body of the piezo puts on the design of the rheometer cup. Alternatively, motor control of the nosepiece will suffice, but will lead to slower acquisition times for confocal stacks.
Images are acquired with a raster point scanner, which can be operated in an 8 kHz resonant mode. The acquisition speed can be effectively doubled with a bi-directional scan; in this case, a typical image stack with a resolution of voxels can be acquired in roughly 2 s. In addition, a series of three-dimensional stacks can be imaged in a bi-directional mode, where the order of slices is reversed on alternate stacks, preventing the piezo from resetting abruptly.
III.3 Translation Stage and Instrument Coupling
To adjust the position of the rheometer relative to the microscope body, and thus the imaging field of view, we designed a mounting stage that provides leveling and translation capabilities. The stage is comprised of two aluminum plates separated by three fine-threaded, ball-bearing-tipped screws for leveling the rheometer. These plates are held together with three springs. The springs are removable and provide access to the bottom plate which bolts directly to two orthogonal Edmund Optics 38-180 translation stages. The translation stages are then mounted to a plate that bolts to the breadboard of the air table (Technical Manufacturing Corporation, model 63-543) on which the entire confocal rheometer sits. In order to place the rheometer’s tool over the objective, the stage must be rotated about it’s vertical center-line axis at an angle of relative to the the microscope – N.B. this is the case for Leica 6000 series inverted microscopes, however each different manufacturer should be tested for orientation requirements.
Through the use of a vibrationally isolated table, mechanical noise from external sources is diminished for the microscope and rheometer separately. However any residual relative motion between the instruments can degrade the imaging quality. The biggest source of this motion comes from the active components of the rheometer itself, with dominant frequencies near 100 Hz. To minimize relative motion, a “soft-coupling” clamp, shown in the inset of Fig. 1, connects the microscope base and the rheometer cup. This clamp is adjustable in the horizontal plane, so the rheometer can be positioned as needed, and is attached to the microscope stand through the stage mounting positions. While the vibrational noise with the clamp (with an amplitude under 100 nm, as directly measured from rapidly acquired microscope images) is still larger than when using a traditional microscope stage, the current conditions do not hinder the sort of measurements described in the next section.
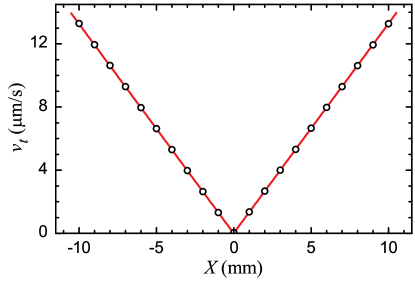
Placing the rheometer on its translation stage only roughly constrains its position, which simplifies assembly of the instrument. To accurately determine the radial position of the microscope objective with respect to the central axis of the rheometer tool, we rely on imaging the surface of the tool directly. For instance, this position can be determined by measuring the local linear velocity of the tool due to a rotation of known angular velocity. We verified this approach with the measurement shown in Fig. 3. Images of the tool were acquired in reflectance while the rheometer was set to a steady shear rate of 0.330 1/s with a gap of . We measured at several locations across the face of the tool as the stage was moved in one dimension. As this path was chosen to run through the rheometer axis, should have a linear dependence on the stage position . The fit shown with a solid line in Fig. 3 yields a shear rate of 0.331 1/s, where the discrepancy from the nominal value reflects the size of the mismatch in the spatial and temporal calibrations of the two instruments.
IV Experimental Results
To demonstrate the capabilities of the instrument as well as provide some context for the discussion of other design issues, we next present a few representative measurements. Throughout the section, the local velocity, vorticity, and gradient axes at the imaging location will be referred to as , , and , respectively.
IV.1 Oscillatory Measurements
Many biological polymer networks have complex rheological properties that play important roles in structural integrity and cell motility. Furthermore, individual fiber bundles can often be imaged, opening up the possibility of linking bulk behavior and various geometrical properties of these sparse disordered networks. We now show a simple example of how the viscoelasticity of a gel, as quantified by the dynamic shear moduli, is reflected in its structure.
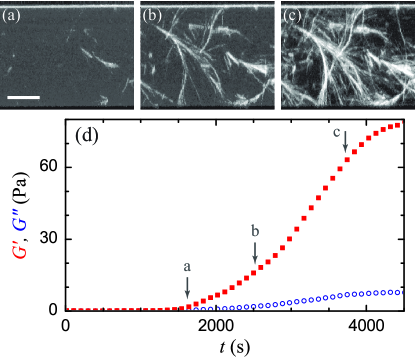
Figure 4 shows data taken during the polymerization of a fluorescently-labeled collagen network (1 mg/mL concentration, 0.12 ionic strength). Once the polymerization was initiated and the sample was loaded, the rheometer gap was set to with a 25 mm parallel plate tool. The storage and loss moduli were continuously monitored using a 0.5% strain amplitude, 1 Hz oscillation. The results, shown in Fig. 4(d), suggest that the polymerization took roughly 4000 s.
At the same time, three-dimensional image stacks were periodically acquired at a radial position of 8 mm. Figure 4(a)-4(c) show images in the -plane taken at the times indicated by the arrows in the rheology plot. Each panel is the maximum projection along the -axis of a section of the stack thick and shows the full extent of the sample in , from coverslip to tool. From these images, where brighter colors indicate a stronger fluorescence signal, the formation of fibers can be followed. It is interesting to note that the background noise signal diminishes as more fluorescently-labeled collagen is incorporated into the network.
For this measurement, the polymerization was carried out on a clean glass coverslip. However, if adhesion is a concern for larger strains, we have found it possible to chemically treat the coverslips to make them hydrophilic (or hydrophobic, when needed) without affecting the imaging quality in any appreciable way.
IV.2 Steady Flow Measurements
Many colloidal systems and other structured fluids display interesting behavior under a continuous shear. This may include ordering at the level of individual constituent particles or the formation of large-scale shear bands. The confocal rheometer can provide some insight into how these structural properties affect bulk rheology under a wide range of shears.
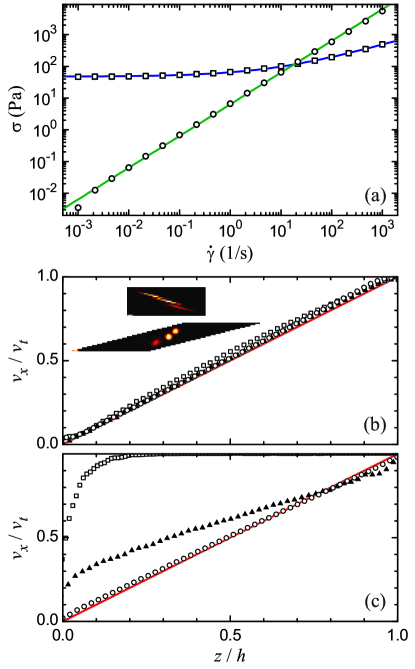
A comparison of the flow behavior for honey, a nearly Newtonian fluid, and an oil-in-water emulsion (compressed to a volume fraction of 0.60), which has a yield stress and shear thins, is shown in Fig. 5. A clean coverslip worked well for the honey, but this surface lead to complete boundary slip for the emulsion drops. We found that a robust solution was to lithographically define a square grid of posts on a coverslip using SU-8, a negative photoresist that adheres well to glass. Image degradation can be avoided by matching the index of refraction of the posts to that of the sample. As there was also considerable slip on the bare metal rheometer tool, we attached a similarly roughened coverslip to its surface.
The difference in the bulk behavior of the materials is clearly seen in the flow curves of Fig. 5(a). The shear stress is nearly linear in the strain rate for the honey (circles), corresponding to a constant viscosity of 6.4 Pa s. On the other hand, the emulsion (squares) closely follows a Herschel-Bulkley form, as shown by the solid fit line, with .
A simple way to characterize the spatial properties of a steady state flow is with the average velocity in the shear direction as a function of the position above the coverslip. Such flow profiles are shown in Fig. 5(b) and (c) for the two fluids for three different shear rates. The velocities are normalized by the local tool speed ; the position is normalized by the rheometer gap , which was set to . The flow was measured by following 1 fluorescent tracer beads mixed in with the samples.
As seen in Fig. 5, the honey undergoes a roughly affine deformation (indicated by the solid line) for all , as expected in a flow where the shear stress is independent of . The emulsion flows in a similar fashion for the highest shear rate, but displays strong shear localization near the coverslip at the lowest shear rate.
The advanced engineering of both the confocal and rheometer are needed to acquire data over the wide dynamic range shown in the figure. For instance, the torque needed by the rheometer to produce the shears in Fig. 5(a) for the honey varies by six orders of magnitude.
In terms of imaging, for the slow rate, the samples move slowly enough for full three-dimensional stacks to be acquired over time. With these in hand, traditional particle finding and tracking algorithms can be used to extract three-dimensional velocity fields from the individual tracers.Crocker and Grier (1996); MPT At higher shear, where it is no longer possible to acquire full stacks, two-dimensional images can be rapidly acquired at fixed . From these images, particle image velocimetry techniques yield values of and averaged over the -plane.
At still higher shear, even a single image is distorted by the raster scanning process, as the fluid moves a significant amount in the time it takes to acquire one line. In this case, a single velocity component of a flow, assumed to be uniform in the direction of scanning, can be inferred from the relative displacement between pairs of image lines needed to recover circular particles. This type of analysis was used for the highest shear rates for both fluids; an example of the image processing is shown in the inset to Fig. 5(b). The raw image is at the top, while the one below it shows the recovered image due to an average flow of . The frequency of the resonant scanner limits the velocity to which this technique can be applied.
When acquiring a three-dimensional stack with a confocal microscope, as needed for a flow profile measurement, it can be critical to know the exact value of at which each slice is taken. As there are several changes in the index of refraction along the imaging path, knowledge of the objective position is insufficient. In particular, the index mismatch between the immersion fluid (with index ) and the sample (with ) introduces a number of effects, including reduced signal intensity, a degradation in resolution, and a shift in the position of the focal plane.Carlsson (1991)
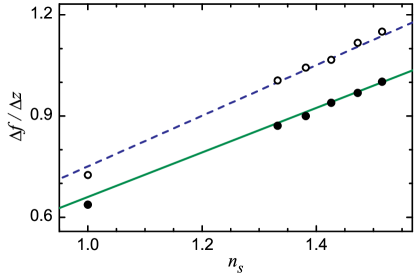
We measured the focal shift for two objectives and a selection of samples that filled the rheometer’s gap, as shown in Fig. 6. For each sample, a linear dependence was found between the rheometer’s gap and the position of the objective needed to bring the surface of the tool into focus. The focal shift can be quantified by the slope of this relationship, where a change in the objective height leads to the focal plane moving by . As expected, the values are nearly reproduced by for two objectives using oil (solid circle, solid line) and water (open, dashed) immersion fluid. This correction was applied to the flow profiles in Fig. 5; in fact, the water-immersion objective had to be moved 89 and for the honey and emulsion, respectively, to cover the actual gap. While the focal shift can be measured with far less instrumentation, the confocal rheometer is well suited to the task, particularly given the ease of setting a variable gap, and can provide a value for any specific combination of objective and sample.
Performing the flow measurements presented a few other challenges, particularly for the emulsion. A consequence of providing optical access to the sample is that the coverslip that serves as the bottom rheometer plate can deflect over the area where it is unsupported by the metal baseplate. This can occur in two ways. For one, loading a stiff sample can result in a significant force on the glass originating from the tool. Additionally, for objectives that require an immersion fluid, the resultant coupling can lead to a deflection of the coverslip when the objective moves in the -direction. This problem is exacerbated by the presence of the rheometer tool, which imposes a fixed boundary plane. If the coverslip moves for either reason, it imposes a stress on the sample which can result, for example, in the rearrangement of emulsion droplets.
There are several ways to mitigate these issues. To minimize deflection, a rheometer cup baseplate with a single small hole [rather than one with a wide slot, as show in Fig. 2(b)] can be used to reduce the unsupported coverslip area. Using water or a low viscosity oil as the immersion fluid greatly reduces the objective coupling. Ill effects of the coupling can be further reduced with the bi-directional scanning described in Sec. III.2, which is essential for imaging colloidal systems.
The severity of the deflection depends strongly on the properties of the sample, so it is important to monitor its effects. In particular, we have found that the normal force sensor of the rheometer is sensitive to very small deflections of the coverslip, including those caused by the objective during sequential three-dimensional stack acquisition. When loading a stiff sample, the rheometer control software can lower the tool at a slow enough rate to allow the sample to fill the gap uniformly. In addition, for a structured fluid that displays yielding behavior, a slow rotation or oscillation of the tool can improve this relaxation. In practice, we modify the loading profile to minimize the coverslip deflection, as measured by the normal force sensor and direct imaging with the microscope.
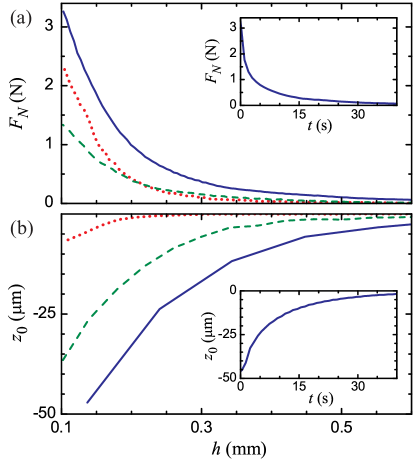
An example of this monitoring is shown in Fig. 7, where the normal force and coverslip location (where before the sample is loaded) were measured during the loading of a compressed emulsion to a gap of . Both of these values were quite high when the tool was lowered at a rate of (solid lines). As shown in the insets, the coverslip relaxes quickly when the tool is rotated at a shear rate of 5 1/s after the gap has been set to its final value. The maximum normal force is smaller when loading at with a 1 1/s rotation (dashed lines). Alternatively, the deflection can be minimized by using a baseplate with a single hole (dotted lines). This baseplate also limits deflection during measurements after the sample has been loaded. Thus the baseplate and loading protocol can be chosen to meet the needs of each experiment.
V Summary
We have described a confocal rheometer comprised of two commercial instruments. While the Anton Paar rheometer did have to be modified to provide adequate access for the Leica microscope, taking advantage of the significant engineering of the instruments simplified assembly of the combined system and went a long way to ensuring successful operation. In addition to providing standard bulk viscoelastic measurement capability, the rheometer has many advantages over a standard shear cell, including a normal force sensor that is particularly useful during loading, easy measurement profile definition, a wide range of applied torque, and a gap that can be precisely controlled over the course of an experiment.
We feel that due to the large number of groups that have incorporated microscopy and rheology as equipment for their research, that this system can be implemented with a modest amount of additional machine work and engineering. We hope that our straightforward design principles will be easily transferable.
VI Acknowledgments
We are indebted to L. Der for his insight on a variety of design issues and machining expertise. This work was funded by the generous support of Georgetown University and the National Science Foundation Grant # DMR-0847490.
References
- Dasgupta et al. (2002) B. R. Dasgupta, S.-Y. Tee, J. C. Crocker, B. J. Frisken, and D. A. Weitz, Phys. Rev. E 65, 051505 (2002).
- Panine et al. (2003) P. Panine, M. Gradzielski, and T. Narayanan, Rev. Sci. Instrum. 74, 2451 (2003).
- Sasa et al. (2010) L. A. Sasa, E. J. Yearley, C. F. Welch, M. A. Taylor, R. D. Gilbertson, C. Hammeter, J. Majewski, and R. P. Hjelm, Rev. Sci. Instrum. 81, 055102 (2010).
- Porcar et al. (2011) L. Porcar, D. Pozzo, G. Langenbucher, J. Moyer, and P. D. Butler, Rev. Sci. Instrum. 82, 083902 (2011).
- Weigandt et al. (2009) K. M. Weigandt, D. C. Pozzo, and L. Porcar, Soft Matter 5, 4321 (2009).
- Liberatore et al. (2006) M. W. Liberatore, F. Nettesheim, N. J. Wagner, and L. Porcar, Phys. Rev. E 73, 020504 (2006).
- Bender and Wagner (1995) J. W. Bender and N. J. Wagner, J. Colloid Interface Sci. 172, 171 (1995).
- Cohen et al. (2004) I. Cohen, T. G. Mason, and D. A. Weitz, Phys. Rev. Lett. 93, 046001 (2004).
- Besseling et al. (2009) R. Besseling, L. Isa, E. R. Weeks, and W. C. K. Poon, Adv. Colloid Interface Sci. 146, 1 (2009).
- Basu et al. (2011) A. Basu, Q. Wen, X. Mao, T. C. Lubensky, P. A. Janmey, and A. G. Yodh, Macromolecules 44, 1671 (2011).
- Paredes et al. (2011) J. Paredes, N. Shahidzadeh-Bonn, and D. Bonn, J. Phys.: Condens. Matter 23, 284116 (2011).
- Cheng et al. (2011) X. Cheng, J. H. McCoy, J. N. Israelachvili, and I. Cohen, Science 333, 1276 (2011).
- Boitte et al. (2013) J.-B. Boitte, C. Vizcaïno, L. Benyahia, J.-M. Herry, C. Michon, and M. Hayert, Rev. Sci. Instrum. 84, 013709 (2013).
- Hell (2003) S. W. Hell, Nat. Biotechnol. 21, 1347 (2003).
- Lu et al. (2008) P. J. Lu, E. Zaccarelli, F. Ciulla, A. B. Schofield, F. Sciortino, and D. A. Weitz, Nature 453, 499 (2008).
- Crocker and Grier (1996) J. C. Crocker and D. G. Grier, J. Colloid Interface Sci. 179, 298 (1996).
- (17) Matlab versions of the tracking code are available at physics.georgetown.edu/matlab.
- Schmoller et al. (2010) K. M. Schmoller, P. Fernández, R. C. Arevalo, D. L. Blair, and A. R. Bausch, Nat. Commun. 1, 134 (2010).
- Arevalo et al. (2011) R. C. Arevalo, J. S. Urbach, and D. L. Blair, Chaos 21, 041102 (2011).
- Holland et al. (2012) C. Holland, J. S. Urbach, and D. L. Blair, Soft Matter 8, 2590 (2012).
- Carlsson (1991) K. Carlsson, J. Microscopy 163, 167 (1991).