Analytical Solution of the Tooling/Workpiece Contact Interface Shape During a Flow Forming Operation
Abstract
Flow forming involves complicated tooling/workpiece interactions. Purely analytical models of the tool contact area are difficult to formulate, resulting in numerical approaches that are case-specific. Provided are the details of an analytical model that describes the steady-state tooling/workpiece contact area allowing for easy modification of the dominant geometric variables. The assumptions made in formulating this analytical model are validated with experimental results attained from physical modelling. The analysis procedure can be extended to other rotary forming operations such as metal spinning, shear forming, thread rolling and crankshaft fillet rolling.
keywords:
flow forming , metal forming , physical modelling , contact interface , analytical modelNomenclature
-
- the entry angle from workpiece to the roller, also known as the attack angle [∘] (Fig. 4)
-
- overall contact area [mm2] (Section 4)
-
- planar projection of the contact area [mm2] (Section 4)
-
- planar projection of the contact area [mm2] (Section 4)
-
- planar projection of the contact area [mm2] (Section 4)
-
- the trailing angle from the workpiece to the roller, also known as exit angle or planishing angle [∘] (Fig. 4)
-
- distance between analytical surface and experimental surface nearest neighbour points (Section 3)
-
- distance between analytical surface and experimental surface interpolant (Section 3)
-
- the distance between the center of the mandrel and the center of the roller [mm](Fig. 4, )
-
- axial feed rate of the roller down the face of the cylinder, along the direction [mm/min]
- MSE
-
- Mean Square Error (Eq. 34)
-
- the mandrel rate of rotation [revolutions/min]
-
- the roller path pitch or distance traveled axially by the roller in one revolution [mm] ()
-
- roller nose radius [mm] (Fig. 4)
-
- numeric resolution of the solution (Section 2.2.2)
-
- initial workpiece radius ()
-
- the mandrel radius [mm] (Fig. 4)
-
- the roller radius excluding the radius of the nose [mm] (Fig. 4)
-
- Intermediate set of radial quantities used to find and (Eq. 26)
-
- the angle of contact between the roller and workpiece [rad](Fig. 2, Eq. 33)
-
- intermediate value of used for the iterative solution of the contact area [rad] (Eq. 33)
-
- maximum angular limit of the solution (Eq. 14)
-
- angular coordinates used to define boundary surfaces (Eq. 19)
-
- starting material thickness [mm] (Fig. 4)
-
- the final material thickness [mm] (Fig. 4)
-
- coordinates lying on the instantaneous roller position (Eq. 20)
-
- coordinate used for intersection conditioning (Eq. 5)
-
- coordinate used for intersection conditioning (Eq. 3)
-
- coordinate lying on the cylinder defined by (Eq. 23)
-
- maximum limit in the direction of the solution (Eq. 15)
-
- coordinates lying on the previous roller path (Eq. 27)
-
- coordinates within the roller/workpiece contact area (Eq. 30)
-
- coordinate used for intersection conditioning (Eq. 1)
-
- coordinates lying on the instantaneous roller position (Eq. 21)
-
- coordinates lying on the cylinder defined by (Eq. 24)
-
- maximum limit in the direction of the solution (Eq. 16)
-
- coordinates lying on the previous roller path (Eq. 28)
-
- coordinates used to define boundary surfaces (Eq. 18)
-
- coordinates within the roller/workpiece contact area (Eq. 31)
-
- coordinates lying on the instantaneous roller position (Eq. 22)
-
- coordinate used for intersection conditioning (Eq. 6)
-
- coordinate used for intersection conditioning (Eq. 4)
-
- coordinates lying on the cylinder defined by (Eq. 25)
-
- coordinates lying on the previous roller path (Eq. 29)
-
- coordinates used to define boundary surfaces (Eq. 17)
-
- coordinates within the roller/workpiece contact area (Eq. 32)
-
- coordinate used for intersection conditioning (Eq. 2)
1 Introduction
To determine the energy required to form a component, the size and orientation of the tooling interface on the workpiece is necessary. While purely analytical models describing this contact are preferable, they are usually difficult to attain for complex metal forming processes. In this study, an analytical approach is presented to model the tooling/workpiece contact area in an application of rotary forming. While the present work focuses on an implementation for flow forming, the applied technique can be applied to other variants of rotary forming operations such as metal spinning, shear forming, thread rolling and crankshaft fillet rolling.
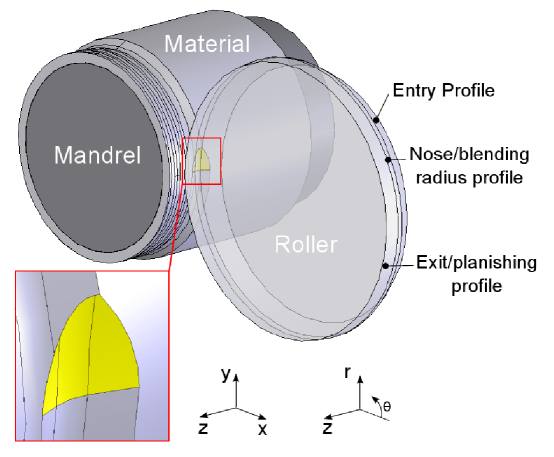
Flow forming, a variant of metal spinning, is a process used to fabricate rotationally symmetrical parts from ductile materials, after Wong et al., (2003). During flow forming, the workpiece is clamped to a rotating mandrel and pressed into contact with the mandrel by rollers. The rollers induce high levels of plasticity in the workpiece causing it to undergo both reduction in thickness and axial lengthening. Since the rollers press on only a very small area of the overall workpiece at any given time, the deformation is highly localized between the roller and workpiece. To properly understand the distribution of this intense local plastic deformation it is essential to be able to calculate the roller/workpiece contact area from the geometric parameters that govern the flow forming process. In addition, the roller/workpiece contact area is critical to coupling other experimental findings, such as power consumption, frictional effects, force, stress and strain distributions through the workpiece back to geometric process parameters.
In flow forming, the combined mandrel rotation and linear movement of the rollers induce contact on the workpiece along a helical path. This helical tool path, coupled with the curved profile of the rollers leads to a very complicated roller/workpiece contact area.
In terms of related tool contact studies, an important analytical derivation of the workpiece contact in shear spinning was completed by Chen et al., (2005). However, in a comprehensive review of metal spinning processes, Music et al., (2010) highlighted that the mechanics of flow forming are quite different than shear spinning. This is also true for the contact area formulation as there is little roller penetration into the workpiece and deformation proceeds according to the sine rule.
In terms of flow forming specific research, investigations made by Gur and Tirosh (1982), Singhal et al. (1995), Ma (1993) and Jahazi and Ebrahimi (2000) have proposed analytical models of this contact. Gur and Tirosh (1982) developed the formulation of a planar contact area in each of the primary rolling and extrusion deformation directions in backwards flow forming. Singhal et al. (1995) derived the contact area imposed by tooling in the flow forming of small diameter tubes where the assumption made was that material is assumed to be perfectly plastic, and the tools were assumed rigid. Ma (1993) extended the work of Gur and Tirosh (1982) to derive a critical angle of attack and Jahazi and Ebrahimi (2000) extended the contact formulation made by Gur and Tirosh (1982) to investigate the mechanics in a specific application of flow forming. More recently, Kemin et al. (1996), Xu et al. (2001) and Hua et al. (2005) have developed Finite Element (FE) models of single roller flow forming. In each of these studies, contact was modeled explicitly within each respective FE model. Furthermore, with the exception of the work by Xu et al., (2001) and Hua et al., (2005), all previous works have made assumptions concerning the roller/workpiece contact geometry that do not necessarily reflect the actual contact during flow forming. These assumptions include:
-
1.
Idealized roller geometry (i.e. no blending radii) (Fig. 1);
-
2.
The use of two-dimensional treatments that do not account for the three-dimensional aspects of the workpiece contact;
-
3.
Not considering the influence of prior forming steps (i.e. roller path overlap) on the instantaneous roller/workpiece contact area.
The most successful technique for modelling the roller/workpiece contact area, and other facets of the flow forming process, has been through FE analyses. Xu et al., (2001) addressed items 1 and 2 listed above in their work to numerically calculate the roller/workpiece of a single roller flow forming. However, Xu et al., (2001) did not give the details of their calculation of the contact area, nor did they specifically address item 3. Hua et al., (2005) has developed a thorough 3-D FE model that addresses all three items, but an FE approach is still limited to case-by-case application involving extensive pre-processing and explicit geometric modelling. An analytical solution provides a solution with significantly lower effort. In the present work, a generalized solution is developed for the roller/workpiece contact area during a single roller flow forming operation that accommodates items 1 to 3. To accomplish this, the following assumptions are made:
-
1.
The single roller flow forming process proceeds under steady state conditions. The final and starting thickness, mandrel rotation and feed rate are constant.
-
2.
The deformation response of the workpiece is perfectly plastic. Elastic effects are not considered.
-
3.
Volume of the flow formed workpiece is conserved outside the tool interface.
-
4.
No material build-up occurs in front of the roller as the workpiece conforms completely with the rigid roller.
2 Contact Solution
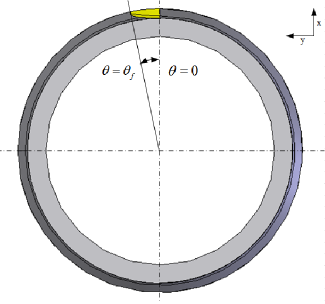
During flow forming, the roller contacts the workpiece along a path having a constant pitch (Fig. 1). The profile of the roller can be divided into three regions; the entry region, the nose region and the exit region. These regions dictate the size and shape of the roller/workpiece contact area. The contact area is bounded by three contours: the tangential exit contour, the axial entry contour and the axial exit contour, labeled 1-3 respectively in Fig. 2(a). The contact area extends angularly from the tangential exit contour () through to (Fig. 2(b)).
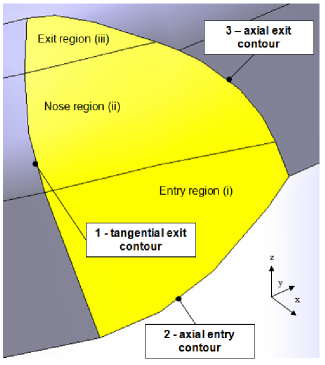
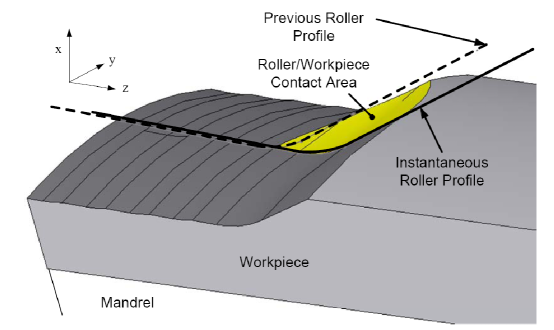
If the roller has an archetypal flow forming profile similar to that shown in Fig. 1 with distinct flat entry and exit regions and a blending radius between the two that creates a nosed roller, the final contact area is dependent on six surfaces (Fig. 3). Contour 1, and the starting points of contours 2 and 3 (Fig. 2) can be calculated directly as they lie exclusively on the -plane. The a priori -coordinates of the extents of contour 1 define the axial limits of the roller/workpiece contact area. Once the a solution has been found for the starting and ending points of contour 1 (by definition the starting points of contours 2 and 3), the common end point of contours 2 and 3 is then solved using an iterative technique.
2.1 Axial Limits
It is first necessary to calculate the axial limits of contact by determining the endpoints of contour 1. Contour 2 is a function of the instantaneous roller contact with the workpiece at pitch . Contour 3 is a function of the instantaneous roller contact on the material as well as the tool contact on the workpiece one revolution of the mandrel beforehand, at . Contour 1 exists solely on the plane and is bound by the points of intersection with contours 2 and 3. Contour 1 is both dependent on roller geometry and the roller path pitch, . There are four possible conditions describing the intersection of the current roller position with that of its position on the previous mandrel revolution (Fig. 4).
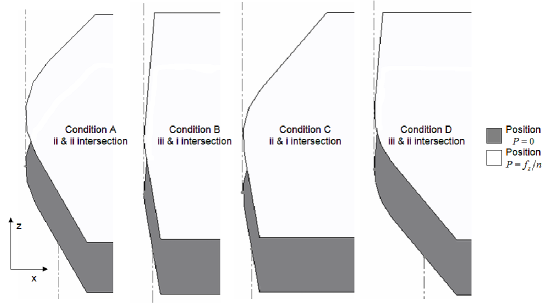
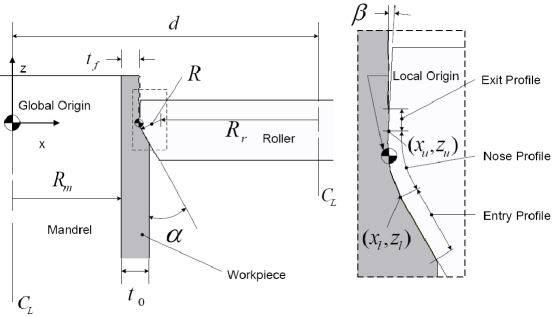
Calculation of the location of the upper end point of contour 1 for the four conditions shown in Fig. 4 is accomplished through comparison of the endpoints of the roller nose profile on the plane. For comparison purposes, the local coordinate system is moved on the axis from the global origin by (Fig. 5). The and coordinates of the upper end point of the nosed region of contour 1, and (Fig. 5):
| (1) |
| (2) |
For the lower and coordinates of the end point of the nose region of contour 1, and (Fig. 5):
| (3) |
| (4) |
The entry profile of the previous roller path and the instantaneous exit profile of the roller will occur at and . These are expressed as:
| (5) |
| (6) |
The values of , , , , and can be compared to identify which contact condition shown in Fig. 4 applies. The conditions and the relationships that must be simultaneously satisfied are shown in Table 1.
| Condition | Relationships | Intersection |
| (/) | ||
| A | Nosed region/Nosed region | |
| B | Exit region/Entry region | |
| C | Nosed region/Entry region | |
| D | Exit region/Nosed region | |
Once the proper contact condition is determined, a solution for the coordinate for the upper end point of contour 1, as well as the upper axial limit of the solution space, , is possible. Solving for the appropriate condition A through D:
| (7) |
| (8) |
| (9) |
| (10) |
In conditions C and D, is expressed as the solution that satisfies the two equations for .
The lower end point of contour 1, , occurs at the intersection of the profile of the instantaneous roller position and the cylinder with radius . This intersection depends on roller geometry and the depth that it penetrates into the workpiece. Either the roller intersects the workpiece at the flat entry region (condition I) or the nosed region (condition II). If the roller intersects at the flat entry region:
| (11) |
where is given by Eq. 3. Otherwise, condition II prevails and the roller intersects within the nosed region. The solution for this intersection point yields the following expressions for the lower end point of contour 1, and the lower axial limit of the solution space. This value, , for each condition is given as:
| (12) |
| (13) |
2.2 Solution Boundaries
Thus far, the region where the tool contact resides has been explicitly bound in the axial direction between and . The following describes how the components needed for a computation of the full three dimensional contact area are developed. These components are the maximum angular limit that the solution space can be defined by and the surfaces that bind the solution space of the instantaneous contact.
2.2.1 Maximum Angular Limit
Contours corresponding to the ones described in Section 2 that pass through the axial limits, and , are formulated to extend angularly from to . This value is the absolute maximum value that can be, corresponding to . The extremal point at angle lies on the plane at ; its coordinates are obtained using the same derivation as the general solution for the contact of two circles using the global datum. The first circle is one centered at with a radius of and the other is at a distance and with a radius of .
| (14) |
with and as follows:
| (15) |
| (16) |
2.2.2 Surface Definitions
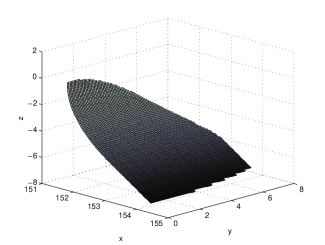
As described in Section 2, there are six different surfaces that define the area. Due to the system complexity, a numerical technique is employed to generate these boundary surfaces in three dimensions. In this technique, the overall solution space is represented by a finite number of points or nodes. For example, if the solution space was broken up into uniformly spaced points, then the resolution, , of the space would be 20. Figure 6 shows the effect on the solution by increasing or decreasing .
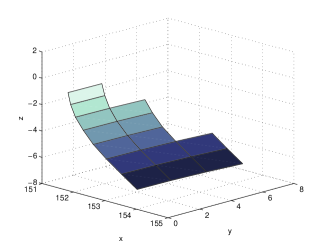
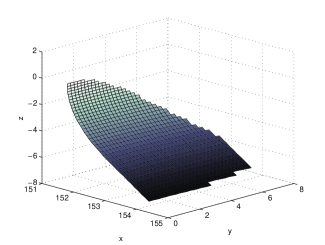
The following are the definitions of the arrays of coordinates used to define the boundary surfaces as functions of , where initially and decays for every term included in the array until .
| (17) |
| (18) |
| (19) |
Now that the arrays of points are formulated, the boundary surfaces can be formed as by square matrices for each direction through space to form , and . The direction of these matrices is a solution for at a given value in the direction of or , corresponding to the coordinate arrays given in Equations 17, 18 and 19. The following are functions of discrete entries in the matrices that define the boundary surfaces.
Starting with the instantaneous roller position:
| (20) |
where . and remain the matrices of dimension by :
| (21) |
| (22) |
The cylindrical surface defined by that describes the outer surface of the workpiece formed around the mandrel:
| (23) |
| (24) |
| (25) |
For the previous roller path, the surfaces are most easily defined in radial expressions, and translated to cartesian coordinates. This radial quantity, is defined as:
| (26) |
where . Converting these radial quantities into cartesian coordinates results in:
| (27) |
| (28) |
| (29) |
2.2.3 Contact Surface Solution
Once the boundary surfaces have been defined, the contact surface can be solved. The contact surface points reside within the instantaneous roller position definition, bound by the intersections with the workpiece surface and the previous roller path surface. In order to determine which points lie within these boundaries, the matrices containing the surfaces are parsed with logical operators and placed in a new set of matrices corresponding to the , and points lying on the contact surface.
For the -coordinates of the contact surface, belongs to the set of coordinates corresponding to:
| (30) |
Similarly, for the -coordinates, :
| (31) |
where ‘’ is the conjunction (and) operator, and ‘’ is the disjunction (or) operator. Finally, for the coordinates, :
| (32) |
Each of these conditions must be simultaneously satisfied for , and . While all -coordinates will lie between the cylinder defined by and the previous tool path (leading to the ‘’ operator), due to the curvature of the instantaneous roller position versus the counterclockwise curvature of the workpiece, the -coordinates require the ‘’ operator for the same comparison.
2.3 Iterative Calculation of the Contact Length
The contact area extends from on the plane to some final radial distance at . Depending on the geometry involved, the resolution selected and the initial value for selected, it is possible that only half of the coordinates in , and correspond to , and . To overcome this, it is necessary to iterate on the initial value of defining the solution space via the following method. The initial solution without any iteration () has all of the surfaces defined extending axially through the endpoints and of contour 1 (Fig. 2) and angularly from to , corresponding according to . Once the first values for , and are available, a preliminary calculation for is possible, residing within as per Eq. 33.
| (33) |
After priming, is probably close to the actual value of . However, the solution space that defines is spread uniformly across the range of and therefore the solution should be retried at a smaller value than . This can be continued times until is a large percentage ( 95%) of to ensure the most accurate result at a given value of .
Once the coordinates for the solution surface have been solved, the total surface area can be readily calculated. This can be accomplished through tessellating or meshing the coordinates within , and , then using Gaussian quadrature or a brute force method to find the area of each element and summing.
3 Experimental Validation
Flow forming is typically applied to forming metallic components involving high speeds, feed rates and forming forces. Due to the nature of the process, it is difficult to completely stop the process at a particular point in time in a safe manner such that the instantaneous forming zone is preserved. Therefore, the forming speeds, forces and feed rates must be significantly reduced in order to study the tooling/workpiece interaction in flow forming.
In order to validate the analytical model above, a physical model of flow forming was developed using Plasticine conforming to ASTM D-4236. The suitability of using Plasticine and similar compounds to model metal forming processes has been established by Sofuoglu and Rasty, (2000) as well as Pertence and Cetlin, (1997). All material preparation steps detailed by Sofuoglu and Rasty, (2000) were followed. The contact condition used for validation was designed to provide geometry that other modelling efforts have failed to address. Specifically, the contact of a nosed roller with a nose/nose entry condition of type ‘AII’ (Section 2.1). Unlike the other contact conditions, this type is the most complex in terms of curvature as there is no straight/linear section appearing anywhere on the surface.
The tooling used was a smooth mandrel with = 69.33 mm and a roller with = 56.23 mm, = 5.00 mm, and . These were installed on a lathe with a thread-cutting feed set such that mm/rev. The mandrel was dusted with talcum powder and Plasticine of a uniform thickness mm was set on it. The outer surface of the Plasticine was also dusted with talcum powder. The roller was brought into contact with the Plasticine such that with rev/min. The steel and Plasticine process components were all measured with standard contact measurement apparatus with an accuracy of mm. This reduction level was selected such that it maximized the size of the contact patch with the given tooling and minimized bulging of material ahead of the roller. Despite these precautions, there was some build-up of material ahead of the roller. The forming was stopped with a brake after two full rotations of the mandrel resulting in the contact patch of the roller mid-forming.
3.1 Experimental Surface Measurement
The workpiece and mandrel were removed from the lathe and imaged using a FARO Laser ScanArm***FARO Technologies, Inc. controlled with Geomagic Studio 9†††Geomagic Inc. software. The resulting 3-D point cloud of the experimental flow formed tooling/workpiece surface was used to compare with the analytical solution. In an effort to assess the accuracy of the surface scan, both the mandrel and the contact patch were scanned together. The mandrel portion of the scan gave a mean of mm over 16,000 points. Defining the difference between the scan and the contact measurement (69.331 0.013 mm) of the mandrel radius as error, the Mean Square Error (MSE) of the scan was 0.0366 mm. Equation 34 is the relationship used for the MSE calculation where is the number of samples and is the difference in distance. This measurement from the scan in comparison to the contact measurement made with a micrometer indicates that the FARO scan accuracy is on the same order as a conventional contact measurement.
| (34) |
3.2 Comparison to the Analytical Solution
The analytical surface was generated from process geometry listed above and was used to generate a surface of the contact interface in the form of a 3-D point cloud for comparison. The two point clouds (analytical and experimental) were then overlaid. Since the origin of the experimental point cloud was unknown, a procedure was developed to determine the correct relative position and register the points of the experimental cloud. The final location was arrived at by axial and angular perturbations of the analytical surface origin. An assessment of the degree of fit of the analytical surface was found by calculating the nearest neighbour points on the experimental surface. For each point on the analytical surface, the experimental point cloud was parsed until a point with minimum distance was found. The distance between the analytical point and the nearest neighbour experimental point was defined as . The mean of the distance between analytical and experimental points (), and the Mean Square Error (MSE) were minimized by translating the analytical surface in the axial and angular directions to determine the final location. Table 2 shows a summary of how these parameters change by moving the origin of the analytical surface relative to the experimental one. In order to compare the surfaces, an intermediate surface was linearly interpolated through both the experimental and analytical point clouds and the distance between the surfaces () was found.
| Condition | Mean | MSE |
|---|---|---|
| Baseline | 0.1614 | 0.4017 |
| +0.4 mm circumferential | 0.1770 | 0.4207 |
| -0.4 mm circumferential | 0.1648 | 0.4059 |
| +0.4 mm axial | 0.1630 | 0.4037 |
| -0.4 mm axial | 0.2607 | 0.5106 |
Figure 7 shows a comparison of the experimental point cloud and the corresponding analytical contact patch. Due to the surface overlap, the analytical surface is depicted as being offset along the axis by 15 mm from the experimental surface. At the best fit position, the analytical surface is qualitatively indistinguishable from the experimental surface. Figures 8 and 9 show the 2-D plots of the analytical profile of the roller in relation to corresponding nearest neighbour experimental points on the plane (Fig. 8) and the plane (Fig. 9). These two plots show the proximity of the analytical surface to the experimental one. Outside of the area influence of the roller, there is a lack of coherence with the analytical surface: this is due to the inherent bulging of material ahead of the roller both axially and tangentially.
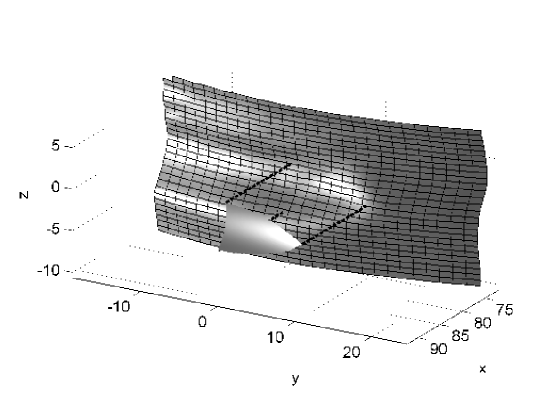
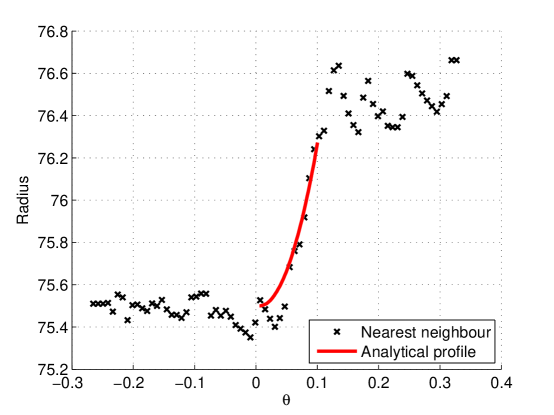
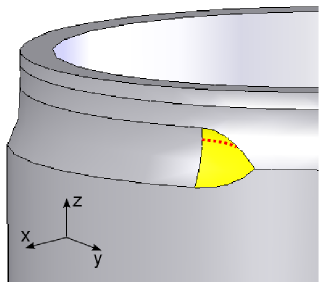
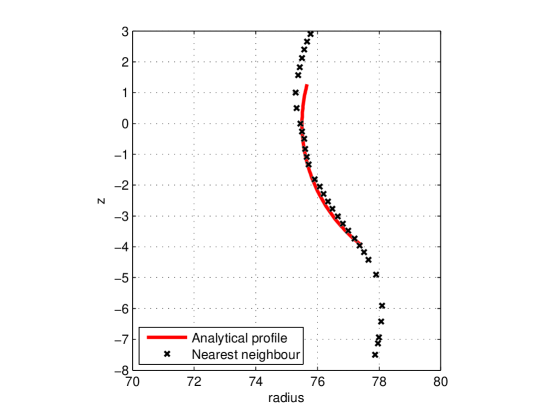
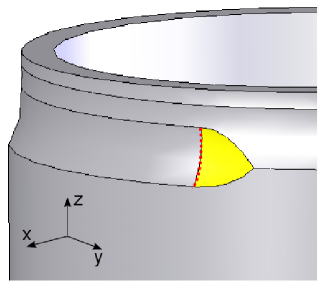
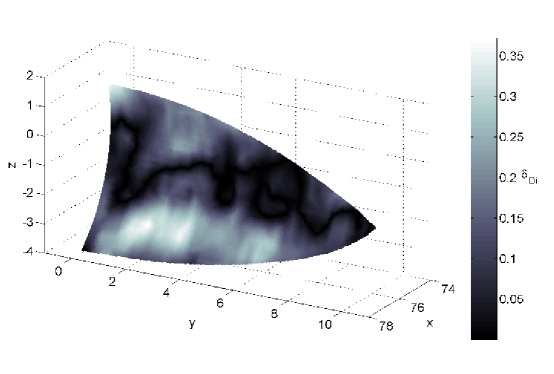
Figure 10 is a contour plot of the distance between the analytical and experimental surfaces, . This plot shows that the peak distance, approximately 0.35 mm, occurs along the axial entry profile due to the minor bulging of material as it encounters the roller. However, there is very little change in the circumferential gradient despite the overall surface variation which re-asserts the accuracy of the fit.
4 Application
The flow forming process can be thought of as a simultaneous combination of both rolling and extrusion (or drawing) processes. An important application of the calculated roller/workpiece contact area is the use of the calculated planar projections , and to determine the relative quantities of extrusion and rolling that are occurring. During flow forming, there is a set of running conditions that sometimes generates diametrical growth or defects. This is due to tangential deformation and, while very small, is approximated with the present analytical solution. Gur and Tirosh, (1982) proposed that the ratio of axial contact length to the circumferential contact length dictates the ratio of extrusion (or drawing for forward flow forming) to rolling that occurs during flow forming. A more accurate measure of this extrusion/rolling ratio would be to consider the ratios of the and the projections of the roller/workpiece contact area. Therefore, it is important to see how these quantities vary with respect to the independent process variables.
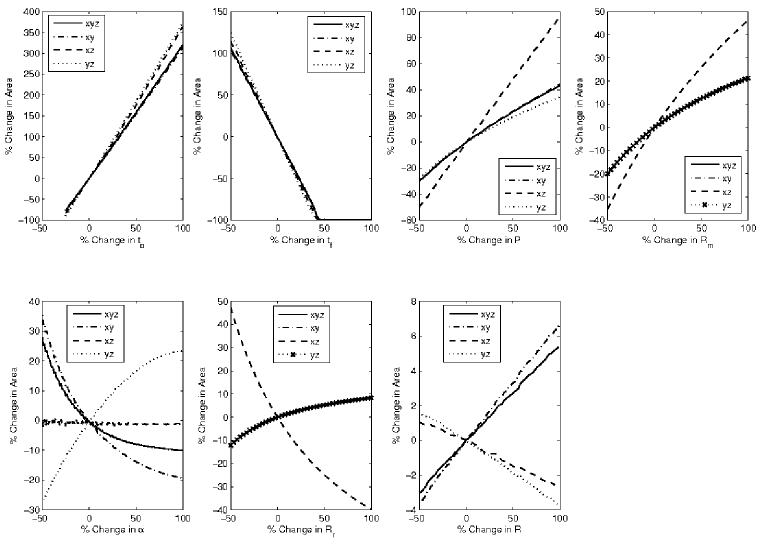
Using the baseline independent geometric variables presented by Xu et al., (2001), a sensitivity analysis was conducted on the independent variables that define the three components of the surface area. The process values used by Xu et al., (2001) were mm/rev, mm, mm, mm, mm, mm and an attack angle of . Note that this set of variables dictates an ‘AI’ (Section 2.1) contact condition where the exit angle does not participate. Through implementing One Factor At a Time (OFAT) analysis, whereby one variable is changed while holding others constant, the independent variables were changed individually between -50 and +100% of the initial values with the exception of and . The starting thickness was varied -25 and +100% as outside the lower range there is no contact. The final thickness was varied 0 to -50%. The resultant effects on the contact area components were then calculated. These results are presented in Figure 10. The overall effect on changing the independent process variables on both the area and the associated components is given in Table 3.
| Variable | % Range | % Range in Area | |||
|---|---|---|---|---|---|
| in Variable | |||||
| 125 | 397.43 | 389.83 | 447.48 | 462.14 | |
| 150 | 206.30 | 204.18 | 214.27 | 224.23 | |
| 150 | 73.35 | 74.48 | 146.31 | 62.24 | |
| 150 | 41.23 | 41.21 | 81.52 | 41.34 | |
| 150 | 37.95 | 54.65 | 3.20 | 50.99 | |
| 150 | 20.45 | 20.50 | 87.07 | 20.48 | |
| 150 | 8.60 | 10.39 | 3.85 | 5.39 | |
The OFAT analysis technique is limited as, by definition, it does not allow for simultaneous changes in multiple variables. For the given geometry, however, this analysis does display the following important observations:
-
1.
In terms of the largest effect on the overall contact area , changing the material starting and final thicknesses and the pitch had the largest effect. This is also true for all of the area components, , and . In order of precedence, the variables that had largest sensitivity on the overall area other than thicknesses and pitch were the radius of the mandrel, the attack angle, radius of the roller, with the nose radius having the least effect overall.
-
2.
Varying the the roller nose radius had the least effect on the contact area as well as the and components.
-
3.
The rolling component, , followed the same trends as the overall area for changes in thicknesses, pitch, mandrel/roller radii and attack angle. This component decreased while the extrusion/drawing component and the overall area increased for larger roller nose radii. Furthermore, , is more sensitive to the attack angle than the mandrel radius.
-
4.
The largest effect on the component, or the drawing/extrusion part of the deformation saw the same precedence of variables as for the overall contact area. This component showed the same response to variable changes as the overall area.
-
5.
The tangential deformation component, , is marginally more sensitive to the radius of the roller than the radius of the mandrel, and the roller nose radius has approximately the same sensitivity as the attack angle. This component also increased for larger values of pitch and mandrel radius, but decreased for larger roller radii and nose radii. remained unaffected by changes in attack angle.
-
6.
The overall contact area increased with increased variable values in all cases except for the final thickness value and the attack angle. This decrease was a linear for the former and non-linear for the latter.
-
7.
The effect of changing the starting thickness, final thickness and roller nose radius is a linear change for all area components while all others are non-linear.
These findings are of practical importance to flow forming. If a worn roller is to be re-used after resurfacing, it may be necessary to modify the pitch in order to maintain the same forming geometry when the process was first commissioned. If a single set of rollers are to be used with different mandrels, it is also important from a process design standpoint so that the same forming zone geometry can be maintained. Furthermore, knowing the sensitivity of each of the variables on the overall contact and therefore deformation mode also permits easier troubleshooting of existing processes.
5 Conclusion
An analytical model of the roller/workpiece interface in flow forming has been developed such that it may predict the contact area. This model is applicable to all tooling geometries for both forward and backward flow forming processes. Due to the general nature of the description of the geometry, the approach taken can be used for other rotary forming operations where a die or a roller is used to deform a cylindrical workpiece locally. This model has been compared to experimental data generated from physical modelling and shows excellent correspondence. Specifically, the analytical model was found to describe the experimental surface within 0.4 mm based on mean square error.
An example of the application of the model has been demonstrated in the form of a OFAT sensitivity analysis applied to independent geometric variables determining tooling interaction. The independent geometric variables examined were starting and final thicknesses (, ), forming pitch (), mandrel radius (), attack angle () as well as roller and roller nose radii (, ). These variables were modified over a range of for the starting thickness and 150% for all others. Specific findings showed that on the basis of a unit change in the respective variables:
-
1.
had four times the effect on the the change in overall area and components
-
2.
had 33% more of an effect
-
3.
had 50% less of an effect, with the exception of the tangential deformation component, which had 50% more of an effect
-
4.
, , and have less than a effect
-
5.
caused the least change: less than 7% change in area
The present work could be extended to study the multi-variant effects on the contact area to fully account for the geometric changes during complicated forming processes. However, geometric factors are not the only process parameters which govern the process. The main direction of future work is to link the geometric factors to other process factors such as workpiece material properties and tribological considerations to gain deeper insight into the overall process mechanics.
References
- Chen et al., (2005) Chen, M.D., Hsu, R.Q., Fuh, K.F., 2005. An analysis of force distribution in shear spinning of cone. Int. J. Mech. Sci. 47, 902-921.
- Gur and Tirosh, (1982) Gur, M., Tirosh, J., 1982. Plastic flow instability under compressive loading during shear spinning process. Eng. Ind. Trans. ASME 104, 17-22.
- Hua et al., (2005) Hua, F., Yang, Y., Zhang, Y., Guo, M. Guo, D., Tong, W., Hu, Z., 2005. Three-dimensional finite element analysis of tube spinning. J. Mater. Process. Technol. 168, 68-74.
- Jahazi and Ebrahimi, (2000) Jahazi, M., Ebrahimi, G., 2000. The influence of flow forming parameters and microstructure on the quality of a D6AC steel. J. Mater. Process. Technol. 103, 362-366.
- Kemin et al., (1996) Kemin, X., Zhen, W., Yan, L., Xianming, Z., 1997. The disposal of key problems in the FEM analysis of tube stagger spinning. J. Mater. Process. Technol. 69, 176-179.
- Ma, (1993) Ma, Z., 1993. Optimal angle of attack in tube spinning. J. Mater. Process. Technol. 37, 217-224.
- Music et al., (2010) Music, O., Allwood, J.M., Kawai, K., 2010. A review of the mechanics of metal spinning. J. Mater. Process. Technol. 210, 3-23.
- Pertence and Cetlin, (1997) Pertence, A.E.M., Cetlin, P.R., 1998. Analysis of a new model material for the physical simulation of metal forming. J. Mater. Process. Technol. 84, 261-267.
- Singhal et al., (1995) Singhal, P., Saxena, P., Prakash, R., 1995. Estimation of power in the shear spinning of long tubes in hard-to-work materials. J. Mater. Process. Technol. 54, 186-192.
- Sofuoglu and Rasty, (2000) Sofuoglu, H., Rasty, J., 2000. Flow behavior of Plasticine used in physical modeling of metal forming processes. Tribol. Int. 33, 523-529.
- Wong et al., (2003) Wong, C., Dean, T., Lin, J., 2003. A review of spinning, shear forming and flow forming processes. Int. J. Mach. Tools Manuf 43, 1419-1435.
- Xu et al., (2001) Xu, Y., Zhang, S.H., Li, P., Yang, K., Shan, D.B., Lu, Y., 2001. 3D rigid-plastic FEM numerical simulation on tube spinning, J. Mater. Process. Technol. 113, 710-713.