Real-time phasefront detector for heterodyne interferometers
Abstract
We present a real-time differential phasefront detector sensitive to better than 3 mrad rms, which corresponds to a precision of about 500 pm. This detector performs a spatially resolving measurement of the phasefront of a heterodyne interferometer, with heterodyne frequencies up to approximately 10 kHz. This instrument was developed as part of the research for the LISA Technology Package (LTP) interferometer, and will assist in the manufacture of its flight model. Due to the advantages this instrument offers, it also has general applications in optical metrology.
pacs:
(040.2840) Heterodyne, (010.7350) Wave-front sensing, (120.2650) Fringe analysis, (120.3180) Interferometry, (120.5050) Phase measurement, (140.3300) Laser beam shaping, (330.6130) Spatial resolution.I Introduction
Many applications in optical metrology require precision measurements and characterization of laser beam wavefronts, as well as an accurate mode-matching of laser beams. To this end, it is usual to perform various adjustments that are both complex and time-consuming, based on repeated measurements of beam parameters siegman . Alternative methods are Shack-Hartmann sensors, which measure the shape of a single wavefront with an accuracy of typically haso , and phase-shifting interferometry lai ; millerd (PSI), which reaches typically kaiser .
Similar to PSI, the relative phase is found by a mathematical algorithm surrel ; hibino which is applied on the intensities sampled for instantaneous operating points with equidistant phase increments. This happens in parallel at each pixel of the spatially resolving photodetector (CCD camera). The advantage of our method over conventional PSI is that the phase-shift, normally implemented by a piezo-electric transducer (PZT), is intrinsically contained in the time-dependent sinusoid obtained from the interference of two electric fields at different frequencies (optical heterodyning). Thus, non-linearities of PZT-elements, and additional electronics required to keep the interferometer at a specific operation point can be avoided yongqian .
This article describes an apparatus able to measure in real-time the relative spatial structure between two interfering wavefronts in a heterodyne interferometer. This allows a quick and very precise characterization of the mode-mismatch between two beams in real-time, making possible an online adjustment of the optical components according to the mode-mismatch displayed. By using beams with known shape, this method can also be used to analyze surfaces and optical components (in transmission and reflection), reaching a sensitivity better than , which corresponds in our case to a precision of about 500 pm at (Nd:YAG laser).
Optical heterodyne interferometry wyant ; fengzhao is a useful technique to measure distance variations with sub-wavelength precision and large dynamic range. This concept is applied, for example, in the LISA Technology Package (LTP) ghh1 which utilizes a set of heterodyne Mach-Zehnder interferometers to measure relative changes in the separation of two drag-free test masses with a noise level better than 10 in the frequency range of 3 mHz to 30 mHz. It is well-known that heterodyne interferometers are susceptible to various noise sources zhao ; vwa which corrupt the phase measurement. One important noise source is the wavefront imperfections of the interfering beams in combination with beam jitter ghh3 ; dave .
This effect is of particular importance if quadrant photodiodes (QPD) are used, which are often employed to obtain alignment signals from the interferometer. The error term induced by the spatial inhomogeneity of the wavefronts can be minimized if the interfering beams have identical shape. The device we present here allows one to match the shape of the wavefronts with a simple procedure, permitting an online adjustment of the optical components.
II Theoretical Background
II.1 Interference pattern and heterodyne interferometry
The electric field of a linearly polarized light beam can be described as
| (1) |
where is an index to distinguish several beams, the vector describes the polarization, is the amplitude of the electric field, and is the spatial distribution of the phasefront. The intensity distribution oscillates at the heterodyne frequency , and is proportional to , where is the interference pattern. Assuming identical polarization vectors and also that the differential coherence length of the laser used is much larger than the distance from the source to the recombination point of the interferometer, the heterodyne component can be described as
| (2) |
where is a space-dependent factor, describes the contrast in terms of the space r, and
| (3) |
gives the spatial dependence of the phase, where is the spatially distortion of the phase distribution. Ideally, for identically shaped wavefronts (), the longitudinal phase term , which is the usual interferometric quantity to be measured, contains the length measurement describing the pathlength difference between the arms of the interferometer:
| (4) |
where is the wavelength of the light. This pathlength difference can be strongly influenced by environmental changes that usually (as in LTP) disturb the main length measurement.
In order to maximize the contrast of the interferometer, the beams need to be matched. It is therefore very useful to characterize the mismatch between them, and to be able to optimize it in real-time.
II.2 Spatially resolved phase measurement
The relative geometry of two interfering beams can be described by the spatial structure of the functions , , and . The apparatus described here measures these three functions in the real-time interference pattern using a CCD camera and pixelwise data processing. In order to obtain the phase of a sinusoidal function as in Equation (2), several mathematical approaches surrel can be used which are based on measuring equidistant intensity samples , with , where is an integer. The approach chosen for this experiment is a 4-point algorithm freischald , corresponding to a straightforward Discrete Fourier Transform (DFT) of the signal with samples and , where is the period of the signal. For a noise-free signal, these intensities would be given by
| (5) |
where is the average of the sampled intensities.
The phase at the pixel , , can be calculated from these intensity samples with the 4-point algorithm as
| (6) |
Several other useful quantities can also be obtained from these 4 data points. Using the abbreviations
| (7) | |||||
| (8) | |||||
| (9) |
we get:
-
•
Contrast at the pixel :
(10) -
•
Total phase over the CCD surface:
(11) -
•
Total contrast over the CCD surface:
(12) -
•
Average intensity at the pixel :
(13) -
•
The maximum and minimum intensity for the set of exposures () can also be determined for diagnostic purposes.
Furthermore, an exposure of the dark fringe can be directly captured by triggering the CCD camera with the appropriate delay :
| (14) |
III Instrument components and setup
The interferometer configuration used in this experiment is a non-polarizing heterodyne Mach-Zehnder interferometer. The light source was a Nd:YAG NPRO (non-planar ring oscillator) laser with a wavelength of 1064 nm. Two acousto-optic modulators (AOM), driven by slightly frequency shifted RF signals near 80 MHz, are used to generate two laser beams with a frequency difference of Hz. Since the beams diffracted by an AOM have a distorted non-Gaussian beam profile, single-mode polarization-maintaining fiber optics are used as mode cleaners. The requirements on the CCD camera are:
-
•
Simultaneous exposure for every pixel (“global shutter” ).
-
•
The exposure time must be very short compared with the heterodyne period, s.
-
•
The camera must be able to be triggered externally to allow frames to be captured at the required instances of time.
-
•
The signal for each pixel needs to be proportional to the intensity on that pixel. Saturation effects, such as “blooming” , must be avoided.
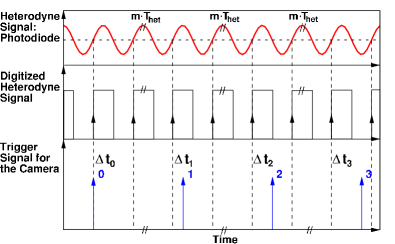
The CCD camera used is a model XEVA-USB from XenICs xenics with a 12-bit dynamic range which reaches 30 frames per second (fps) at a resolution of pixels with a pixel pitch of 30 m. The photosensitive chip is made of InGaAs, which has a quantum efficiency of approximately 80% for the near infrared (0.9–1.7 m). The exposure time used was 1 s (). Ideally, the interference pattern should be sampled 4 times within a single heterodyne period of . This would require a sampling period of s (approximately 6500 fps) for the CCD camera which cannot be reached in practice due to the time required to transfer the image. In order to capture the intensity sample , an integer number of heterodyne periods is added to , and the trigger signal is sent to the CCD camera with the delay
| (15) |
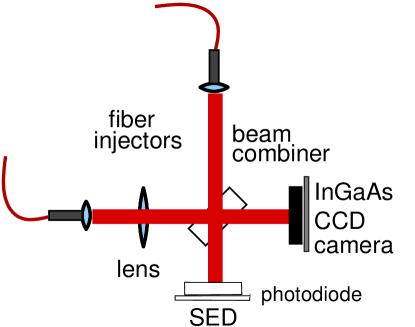
with . The heterodyne period is estimated by the timing control electronics of a Field Programmable Gate Array (FPGA) at the beginning of the measurement as an average over 2000 periods, and is then transfered to the PC through the parallel port interface. The experimental setup is outlined in Figure 1.
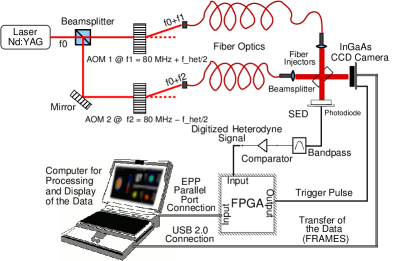
In practice, the environment is not stable enough to preserve a constant phase relationship over many periods of . Hence, additional circuitry is used to re-synchronize the trigger timing electronics with the actual phase of the heterodyne signal: A single-element photodiode (SED) is located at the second output of the interference beamsplitter where the same interference pattern emerges with a phase shift. The heterodyne signal measured by the SED is bandpass filtered and digitized by a comparator. When the phasemeter software is ready to capture the frame , a command is sent from the PC to the FPGA through the parallel port, which includes the corresponding delay . The FPGA detects the rising edge of the digital heterodyne signal and triggers the camera with the controlled delay (see Figure 2).
The CCD camera captures the frame and transfers it to the PC through its USB 2.0 interface. After all four frames have been acquired, the phasemeter software computes the physical quantities described in Equations (6) to (13), and an additional exposure is captured by triggering the camera with a delay given by Equation (14), which corresponds to an exposure of the dark fringe.
IV Results
IV.1 Real-time operation
A graphical user interface (GUI) was developed to display the measured data in real-time (see Figure 3).
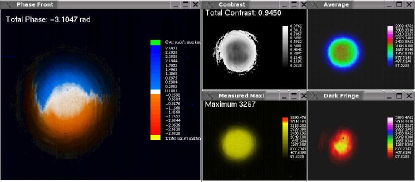
The phasemeter reaches a rate of approximately 5 to 6 data displays per second, and hence enables real-time mode-matching of the beams, as well as an online optical alignment of an interferometer and optimal adjustment of its components. The five different displays in Figure 3 are shown separately as 3D representations in Figures 4 to 8.
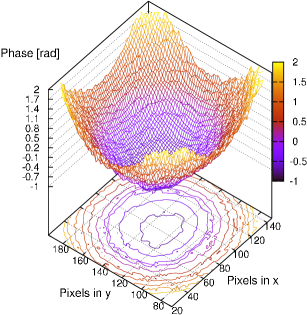
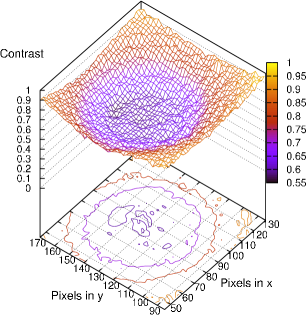
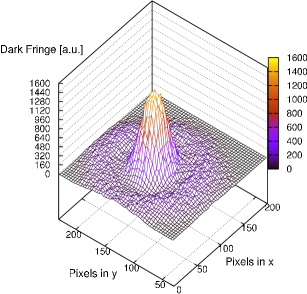
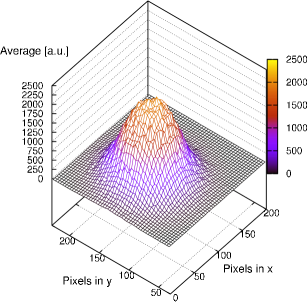
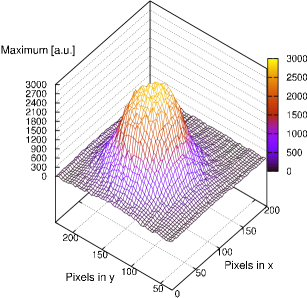
These measurements were conducted on a table-top Mach-Zehnder interferometer, as shown in Figure 1.
IV.2 Performance of the phasemeter
In order to measure the noise level of the instrument, the camera was illuminated with a spatially homogeneous light source (an array of infrared LED’s behind a matt glass window), the intensity of which was modulated sinusoidally at a frequency of approximately 1623 Hz. This is a very stable test subject, ideal to determine the phase noise level of the instrument. It is expected to obtain a flat phasefront of the amplitude modulation from this measurement, since all pixels capture a similar sinusoidally modulated intensity with the same phase relationship. A series of real-time phasefront measurements were conducted in this configuration, determining the rms phase value at every pixel. Thus, a spatial rms phase variation of 2.96 mrad was meaured over the CCD area of observation. According to Equation (4), this value corresponds to a rms spatial resolution of about 500 pm.
As it can be seen in Equation (6), one noise source of the phase measurement is the fluctuation of the sampled intensities. The rms error of the phase, , induced by intensity fluctuations can be estimated from Equation (6) as:
After simplifying Equation (IV.2) by using Equation (5), we obtain:
| (17) |
The following three error sources were identified, and their noise contribution to the phase measurement was estimated:
-
1.
Laser power fluctuations: An Allan deviation of was measured at an averaging time of 33 ms, which corresponds to the sampling period of the CCD camera (30 fps), yielding a phase error of 1.22 mrad from Equation (17).
-
2.
ADC digital noise of the camera: A rms intensity error of four quantization units was measured by constant and spatially homogeneous illumination of the CCD camera. The pixelwise rms variation and an average over the CCD surface were then computed. This value corresponds to a relative intensity fluctuation of , which translates (by using Equation (17) ) into a phase error of 1.38 mrad.
-
3.
Time jitter: There are at least three sources of jitter. Firstly, the synchronization delay of the comparator output with respect to the 10 MHz clock of the FPGA, which is uniformly distributed between 0 and 100 ns. Secondly, a similar delay between the FPGA clock and the CCD internal clock, which is also at 10 MHz but unsynchronized. Thirdly, other jitter effects such as apparent period fluctuations of the signal, due to setup conditional and limited stability, and the non-sychronization between the FPGA and CCD clocks with the clock of the modulation electronics controlling the AOM’s driving signal, and therefore the heterodyne frequency generation. This latter effect is reduced (but not totally cancelled) by re-tracking the timing control electronics to the rising edge of the digital heterodyne signal for each exposure. A phase error of 0.99 mrad was obtained by simulating the first and second effects in software, using two independent random delays uniformly distributed.
Table 1 summarizes the noise contributions identified for the phase measurement.
| Noise Source | RMS Phase Error |
|---|---|
| Laser power fluctuations | 1.22 mrad |
| ADC digital noise of the camera | 1.38 mrad |
| Time jitter | 0.99 mrad |
| Total contribution | 2.09 mrad |
| Noise level measured | 2.96 mrad |
 |
 |
| (a) | (b) |
 |
 |
| (a) | (b) |
 |
 |
| (a) | (b) |
IV.3 Measurements
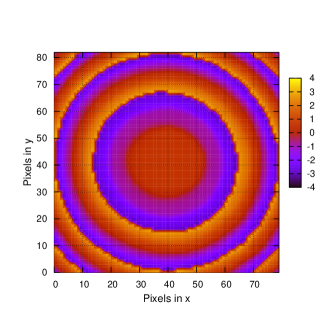
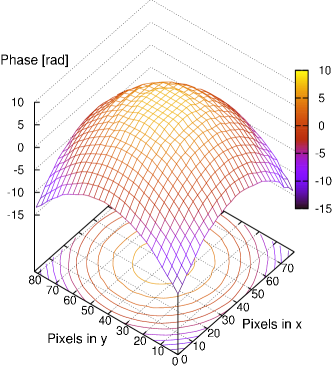
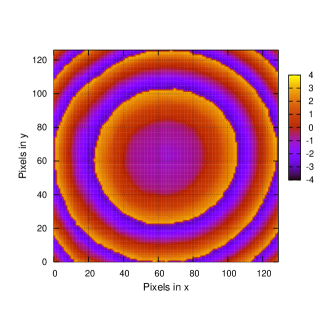
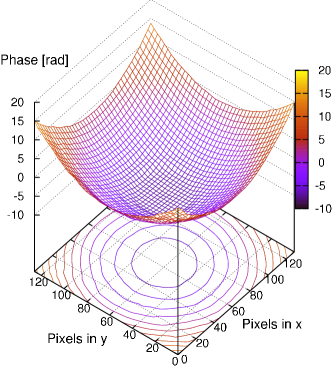
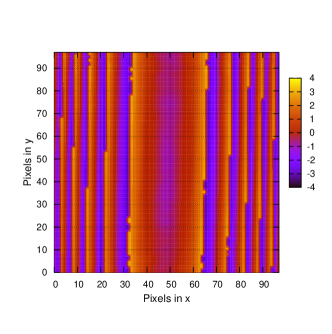
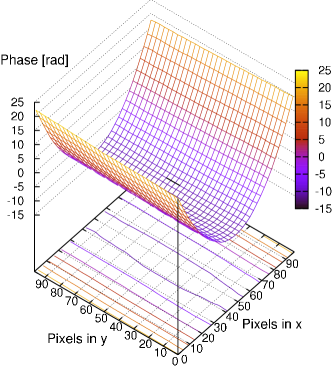
In order to test the functionality of the phasemeter, a series of measurements were conducted at the table-top interferometer shown in Figure 1. The aim of these measurements was to intentionally change the curvature of one of the interfering wavefronts and to use the phasemeter to read out the spatial distribution of the phase. Since the two interfering wavefronts are similar, a lens was introduced into the path of one beam, between the corresponding fiber injector and the beam combiner (see Figure 9). The results of these measurements are shown in Figures 10 to 12. Three different type of lenses were used: mm (Figure 10), mm (Figure 11), and a cylindrical lens with mm (Figure 12). The curvature of the wavefront considerably increases (due to the lens) such that this covered several wavelengths in the area of observation. The resulting phasefront measured is wrapped as can be recognized by the phase rings in Figures 10(a) and 11(a), and the stripes in Figure 12(a). A two-dimensional phase unwrapping algorithm ghiglia1994 ; flynn ; ghiglia1998 was developed and was used for post-processing these data. The result of this post-processing is shown in Figures 10(b), 11(b), and 12(b). It can be seen, by comparing Figures 10(b) and 11(b), that the inflection of the phasefront curvature changes according to the focal length of the lens used (mm) respectively. Within the LTP interferometry research and development, this instrument will be used during manufacture of the optical bench interferometer flight model. The lenses of the fiber injectors can be adjusted such that the difference in curvature between the two interfering wavefronts are minimized by using the real-time phasefront read out provided by this phasemeter. A phasefront measurement was already conducted at the optical bench engineering model for LTP ghh1 ; ghh2 . These results are presented in Figure 13 and clearly show an inhomogeneous phasefront, which can be attributed to non-optimal adjustment of the lenses in the two fiber injectors. A further test was done on a table-top interferometer in order to adjust the lenses of two commercial fiber injectors by using this instrument. The aim of this adjustment was to match the parameters of the interfering beams and to obtain a homogeneous flat phasefront. The result of this experiment is shown in Figure 14. A considerable improvement was achieved in matching the shape of the two beams (compare the phase scale of the plots in Figures 13 and 14).
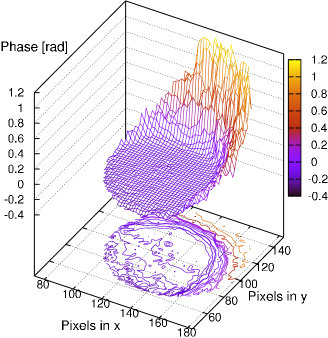
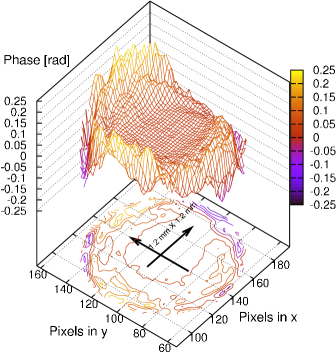
It can be seen that over a surface of approximately 1.2 mm1.2 mm the phasefront shows a considerably homogeneous spatial profile. We analyzed a circular section of approximately 1 mm diameter at the beam center. The standard deviation of these data is 3.49 mrad, which is very close to the measured sensitivity of the instrument. This value corresponds to a spatial resolution of 590 pm, and amounts to a considerable improvement in the correction of the beam shapes.
V Conclusions
We have developed an instrument which allows real-time phasefront detection and mode-mismatch characterization of two interfering beams in a heterodyne interferometer. A rms noise level of 2.96 mrad, which corresponds to a wavefront roughness of 500 pm, was obtained experimentally. This makes it possible to optimize the beam shapes by adjusting the optical components in real-time with the help of the data displayed onto the graphical user interface (5 to 6 data displays per second). The results shown in Figures 10 to 12 demonstrate the proper functionality of the instrument. By using well matched wavefronts, this method can also be used to analyze, and measure accurately, surfaces and optical components down to subnanometer levels. It is planned that this instrument be used in the manufacturing of the flight model of the optical bench for the LISA Technology Package.
Acknowledgements
The authors kindly thank Albrecht Rüdiger, Benjamin Sheard, Paul Cochrane, Alexander Bunkowski, James DiGuglielmo, and Martin Hewitson for their valuable contributions in reviewing and improving various parts of the manuscript.
References
- (1) A.E. Siegman, Lasers (University Science Books, California, 1986).
- (2) HASO II User Manual, Imagine Optic, Rue Charles de Gaulle 18, F-91400 Orsay, France.
- (3) Gaunming Lai and Toyohiko Yatagai, “Generalized phase-shifting interferometry,” J. Opt. Soc. Am. A 8, 822–826 (1991).
- (4) James Millerd, Neal Brock, John Hayes, Brad Kimbrough, Matt Novak, Michael North-Morris, and James C. Wyant, “Modern Approaches in Phase Measuring Metrology,” Proc. SPIE 5856, 14–22 (2005).
- (5) S. Kaiser, T. Maier, A. Grossmann, and C. Zimmermann, “Fizeau interferometer for phase-shift interferometry in ultrahigh vacuum” Review of Scientific Instruments 72, 3726–3727 (2001).
- (6) Yves Surrel, “Fringe Analysis,” Topics App. Phys. 77, 55–102 (2000).
- (7) Kenichi Hibino, Bob F. Oreb, David I. Farrant, and Kieran G. Larkin, “Phase-shifting algorithms for nonlinear and spatially nonuniform phase shifts,” J. Opt. Soc. Am. A 14, 918–930 (1997).
- (8) Li Yongqian, Zhu Zhenyu, and Li Xiaoying, “Elimination of reference phase errors in phase-shifting interferometry,” Measurement Science and Technology 16, 1335–1340 (2005).
- (9) Richard Shagam and James C. Wyant, “Optical frequency shifter for heterodyne interferometers using multiple rotating polarization retarders,” Applied Optics 17, 3034–3035 (1978).
- (10) Feng Zhao, “Picometer Laser Metrology for the Space Interferometry Mission (SIM),” in Proceedings of Conference on Lasers and Electro-Optics (CLEO), Trends in Optics and Photonics Series, Volume 96/A, May 2004.
- (11) Gerhard Heinzel, Claus Braxmaier, Roland Schilling, Albrecht Rüdiger, David Robertson, M. te Plate, Vinzenz Wand, K. Arai, Ulrich Johann, and Karsten Danzmann, “Interferometry for the LISA technology package (LTP) aboard SMART-2,” Classical and Quantum Gravity 20, 153–161 (2003).
- (12) Huijie Zhao and Guangjun Zhang, “Nonlinear error by orientation and elliptic polarization in a two-beam interferometer,” Optical Engineering 41, 3204–3208 (2002).
- (13) Vinzenz Wand, Johanna Bogenstahl, Claus Braxmaier, Karsten Danzmann, Antoni García, Felipe Guzmán, Gerhard Heinzel, Jim Hough, Oliver Jennrich, Christian Killow, David Robertson, Zoran Sodnik, Frank Steier, and Harry Ward, “Noise sources in the LTP heterodyne interferometer,” Classical and Quantum Gravity 23, 159–167 (2006).
- (14) Gerhard Heinzel, Vinzenz Wand, Antonio García, Oliver Jennrich, Claus Braxmaier, David Robertson, Kevin Middleton, David Hoyland, Albrecht Rüdiger, Roland Schilling, Ulrich Johann, and Karsten Danzmann, “The LTP interferometer and phasemeter,” Classical and Quantum Gravity 21, 581–587 (2004).
- (15) David Robertson, Christian Killow, Harry Ward, Jim Hough, Gerhard Heinzel, Antonio García, Vinzenz Wand, Ulrich Johann, and Claus Braxmaier, “LTP interferometer-noise sources and performance,” Classical and Quantum Gravity 22, 155–163 (2005).
- (16) Klaus Freischlad and Chris L. Koliopoulos, “Fourier description of digital phase-measuring interferometry,” J. Opt. Soc. Am. A. 7, 542–551 (1990).
- (17) XFPA-320*256 User Manual, XenICs n.v.,Kapeldreef 75, B-3001 Leuven, Belgium, July 2003.
- (18) Dennis C. Ghiglia and Louis A. Romero, “Robust two-dimensional weighted and unweighted phase unwrapping that uses fast transforms and iterative methods,” J. Opt. Soc. Am. A. 11, 107–117 (1994).
- (19) Thomas J. Flynn, “Two-dimensional phase unwrapping with minimum weighted discontinuity,” J. Opt. Soc. Am. A. 14, 2692–2701 (1997).
- (20) Dennis C. Ghiglia and Mark D. Pritt, Two-Dimensional Phase Unwrapping: theory, algorithms, and software (John Wiley & Sons, Inc., 1998).
- (21) Gerhard Heinzel, Claus Braxmaier, Martin Caldwell, Karsten Danzmann, F. Draaisma, Antonio García, Jim Hough, Oliver Jennrich, Ulrich Johann, Christian Killow, Kevin Middleton, M. te Plate, David Robertson, Albrecht Rüdiger1, Roland Schilling, Frank Steier, Vinzenz Wand, and Harry Ward, “Successful testing of the LISA Technology Package (LTP) interferometer engineering model,” Classical and Quantum Gravity 22, 149–154 (2005).