Laser micro-fabrication of concave, low-roughness features in silica
Abstract
We describe a micro-fabrication method to create concave features with ultra-low surface roughness in silica, either on the end facets of optical fibers or on flat substrates. The machining uses a single focused CO2 laser pulse. Parameters are chosen such that material is removed by thermal evaporation while simultaneously producing excellent surface quality by surface tension-induced movement in a low-viscosity melt layer. A surface roughness nm is regularly obtained. The concave depressions are near-spherical close to the center with radii of curvature between and m. The method allows the fabrication of low-scatter micro-optical devices such as mirror substrates for high-finesse cavities or negative lenses on the tip of optical fibers, extending the range of micro-optical components.
pacs:
07.60.Vg, 42.50.Pq, 42.62.Cf, 79.20.Eb, 81.05.Kf, 81.16.-c, 81.20.Wk,CO2 laser light is a powerful tool for the surface treatment of fused silica. Strong absorption of the m light within the first few enables controlled surface melting using moderate intensities. A central benefit of such treatment is that surface tension in the molten layer smoothens out surface roughness up to a scale comparable to the thickness of the melt layer. This was recognized as an efficient way to polish optical surfaces Laguarta et al. (1994); Nowak et al. (2006). Owing to the surface-minimizing effect of the surface tension, melting of large-scale domains which penetrate considerably into the volume will result in the formation of convex structures. While this behaviour has been successfully employed for the fabrication of convex micro-optical structures Paek and Waver (1975); Wakaki et al. (1998); Vernooy et al. (1998); Armani et al. (2003), it is undesired in the context of surface polishing. At higher intensities, material removal by evaporation becomes important. In the context of optical surfaces, evaporation has mainly been studied as an unwanted side-effect of damage repair Feit and Rubenchik (2003); Mendez et al. (2006) and polishing Nowak et al. (2006). Nevertheless, it holds promise for micro-machining of optical components Markillie et al. (2002).
Here we describe micromachining of concave profiles on silica surfaces in a simple process using a single laser pulse. We work in a regime where surface evaporation is dominant and shapes a depression, while melting is restricted to a thin layer that smoothens the surface on a short scale. This avoids the need for scanning techniques, special atmospheres, preheating, or polishing pulses. The method allows fabrication of microscopic concave surfaces on the tip of optical fibers as well as on bulk fused silica substrates. It was originally developed to realize high-finesse fiber Fabry-Perot cavities (FFPs) that enabled the first cavity quantum electrodynamics (CQED) experiments with Bose-Einstein condensates Colombe et al. (2007), and very recently has been used with single organic molecules Toninelli et al. (2010) and quantum dots Barbour et al. (2011). More details on these FFPs can be found in Hunger et al. (2010); Muller et al. (2010). Here, we present an investigation of the physical process leading to the formation of these ultrasmooth concave depressions.

We use an RF-pumped CO2 laser (Synrad Firestar v20) with a nominal power of 20 W. Pumping is pulsed at 20 kHz, the average power being controlled via the duty cycle. Laser power fluctuations are minimized by reducing unwanted back-reflections to the laser with a quater-wave plate and polarizer, and we obtain energy fluctuations of 1.2% for a 4 ms pulse train. The beam is focussed onto the sample surface. To position the sample with respect to the focal waist, we use a long working distance microscope that allows us to inspect the surface via a dichroic mirror. We estimate the alignment precision to 2 m transversally and 7 m along the beam axis, limited by the depth of field of the microscope.
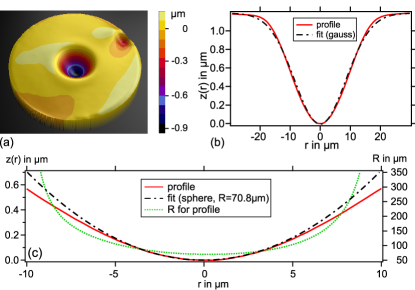
Our substrates are metal-coated, single-mode or gradient-index optical fibers (Oxford Electronics) with 125 and 200 m cladding diameter, and 2 mm thick fused silica glass plates (Hellma QS). The fibers were not cleaned after cleaving; the plates were roughly cleaned with ethanol. After machining, surfaces were analyzed with several methods. Surface roughness is evaluated by atomic force microscopy (Dimension 3100 AFM) and optical loss measurements, discussed further below. The overall shape is measured by optical interferometric profiling (Fogale Micromap 3D). Figure 1 shows a typical machined surface. We observe profiles with an approximately Gaussian shape. The geometrical properties used for characterization are the central radius of cuvature , the total depth and the structure diameter . We evaluate from a polynomial fit to the center of the structure. We define as the height difference between the maximum and the minimum elevation, and as the distance between the turning points from convex to concave curvature of a high-order polynomial fit.
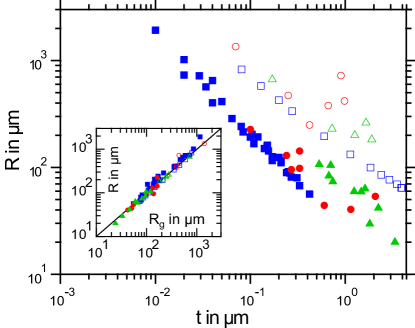
We machined a large set (several hundreds) of fibers, and a series of glass plates, with a broad range of parameters. Laser powers were between mW and 2 W at the sample surface and pulse trains had durations to 120 ms (consisting of 80 to 2400 pulses). Beam waists were between and m. With these parameters, the resulting structures are m deep and have diameters of m, leading to radii of curvature m. Fig. 2 shows how the results depend on the laser parameters. For increasing , the structures become deeper and becomes smaller. For increasing , both and increase also. The measured agrees well with the value expected for a gaussian shape (inset in Fig. 2): of the three parameters , only two are independent and fully determine the third.
The fiber data show a spread for fixed parameters of up to in the profile depth, in the profile diameter and in the radius of curvature. Probable causes for this spread are the fluctuations in the laser energy and the limited positioning precision along the optical axis.

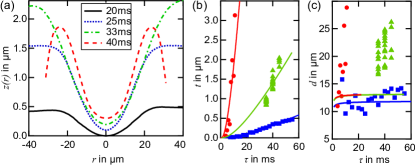
The possible range of laser parameters for the fabrication of concave profiles is restricted by two physical limits. For very short pulses at high intensity, melting and resolidification occur faster than the surface smoothing process Nowak et al. (2006). (Our parameters do not reach this limit.) For very long pulses, the melt layer extends far into the volume and leads to global contraction into a convex shape. This regime is announced by the formation of a bulge around the depression at our longest pulse durations (red dashed curve in Fig. 3 (a)). The bulged depressions deviate from a Gaussian shape, becoming shallower and broader.

Some insight into the evaporation process can be gained from a simple model in which the surface temperature profile is used to calculate the ablation rate. The local temperature is calculated considering the absorption of a laser beam (intensity profile ) by the surface of a half-space filled with a homogeneous medium. The medium is characterized by its absorption coefficient , thermal conductivity , and thermal diffusivity . (Numerical values for fused silica at room temperature are , , and .) The resulting surface temperature profile is obtained from the two-dimensional heat flow equation von Allmen and Blatter (1995); Feit and Rubenchik (2003):
| (1) |
The temperature in the center can be evaluated analytically, . The material removal rate (velocity of the evaporation front) is related to the local temperature as , where eV is the latent heat of evaporation per atom and cm/s Feit and Rubenchik (2003). It becomes significant above C and has a very strong temperature dependence in this temperature range. This simple expression neglects all non-linearities as well as the boundary condition set by the finite size of the fiber that modifies the transverse heat conduction.
For short pulses (no significant bulge), the depth of the structures is reproduced well by this model (Fig. 3(b)). We treat as a free fitting parameter on account of its strong temperature dependence; the resulting values are in the range of published values Yang et al. (2009) for hot silica. (The small difference between the values for the two fibers is not significant considering the uncertainties of the power and waist measurements.) The observed profile diameters for plate machining are in reasonable agreement with the model. For fiber machining, however, the profile diameters are systematically larger than predicted by the model and also show a different parameter dependence (Fig. 3(c)). A possible explanation is the boundary condition set by the cylindrical geometry of the fiber. The restriction of the transverse heat flow causes heat accumulation and thus leads to an enlarged melt and evaporation area.
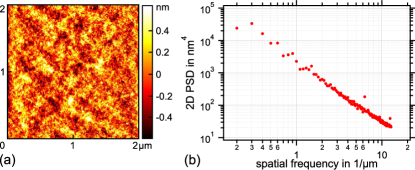
The surface roughness is determined by AFM measurements at different positions with scan areas of and m size to avoid artefacts and to minimize noise. To distinguish between micro roughness, which is important for the optical quality, and the larger scale shape which determines the imaging properties, the deviation from a polynomial fit from each scan line is used for roughness calculations. All measurements show comparable roughness values of nm rms. Fig. 4 shows the residual from this fit and a two dimensional power spectral density calculated from the data (2D PSD). Reference measurements on mica sheets enable us to estimate the noise of the measurement to be nm. Correcting for this yields nm rms for the laser-machined structures, a value approaching that of superpolished optics. Scatter loss can be estimated Bennett (1992) by , which predicts ppm at nm for this roughness. For two-fiber cavities with state-of-the-art coatings, we have recently obtained a cavity finesse of , compatible with the surface roughness result within the uncertainty of the measured cavity transmission.

While traditional mirror superpolishing methods are restricted to large radii of curvature in the centimeter to meter range Hood et al. (2001), the method described here achieves extremely small radii of curvature, and allows a wide range of geometries not limited to the range of data shown here. It thus opens a previously inaccessible geometry regime for high-quality micro-optical lenses and mirrors, starting from low-cost standard substrates. First applications in neutral-atom, quantum dot and molecule CQED Colombe et al. (2007); Volz et al. (2011); Barbour et al. (2011); Toninelli et al. (2010) have already shown the power of this method, in realizing microscopic, high-finesse optical cavities with small mode volume. Applications in cavity optomechanics and quantum information experiments with ion traps are under way.
Acknowledgements.
We thank J. Hare and his team (LKB, Paris) for access to their CO2 laser in early stages of this project, D. Chatenay and his team (LPS, Paris) for access to their optical profiler and the CENS (Munich) and INSP (Paris) institutes for access to their AFMs. R. W. acknowledges fruitful discussions with Kris M. Nowak, Howard J. Baker and Denis R. Hall at Heriot-Watt University. This work was supported in part by the AQUTE Integrated Project of the EU (grant agreement 247687) and by the Institut Francilien pour la Recherche sur les Atomes Froids (IFRAF).References
- Laguarta et al. (1994) F. Laguarta, N. Lupon, and J. Armengol, Appl. Opt. 33, 6508 (1994).
- Nowak et al. (2006) K. M. Nowak, H. J. Baker, and D. R. Hall, Appl. Opt. 45, 162 (2006).
- Paek and Waver (1975) U. C. Paek and A. L. Waver, Appl. Opt. 14, 294 (1975).
- Wakaki et al. (1998) M. Wakaki, Y. Komachi, and G. Kanai, Appl. Opt. 37, 627 (1998).
- Vernooy et al. (1998) D. W. Vernooy, A. Furusawa, N. P. Georgiades, V. S. Ilchenko, and H. J. Kimble, Phys. Rev. A 57, R2293 (1998).
- Armani et al. (2003) D. K. Armani, T. J. Kippenberg, S. M. Spillane, and K. J. Vahala, Nature 421, 925 (2003).
- Feit and Rubenchik (2003) M. Feit and A. Rubenchik, in Proc. SPIE (2003), vol. 4932, p. 91.
- Mendez et al. (2006) E. Mendez, K. M. Nowak, H. J. Baker, F. J. Villarreal, and D. R. Hall, Appl. Opt. 45, 5358 (2006).
- Markillie et al. (2002) G. A. Markillie, H. J. Baker, F. J. Villarreal, and D. R. Hall, Appl. Opt. 41, 5660 (2002).
- Colombe et al. (2007) Y. Colombe, T. Steinmetz, G. Dubois, F. Linke, D. Hunger, and J. Reichel, Nature 450, 272 (2007).
- Toninelli et al. (2010) C. Toninelli, Y. Delley, T. Stöferle, A. Renn, S. Götzinger, and V. Sandoghdar, APL 97, 021107 (2010).
- Barbour et al. (2011) R. J. Barbour, P. A. Dalgarno, A. Curran, K. M. Nowak, H. J. Baker, D. R. Hall, N. G. Stoltz, P. M. Petroff, and R. J. Warburton, J. Appl. Phys. (2011).
- Hunger et al. (2010) D. Hunger, T. Steinmetz, Y. Colombe, C. Deutsch, T. W. Hänsch, and J. Reichel, New J. Phys. 12, 065038 (2010).
- Muller et al. (2010) A. Muller, E. B. Flagg, J. R. Lawall, and G. S. Solomon, Opt. Lett. 35, 2293 (2010).
- von Allmen and Blatter (1995) M. von Allmen and A. Blatter, Laser-Beam interactions with materials, Springer Series in Materials Science Vol. 2 (Springer, Heidelberg, 1995).
- Yang et al. (2009) S. T. Yang, M. J. Matthews, S. Elhadj, V. G. Draggoo, and S. E. Bisson, J. Appl. Phys. 106, 103106 (2009).
- Bennett (1992) J. M. Bennett, Meas. Sci. Technol. 3, 1119 (1992).
- Hood et al. (2001) C. J. Hood, H. J. Kimble, and J. Ye, Phys. Rev. A 64, 033804 (2001).
- Volz et al. (2011) J. Volz, R. Gehr, G. Dubois, J. Estève, and J. Reichel, Nature 475, 210 (2011).