∎
Tel.: +33-4-67143529
Fax: +33-4-67144637
66email: ciccotti@lcvn.univ-montp2.fr
Present address: of G. Pallares
CEA, IRAMIS, SPCSI, Grp. Complex Systems & Fracture, F-91191 Gif Sur Yvette, France
77institutetext: L. Ponson 88institutetext: Division of Engineering and Applied Science, California Institute of Technology, Pasadena, CA 91125, USA
88email: ponson@caltech.edu
Crack opening profile in DCDC specimen
Abstract
The opening profile of the cracks produced in the Double Cleavage Drilled Compression (DCDC) specimens for brittle materials is investigated. The study is achieved by combining Finite Element simulations of a DCDC linear elastic medium with experimental measurements by crack opening interferometry on pure silica glass samples. We show that the shape of the crack can be described by a simple expression as a function of the geometrical parameters of the sample and the external loading conditions. This result can be used to measure accurately in real time relevant quantities during DCDC experiments, such as the crack length or the stress intensity factor applied to the specimen.
Keywords:
DCDC Finite Element simulations Crack Opening Interferometry Linear Elastic Fracture Mechanics Crack opening profile1 Introduction
The Double Cleavage Drilled Compression (DCDC) sample refers to a parallelepipedic column with a circular hole drilled through its center that is subjected to axial compression. This geometry provides many advantages in studying the fracture of brittle materials. Janssen originally introduced such a fracture test for measuring the fracture toughness of glass (Janssen 1974). Under a uniform axial compression, the Poisson effect produces a tensile stress concentrated around the central hole. This induces the initiation of two symmetric mode I cracks generated at each crown of the hole and propagating along the mid-plane of the sample as the axial compression is increased (see Figs. 1 and 7). The high stability of the crack propagation has made of the DCDC a rather popular fracture test geometry used in various contexts including studies on sub-critical crack propagation in oxide glasses (C lari et al. 2003; Bonamy et al. 2006; Grimaldi et al. 2008; Fett et al. 2008), on crack healing in polymers (Plaisted et al. 2006) or on failure behavior under mixed mode loading for linear elastic materials (Larnder et al. 2001; Fett el al. 2005).
The present study presents a coupled theoretical and experimental investigation of the crack opening profile in the DCDC specimen. A 2D Finite Element (FE) simulation based on linear elasticity is compared with a direct measurement by crack opening interferometry on a silica glass specimen. The results are expressed in a simple form as a function of the geometrical parameters of the specimen following a Williams expansion series. This experimental technique, combined with the results of the simulations, allows the direct measurement of the stress intensity factor driving the crack propagation in the DCDC specimen. In addition, it provides a solid base for the interpretation of recent experiments on the nanoscale capillary condensation of water inside sharp cracks in glass (Grimaldi et al. 2008). We should stress that this linear elastic modelling only applies for very brittle materials like glass (for which the DCDC sample is mostly adapted). When dealing with more compliant materials such as PMMA the second order terms due to rotation become very relevant and should be considered by a nonlinear modelling (Plaisted et al. 2006).
2 Finite Element simulation of DCDC specimens
2.1 Loading configuration and finite element mesh
The finite element simulation used to estimate the crack opening profile of the DCDC specimens is based on a 2D plane strain analysis implemented by the finite element code CAST3M111CAST3M software is developed by CEA-Saclay, France. Reference web page: http://www-cast3m.cea.fr/cast3m/index.jsp. The mesh is constituted of linear elastic isotropic four nodes elements. The plane strain condition is chosen to model the behavior of the sample in its mid-plane, where the experimental measurements are made. The details of the sample loading configuration and the mesh geometry are shown in Fig. 1. The sample consists of a prism of dimensions with a cylindrical cross hole of radius drilled through the specimen (thickness ). The sample is loaded with a compressive stress applied to the two opposite faces. The Poisson’s ratio and the Young’s modulus were set to and respectively to represent the properties of silica glass used for the experiments. However, the influence of and on the simulated displacement fields and the stress intensity factor are explicitly given in the following. There are effects of on the computed value of that are not captured by the analytical description proposed, but they remain inferior to 1% in the range . During the test, two symmetric cracks propagate from the central hole in opposite directions along the midplane of the sample. The difference in the lengths of the two cracks is less than 1% and we will call the average crack length as measured from the side of the hole. Thanks to symmetry of the geometry, one can limit the simulation to one quarter of the specimen (composed of about 3500 nodes), imposing specific boundary conditions to the system (cf. Fig. 1 bottom), i.e. along the symmetry plan normal to and along the one normal to on the uncracked ligament. No displacement constraint is imposed on the stress application faces, meaning that friction at the platen/sample surfaces is neglected. The presence of frictional confinement might partially suppress the rise for cracks approaching the end of the sample (cf. Fig. 2 a), but the rapid acceleration of the crack at the end of the tests is indeed experimentally observed. In any case, the friction effect only affects very long cracks that are out of the domain retained here. The gap between the millimeter length scale of the external mechanical loading and the nanometric length scale of the crack opening near the tip requires an adapted mesh for the calculation of stress and displacement fields. To analyze such a multi-scale problem without exceeding reasonable computational times, the elements of the mesh are chosen so that their size decreases exponentially while approaching the crack tip, down to a minimum element size of 0.01 nm. This allows reproducing correctly the asymptotic square root crack opening displacement profile predicted by linear elasticity down to a nanometer distance from the crack tip.
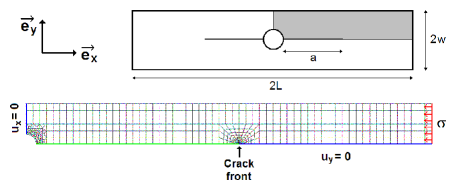
To investigate the influence of the geometrical parameters on the crack opening profile, a first series of meshes was designed with seven values for the hole radius ranging from () to (), keeping the width and length constant with and . The effect of the specimen width on the opening profile is studied using another series of seven meshes, varying from to while keeping radius and length constant with and . For each new geometry, the crack length was changed between 2.5 and with steps.
2.2 Evaluation of the stress intensity factor
Once the stress, strain and displacement fields are calculated for the mesh corresponding to a given crack length , the elastic displacement () along the crack lip is measured as a function of the distance from the crack tip. Let us note that with these notations, the full opening between the two crack lips is given by . The stress intensity factor applied to the specimen is calculated using two different methods. At first, the crack opening profile is fitted using the Irwin equation (Ewalds 1985)
| (1) |
with due to plane strain condition. The regression is done in the very vicinity of the crack tip, typically in the range where the crack profile follows a square root behavior as shown in the following. On the other hand, the J-integral method (Rice 1968) is computed, providing the mechanical energy release rate related to the stress intensity factor by the expression (Ewalds 1985). The obtained values normalized by are represented in Fig. 2 a as a function of the normalized crack length for different values of the ratio . Both methods are found in agreement within .
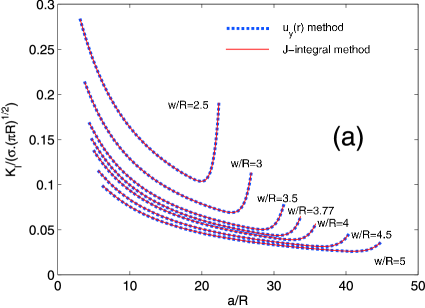
Following He et al. (1995) and Fett et al. (2005), the dimensionless stress intensity factor can be expressed as
| (2) |
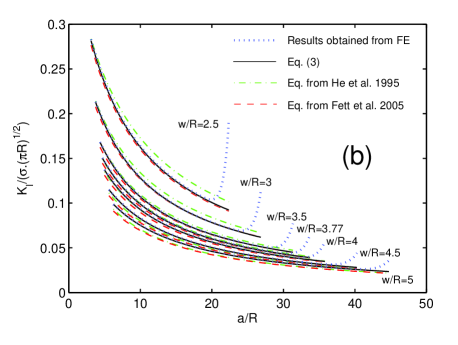
The previous expression was used in He et al. (1995) to fit the simulations on the domain obtaining the parameter set , , , and . In Fett et al. (2005), the results were fitted on the same domain , but taking also in consideration the effect of an offset of the hole with respect to the center of the sample ( here) and obtaining , , , and . These two equations are plotted respectively in green and red in Fig. 2 b together with the results of our simulation. While the agreement is correct for some specific values of (close to 4 for the expression of He et al. (1995), closer to 3 for Fett et al. (2005)), some differences are observed, especially when reaching the extreme values of .
This difference is attributed to the fact that Eq. (2) does not provide an accurate fit on the whole parameter range. However, an excellent fit can be obtained for a larger parameter range by allowing for a second order dependence in using the following expression
| (3) |
which leads in our dataset to the parameters , , , , , and . The agreement is excellent as shown by the comparison with the results of the simulations (blue curves) presented in Fig. 2 b.
The deviations from the fit for the largest values of are caused by the interaction of the crack with the specimen boundary and are beyond the domain of validity of the equation, which is given by . This regime with rapid increase of the stress intensity factor with crack extension corresponds to the sudden and instable crack propagation observed in the experiments prior to complete failure of the DCDC specimens in two symmetric pieces.
2.3 Williams expansion series of the crack opening profile
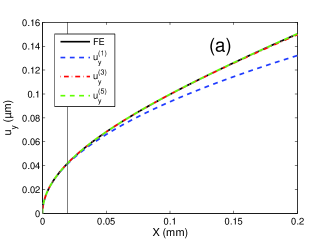
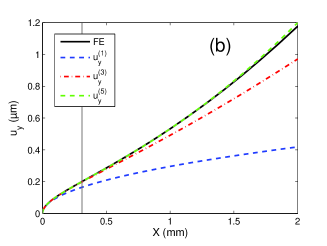
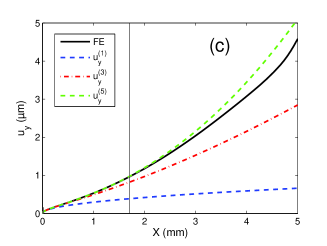
The crack opening profile is first analyzed in the same geometry as the samples used in the experimental part of this study. In particular, we choose , and , with an external applied stress . The crack opening profile obtained for a crack length is shown in Fig. 3. From the blowup (c), we can observe that the range of validity of the Irwin equation (blue dashed line) is limited to the first near the crack tip. In order to provide an expression with a larger range of validity, can be expressed in terms of a Williams expansion (Williams 1957; Maugis 1999)
| (4) |
where only the odd terms , , ,… are present due to the symmetry conditions of the pure mode I loading (the displacement function must be antisymmetric in relation to the transformation ). The first term of this development corresponds to the Irwin expression given in Eq. (1). As a result, the first coefficient is directly associated with the singular stress behavior and can be expressed in terms of the stress intensity factor
| (5) |
As shown in the previous section, (resp. ) can be expressed as a function of the external stress and the geometrical parameters using the Eq. (3).
The other coefficients entering in the development of the crack profile are obtained by an iterative fit procedure: At first, the development to the first order is subtracted to the crack profile and is fitted by a function varying as , providing the value of the coefficient . The procedure is then iterated fitting by a function evolving as , providing the value of the coefficient . At this fifth order, the agreement with the results of the simulation is excellent up to as shown in Fig. 3 c. As a result, we limit our analysis to this order in the following of this study. The limitations of the developments of lower orders are presented in Fig. 3 a and 3 b. In particular, the Irwin equation – development to the first order – is found to be valid for m. The range of validity of these Williams developments is not universal and does depend on the sample dimensions as discussed in section 4.
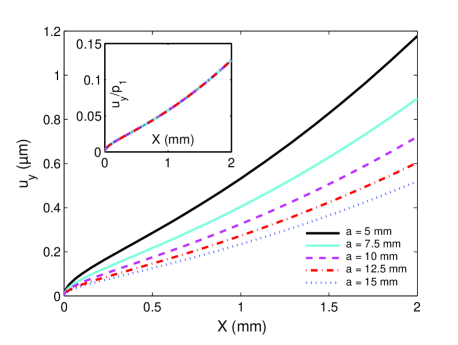
The effect of the crack length on the crack opening profile is now investigated. Fig. 4 represents the profile obtained for five values of ranging from to . As shown in the inset of Fig. 4, all profiles have the same shape once normalized by the first coefficient of their Williams development. In other words, the crack opening profiles can be written as
| (6) |
where the coefficients and are independant of the crack length.
Very interestingly, these coefficients are also independent of the radius of the hole in the DCDC specimens. This is shown in Fig. 5 where the variations of and with the crack length are plotted for seven specimen geometries with different radius , keeping constant the specimen width . All the curves present an extended plateau regime as far as the crack tip is not too close to the specimen sides, as expected from the previous observations. Moreover, all the plateau regimes correspond to the same value of and , irrespective of the radius of the hole. In other words, hole radius and crack length have no influence on the shape of the crack lips in a broad range of these geometrical parameters.
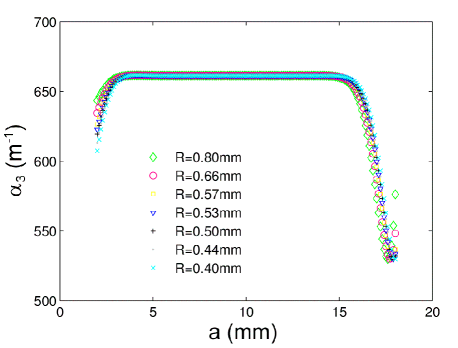
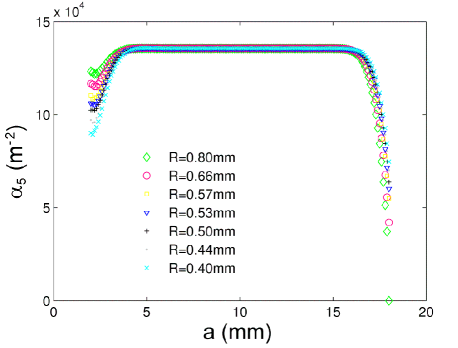
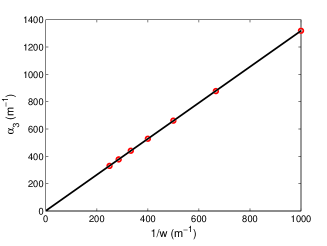
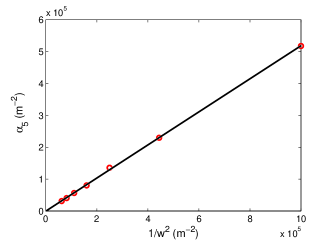
However, a dimensional analysis suggests that both coefficients must vary with a length of the problem. More precisely, and are expected to scale as the inverse of a length and the inverse of the square of a length, respectively. The specimen width being the only remaining relevant length scale of the problem, it is natural to observe on Fig. 6 the following scalings
| (7) |
where the dimensionless constants are provided by linear regressions represented by straight lines.
As a result, combining Eq. (6) with Eq. (7), one gets a rather simple description of the crack opening profile
| (8) |
This expression remains valid with a precision better than as far as the effects of the finite size of the specimen are not relevant, i.e. for , and relatively close to the crack tip, i.e. for , because we limited the Williams development to the fifth order.
Using the Eq. (3) providing the expression of the stress intensity factor as a function of the geometrical parameters, one obtains here a closed form of the opening profile as a function of simply measurable quantities of the problems. This can be very useful during DCDC experiments. Indeed, combining this analytical expression with the experimental measurement of the crack opening profile using e.g. the interferometry technique described in the next section can provide an easy way to assess accurately the stress intensity factor that drives the crack growth in DCDC experiments.
But before discussing in more details these applications, we compare now the main results of this analysis with experimental measurements. We focus on one single DCDC geometry and compare the opening profile measured experimentally with the result of the finite element simulations.
3 Experimental measurement by crack opening interferometry
The experimental measurement of the crack opening profile is performed by using a precision loading apparatus (based on a Microtest load cell produced by Deben, Woolpit, UK) providing highly stable failure conditions necessary for in-situ observations of slow crack propagations in glasses by Atomic Force Microscopy (AFM) (C lari 2004). DCDC samples of pure silica glass (Suprasil 311, Heraeus, Germany) are machined into bars ( and ) and polished with to a RMS roughness of for an area of . A hole of radius was drilled at their center to trigger the start of two symmetric fractures (see Fig. 7).
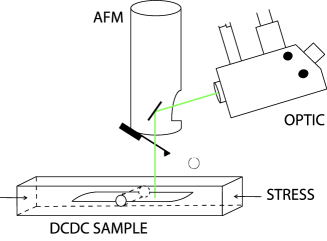
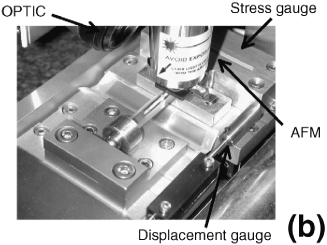
The measurement of the crack opening profile is performed by means of monochromatic light reflection interferometry (Sommer 1970; Liechti 1993) according to the sketch of Fig. 8. When observing the crack tip by AFM at the free surface of the sample, the crack front is vertical as in Fig. 7 b. In order to use the AFM setup to measure the crack opening displacement, the DCDC sample had to be placed with the fracture front lying horizontally. The white light source (illuminating vertically the sample after passing through the optical axis on the CCD camera and being reflected by an inclined mirror in the AFM head) was substituted by a green laser source (wavelength ) in order to provide an intense monochromatic light (Fig. 7 a).
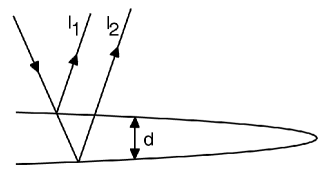
When the monochromatic beam reaches the fracture plane in an orthogonal direction, it is split into two beams that are reflected by the two fracture surfaces and then collected back by the CCD camera. The path difference between the two beams is twice the distance between the two lips of the crack, i.e. according to the notations used previously. The phase difference is therefore given by
| (9) |
where is the refractive index of the fluid filling the gap in the fracture and the term is a constant additive phase shift caused by the fact that both beams are normally reflected on symmetrically opposite interfaces (respectively glass/fluid and fluid/glass) (Born and Wolf 1999).
The intensity of the reflected light is given by:
| (10) |
where the approximation on the right stems from the fact that the two reflected beams have similar intensity. Since is a monotonically increasing function of , the reflected intensity will develop into a series of fringes parallel to the crack front, each new one corresponding to an increase of the crack opening by a quantity . The term in Eq. (9) implies the presence of an intensity minimum at . The first intensity maximum is obtained for and the position of the order fringe is given by the equation
| (11) |
By measuring the position and order of the fringes along the whole crack, we obtain a series of discrete data points on the full crack opening profile as shown in Fig. 9.
In order to provide a better resolution, the fringe pattern along the crack length is imaged with a series of overlapping images. To insure that we preserve the right order and position of the fringes, the displacements of the load cell are measured by a heterodyne interferometer (Zygo) with resolution. The uncertainty in the position of each fringe ( m) was estimated depending on the quality of the local signal and fringe shape (the error bars are plotted in Fig. 9). A special attention must be paid to the first fringe, since the opening gradient is maximal in that region. However, in our operating conditions, the position of the first fringe is located to some hundreds of micrometers from the crack tip, making its measurement safe. The eventual optical bias induced by the stress gradient on the apparent crack tip position can be shown to be less than 0.1 m in glass samples (Kysar 1998).
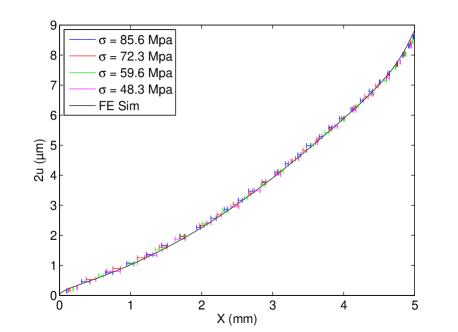
In order to verify the robustness of the method and the linearity of the loading configuration and sample, the measurement was repeated for four different loads (, , and ) and the opening profile was normalized to the reference load also used in the FE simulations according to linear elasticity. The four experimental series were realized in a time span of one hour in order to guarantee stable conditions (, ) and minimal crack propagation. Since the highest stress used in this experiment corresponds to , the maximum crack propagation velocity is of the order of (as determined by AFM in-situ crack propagation experiments effectuated on the same sample as shown in Fig. 7 b, cf. C lari 2004). The maximum crack advance in one hour can thus be estimated to , which is below the resolution of our optical microscope. The crack length can thus be considered as constant with the value .
The results of Fig. 9 show an excellent agreement between the four measurements within the experimental errors. The agreement is also excellent when comparing the experimental measurements to the results of the FE simulation for the same set of parameters (represented by a black line on Fig. 9). We point out that the agreement with the FE simulations is also excellent in the diverging part near the central hole (corresponding to distances from the crack tip). We should remind that the FE simulation is made in 2D under plane strain condition in order to represent the deformation field in the bulk of the DCDC specimen where the crack opening interferometry is applied. When we refer to the crack length in a 3D specimen, this should thus be measured in the center of the specimen.
Finally, due to the robustness of the crack opening profile shown in the previous section, the agreement between the FE simulation and the experimental measurements for a given sample geometry can be considered as representative for a broad set of geometrical parameters.
4 Discussion
The expression (8) for the crack opening profile in the DCDC specimen shown in the theoretical part of this paper and validated in the experimental section is quite interesting. The first important remark is that the fifth order Williams expansion is invariant with respect to variations in the crack length and the hole radius. Once the stress intensity factor is determined by Eq. (3), this acts simply as a multiplicative factor to a constant crack opening profile. Of course, this is only valid for sufficiently long crack lengths () and crack tips far enough from the specimen side (). In addition, this expression gives an accurate description of the opening profile in the domain of validity of the fifth order Williams expansion .
As a consequence, the ranges of validity of the first and third order developments are also invariant for samples of same width , and are expected to scale with . The range of validity of the first order term (Irwin equation (1)) is given by , while the range of validity of the third order development is . An estimate of these upper bounds can be easily found comparing the terms of the expansion of the crack opening profile, as given in Eq. (8).
We should point out that the use of typical optical systems available in AFM instruments does not allow the interferometric measurement of the close neighborhood of the crack tip. The custom coupling of this system with a high quality optical and illumination system would allow using higher magnifications and extracting valuable information from the interpolation of the fringe intensity profiles (cf. Swadener and Liechti 1998). However, the present results allow us to measure the stress intensity factor by a simple and direct experimental measurement of the crack opening displacement over the first millimeters from the crack tip. In fact, fitting the experimental profile by the Eq. (8) using two free parameters (position of the crack tip and multiplicative constant of the profile), this technique enables an accurate measurement of the stress intensity factor and the crack length. This single measurement might be an interesting alternative to the load measurement combined with the optical estimation of the crack length necessary to assess the stress intensity factor, as classically done for DCDC fracture tests. This feature is particularly interesting for in-situ investigations of the crack tip since it allows reducing the weight and dimensions of the loading fixture.
We remind that, as discussed by Plaisted et al. (2006), linear modelling can not provide a complete description of the DCDC deformation field, since the second order terms due to rotation can become very relevant, especially for long cracks. However, these effects are relatively limited in very stiff and brittle materials and do not seem to affect the present analysis as confirmed by the excellent agreement between the linear analysis and the experiments realized at four different loads. Moreover, subcritical propagation curves performed repeatedly on different crack length regions of the same DCDC glass specimen are found to be in satisfactory agreement between them (C lari 2004), thus confirming the validity of the present treatment for glasses. A generalization of our approach to softer materials by accounting for nonlinear terms would be an interesting future development.
Finally, it is interesting to discuss the limitations of our approach at much smaller scales. Due to the elevated degree of homogeneity and brittleness of silica glass, the lower limit of validity of the Irwin relation for a sharp crack is expected to be of the order of a few nanometers from the crack tip. In addition, the FE simulation is strictly a good representation of a measurement of the crack opening in vacuum. In ambient condition, capillary condensation is expected to develop into the crack cavity (Wondraczek et al. 2006; Grimaldi et al. 2008; Ciccotti et al. 2008). On the one hand, this can bias the apparent position of the crack front due to the weak reflectivity of the air/glass interface. On the other hand, this can alter locally the crack opening profile due to the attractive capillary forces. For the experiments presented here, the largest length of the capillary condensed phase can be estimated to few micrometers. As a consequence, this corresponds to a distortion of the crack lip on the first few micrometers close to the tip, which can unfortunately not be measured by the present setup, but which could be revealed by the coupling it with a higher quality optical and illumination system. The effect of capillary condensed phase represents an interesting challenge for future experimental and theoretical investigations.
5 Conclusion
This work reports a combined theoretical and experimental study of the crack opening profile in DCDC specimens of linear elastic brittle materials. It has been shown how a fifth order Williams expansion series can be used to describe very accurately the crack opening profile over a conveniently large domain near the crack tip. Finite element simulations have allowed on one side to obtain an accurate expression of the variations of the stress intensity factor with the crack length for a broad range of DCDC geometries, and on the other side, to express the crack opening profile in a simple form as a function of the geometrical parameters of the specimen. The ranges of validity of these analytical expressions and more specifically of the Williams development at various orders are calculated and interpreted. Moreover, the simulated profiles were successfully tested against an accurate experimental measurement by monochromatic-light crack opening interferometry. This single optical measurement might be an interesting alternative to the load measurement combined with the optical estimation of the crack length both necessary to assess the stress intensity factor, as classically done for DCDC fracture tests.
Acknowledgements.
We wish to thank C. Marli re and F. C lari for initial developments of the fracture experiment and C. Blanc for his help in the setup of the interferometric technique. We thank S. Roux and T. Fett for stimulating discussions. This work was supported by the ANR grant CORCOSIL (BLAN07-3-196000).References
- (1) Bonamy D, Prades S, Ponson L, Dalmas D, Rountree CL, Bouchaud E, Guillot C (2006) Experimental investigation of damage and fracture in glassy materials at the nanometer scale. Int J Prod Tech 26:339–353
- (2) Born M, Wolf E (1999) Principles of optics: electromagnetic theory of propagation, interference and diffraction of light, 7th ed. Cambridge University Press, Cambridge
- (3) Célarié F, Prades S, Bonamy D, Ferrero L, Bouchaud E, Guillot C, Marlière C (2003) Glass breaks like metal but at the nanometer scale. Phys Rev Lett 90:075504
- (4) Célarié F (2004) Ph.D. thesis, Université Montpellier 2, France
- (5) Ciccotti M, George M, Ranieri V, Wondraczek L, Marli re C (2008) Dynamic condensation of water at crack tips in fused silica glass. J Non-Crist Solids 354:564–568
- (6) Ewalds HL, Wanhill RJH (1985) Fracture Mechanics. Edward Arnold Limited, London
- (7) Fett T, Rizzi G, Munz D (2005) T-stress solution for DCDC specimens. Eng Fract Mech 72:145–149
- (8) Fett T, Rizzi G, Creek D, Wagner S, Guin JP, López-Cepero JM, Wiederhorn SM (2008) Finite element analysis of a crack tip in silicate glass: No evidence for a plastic zone. Phys Rev B 77:174110
- (9) Grimaldi A, George M, Pallares G, Malière C, Ciccotti M (2008) The crack tip: a nanolab for studying confined liquids. Phys Rev Lett 100:165505
- (10) He MY, Turner MR, Evans AG (1995) Analysis of the double cleavage drilled compression specimen for interface fracture energy measurements over a wide range of mode mixities. Acta Metall Mater 43(9):3453–3458
- (11) Janssen C (1974) Specimen for fracture mechanics studies on glass. In: Biezeno CB, Burgers JM (eds) Proceedings of the 10th International Congress on glass in Tokyo. pp 10.23–10.30
- (12) Kysar JW (1998) Effects of strain field on light in crack opening interferometry. Inter J Solids and Struct 35(1-2): 33–49
- (13) Lardner TJ, Charkravarthy S, Quinn JD, Ritter JE (2001) Further analysis of the DCDC specimen with an offset hole. Int J Fract 109:227–237
- (14) Liechti KM (1993) On the use of classical interferometry techniques in fracture mechanics. In: Epstein JS (ed) Experimental Techniques in Fracture. 3rd ed. VCH Publishers, New York. pp 95–124
- (15) Maugis D (1999) Contact, Adhesion and Rupture of Elastic Solids, 2nd ed. Springer-Verlag, Heidelberg
- (16) Plaisted TA, Amirkhizi AV, Nemat-Nasser S (2006) Compression-induced axial crack propagation in DCDC polymer samples: experiments and modelling. Int J Fract 141:447–457
- (17) Rice J (1968) A path-independant integral and the approximate analysis of strain concentration by notches and cracks. J Appl Mech 35:379–386
- (18) Sommer E (1970) An optical method for determining the crack-tip stress intensity factor. Eng Fract Mech 1:705–108
- (19) Swadener JG, Liechti KM (1998) Asymmetric shielding mechanisms in the mixed-mode fracture of a glass/epoxy interface. J Appl Mech 65: 25–29
- (20) Williams ML (1957) On the stress distribution at the base of a stationary crack. ASME J Appl Mech 24:109–114
- (21) Wondraczek L, Dittmar A, Oelgardt C, Célarié F, Ciccotti M, Marlière C (2006) Real-time observation of non-equilibrium liquid condensate confined at tensile crack tips in oxide glasses. J Am Ceram Soc 89:746–749