Confocal Microscopy of Colloidal Particles: Towards Reliable, Optimum Coordinates
Abstract
Over the last decade, the light microscope has become increasingly useful as a quantitative tool for studying colloidal systems. The ability to obtain particle coordinates in bulk samples from micrographs is particularly appealing. In this paper we review and extend methods for optimal image formation of colloidal samples, which is vital for particle coordinates of the highest accuracy, and for extracting the most reliable coordinates from these images. We discuss in depth the accuracy of the coordinates, which is sensitive to the details of the colloidal system and the imaging system. Moreover, this accuracy can vary between particles, particularly in dense systems. We introduce a previously unreported error estimate and use it to develop an iterative method for finding particle coordinates. This individual-particle accuracy assessment also allows comparison between particle locations obtained from different experiments. Though aimed primarily at confocal microscopy studies of colloidal systems, the methods outlined here should transfer readily to many other feature extraction problems, especially where features may overlap one another.
keywords:
confocal microscopy , colloids , feature location , particle tracking , image analysisPACS:
07.05.Kf , 07.05.Pj , 42.30.Va , 82.70.Dd , 87.64.Tt , 87.64.Rr,
1 Introduction
Confocal microscopy has made an enormous impression on the biological sciences [1], and started to do the same in colloidal science. In particular, the ability to perform a quantitative analysis, especially to extract particle coordinates from genuinely bulk colloidal samples, is hugely useful in providing information at the single particle level, and is ideal for comparison with the results of computer simulations. Whilst the range of experimental avenues to be explored is vast, several themes have emerged. Paradoxically, arguably more difficult systems such as glasses and gels have been studied in detail, as we discuss below. This is partly because of present outstanding questions in these which are likely only to be answered with knowledge of localised events, which more traditional ‘averaging’ techniques such as light scattering cannot easily access, but also because more tightly confined systems move at rates better suited, i.e. more slowly, to the more sedate hardware available until very recently.
Amongst the very early studies of colloidal samples was a structural analysis of a very high density glass [2]. This lead to studies of (particularly heterogeneous) dynamics in supercooled liquids and glasses [3, 4, 5, 6, 7]. Similar studies concentrated on aging [8, 9, 10, 11] and the response of samples to localised perturbation [12]. Recently, in response to the experimental verification by light scattering of a re-entrant glass transition [13], the effect of an increasing short-range particle attraction on the glass transition has been studied [14]. In a similar fashion but for different attractions, other groups have studied gels [15, 16, 17, 18, 19, 20, 21].
As well as disordered systems, there have been studies of bulk crystals in systems with both hard sphere [22] and more complex interactions [23, 24, 25, 26], as well as crystallisation [27, 28], stacking disorders [29], and growth (including epitaxial) of crystals [30, 31, 32, 33]. Though many of these take advantage of the particle coordinates for structural and dynamic analyses, it is also possible to infer thermodynamic properties directly by microscopy [34].
Recently, interest has developed in the behaviour of glasses under shear [35, 36] and flow [37]. Studies such as these benefit enormously from the advent of video-rate and faster confocal microscopes. At the other temporal extreme, studies on force distributions in emulsions [38, 39, 40] and sedimenting nearly-colloidal systems [41, 42], in which particles are forced into intimate contact, present equal challenges.
Several papers have described microscopy of colloids, both for video and confocal microscopy (reviewed in [43] and [44] respectively). The introductions by Weeks ([45], and latterly [46]) are accessible general references. The standard reference for quantitative studies, i.e. particle location and tracking, [47], is essentially for two dimensional studies using video microscopy. Others extended these to three dimensional confocal microscopy [48, 49, 50]. Some details of the other groups’ techniques have emerged [23, 51] and an excellent reference is web-based [52].
The above examples encompass a huge range of typical particle types, configurations, and imaging conditions. Key parameters which vary widely include the volume fraction (ranging at least from to [24, 41]); particle size; typical particle separation (very different for gels and attractive glasses from that for coexistence crystals, even at the same volume fraction); sample composition (especially refractive index mismatch); the nature of the particles themselves (particularly whether the whole particle is visible to the imaging system); and the speed at which images can be captured. All of these affect the success of particle location, but these issues are not thoroughly considered in many papers. We emphasise particularly that studies which claim structural differences between different systems (e.g. [7]) should justify that the particle location works equally well in both systems.
Our aim is for reliable and optimum coordinates. By optimum we mean both that the coordinates extracted from a given data set are the best that can be inferred from that data set, and that the data set contains the greatest possible information about the sample. Crucial to optimum coordinates is therefore optimum image capture, and optimum coordinate extraction, both of which we discuss here. Reliable refers to the fact that we have confidence — that is, an objective quantification — in each coordinate measured. Also in this paper, we introduce a means of comparing accuracy between data sets of differing quality; this is a measure of reliability. With this, we are able to obtain particle coordinates in difficult (what is meant by ‘difficult’ will become clear) samples, where, although the accuracy is necessarily low, we can nonetheless reliably locate the particles. Crucially, we argue that if meaningful quantitative comparisons are to be made between different systems, it is vital that such a measure is available. Quantitative confocal microscopy of colloids works well under favourable conditions (see the above citations), and we describe here how one can know how successful it has been.
Although we are interested in colloidal systems, we note that much of what we discuss has been considered in other fields. Some prominent examples are particle image velocimetry (PIV), biophysics and astronomy. PIV does not quite track particles, but it seeks the location of correlation peaks using techniques similar to ours [53]. In biophysics, tracking of fluorescently dyed objects, for example proteins and lipids, as they diffuse on cell surfaces is a common problem [54, 55, 56] and astronomers have developed many advanced algorithms, in particular for detecting x-ray sources, for example [57, 58]. There is inevitable overlap between these fields, since they all seek to locate features with maximum precision. Doubtless there is scope for further consolidation between these fields, but equally there is a strong motivation for discussing the particular requirements of colloidal particle location in the microscope. Nonetheless, the contents of this paper should apply outside of colloidal science, and in particular need not be limited to confocal studies; many bright features can be located using the techniques we describe.
This paper covers the whole process of particle location, from the imaging of objects in the colloidal regime, to testing the validity of the extracted coordinates. In section 2 we discuss imaging of colloid-sized objects. We elaborate in section 3 on practical confocal microscopy of colloidal systems. Section 4 discusses strategies for coordinate extraction, and Section 5 describes some basic tests of accuracy. Section 6 discusses the centroiding technique in some detail. Thereafter, in Section 7, we describe our improvements on this method, including a detailed error analysis, its success, and limitations.
2 Imaging Colloid-sized objects
In this Section, we describe the confocal micrograph of a spherical colloid-sized object, which is subtly distorted by the imaging system. The distortion is an inherent feature of imaging objects near to the diffraction limit of any imaging system. Its nature is important when attempting to locate objects in the colloidal size range, particularly in dense systems. For spheres, the micrograph which the imaging system produces is the sphere spread function (SSF). It will be described in detail, as will noise, which must be carefully dealt with to obtain optimum coordinates.
2.1 Imaging Process
Figure 1 shows the generic imaging process: visible electromagnetic radiation emanating from the object is represented by , whilst is the image. The operation which transforms one into the other is performed by the imaging system and is designated :
An extended object can be considered a series of points on a finely-spaced lattice. An arbitrary point in this lattice is specified by the delta function , allowing the object to be rewritten in terms of these lattice coordinates:
and where the integrals are over the field of view. This is a null operation, but permits us to proceed. The imaging process can be written as a convolution, a description which is useful since both digital filtering and modelling the image of a spherical colloidal particle are performed in these terms. Now, an image is given by , since the coordinate system used to describe the object cannot be important, so that:
which, provided the imaging operation is linear, reduces to:
| (1) |
From this we identify the distribution as the image of a single point, which in any real imaging system is not itself a single point; it is the point spread function (PSF) whose origin is the diffraction limit of the imaging system, and which is widely described in standard texts, for example [59].
The expression for the observed intensity, , is a convolution integral; is the convolution of the system PSF with the object illuminance, which can be written as
| (2) |
where ‘’ denotes convolution.
The image produced by an imaging system with linear is simply the convolution of the effect that it has on a single point object with the original image; the imaging system places a copy of the point spread function at each point in the image, scaled by the intensity of the object at the corresponding point.
It is well documented that the PSF for the light microscope is well modelled by a Gaussian in both the lateral and axial directions (e.g. [41, 59, 60, 61]). Also for other imaging systems it is possible to model accurately the PSF, and there are commercial software packages which can do this (for example, Huygens and Autoquant, http://www.svi.nl/products/professional/ and http://www.aqi.com/index.asp respectively). Alternatively, one could measure the response of sub-microscopic, essentially ‘point’ objects, many times to obtain a convincing (mean) system PSF. However, for our purposes, since the first peak in the PSF contains overwhelmingly the majority of the intensity of the distribution, and since the central peak is well modelled by Gaussians, the system PSF can be modelled by a simple set of Gaussians placed in a single array.
populated the array in one calculation, and allowed the relative lateral and axial extents to be varied. The extent (the variance, ) of the PSF was adjusted via and , to correspond to reasonable values for the confocal microscope.
2.2 Imaging a Colloid-sized Object
Every imaging system distorts the object by the PSF. In the worst cases, this renders the object unresolvable. In contrast, if the objects under study are much larger than the resolution limit, the distortions are not noticed (photographs, television images). In imaging colloids, we investigate an intermediate situation where diffraction effects are important but not overwhelming.
Following the discussion above, we recognise the sphere spread function (SSF) as the convolution of true sphere response, , with the appropriate PSF:
| (3) |
We describe a simple model of this process for an indication of the resultant SSF. We will use this to justify our particle location technique. In particular, we consider an approximation to the fluorescence confocal image of a homogeneously-dyed spherical colloidal particle. (The scattering of light from a dielectric sphere is more complicated [62] and does usually not give rise to a uniform intensity over the sphere, but this is beyond the scope of the present article.) We convolve its ‘true’ image with the PSF of the imaging system, , (Equation 3 and Figure 2). Intensity distributions through the resultant modelled SSF compare well with confocal images of homogeneously-dyed PMMA particles. For more details, consult [41].
The PSF of a point particle is well modelled by a Gaussian surface of revolution. This is not necessarily the case for larger particles and thus suggests that a Gaussian does not always model the SSF; its success is likely to vary with the size of the spheres. Although a Gaussian approximation does account for the important properties quite well (the shape is roughly right, and it is spherically symmetric) [47], it has been pointed out recently that the lobes can have an important effect on the inferred particle locations [63].
Even with our simple Gaussian approximation, we see the important feature: the ‘smearing’ of a micron sized sphere due to the diffraction limit results in an SSF that is larger in extent than the true size of the sphere. In the case where the spheres are well separated, this is of no consequence. However, when the spheres are close to one another, the SSFs overlap, a detail which turns out to be crucial in microscopy of some colloidal samples, and which we discuss in detail later.
We argued above that the image of a particle can be written as a convolution of its illuminance with the imaging system PSF , equation 3. In a similar way, we can view the placement of this image at any particular point in space (i.e. the particle coordinate) as a convolution with a Dirac delta function at that point.
| (4) |
where represents the sphere spread function (modelled, such as above, or measured) which corresponds to a sphere centred on the origin (thereby defining implicitly an origin).
By the convolution theorem, we can write this as
| (5) |
where is the Fourier Transform of the image , is that of the SSF and is that of a delta function at the particle’s position . The last equality follows since the Fourier transform of a delta function centred on the origin is simply a constant ( or , depending on the definition), . This idea of the image of a particle as an instance of a motif will be useful later.
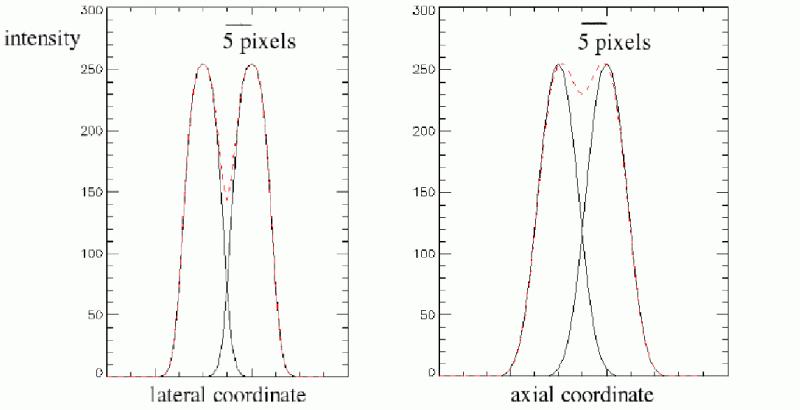
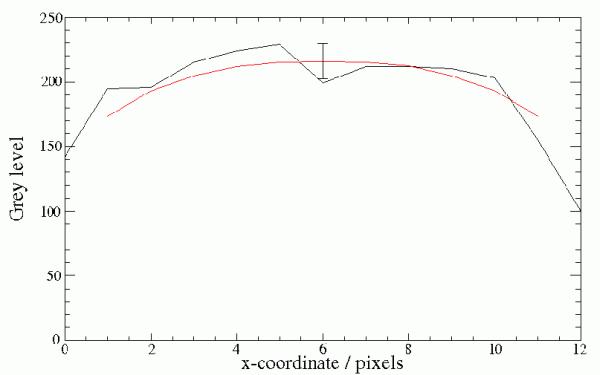
The intensity profile through a typical modelled SSF in lateral (left) and axial (right) direction are shown in figure 3. This SSF represents a sphere with a diameter of and was calculated using a Gaussian PSF of lateral extent nm and axial extent nm. The centroid of the brightness within a window about the particle corresponds to the centre of the particle (within uncertainty).
We have seen that the image of an object is its true form convolved with the instrument resolution function (the PSF), and how this affects the optical micrograph of a colloidal particle. The degree of broadening is purely a function of the system PSF, so one readily appreciates that the PSF would ideally be itself a point. Though diffraction means that this is never true, it can be made more nearly so. One widely used means of narrowing the PSF is the laser scanning confocal microscope (LSCM), which we consider now.
2.3 Confocal Microscopy of Colloid-sized Objects
Instrumental (PSF) related ‘smearing’ always hampers imaging colloid-sized objects with the light microscope, but is particularly compromising for bulk samples. There have been successful bulk colloidal studies using a conventional optical microscope [60, 64, 65, 66], but the large extent (particularly axially) of the PSF is problematic. The confocal microscope addresses this difficulty particularly well.
Figure 4 shows a simple representation of the confocal principle (for technical details see, e.g. [1, 41, 45, 46, 61]). The two sets of rays illustrate imaging of a point at the focal plane (solid black) and one outwith the focal plane (dashed red). Both are brought to focus at different points; light originating from outwith the object focal plane appears in the detected image as out-of-focus blur. The image is substantially improved by eliminating this by inserting an aperture at the detector (illustrated); the image plane is conjugate with the focal plane, hence confocal. The pinhole size is a compromise between the greater confocal effect of a small pinhole and the reduced light budget this affords. Due to the difficulty of manufacturing small variable apertures the pinhole size is not usually continuously variable. A near-match is usually more than satisfactory. The confocal aperture reduces the axial extent of the PSF, and whilst this is its most dramatic influence, it also diminishes the PSF lateral extent [41, 61]. The confocal microscope is thus able to provide finely resolved images from within a bulk sample: this optical sectioning is overwhelmingly the most important benefit of the confocal microscope for colloidal studies. This improvement in resolution is at the expense of its field of view, which can subsequently be recovered by scanning [67].
2.4 Noise
So far we have assumed that the detector accurately reproduces the response of the object under study. In a real experiment, however, there is also noise, an all-inclusive term for processes which affect the image but which do not relate to the object itself. Examples include the discrete nature of the radiation; varying detector sensitivity; unstable illumination; electrical noise; and transmission errors.
The signal-to-noise ratio (SNR) of an image is a means of quantifying the extent of noise-derived degradation [68]. No one measure of SNR fully quantifies the ‘quality’ of an image; most image processing addresses images which are ultimately for (inherently subjective) human observation. We give one definition of SNR:
If the detected image comprises a ‘signal’ part and a ‘noise’ part :
| (6) |
then the respective variances are and . The SNR is simply defined as:
where the second equality follows since the noise in this case is uncorrelated: .
To find the SNR, therefore, we require two of . From a single image, we only know . Occasionally, it is possible to extract a region of constant intensity (a region of sky within a photograph) and from this infer . Generally, and particularly in colloidal samples, this is not so, and we must obtain two images ( and ) of the same scene :
Taking the normalised correlation between the two realisations and :
This permits direct calculation of the SNR
With colloidal samples it is, however, seldom possible to form two successive images of the identical image, so that the SNR can rarely be calculated for a genuinely representative sample.
Although the SNR is not definitive, we have found that an experienced eye is satisfactory in determining pre-analysis whether images are suitable. This is not crucial, since — with the aid of the analysis described in this paper — we assess the accuracy of individual coordinates post-processing.
3 Imaging Bulk Colloidal Samples
In the previous section, we described how colloidal objects can in principle be imaged using the confocal microscope. In this section, we discuss how this is achieved in practice, particularly with regard to achieving the best possible images.
3.1 Sample Requirements
For our analysis, it is required that fluorescence is present in the system, the particles are of suitable size and the refractive indices of the particles and suspension medium are suitably close.
Most confocal microscopes require fluorescence. For particle location, it is necessary that particles are labelled in order to distinguish them from the suspension medium. The whole particle or only parts, e.g. the core, can be dyed. Usually the dye is chemically attached to the particles, hence preventing dye from leaching into the solvent. However, fluorescent solvent may be used with undyed particles (Figure 5). Dye properties vary in both fluorescence yield and how quickly their fluorescence property is lost on excitation (photobleaching) [22].
The acceptable size range for the particles is specified by the resolution of the microscope; around – nm laterally and – nm axially [61]. According to the usual Nyquist-Shannon sampling requirement [69, 70], the distance represented by each pixel (the pixel pitch) should be around half this. Nevertheless, a certain degree of undersampling is permissible, since the shape of the particles is known. The procedure for locating particles requires around pixels per particle (see below), which implies a particle size of at least around m diameter with larger particles resulting in more reliable results. Most studies have used particles with a diameter around m.
The refractive index mismatch between the particles and suspension medium must be low to minimise the effect of scattering; scattering events between the entry point of the beam and the position being imaged reduce image quality. The refractive index mismatch, as well as the particle concentration and particle size, determine the depth into the sample where images of sufficiently high quality can be obtained. Increasing refractive index mismatch, increasing particle concentration, reducing particle size and increasing depth all worsen the reliability of particle location. As an example, poly-methyl-methacrylate (PMMA) particles labelled with the dye 4-methyl-aminoethylmethacrylate-7-nitro-benzo-2-oxal,3-diazol (NBD) having a diameter of about m and a refractive index dispersed in cis-decalin () provide usable images for very dense samples () to a depth of around m, whereas the same system but with a very nearly refractive index-matching mixture of cis-decalin and cycloheptylbromide (CHB) provides images at more than m into the sample (when the objective lens working distance is often limiting). At the other extreme, for silica () in water () useful data is likely to come only from within a few micrometers of the cover slip.
3.2 Sample Containers
The sample cell significantly contributes to the image quality which can be achieved from bulk colloidal systems. Although the typical sample cell is a simple chamber, it must be optically suitable, straightforwardly filled and then sealed airtight, as well as impervious to the constituents of the sample.
The optical requirements of the cell for light microscopy have been discussed in detail before [60, 65]. These are simplified for confocal studies, since here only one surface of the cell is in the optical path. The most important requirement is that the thickness of this cell wall must not exceed the objective working distance by more than the depth to which one wishes to observe.
The widely-used capillary tubes [60, 65] with typical wall thicknesses of about m, although very convenient, provide poor images (which may in part be due to their method of manufacture). We thus prefer to make use of cover glasses, which are by design of high optical quality. Constructing a chamber from these is generally straightforward; figure 6 shows three arrangements. The first (Fig. 6A) is an arrangement of cover glasses and a microscope slide which is held together by use of UV-curing adhesive (e.g. Norland Optical Adhesive, NOA 61). The number of cover glasses can be varied to form different sized cavities. The cavities must be filled by capillary action, so are not suitable for dense and/or viscous samples. A second cell (Fig. 6B) comprises a cover slip attached to a machined block of material (such as PMMA). The outer dimensions of the cell are typically chosen for convenience to match cover glass sizes, whilst the inner are freely chosen. The cell is filled through a small hole and air correspondingly evacuated through a second hole ( mm diameter is convenient). Once the cell is filled, the holes are sealed using UV-curing glue. If desired, the cell can be made suitable for observation from either side by attaching a cover glass to one side and a microscope slide to the other. The second is by far the most versatile, and remains sealed for a very long time. As with the first cell, it is difficult to fill with the most dense and/or viscous samples. In particular, care must be taken of the so-called ‘self-filtration’ effect [71]. The third cell (Fig. 6C) consists of a glass vial with its base replaced by a cover glass (UV-curing adhesive is again suitable). This cell is easily filled even with the most dense samples and its contents can be reused or adjusted, but in our experience cells of this type are frequently not airtight for long times.
As well optically suitable and impervious to the sample, the surfaces of the cell should be chosen with consideration in view of wall effects. This depends on the specific project, for example, smoothness can cause wall-induced ordering. This can be avoided by treating the surface. The simplest method is to deposit a drop of a dilute particle suspension on the (tilted) glass surface and then bake this once dry (for PMMA, 50 min at 85℃ is suitable). Particularly if polydisperse particles are used, this provides a good non-slip coating [36] which discourages epitaxial crystal growth. Alternatively, one can spin-coat the glass surfaces with a layer of PMMA, which is subsequently covered with a stabiliser such as poly(12-hydroxystearic acid) (PHS), which is also used to sterically stabilise particles. The PMMA layer can be omitted by using a PHS-Si stabiliser, which adsorbs directly onto the glass [72].
3.3 Achieving Optimum Images
In this section we discuss how to achieve images of bulk (three-dimensional) samples in a digital format which are suitable for particle location. Notably, we discuss how to choose an appropriate pixel pitch to best balance fidelity and image size. We outline a recipe for capturing good quality images, and some common sources of poor image quality.
Contrast
The intensity of light is usually detected by photomultiplier tubes (PMTs) or charge coupled devices (CCDs). After analog-digital conversion, the image is represented by a series of discrete levels, greyscales or greylevels, and the number of greylevels is the image depth. Visually pleasing images require that gradations between neighbouring greylevels are barely perceptible; this needs of order greylevels. Frequently greylevels, i.e. -bit images, are chosen, but also -, -, and -bit images are used. These larger image depths reflect that ‘visually pleasing’ is not always sufficient for quantitative studies.
The recorded greylevel is determined by the illuminance (often loosely the power), which is device specific (e.g. the laser power entering the confocal microscope), as well as the gain, which scales the detector output signal, and the offset, which is an additive constant to compensate for a background count. The latter two are usually user-definable and should be optimised to maximise image contrast. Contrast is variously defined, but always describes the range of intensities present in an image. One definition of the contrast, , is:
where is the image mean background intensity, and is the intensity at point .
Maximum contrast means using the full dynamic range of the imaging system. This is facilitated by using an image histogram, or occurrence count, of intensity values. Figure 7 shows typical images and their histograms, which here have two peaks representing particles and solvent, respectively. The histogram for the original image (top and bottom middle) shows an appropriate range of brightness, while the top and bottom rows illustrate the effect of altering the offset and gain, respectively. While the original image (top and bottom middle) shows an acceptable histogram, that on the bottom right uses the full dynamic range of the detector best and is thus closest to what one should aim for. Furthermore, one must avoid saturation, where the highest intensity pixels ought to take a value greater than the image format maximum ( for -bit images) and therefore are artificially restrained to this maximum value (Figure 8).
Note that the operations shown in Figures 7 and 8 were performed after image capture and thus merely simulate the effect of adjusting the gain and offset; they are lookup table (LUT) operations. This raises an important point: LUT operations do not increase the information contained within the images. These are empty operations, and serve only to increase the visual appeal of the images. To maximise the information retained from the imaged volume the imaging system parameters must be set so that the contrast in the detected image corresponds to the dynamic range at the time of capture.
Pixel Pitch and Image Size
As well as ensuring the image uses the full dynamic range of the detector, one must choose an appropriate pixel pitch and region of the sample to study. Recalling the Nyquist-Shannon requirement (§3.1), the pixel pitch should be around – nm laterally and – nm axially. The particles are isotropic, however, and it is convenient to have the pixel pitch close to isotropic. Moreover, the particle location schemes we will discuss below are suited to particle sizes of approximately – pixels in each direction. For particles of diameter m, this suggests a pixel pitch of – nm in each direction. Since the particle shape is known, particle locations can be inferred to greater resolution than the sampling frequency suggests, so that a slightly larger pixel pitch can be chosen.
For a quantitative analysis, a reliable means of calibration of the pixel pitch is essential. Standard test beads (e.g. TetraSpeck Fluorescent Microspheres) allow lateral and axial calibration and identification of spherical aberrations, but are usually too small for a reliable calibration; for a m diameter particle and a pixel pitch of m the error in the pixel pitch is around . A high resolution test slide (e.g. Richardson Test Slide, Model 80303) is better suited for two-dimensional calibration as well as identification of distortions; distances of order m can easily be calibrated, determining the pixel pitch to better than . Using this method, it is also possible to establish variations in the pixel pitch across the images.
Having determined the pixel pitch, one must decide upon the desired field of view. Unlike in conventional microscopes, in scanning microscopes the size of the region scanned, and thus the field of view, can be user-defined. The pixel pitch and field of view then determine the number of pixels in the image, which in turn is limited by the image processing hardware. (With our current desktop computing hardware, the limit is typically around pixels, for bit images, with this requirement being relaxed as desktop computing performance, particularly memory size, improves.) The ideal choice of parameters is therefore a compromise between the sampling requirement, the desire for about – pixels per particle in each direction and the overall image size (or number of pixels). For the above mentioned system a voxel size of around mmm is convenient and suitable, and results for voxels in a visible volume of about mmm, which is large enough for many purposes.
Capturing Images
Initially bright-field illumination is useful to find a suitable focus in the sample, nearest to the cover glass is most straightforward. Bright-field illumination affords a greater field of view, which, together with the lack of confocal sectioning, makes it much easier to ‘find’ the particles. Changing to confocal imaging should immediately give an image, although most likely a poor one.
With depth in the sample, scattering decreases the signal and hence the SNR. Images captured deeper in the sample are thus inherently more noisy than shallower ones. Data should therefore be captured as close to the cover slip as the phenomenon under observation will allow (or indeed requires). To avoid saturation, the imaging parameters, such as laser power, gain and offset, should be set at the shallowest (i.e. brightest) point of the region to be imaged. Though a nuisance, we can offset the effect of scattering against that of photobleaching. By starting a scan deep in the sample, where the image is of relatively low intensity but not yet photobleached, and proceeding to a shallower region, any photobleaching will tend to counteract the increase in the intensity. (Though the excitation light is reasonably well concentrated in the focal volume, photobleaching is not confined to the focal plane.) For this reason, when using an inverted microscope we use a coordinate system with the positive direction pointing ‘down’ with respect to the laboratory.
Among the adjustments in the confocal microscope, the size of the confocal aperture deserves special attention. Smaller apertures result in a smaller depth of field and thus give ‘more confocal’ images, while larger ones provide more collected light. Particularly when the shape of the particles is known the gain in light collected and therefore SNR may offset the loss of resolution due to the broadened PSF. The amount of collected light also depends on the acquisition time, which should be significantly shorter than any relevant time scale of the sample [50].
4 Finding Particle Coordinates
4.1 Dealing with Noise
Here we describe how to deal with noise prior to feature extraction. Apart from slight modifications, this procedure follows a method described previously [47]. Noise may include geometric distortions, non-uniform contrast and instrumental noise. We will not discuss geometric distortions, the absence of which can be confirmed using a test slide; supposing they were present, they can be dealt with using standard algorithms [47].
Contrast Gradients
The procedure we describe was originally intended to process images captured using CCD cameras. Such images, in which different pixels are sampled by different detector elements of, in general, different sensitivity, frequently display contrast variations. Even if in most confocal microscopes all of the pixels are scanned by the same detector, this procedure corrects for non-uniformities in illumination across the field of view.
Provided the image contains features which are suitably small and sufficiently far apart, large scale variations in the background (we take this to mean on a length larger than the particles) can be adequately modelled by a ‘boxcar’ average of extent , where is an integer larger than the sphere’s apparent radius in pixels, but less than the typical intersphere separation and can be different in the three dimensions [47]. This corresponds to a real-space convolution of the image with the following kernel:
| (7) |
This correction relies on the assumption that features are ‘small’ and ‘well separated’, which, loosely, means that the typical intersphere separation is larger than the sphere. For samples of volume fraction or greater, this is not true. Nonetheless, we see later that the results are reasonable.
We note that contrast gradients may genuinely be present. For example, in an image of a crystalline sample, crystallites may lie in slightly different planes from one another, giving rise to a genuine contrast variation. We assume that such effects are negligible.
Single Pixel Noise
For confocal micrographs of colloidal samples, the instrumental noise often comprises a significant proportion of single pixel noise. This would ordinarily be dealt with using a median filter [68]; each pixel is replaced with the median value from its neighbourhood, whose size is typically chosen to be , , or pixels. This has a smoothing effect which deals well with single pixel noise. In keeping with many earlier studies, we prefer another approach. It is difficult to defend this over the median approach a priori, but it turns out to work well, and is remarkably robust.
We assume single pixel instrumental noise, or, equivalently, that the noise has correlation length pixel. Removal of all features having this lengthscale by low pass filtering would certainly eliminate single pixel noise, but this has the disadvantage of blurring edges111Low-pass filtering, in its simplest form, involves cutting from the Fourier Transform of the image all points that lie above a threshold frequency. Such a circular region in the Fourier Transform gives rise, upon Fourier transforming once more, to a real-space convolution kernel of the form , where and is the threshold frequency. This kernel effectively places a function, or series of concentric rings, about each point in the original image, thereby blurring beyond usefulness the processed image.. Rather, the usual approach is convolution of the image with the kernel:
| (8) |
where is the normalisation condition, . Since the Fourier Transform of a Gaussian is itself a Gaussian, this attenuates high frequencies as desired, while more adequately preserving edges.
It was shown [47] that that these two operations (equations 7 and 8) can be implemented in a single step using the following kernel:
| (9) |
The normalisation is appropriate for comparison between images filtered with different values of . is again set to unity.
A practical limitation on the convolution arises since it involves, for each point in the original image, a sum over all points for . This cannot occur for any point which lies less than pixels from the edge of the original image. In practice these are often discarded. Depending on the application, it may be useful to have coordinates from this region despite the reduced information. To achieve this, the original image is ‘padded out’ with a border of width around the entire volume. (Above and below the stack the pixels are all set to the mean intensity value in the first and last slices respectively. To the sides of the stack, the border around each slice is set to the average value of the intensity in that slice.) This padding permits the entire image to be retained, while the padding is discarded afterwards. This average is necessarily not ideal and somewhat arbitrary (one cannot generate information which is not in the image initially), making particle coordinates within the border inherently less reliable than those from the bulk sample. Interestingly, failure to carry out the padding introduces artefacts into the Fourier Transforms of the images; if the Fourier representation is useful, this may be important. For details of the artefact, see [41].
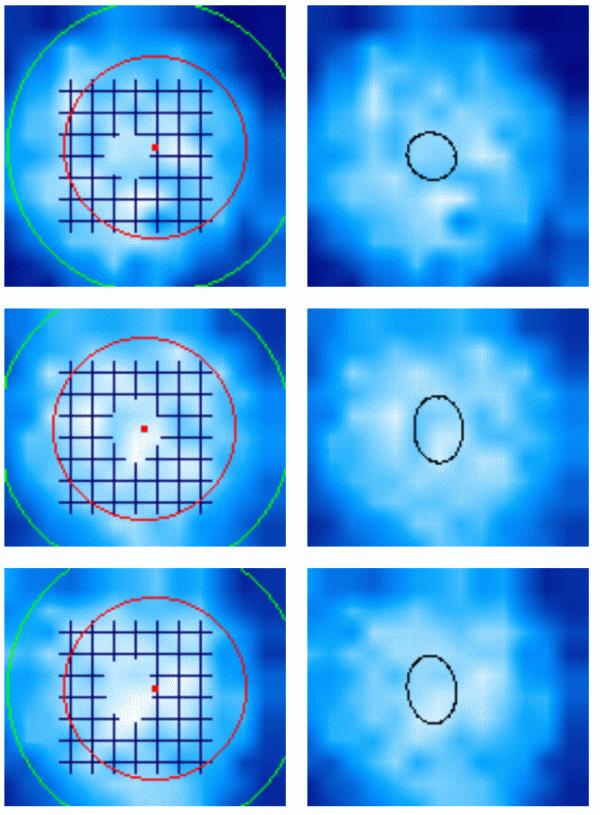
Figure 9 (left) illustrates a slice from a typical good quality stack of a largely crystalline region. The volume was then filtered using the three-dimensional algorithm, and the same slice extracted once more (Fig. 9 right). This example is of a successfully filtered image. In dense samples, neighbouring particles occasionally show ‘bridges’, or small bright bands connecting their images. This is an important but unavoidable problem which we discuss in detail later.
4.2 Strategies for Finding Particle Coordinates
The centre of a particle can only be identified from its image by relying on a priori knowledge of its shape. In our case each particle is spherical, and, following the arguments above, we thus know the shape of the fluorescence intensity profile through each particle’s image. Use of a priori knowledge in this way is known as Bayesian inference, and is widely used in many fields [73, 74]. Even the simplest particle location scheme infers coordinates by taking advantage of this information and is therefore in this sense Bayesian.
A priori knowledge of the particles’ shapes permits location of the particles to higher precision than the sampling rate. This sub-pixel resolution ultimately allows location of particles to substantially better than the resolution of the microscope. In principle there is no limit on this statement, though inherent experimental error and limitations in the interpolation techniques ensure a maximum resolution which cannot be known in advance; we address this later.
We consider three strategies to identifying particle locations. The first involves identifying particles and subsequently inspecting each in turn (Sec. 4.2.1). This is widely used, but can only be useful when finding the centres of solidly-fluorescent spheres. The second, a deconvolution method to extract instances of the particle image (Sec. 4.2.2), is more general, but not used here. Similarly, the third, the Hough Transform (Sec. 4.2.3), is very general and, we argue, suitable for further exploitation in colloidal studies, but not used here. A recent study carried out a computational comparison of some of the methods described below [75]. They found, perhaps unsurprisingly, that a direct Gaussian fit to the intensity profile was most successful for point sources (where the measured intensity profile ought to be simply the PSF), whereas a pattern-matching approach (see ‘Refinement using Measured SSF’, below) was more successful for larger particles. They did, however, neither consider real data nor the more complicated situation where several particles are present.
4.2.1 Identification of Local Brightness Maxima and Subsequent Refinement
The majority of particle location schemes operate on the assumption that the image of a particle has a maximum intensity at, or near to, its centre, i.e. that there is a one-to-one correspondence between local brightness maxima and particle centres. (‘Local’ is important since the image brightness can in general vary dramatically on the scale of several particle diameters without compromising the technique.) In practice, however, the sampling grid will never coincide with the sphere centre and also other imperfections, for example resulting form noise, have to be considered. Nevertheless, we assume that based on the local brightness maxima we can reach nearest pixel accuracy. The refinement step then gives subpixel resolution. There is a hierarchy of possible refinements, based on the extent to which the a priori knowledge is relied upon.
Refinement Using the Spherical Symmetry of the SSF: Centroiding
Refinement Using a Functional Form for the SSF
Rather than using a centroiding approach, i.e. the fact that the SSF is spherically symmetric, the functional form of the SSF could be used. Already an approximation to the functional form might improve the centroiding approach. In particular, it improves the performance in the case of SSF overlap, which is modeled by a simple superposition.
In related systems, such as particle image velocimetry (PIV), as well as the -point centroid estimators, there are two widely used approximations to the functional form [53]. The first is a parabolic peak fit with the functional form
and similarly for and . Based on this model, the ‘true’ position () of the particle is:
where is the candidate (integer) location and is the intensity of the sampled image at position . In our work, there is no basis for using a parabolic fit.
A Gaussian fit seems more appropriate [47], although the deviations are sometimes significant (Sec. 2.2, [63]):
This implies that
so that the three-point Gaussian estimate is parabolic in the natural logarithm of the sampled points :
and similarly for and . These three-point estimators are convenient and widely applied. They rely on the image of the particle being around three pixels in diameter [53], which may not permit the desired sampling rate: remembering Section 3, the pixel pitch ought to be around , so a typical colloidal particle suitable for confocal microscopy (diameter ) need be at least pixels in diameter. Once again, knowledge of the functional form of the SSF may allow recovery of the particle location despite the apparent undersampling. It is not possible in principle to resolve this conflict, and opinions, judging by the literature [23, 22], differ on exactly what is the appropriate choice.
Fitting to a functional form outperforms the centroid approach when the SSFs of neighbouring particles overlap. It is well documented that the above fits are appropriate only for well-resolved correlation peaks [53, 76]. Progress in this direction has not been attempted, largely because the functional form is not in general known. An approach which avoids this deficiency is described next.
Refinement Using the Measured SSF
In this case, the SSF is measured in a window just larger than the SSF itself. ‘Stamps’ of this SSF around the candidate particle locations are then fitted to the image. Provided the SSF was sampled appropriately, it also accounts for aberrations and imperfections, and more accurately for the system PSF. We describe this technique in Section 7.
4.2.2 Particle Location by Deconvolution of the SSF
If we are to extract instances of a motif, as the above refinement using the measured SSF suggests, then a deconvolution technique is seemingly more appropriate. We have established that the imaging system can be represented as a convolution process (Sec. 2.1, Eq. 2), and we could in principle recover the original form of an imaged object by deconvolution of the PSF from the observed image. Similarly, the image of a particle is formed by placing a copy of the SSF (the above ‘stamp’) at the particle coordinate (Sec. 2.2, Eq. 4). From Equation 5 it follows that
where denotes the reverse Fourier Transform. Thus by deconvolving the SSF from the image of a particle, we obtain a single bright point at its centre which is easily located.
If there are several spheres in the image, the situation is complicated slightly, since it is not possible to define the centres of all spheres as being at the origin. The Fourier Transform of a delta function which is not centred on the origin is:
Thus the Fourier Transform is no longer constant, but contains phase information which encodes each particle’s distance from the origin. This is the reason why the locations of several particles can be determined by the deconvolution process.
In the case where the field of view contains particles at positions , the image can be written (Eq. 4):
Since the Fourier Transform is a linear operation, this gives us (Eq. 5)
with the Fourier transform of the delta function. Finally we obtain
| (10) |
Thus by measuring the sphere spread function carefully, we could in principle deconvolve it from the observed image , to obtain a series of bright points indicating the positions of the imaged spheres. Locating the bright points then returns the positions of the particles.
Although this technique is appealing, it is very sensitive to noise in the detected image, similar to the deconvolution of the PSF [41]. The effect of noise in Fourier space is (Eq. 6):
Noise is usually additive and highly localised in the object space, i.e. single pixel. In Fourier space, the noise is therefore highly delocalised, and its amplitude nearly constant. Dropping arguments we write
If there is no noise present, we recover the expected form (Eq. 10).
This technique shares a problem inherent in many deconvolution processes: Wherever the function falls near to zero, the first term on the right hand side is liable to become very large (depending on the behaviour of at that point), while the second term is certain to become very large, since is approximately constant. Because many deconvolution kernels contain zero-height pixels, deconvolution of a noisy image cannot be relied upon in this simple implementation.
There are several schemes for circumventing this difficulty. For example, one can seek the solution which contains the same information in Fourier and real space (Weiner or Optimal Filter). Furthermore, Maximum Entropy techniques determine as smooth an image as is consistent with the original data. To our knowledge, these techniques have been sparingly used in colloidal systems [39, 40] and we thus refer to the literature for details [68].
4.2.3 Hough Transform
The Hough Transform is a feature extraction technique popular in computer vision [68]. The original version identified lines [77], and this has been generalised to find the outlines of arbitrary shapes [78, 79]. It can be applied to differently shaped objects and is in particular not restricted to particles with a bright centre. However, at least in its simple form, a suitable parameterisation for the outline of the shape has to be found. (In the generalised version, the parameterisation is in the form of a lookup table.) Briefly, the Hough Transform operates by inverting the parameterisation so that the parameters become the coordinates (in Hough space) and the real-space coordinates become parameters. When points in real space are transferred to Hough space, any regions of high point density indicate objects and their parameters. This is assessed using accumulator cells, or bins, whose size dictates the precision to which the parameters are found.
The Hough transform has been applied successfully to systems of discs [80, 81] (in fact, spheres viewed in two-dimensions), and would presumably translate well to colloidal studies, but we are not aware of any three-dimensional studies. This might be due to the difficulty of extending the Hough Transformation to systems with many parameters, in particular the need for many points per accumulator cell for reliable parameter determination. In addition, the Hough Transform is dependent on the object outlines (edges) having been detected reliably.
5 Tests of Accuracy
Before we present the centroiding and SSF refinement techniques in detail (Sec. 6 and 7), we review some tests which can be used to compare the accuracy of both techniques. At least the first three of these are well known [47, 52].
5.1 Basic Tests
There are two basic visual tests. Firstly, a reconstruction that places an image of a sphere at its supposed position gives a very crude indication of believability (Figure 10), although this gives no objective measure of accuracy.
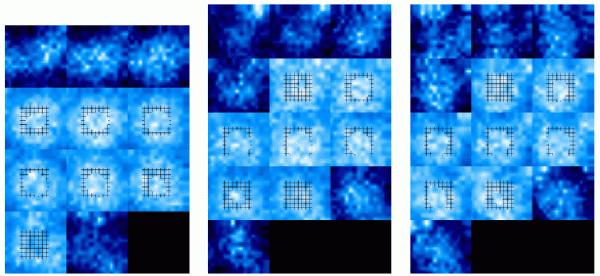
The one-to-one correspondence between particle images and detected locations can be checked using markers (e.g. crosses) on the original image (Fig. 11). Without an empty magnification it is, however, only possible to overprint markers to the nearest pixel.
5.2 Test for Rogue Particles
For a perfectly imaged sample, each particle image should be identical; variations may indicate imperfectly located particles. Simple properties characterising the particle image are its total brightness, peak brightness, the first moment of its intensity distribution (its radius of gyration), and its ellipticity [47]. For identical particles, we expect these values to fall within a narrow band of values. Figure 12 shows two examples, the radius of gyration squared of a particle versus its total brightness (left) and its peak brightness (right). Most points are close together within a tight locus except a few, which might be disregarded as rogue particles. However, it is never certain what the acceptable locus is, and correspondingly never obvious where the cutoff should occur. Furthermore, this does not allow us to infer the reliability of particle locations on an individual basis.
5.3 Test for Pixel Biasing
All of the techniques we consider here involve finding the nearest pixel to the true centre first and then refining this candidate particle location. If the first step fails, particle locations are not reliable, which can be detected, for example, by the above means. However, if the first step is successful but the refinement step fails, the particle locations are sometimes biased towards integer values. We can detect this using the distribution of the fractional part of the particle location, which should be evenly distributed from zero to one (Fig. 13).
5.4 Tests based on structural properties
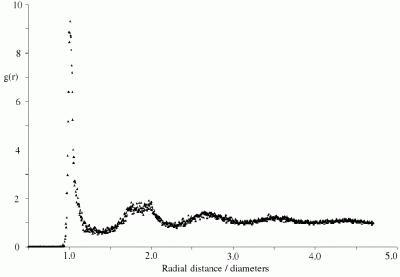
Often it is possible to compare the structural properties of an ensemble of particles with the expectation either from theoretical studies, or from simulations. Although there are many possible structural descriptors, the radial distribution function, , is most commonly used to check the reliability of the particle location. The height of the first peak and its sharpness, i.e. where it begins to rise (which ought to be infinite and respectively for hard spheres), are useful indicators of the reliability of the determined particle locations. Nevertheless, is it rather a measure of location precision than accuracy and it is also an average quantity, and hence unable to test individual particle locations. We will use this criterion in Secs. 6 and 7.
5.5 Checking the volume fraction
The volume fraction of a sample as prepared is often only known with a large systematic error [41]. It can therefore be helpful to calculate it from the determined particle coordinates, which can also serve as a consistency test for the coordinates.
The total volume fraction can be determined from the volume of the imaged region, , the number of particles it contains, as well as their radii, :
This depends on a reliable determination of the particle number , i.e. that neither particles are missed nor spurious particles are added. To overcome this problem in spatially homogeneous samples, we can determine the local volume fraction for each particle. This requires us to determine the volume per particle, which can be found by partitioning the space appropriately; there is no unique way of doing this, but the Voronoï construction [82] is well-defined and physically sensible [41]. For a homogeneous sample the local volume fraction ought to be similar (within a certain distribution) for all of the particles. Anomalously large volumes will be attributed to neighbours of a missed particle, which can be ignored in calculating the mean volume fraction. The volume per particle, and its distribution, may itself be of interest in spatially heterogeneous samples.
The value of as determined from the particle coordinates is subject to a systematic error, due to the error in the determination of the particle radius, . Typically, an error of around one percent in can be achieved (correspondingly, three percent in ). It is usual to get the random error in the coordinate-derived to much better than this. For details of a comprehensive dataset, see [41, Figure 8.1].
6 Centroiding
In this section we describe centroiding as commonly applied to colloidal systems. We note that centroiding methods are used in several other fields. Most notable is particle image velocimetry (PIV) [53], in which roughly-Gaussian shaped (correlation) peaks are located [83, 84, 85, 86, 87] with some using more sophisticated procedures, such as the three-point estimator (Sec. 4.2) [53, 87] or iterative procedures [88]. They also include discussions on the accuracy of centroiding [76] as well as the presence of noise [89, 90, 91]. The centroiding method was first applied to two-dimensional projections of colloidal samples by Murray and Grier [43], and then refined in the classical paper by Crocker and Grier [47], which also forms the basis for the routines by Weeks [52]. All centroiding algorithms seek to find with maximum accuracy the position of the centroid of an image distribution, but in colloidal studies this is, as we will explain, not always what we desire. Although this section is particularly relevant to Weeks’ tracking routines, it is not uniquely so and should also be relevant to most other centroiding routines.
6.1 Procedure
After filtering the raw image (Sec. 4), the image is searched for local maxima to determine the candidate particle locations, i.e. the nearest pixel (integer) to the ‘true’ location. Local maxima are simply the brightest points within a three-dimensional region (of size , see below). Subsequently a window (of size ) is considered around each candidate particle location. Within this window, the centroid of the image intensity distribution is taken, giving the final particle coordinate. Other properties of the intensity distribution, such as total brightness, peak brightness and radius of gyration, can easily be determined within this window.
To avoid problems due to external noise, most notably the influence of light from objects other than that under study, the algorithm ignores all pixels within the above window whose intensity falls below a certain fraction (quantified by ) of the peak height belonging to that particle. Statistics calculated for a particle hence refer only to pixels having intensity greater than this fraction of the peak intensity. In addition to this ‘local’ threshold, it can be useful to disregard any features whose peak brightness is less than a certain fraction of the brightest feature of the whole image, on the grounds that these are spurious. While it is possible for the brightness of features to vary substantially within an image, particularly for dense objects which are poorly refractive index-matched to the solvent, this is a useful safeguard and commonly chosen (arbitrarily) to be around .
6.2 Parameter Optimisation
The centroiding technique is in general quite robust to variations in its parameters, as we will show in this section. Since the parameter space is huge, we concentrate on its most useful portion and illustrate the effect of the different parameters using a high quality image. It is a image with a pixel pitch of mmm and originates from PMMA particles of radius m and volume fraction in cis-decalin and was taken using a BioRad confocal microscope. We use as standard parameters: , , and for noise filtering (, as defined in Sec 4.1) . The effect of the parameter choice is judged using the radial distribution function . As argued in Sec. 5.4, the height of the first peak and the distance where the first peak begins to rise. Although the importance of individual parameters depends on the exact system under study and the indicators for reliability, the following discussion reflects general trends.
Noise filtering parameter
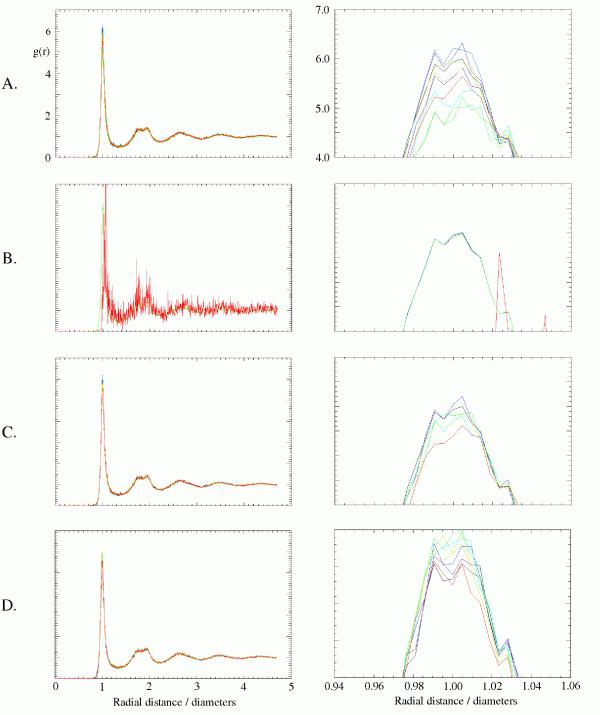
Figure 14A shows the dependence on , the length specified in the filtering procedure. Slightly larger windows are acceptable (, violet, is better than , black, but very similar to , light blue), while too small windows should be avoided ( and , both green). Furthermore, anisotropic windows (above and , blue; , cyan) are preferable, although isotropic windows (, yellow; , orange; , red) still work reasonably well.
Separation Parameter
The parameter is a -element integer vector. Typically, the particles are of radius m and the pixel pitch about m laterally and m axially and thus the particle radius will be around pixels laterally and pixels axially. This suggests .
Since this parameter determines (half) the minimum separation between candidate particle locations and is furthermore used solely to find candidate particle locations, and is not used in the refinement step, it will only determine the number of detected particles. Four cases are shown (Fig. 14B): (green), (black), (blue) and (red), which result in , , and locations respectively. There is only a weak dependence of the particle number and on provided its value is near to the particle radius. This is because the particles are very similar in size; as long as is sufficiently small to capture essentially all of the particles, it has almost no further effect. is clearly too large and therefore excludes many bright peaks, is correspondingly noisier (as it is based on only about % of the particles), but also has its peak shifted upwards by about %, since the analysis finds only a subpopulation of apparently larger particles.
Extent Parameter
The window for the refinement should cover a particle and have an odd integer size. (The latter is for technical, image processing reasons; a window should have a unique central pixel.) In the present example we thus choose instead of .
Figure 14C shows that the exact choice of is not critical as long as the window is large enough: (black) is very similar to the larger (blue), while the smaller (cyan) is inferior. Also an anisotropic window, (green), (yellow) and (red) is possible, again provided it is large enough. This is encouraging, because the size of the window must be chosen by eye from the original image.
Threshold Parameter
The effect of the threshold parameter depends strongly on the image quality. In the present example, Fig. 14D, it is weak. With increasing , the peak height first increases (0.1, black; 0.2, violet; 0.3, blue; 0.4, cyan; 0.5, green; 0.6, light green) since pixels which are likely to be spurious are disregarded (as intended), but then the peak height decreases (0.7, orange; 0.8, red), which is due to a smaller number of ‘valid’ pixels and thus a reduced reliability. A compromise value of about is generally a good choice. We reiterate that this is a local threshold parameter used only the refinement step, and unrelated to any global value such as that described in 6.1.
6.3 An Appraisal of the Centroiding Technique
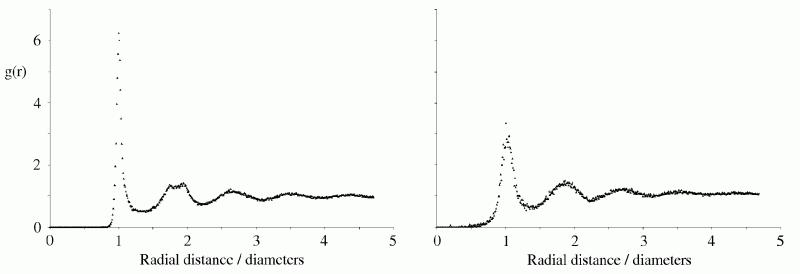
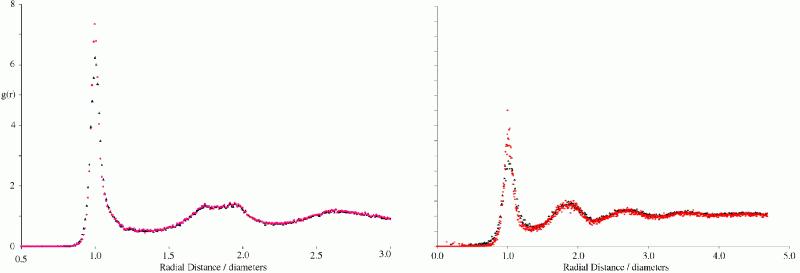
The centroiding technique is clearly successful, for at least some sample conditions. For example the radial distribution functions found from density-matched crystalline samples are convincing [22] and also glassy sediments give good results (Fig. 15, left) even for relatively low quality images (right), for example those obtained at a high capture speed. This figure indicates that these samples give rise to good under the right imaging conditions and suggest that poor quality may be due to the particle location method rather than the sample.
However, this technique also has shortcomings. Usually an accuracy of around nm in the lateral and nm in the axial directions are claimed (for example, [3]). Since these values should depend on the experimental conditions, such as the sample properties, the noise present and how the image was captured, one needs, however, to assess the accuracy of each individual image or, ideally, even each particle location in an image.
The precision with which particle locations have been found can be inferred by plotting the radial distribution function with increasingly smaller bins of radial distance . Assuming the sample contains sufficiently many particles, this will result in a successively sharper peak until the effect of the bin size is no longer seen. Then the bin size is lower than the mean precision to which the particle coordinates are known. This precision is typically around – nm for the samples used in this enquiry, which is at best a lower bound on the typical accuracy of particle locations. However, the precision to which the locations of the centroids of particle brightness are known is not the same as the accuracy with which the particle locations are known, because the centroid of a particle image’s brightness is not necessarily the centre of that particle. This is a consequence of imaging objects that are close in size to the resolution of the microscope. This results in images — or SSFs — of particles which are larger than the particles themselves (Fig. 3) and thus the possibility of overlapping images or SSFs.
Figure 16 shows the case where two particles are so close to one another that their SSFs overlap. In this case, the intensity distribution in the centroid window is clearly asymmetric, and the centroid does not correspond to the true sphere centre. The apparent particle locations are too close together, which explains contributions to at distances less than .
The intensity profiles calculated for two particles with diameter m at contact are shown in figure 17. Between the particles the intensity drops to % of the peak intensity in lateral direction (left). Due to the lower resolution in axial direction, the intensity falls only to around %, if the particles are touching in this direction (right). Depending on the noise level, this might result in no detectable intensity drop between these two particles.
The centroiding technique will thus become unreliable in dense suspensions with a large fraction of touching or close particles. The distance below which particles cannot be resolved any longer depends on the conditions, but is typically below particle diameters.
The fact that the image of a particle can be larger than the particle itself is not specific to confocal microscopy. Since we began investigating this effect, another group has suggested that the corresponding effect for normal bright field microscopy has been responsible for a significant controversy on so-called like-charge attraction (e.g. [92, 93]). It has been demonstrated that the overlap of particle SSFs (our terminology) can result in an apparently decreased or increased separation of particles [63]. The increased separation arises because the intensity profile of a single particle is non-monotonic for brightfield microscopy [59, 63], rather than the (overly simplistic) monotonically decreasing form used here. (Here the Gaussian approximation to the PSF is notably inadequate.)
The problem of SSF overlap can be avoided by using so-called core-shell particles (for example, [2]). They consist of a fluorescent core and a non-fluorescent, but otherwise identical shell. The shell is large enough that the SSFs of touching particles do not significantly overlap. Core-shell particles are, however, more difficult to obtain and necessarily have fewer bright pixels per particle, so that it may be necessary to oversample the images to provide sufficient data to allow the centroiding procedure to work. Care must also be taken regarding polydispersity: the cores can be polydisperse when the shells are not, and vice versa.
We feel it is appropriate here to reiterate that despite the limitations of centroiding, it is certainly an effective and robust technique under suitable circumstances. Its relative simplicity commends its use where possible. In particular, it is reliable in dilute samples, where there is a small probability of SSFs overlapping one another. Furthermore, although we have not dealt in depth with polydisperse samples, the fact that centroiding relies only on the particles being spherically symmetric suggests that it ought to be applicable to these systems.
7 SSF refinement
To address some of the difficulties inherent in the centroid method, we have developed an iterative technique which takes into account the known shape of the SSF, using the ‘Refinement using the Measured SSF’ strategy (Section 4.2.1); we refer to this as SSF refinement.
As before, the raw image is first filtered (Sec. 4) and, as with the centroiding technique, the image searched for local maxima to determine candidate particle locations. Then, instead of taking the centroid of the image intensity distribution within a window surrounding the candidate particle location, an experimentally determined SSF is fitted to the original image in the vicinity of the candidate particle location. This is done, following similar work [94, 95], with a chi-square test [96].
7.1 Determination of the Experimental SSF
The average image of a large number of individual particles would ideally provide an experimental SSF. This requires, however, separate and slow-moving particles, which is difficult to achieve. Furthermore, these particles should be part of the sample of interest to have identical imaging conditions. Only in this case does the SSF properly account for aberrations and imperfections such as those caused by index mismatch between the sample and the immersion oil, i.e. it genuinely reflects the system PSF. This can even depend on, e.g., the depth in the sample. In contrast, a different reference sample may not accurately reflect the image, and thus SSF, of the particle in the sample of interest.
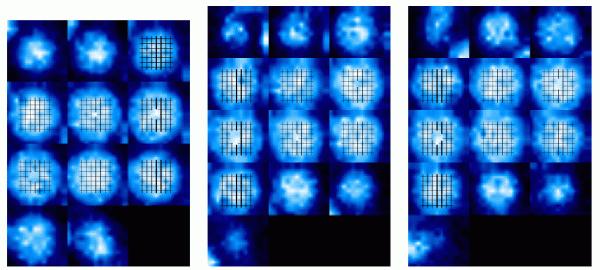
Therefore in most cases only an approximation to the ideal experimental SSF can be determined. A region of appropriate size is considered around each of the (nearest integer) candidate particle locations as determined by the centroiding technique. The number-weighted mean of these images is then taken as the SSF, . The resultant SSF is insensitive to a number- or intensity-weighted average. This average results in an SSF which is broader than the ‘true’ SSF, but this seems not to affect significantly the quality of the obtained particle locations.
7.2 Determining Particle Locations
Having determined the SSF experimentally, we have established how the vicinity of each particle ought to look. We can now refine the (nearest integer) candidate particle locations. Within a window around these locations, we search for the location which best matches the SSF. The size of this window is chosen to match the accuracy of the centroiding procedure, typically less than pixels in each direction: in the worst cases, the first peak of begins to rise at about % of one diameter, , i.e. contacting particles are apparently about too close and their locations are thus wrong by about , or about pixels, since the diameter corresponds to typically – pixels. For particularly noisy images, this value should be increased.
The experimentally determined SSF, , is expressed in terms of its own (integer) coordinates , and with , and . The detected image is also known only at integer locations. The image of particle is extracted from this: . We have chosen to change to the double prime coordinates which are measured within particle ’s own window, allowing straightforward comparison with ; coordinates in this system are straightforwardly related to the particle’s global coordinate . For a meaningful comparison between and , they must be normalised consistently while exploiting the full dynamic range. This can be achieved by normalising the SSF to occupy the entire range of greyscales and then scaling the image of each feature, , such that its peak height matches that of the SSF. Noise renders this an approximation, but seems not to significantly affect the procedure.
The chi-square hypersurface of particle as a function of the overlap coordinates , is then:
where the sum runs over all , , and (i.e. every pixel value in the SSF is compared with every value in the current particle ‘image’) and , and take the values , and with the iteration grid size .222The grid coordinates run etc. in the SSF/particle (‘double prime’) coordinate system, or in the global (‘single prime’) coordinate system. (This makes it impossible to extract features which lie within half of the iteration grid size of the edge, as for the centroiding technique.) The uncertainty associated with each point, , is assumed to be constant, although photon counting statistics suggests an intensity dependence. Again, we obtain good results despite this approximation.
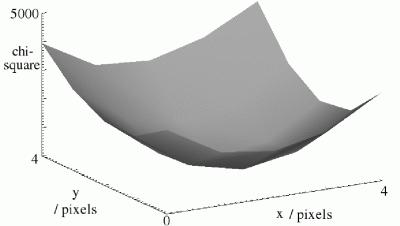
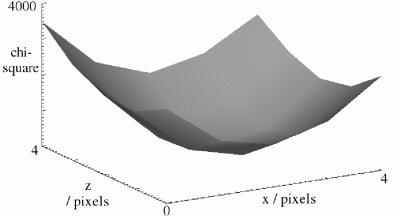
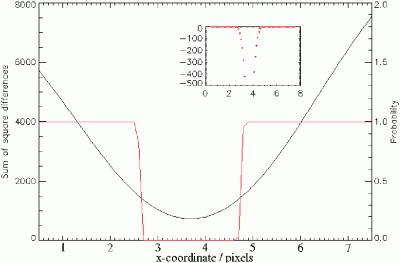
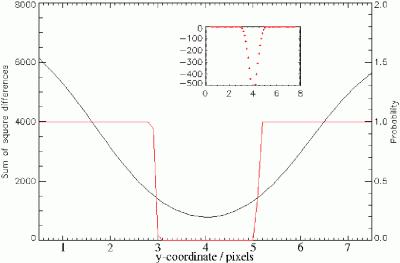
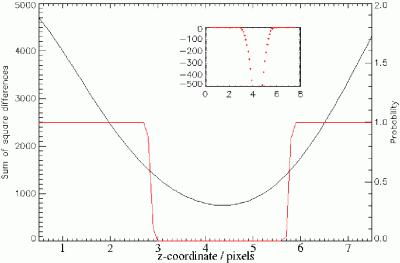
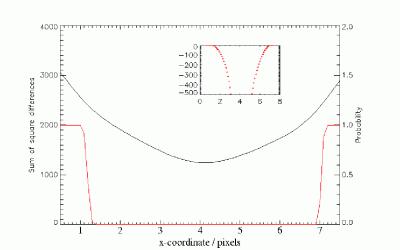
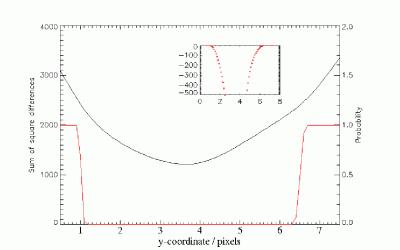
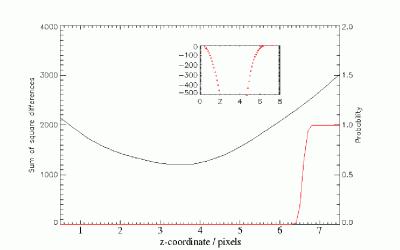
The chi-square values display a minimum near to the genuine particle location (Fig. 18), which, due to the different resolution, is usually shallower in the axial () than in the lateral (, ) directions. Everything so far has involved integer coordinates; for subpixel resolution, we need some form of interpolation. To locate the minimum to sub-pixel accuracy, we consider two interpolation schemes.
The first is to produce a fit to the SSF which is overlain on the image and moved in any direction. This not only requires a fit function, which is in general not available, but also leads to the ambiguity that a variation in can either be due to a change in the quality of the fit to the image, which is desired, or to a change in the quality of the interpolation of the SSF.
The strategy we adopt here is different. We determine the minimum by interpolating the surface in the three directions (, , ) independently, typically using the five data points closest to the minimum in each direction. By repeatedly interpolating for a large number of points lying within half a pixel of the minimum of the array, we obtain an array of sub-pixel estimates to . The lowest-valued entry in this list gives the best correspondence between the measured SSF and the image of the feature. A precision of one hundredth of a pixel is more than necessary, but still computationally tolerable. A crude error estimate can also be made by estimating the error in the interpolation; one popular interpolation algorithm, POLINT, does this by default [97, §3.1].
7.3 Appraisal of the SSF refinement technique
We illustrate the result of a SSF refinement using two examples (Fig. 19); further examples can be found in the literature [41, 42]. They are based on the previously used data set (Fig. 15). In the case of the high quality image (Fig. 19 (left)), the obtained is reassuringly similar to the one from the centroiding technique. The first peak begins to rise at very slightly higher , about diameters, which is reasonable, because the polydispersity of the sample is about %. In addition to the sharpening, the height of the first peak is increased by about %, which indicates that even a relatively satisfactory analysis can be improved by the SSF refinement technique.
The situation is different for an image of mediocre quality (Fig. 19, right). Here the obtained by the centroiding technique is quite poor. In contrast, the SSF refinement technique results in a with a first peak which is sharper, it begins to rise at about diameters (as opposed to diameters for the from the centroiding technique), and higher, by more than %. We also notice the occurrence of some noise at very small ; since is calculated by dividing by , this can be caused by a very small number of erroneous particle locations. (As we will explain below, these can be identified.) The SSF refinement technique results, in particular for sub-optimal data, in an improved quality of particle location.
SSF refinement works partly because it searches neighbouring pixels, that is, it does not assume that the centroid coordinates are correct to the nearest pixel. Noise in the data means that, despite the noise filtering step, the brightest point of a particle’s image may not be the nearest to its true position. This might also apply to dilute suspensions with fast-moving particles [23]. Since the centroiding procedure uses the brightest point as the nearest-pixel estimate, this leads to an error of at least one pixel in some cases. An iterative version of the centroiding procedure, should show some of the improvement we have found. This requires goodness of fit information for each individual particle, which we provide here.
In we have a measure for the accuracy of the location of each individual particle. We can thus not only compare the quality of different images, but also individual particle locations. It is important to remember that any particle location scheme relies on a priori knowledge of the sizes and shapes of the particles. The less we know about any given particle (for example, how much its radius differs from the mean), the less successful the particle location is likely to be. This will be reflected in the value, which can be obtained on an individual particle basis. Whether a poor value is due to a poorly-determined location or a poor match between the particle image and the target SSF has then to be investigated. This information can be used when calculating and interpreting structural properties, such as the radial distribution function , based on the particle locations (Sec. 7.4).
Since SSF Refinement is more complex than centroiding, it requires more processing time, by up to an order of magnitude. However, the analysis can still reasonably be performed using routines which were written in the IDL programming language without particular attention to efficiency, and on a typical desktop computer (AMD Athlon 3800+ 2.4Ghz, 2Gb RAM, running Windows XP). For a typical image ( voxels, containing about particles) and standard parameters (, iteration grid size pixels) around seconds and just over three minutes are required for the centroiding and SSF Refinement, respectively. (These times include the noise filtering, which has to be done prior to both procedures, and in the example given takes around half a minute.) The error analysis, which will be described in the following section, is of similar computational complexity, but runs more slowly due to the slow routine used for converting the value to a probability (Equation 11).
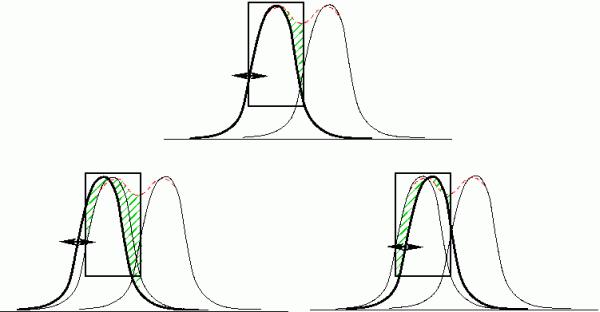
Despite its advantages, SSF refinement does not wholly overcome the problem of close particles (Fig. 20). We consider three cases: First, even if the particle location is determined correctly (top) and the SSF (thick line) is thus aligned with the particle’s image (thin lines), the overlap with the neighbouring particle leads to a non-zero contribution to (shaded area) in the window within which it is calculated (rectange). This is not necessarily important; the analysis relies only on having a minimum at the particle location. Second, if the particle location, and thus the SSF, is moved away from the neighbouring particle (left), then the contribution to (shaded area) is increased and this location would thus quite rightly be rejected by the SSF refinement procedure. Third, if the particle location is moved closer to the neighbouring particle (right), compared to the correct location the initially shaded area now shrunk while a new shaded area is created on the opposite, left side of the SSF. How these two effects balance, and thus how changes, depends on the precise shape of the SSF and the particle image. Nevertheless, this illustrates that the minimum in might shift toward the neighbouring particle. This is similar to the mentioned effect of close particles on the centroiding technique, although we expect it to be less significant for the SSF refinement technique.
There are several possibilities how one could deal with this problem. Knowledge of the SSF allows us to determine the intensity profile for any set of particles and to fit several particle locations simultaneously. However, this is computationally very intensive. A less demanding approach would be to use on a pixel level and develop a strategy to identify neighbouring particles by their anisotropic (shaded areas in Fig. 20) and then either disregard these pixels which are supposedly affected by a neighbouring particle or use (the minimum in) their number to determine the particle location.
7.4 Error Analysis
We showed that contains information on the reliability of each particle coordinate. In addition, we can determine the accuracy of the location in an arbitrary direction. The shape of the hypersurface reveals how sensitive this value is to variations in the fit parameters, and these can be used to infer the error in these quantities.
Recent papers have suggested a means of error determination based on the mean variation between a particle’s presumed stationary location determined in a series of ‘identical’ image captures [21, 98], i.e. precision. In contrast, we aim for a measure which is both measured at the single particle level and genuinely quantifies accuracy rather than precision.
First, we consider our expectation for the absolute value of . This depends not only on the uncertainty in each data point, but also the number of degrees of freedom, ; it is usual to define the reduced chi-square value . This value is expected to take the value if the data are described well by the model, and the uncertainties are representative [96].
To obtain an estimate for the errors in the fit parameters, i.e. the particle locations, we consider the shape of the hypersurface. There are established means of estimating the error in the position of the minimum [96, 94, 95, 97, 99, 100]. If we neglect any error in sampling the surface, that is, assume perfect interpolation, then the error is found from the curvature of the surface. It is customary to take the error in a parameter as being the change in its value for which has increased by unity, . This assumes that the experimentally determined minimum of is unity, . If the model is appropriate but the noise is unknown, then the condition can be recast: the error in is found when it has risen by a value equal to , i.e. . Crucially, it is therefore not necessary to estimate the uncertainty in each pixel intensity value. Moreover, since and are related by the degrees of freedom, , which is constant within a given experiment, we can continue using .
An increase gives the probability of finding the position between the genuine centre and that location of %, that is, at the one confidence level. This follows from the chi-square cumulative distribution [101]:
| (11) |
Values of are tabulated in reference [97, §14.5].
Using this relation, we can calculate the probability that the particle centre lies between the minimum of the -hypersurface and any point on that surface, i.e. for any . The -hypersurface can therefore be mapped to a probability surface.
A probability distribution created from the -hypersurface is shown in figure 21 (black curves, left-hand axis) as cuts through a particle in -, - and -direction (from top). Also shown (red) is the cumulative probability that a particle centre will be found somewhere between the minimum of and that location. We can hence infer an error bound; the width of the region of the cumulative probability curve which has height less than , the ‘ point’. It is about nm in the lateral direction, and about nm in axial direction.
We can represent these more informatively. Figure 22 shows the entire particle as viewed in the -, - and -planes (top to bottom). The results from the centroid procedure are overlain: the centre and an indication of the particle size are shown (left, red dot and circle), as well as the particle size as determined by light scattering (green circle; both circles centred on centroid location). The black grid represents those points where the cumulative probability is greater than the value () (the probabilities, according to the prescription given above, are calculated on a grid), as this highlights (in the middle) the region below the value, which defines the likely particle location. For clarity, we have extracted the locations which denote the perimeter of the gap in the grid, and fitted ellipses through these (right). These represent the confidence level for the particle locations. These are not symmetric, in particular, they are elongated along the axial direction, as we may have expected. Furthermore, although these look believable when compared with the original confocal image (the blue-white background), neighbouring slices also contribute to the determined location, making subjective conclusions difficult. A series of slices is shown in figure 23; these are cuts through -, -, and -directions from top to bottom. They are combined in a three-dimensional representation in figure 24, which summarizes the results obtained by the SSF refinement technique. Ellipses representing the confidence limit on the particle location (right) is compared to the contour surface based on slices through the raw image of a particle (left).
For comparison we now present the corresponding results for an image of lower quality, but similar sample, PMMA spheres with radius m in cis-decalin (Figs. 25 – 27). The error bounds calculated based on the surface (Fig. 25) are about – nm in lateral and about nm in axial direction. These are about double the values found for the good quality image (Fig. 21). The axial uncertainty is determined from one direction only (bottom), because the probability does not rise sufficiently within the window studied (though the window size can be increased, care must be taken not to include contributions from neighbouring particles). The lower image quality is also reflected in the larger regions of likely particle locations, quantified in the confidence level for the particle locations (Figs. 26 and 27), which are significantly larger than for the good quality image (Figs. 22 and 23).
The different curvatures of the -hypersurface for the good (Fig. 21) and low (Fig. 25) quality image contain the important information which allows us to compare the accuracy of the coordinates extracted from similar systems. When comparing systems which are optically different (e.g. [7]), a measure similar to this one can thus be used.
On a quantitative level, the error bounds are rather large compared with those cited by other studies; about – nm. The systematic errors probably explain this: The error we have quantified above is the inherent error arising from the noise, SSF overlap, and other sources of error. However, to assume that we can use as the error criterion rather than the usual unity is only justified if the data are well-modelled by the SSF. When this is not true, the relative increase in is overestimated, and correspondingly the error overestimated. In this paper the experimental SSF is determined as an average which is necessarily broader than its true form; this certainly gives rise to a systematic error. Nonetheless, we feel that the error determined as described above is a genuine and informative measure of the error in the particle locations. It is indicative of the shape of the confidence contours, and gives a compelling comparison of the accuracy between different particles.
The foregoing analysis was performed without the need for an estimate of , the error on each pixel’s intensity. We can, however, infer what the mean of this value must be, supposing the model is correct, i.e. the extracted SSF is representative. For the particle shown in Figures 21-24, the minimum of the surface was about per pixel. Neglecting any intensity dependence of , for example due to photon-counting related noise, this gives an estimate of the mean noise in each pixel . Figure 28 shows a one-dimensional cut through the raw data for the particle shown in Figures 21-24, along with an error bar which to the eye is approximately the correct size. Its size is in total, about half the size implied by the above calculation, revealing as expected that systematic errors contribute to the surface.
The information on the reliability of particle locations is furthermore very useful in those cases where it is not necessary to consider all of the particles in a sample. Then only those particles can be taken into account which are known, via , to be reliably located. However, care must be taken when discarding information; a discarded particle may be accurately located but have a poor value for another reason, for example, if it has a different size. There is, for example, a clear improvement in caused by considering only particles with better than a certain value (Fig. 29, showing the same sample as on the left in Fig. 15). Since these particles match the SSF best, they must both be located to high precision and similar to the expected shape.
In some cases, it may be of interest to specify an SSF which corresponds to a sub-population within the sample, for instance relatively small particles. SSF refinement with discrimination would then preferentially select a sub-population, in this case by ignoring larger particles. Due to the inherent variability in the images of particles, this is realistic only for quite differently-sized particle.
Moreover, we can apply different SSFs representing different shapes or sizes of particle and, in particular, one may be interested in replacing the SSF with the PSF. We noted earlier the similarity between deconvolution of instances of the SSF and those of the PSF. Thinking along these lines suggests using the procedure for finding instances of the SSF for locating instances of the PSF. If the system under study consists of point-like visible components, then the SSF of each is identical to the PSF. In a system matching this description, for example one comprising particles with a very small fluorescent core, the SSFs would not overlap and SSF refinement would be accurate without approximation to within the uncertainty of the imaging system.
8 Conclusion
Confocal microscopy has become a powerful tool for studying colloidal systems, in particular to obtain quantitative information on the level of individual particles. Here we have reviewed and extended methods for particle location in colloidal systems with a special emphasis on dense systems. We have considered the different steps finally leading to reliable particle coordinates and the associated errors; from optimum image formation to the initial finding of candidate particle locations and the subsequent refinement by both centroiding and SSF refinement, and ultimately to a detailed, novel error analysis which provides confidence regions for individual particles.
Particular emphasis was put on image analysis, where we focused on two important methods. First, we reviewed the centroiding technique, which is widely used in colloid science [47], but have maintained generality by outlining some other feature location strategies. Second, we have introduced a technique previously unreported in colloidal studies: SSF refinement. This not only optimises particle coordinates, but also allows for a detailed error analysis by means of the measure. It permits a quantitative comparison between different systems and, furthermore, is sufficiently general to be useful in most feature extraction applications. Moreover, we have demonstrated how to locate particles reliably, albeit not necessary precisely, under adverse imaging conditions, such as dense colloidal suspensions where features may overlap. The confidence intervals based on a analysis are instrumental in achieving this.
Acknowledgments
We are grateful to the UK Engineering and Physical Sciences Research Council (EPSRC), the Deutsche Forschungsgemeinshaft (DFG) (Collabarative Research Centre SFB-TR6, Project Section C7) and to Rhodia Research and Technology (Rhodia – Centre de Recherches et Technologies d’Aubervilliers) for support, to Andrew Schofield in The University of Edinburgh School of Physics for supplying the particles and for helpful discussions, and to Eric Weeks for providing the three-dimensional version of the centroid-based particle tracking software [52]. We thank Jan Skov Pedersen, Wilson Poon, and Mark Haw for helpful discussions.
References
- [1] J. B. Pawley (Ed.), Handbook of Biological Confocal Microscopy, 3rd Edition, Springer-Verlag New York Inc., 2006.
- [2] A. van Blaaderen, P. Wiltzius, Real-space structure of colloidal hard-sphere glasses, Science 270 (1995) 1177–1179.
- [3] E. R. Weeks, J. C. Crocker, A. C. Levitt, A. B. Schofield, D. A. Weitz, Three-dimensional direct imaging of structural relaxation near the colloidal glass transition, Science 287 (2000) 627–631.
- [4] E. R. Weeks, D. A. Weitz, Subdiffusion and the cage effect studied near the colloidal glass transition, Chemical Physics 284 (2002) 361.
- [5] W. K. Kegel, A. van Blaaderen, Direct observation of dynamical heterogeneities in colloidal hard-sphere suspensions, Science 287 (2000) 290–293.
- [6] U. Gasser, A. B. Schofield, D. A. Weitz, Local order in a supercooled colloidal fluid observed by confocal microscopy, J. Phys.: Condens. Matter 15 (2003) S375–S380.
- [7] J. C. Conrad, F. W. Starr, D. A. Weitz, Weak correlations and local density and dynamics near the glass transition, J. Phys. Chem. B 109 (2005) 21235–21240.
- [8] R. E. Courtland, E. R. Weeks, Direct visualization of ageing in colloidal glasses, J. Phys.: Condens. Matter 15 (2003) S359–S365.
- [9] G. C. Cianci, R. E. Courtland, E. R. Weeks, Invariance of structure in an aging colloidal glass, Vol. 832, AIP Conf. Proc.: Flow dynamics: The Second International Conference on Flow Dynamics, 2006.
- [10] G. C. Cianci, R. E. Courtland, E. R. Weeks, Correlations of structure and dynamics in an aging colloidal glass, Solid State Comm. 139 (2006) 599–604.
- [11] N. B. Simeonova, W. K. Kegel, Gravity-induced aging in glasses of colloidal hard spheres, Phys. Rev. Lett. 93 (2004) 035701.
- [12] P. Habdas, D. Schaar, A. C. Levitt, E. R. Weeks, Forced motion of a probe particle near the colloidal glass transition, Europhys. Lett. 67 (2004) 477–483.
- [13] K. N. Pham, A. M. Puertas, J. Bergenholtz, S. U. Egelhaaf, A. Moussaïd, P. N. Pusey, A. B. Schofield, M. E. Cates, M. Fuchs, W. C. K. Poon, Multiple glassy states in a simple model system, Science 296 (2002) 104–106.
- [14] N. B. Simeonova, R. P. A. Dullens, D. G. A. L. Aarts, V. W. A. de Villeneuve, H. N. W. Lekkerkerker, W. K. Kegel, Devitrification of colloidal glasses in real space, Phys. Rev. E 73 (2006) 041401.
- [15] P. A. Smith, Colloidal gels under oscillatory shear, Ph.D. thesis, University of Edinburgh School of Physics (2004).
- [16] A. D. Dinsmore, D. A. Weitz, Direct imaging of three-dimensional structure and topology of colloidal gels, J. Phys.:Condens. Matter 14 (2002) 7581–7597.
- [17] P. Varadan, M. J. Solomon, Direct visualization of long-range heterogeneous structure in dense colloidal gels, Langmuir 19 (2003) 509–512.
- [18] Y. Gao, M. Kilfoil, Experimental determination of order in non-equilibrium solids using colloidal gels, J. Phys.: Condens. Matter 16 (2004) S5191–S5202.
- [19] R. Sanchez, P. Bartlett, Equilibrium cluster formation and gelation, J. Phys.: Condens. Matter 17 (2005) S3551–S3556.
- [20] A. D. Dinsmore, V. Prasad, I. Y. Wong, D. A. Weitz, Microscopic structure and elasticity of weakly aggregated colloidal gels, Phys. Rev. Lett. 96 (2006) 185502.
- [21] C. J. Dibble, M. Kogan, M. J. Solomon, Structure and dynamics of colloidal depletion gels: coincidence of transitions and heterogeneity, Phys. Rev. E 74 (2006) 041403.
- [22] A. I. Campbell, P. Bartlett, Fluorescent hard-sphere polymer colloids for confocal microscopy, J. Colloid Interface Sci. 256 (2002) 325–330.
- [23] C. P. Royall, M. E. Leunissen, A. van Blaaderen, A new colloidal model system to study long-range interactions quantitatively in real space, J. Phys.: Condens. Matter 15 (2003) S3581–S3596.
- [24] A. Yethiraj, A. van Blaaderen, A colloidal model system with an interaction tunable from hard sphere to soft and dipolar, Nature 421 (2003) 513–517.
- [25] M. Leunissen, C. Christova, A.-P. Hynninen, C. Royall, A. Campbell, A. Imhof, M. Dijkstra, R. van Roij, A. van Blaaderen, Ionic colloidal crystals of oppositely charged particles, Nature 437 (2005) 235–240.
- [26] A. I. Campbell, V. J. Anderson, J. S. van Duijneveldt, P. Bartlett, Dynamical arrest in attractive colloids: the effect of long-range repulsion, Phys. Rev. Lett. 94 (2005) 208301.
- [27] U. Gasser, E. R. Weeks, A. B. Schofield, P. N. Pusey, D. A. Weitz, Real space imaging of nucleation and growth in colloidal crystallization, Science 292 (2001) 258–262.
- [28] E. H. A. de Hoog, W. K. Kegel, A. van Blaaderen, H. N. W. Lekkerkerker, Direct observation of crystallization and aggregation in a phase-separating colloid-polymer suspension, Phys. Rev. E 64 (2001) 021407.
- [29] N. A. M. Verhaegh, J. S. van Duijneveldt, A. van Blaaderen, H. N. W. Lekkerkerker, Direct observation of stacking disorder in a colloidal crystal, J. Chem. Phys. 102 (1994) 1416–1420.
- [30] A. van Blaaderen, R. Ruel, P. Wiltzius, Template-directed colloidal crystallization, Nature 385 (1997) 321–324.
- [31] A. van Blaaderen, P. Wiltzius, Growing large, well-oriented colloidal crystals, Adv. Mater. 9 (1997) 833–835.
- [32] A. van Blaaderen, J. P. Hoogenboom, D. L. J. Vossen, A. Yethiraj, A. van der Horst, K. Visscher, M. Dogterom, Colloidal epitaxy: playing with the boundary conditions of colloidal crystallization, Faraday Discuss. 123 (2003) 107–119.
- [33] J. P. Hoogenboom, P. Vergeer, A. van Blaaderen, A real-space analysis of colloid crystallization in a gravitational field at a flat bottom wall, J. Chem. Phys. 119 (2003) 3371–3383.
- [34] R. P. A. Dullens, D. G. A. L. Aarts, W. K. Kegel, Direct measurement of the free energy by optical microscopy, PNAS 103 (2006) 529–531.
- [35] D. Derks, H. Wisman, A. van Blaaderen, A. Imhof, Confocal microscopy of colloidal dispersions in shear flow using a counter-rotating cone-plate shear cell, J. Phys.: Condens. Matter 16 (2004) S3917–S3927.
- [36] R. Besseling, E. R. Weeks, A. B. Schofield, W. C. K. Poon, Three-dimensional imaging of colloidal glasses under steady shear, Phys. Rev. Lett. 99 (2007) 028301.
- [37] L. Isa, R. Besseling, E. R. Weeks, W. C. K. Poon, Experimental studies of the flow of concentrated hard sphere suspensions into a constriction, J. Phys.:Conference Series 40 (2006) 124–132.
- [38] J. Brujić, Experimental study of stress transmission through particulate matter, Ph.D. thesis, University of Cambridge (2004).
- [39] J. Brujić, S. F. Edwards, D. V. Grinev, I. Hopkinson, D. Brujić, H. A. Makse, 3d bulk measurements of the force distribution in a compressed emulsion system, Faraday Discussions 123 (2003) 207–220.
- [40] J. Brujić, S. F. Edwards, I. Hopkinson, H. A. Makse, Measuring the distribution of interdroplet forces in a compressed emulsion system, Physica A 327 (2003) 201–212.
- [41] M. C. Jenkins, Quantitative confocal microscopy of dense colloidal systems, Ph.D. thesis, University of Edinburgh School of Physics, available at http://hdl.handle.net/1842/1347 (2006).
- [42] M. C. Jenkins, M. D. Haw, W. C. K. Poon, S. U. Egelhaaf, In preparation.
- [43] C. A. Murray, D. G. Grier, Video microscopy of monodisperse colloidal systems, Annu. Rev. Phys. Chem. 47 (1996) 421–462.
- [44] M. H. Chestnut, Confocal microscopy of colloids, Curr. Opin. Colloid Interface Sci. 2 (1997) 158–161.
-
[45]
E. R. Weeks, How does a confocal microscope work?
http://www.physics.emory.edu/~weeks/confocal/. - [46] D. Semwogerere, E. Weeks, Encylopedia of Biomaterials and Biomedical Engineering, Taylor and Francis, 2005, Ch. Confocal Microscopy.
- [47] J. C. Crocker, D. G. Grier, Methods of digital video microscopy for colloidal studies, J. Colloid Interface Sci. 179 (1996) 298–310.
- [48] A. D. Dinsmore, E. R. Weeks, V. Prasad, A. C. Levitt, D. A. Weitz, Three-dimensional confocal microscopy of colloids, Applied Optics 40 (2001) 4152–4158.
- [49] P. Habdas, E. R. Weeks, Video microscopy of colloidal suspensions and colloidal crystals, Curr. Opin. Colloid Interface Sci. 7 (2002) 196–203.
- [50] V. Prasad, D. Semwogerere, E. R. Weeks, Confocal microscopy of colloids, J. Phys.: Cond. Mat. 19 (2007) 113102.
- [51] E. H. C. Bromley, I. Hopkinson, Confocal microscopy of a dense particle system, J. Colloid Interface Sci. 245 (2002) 75–80.
-
[52]
E. R. Weeks, Particle tracking tutorial.
http://www.physics.emory.edu/~weeks/idl/tracking.html. - [53] M. Raffel, C. Willert, J. Kompenhans, Particle Image Velocimetry–a practical guide, Springer-Verlag, Berlin Heidelberg, 1998.
- [54] R. E. Thompson, D. R. Larson, W. W. Webb, Precise nanometer localization analysis for individual fluorescent probes, Biophys. J. 82 (2002) 2775–2783.
- [55] R. J. Cherry, P. R. Smith, I. E. G. Morrison, N. Fernandez, Mobility of cell surface receptors: a re-evaluation, FEBS Lett. 430 (1998) 88–91.
- [56] M. J. Saxton, K. Jacobson, Single-particle tracking: applications to membrane dynamics, Annu. Rev. Biophys. Biomol. Struct. 26 (1997) 373–99.
- [57] T. R. Ayres, Positional uncertainties and detection limits of ROSAT x-ray sources, Astrophys J. 608 (2004) 957–970.
- [58] E. D. Feigelson, G. J. Babu, Statistical Challenges in Modern Astronomy, New York: Springer, 1992.
- [59] E. Hecht, Optics, 2nd Edition, Addison-Wesley, 1987.
- [60] M. S. Elliot, The optical microscopy of colloidal suspensions, Ph.D. thesis, University of Edinburgh School of Physics (1999).
- [61] T. Wilson, Confocal Microscopy, Academic Press, 1990.
- [62] M. Kerker, Scattering of Light, New York, Academic, 1969.
- [63] J. Baumgartl, C. Bechinger, On the limits of digital video microscopy, Europhys. Lett. 71 (2005) 487–493.
- [64] M. S. Elliot, B. T. F. Bristol, W. C. K. Poon, Direct measurement of stacking disorder in hard-sphere colloidal crystals, Physica A 235 (1997) 216–223.
- [65] M. S. Elliot, W. C. K. Poon, Conventional optical microscopy of colloidal suspensions, Adv. Colloid Interface Sci. 92 (2001) 133–194.
- [66] M. S. Elliot, S. B. Haddon, W. C. K. Poon, Direct observation of pre-critical nuclei in a metastable hard-sphere fluid, J. Phys.: Condens. Matter 13 (2001) L553–L558.
- [67] W. Lukosz, Optical systems with resolving powers exceeding the classical limit, J. Opt. Soc. Am. 56 (1966) 1463–1472.
- [68] R. C. Gonzalez, R. E. Woods, Digital Image Processing, Addison-Wesley, 1992.
- [69] H. Nyquist, Certain topics in telegraph transmission theory, Trans. AIEE 47 (1928) 617–644.
- [70] C. E. Shannon, Communication in the presence of noise, Proc. Institute of Radio Engineers 37 (1949) 10–21.
- [71] M. D. Haw, Jamming, two-fluid behavior, and self-filtration in concentrated particulate suspensions, Phys. Rev. Lett. 92 (2004) 185506.
- [72] A. B. Schofield, Private communication (2006).
- [73] G. D’Agostini, Bayesian inference in processing experimental data: principles and basic applications, Rep. Prog. Phys. 66 (2003) 1383–1419.
- [74] V. Dose, Bayesian inference in physics: case studies, Rep. Prog. Phys. 66 (2003) 1421–1461.
- [75] M. K. Cheezum, W. F. Walker, W. H. Guilford, Quantitative comparison of algorithms for tracking single fluorescent particles, Biophys. J. 81 (2001) 2378–2388.
- [76] J. Bolinder, On the accuracy of a digital particle image velocimetry system., Technical Report ISSN 0282-1990, Institutionen för Värme- och Kraftteknik, Lund Institute of Technology (1999).
- [77] P. V. C. Hough, Method and means for recognizing complex patterns, U. S. Patent 3069654 (1962).
- [78] R. O. Duda, P. E. Hart, Use of the Hough transform to detect lines and curves in pictures, Communs Ass. Comput. Mach. 15 (1972) 11–15.
- [79] D. H. Ballard, Generalizing the Hough transform to detect arbitrary shapes, Pattern Recogn 13 (1981) 111–122.
- [80] S. Warr, J.-P. Hansen, Relaxation of local density fluctuations in a fluidized granular medium, Europhys. Lett. 36 (1996) 589–594.
- [81] S. Warr, G. T. H. Jacques, J. M. Huntley, Tracking the translational and rotational motion of granular particles: Use of high-speed photography and image processing, Powder Tech. 81 (1994) 41–56.
- [82] F. P. Preparata, M. I. Shamos, Computational Geometry: An Introduction, Springer-Verlag New York Inc., 1993.
- [83] R. E. Elkins, G. R. Jackman, R. R. Johnson, E. R. Lindgren, Evaluation of stereoscopic trace particle records of turbulent flow fields, Rev. Sci. Instrum. 48 (1977) 738–746.
- [84] R. G. Racca, J. M. Dewey, A method for automatic particle tracking in a three-dimensional flow field, Exp. Fluids 6 (1988) 25–32.
- [85] C. E. Willert, M. Gharib, Digital particle image velocimetry, Exp. Fluids 10 (1991) 181–193.
- [86] J. Westerweel, Digital particle image velocimetry–theory and application, Ph.D. thesis, Technical University of Delft (1993).
- [87] T. Schlicke, Ph.D. thesis, University of Edinburgh School of Physics (2002).
- [88] Y. Sugii, S. Nishio, T. Okuno, K. Okamoto, A highly accurate iterative PIV technique using a gradient method, Meas. Sci. Technol. 11 (2000) 1666–1673.
- [89] G. Cao, X. Yu, Accuracy analysis of a Hartmann-Shack wavefront sensor operated with a faint object, Optical Engineering 33 (1994) 2331–2335.
- [90] S. Thomas, Optimized centroid computing in a Shack-Hartmann sensor, Proc. SPIE 5490 (2004) 1238–1246.
- [91] J. Ares, J. Arines, Influence of thresholding on centroid statistics: full analytical description, Appl. Opt. 43 (2004) 5796–5804.
- [92] D. G. Grier, Y. Han, Anomalous interactions in confined charge-stabilized colloid, J. Phys.: Condens. Matter 16 (2004) S4145–S4157.
- [93] J. Baumgartl, J. L. Arauz-Lara, C. Bechinger, Like charge attraction in confinement: Myth or truth?, Soft Matter 2 (2006) 631–635.
- [94] R. A. Arndt, M. H. MacGregor, Methods in Computational Physics, Vol. 6, Academic Press, 1966, Ch. Nucleon-nucleon phase shift analyses by chi-square minimization, pp. 253–294.
- [95] N. Bobroff, Position measurement with a resolution and noise-limited instrument, Rev. Sci. Instrum. 57 (1986) 1152–1157.
- [96] P. R. Bevington, Data Reduction and Error Analysis for the Physical Sciences, McGraw-Hill, 1969.
- [97] W. H. Press, S. A. Teukolsky, W. T. Vetterling, B. P. Flannery, Numerical Recipes in C++, 2nd Edition, Cambridge University Press, 2002.
- [98] T. Savin, P. S. Doyle, Static and dynamic errors in particle tracking microrheology, Biophys. J. 88 (2005) 623–638.
- [99] M. Lampton, B. Margon, S. Bowyer, Parameter estimation in x-ray astronomy, Astrophys. J. 208 (1976) 177–190.
- [100] J. S. Pedersen, Analysis of small-angle scattering data from colloids and polymer solutions: modeling and least-squares fitting, Adv. Colloid Interface Sci. 70 (1997) 171–210.
- [101] H. Cramér, Mathematical Methods of Statistics, Princeton University Press, 1946.


