Scanning optical homodyne detection of high-frequency picoscale resonances in cantilever and tuning fork sensors
Abstract
Higher harmonic modes in nanoscale silicon cantilevers and microscale quartz tuning forks are detected and characterized using a custom scanning optical homodyne interferometer. Capable of both mass and force sensing, these resonators exhibit high-frequency harmonic motion content with picometer-scale amplitudes detected in a 2.5 MHz bandwidth, driven by ambient thermal radiation. Quartz tuning forks additionally display both in-plane and out-of-plane harmonics. The first six electronically detected resonances are matched to optically detected and mapped fork eigenmodes. Mass sensing experiments utilizing higher tuning fork modes indicate sensitivity enhancement over fundamental mode operation.
Since its invention in 1986 the Atomic Force Microscope (AFM) has relied on the deflection of a spring-mass system, originally engineered as a cantilever terminated with a sharp tip,Binnig and Quate AFM 1986 responding to very small external forces exerted between the tip and probed surface. The introduction in 1991 of the frequency-modulated AFM scheme allowed enhanced force sensitivity without a trade-off in operating speed.Albrecht FM AFM 1991 Gains in measurement speeds were achieved by increasing the fundamental resonant frequency from the initial Hz to Hz. The sensor spring constants in use have increased from the originally soft 0.01 N/m for silicon micromachined cantilevers to much stiffer 3000 N/m quartz tuning fork devices. The latter proved to be a higher-speed and high- alternative, possessing intrinsic piezoelectric properties characteristic to quartz crystals.Giessibl tuning fork 1998 The piezoelectric response of the fork, linking the mechanical motion to an electric signal, greatly simplifies AFM design by allowing a compact and simple readout. The tuning fork performance is remarkable both at room temperature as well as in cryogenic environments.Giessibl atomic resolution 2000 In most cases the mechanical excited motion of the fork is the fundamental symmetric in-plane mode.Rossing92 In contrast to the fundamental mode, higher harmonics are predicted to carry information on the interaction between tip and sample.Durig 2000 Electronically detected higher harmonics have led to subatomic AFM features Hembacher 2004 and increased measurement speed.Liu 2003 Recently, the use of higher harmonic detection in cantilever type sensors demonstrated the capability to measure local sample stiffnessOzgur Sahin high mode cantilever and the contact potential of C60 adsorbed on graphite.Sadewasser06 Mass detection in cantilever based measurements was shown to benefit from enhanced sensitivity at higher modes.Braun05 Thus, quantitative knowledge of the higher harmonic content of cantilever and tuning fork sensors directly feeds into the design of next-generation nanoprobes.

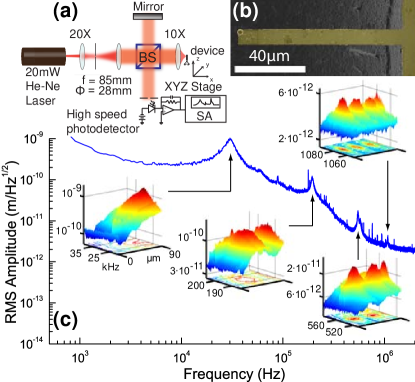
In this Letter, we present picoscale characterization based on a scanning homodyne interferometric scheme allowing detection of high-frequency oscillation modes in micromachined devices. Interferometric detection of cantilever motion has been shown to possess sub-nm sensitivity in static and low-frequency AFM cantilever deflectionErlandsson88 ; Rugar88 ; Schonenberger89 as well as in higher bandwidth mass sensing applications.Lavrik 2003 Here, a free space Michelson interferometer [Fig. 1(a)], with m-scale spot size in the active arm, enables pm-scale oscillatory motion detection up to 200 MHz. A coherent and polarized Gaussian beam originating from a 20-mW HeNe laser ( nm) is expanded and collimated by means of an expansion module delivering a beam waist mm. The beam is split using a polarizing beam splitter and focused in the active arm of the interferometer by a microscope objective ( mm) to spot size m. A custom built low-noise and high-speed transimpedance amplifier, with a gain of V/A, amplifies the photocurrent of a reverse-biased high-speed silicon PIN photodiode allowing low intensity fringe detection in a 200 MHz bandwidth. The optomechanical setup is simple and robust to vibrations when built on a dedicated optical breadboard, offering a relatively inexpensive solution and measurement accuracy comparable to commercially available laser Doppler vibrometers. We apply this technique to sensors of different design and materials, but matching resonant frequencies.
A benchmark of the measurement capability of such a system is given in Fig. 1(c). Thermally excited modes in a bandwidth of 1.5 MHz of a silicon cantilever [Fig. 1(b)], with length m, width m, and thickness nm, are detected as peaks in the amplitude spectral density (ASD) of oscillation when the interferometer is positioned at the cantilever free end. Thermal motion in such devices was previously used to detect femtogram virus particles binding on the cantilever beam surface.Gupta Using the analytically computed eigenfrequencies of the cantilever beam,Sarid with , mass density and elastic modulus GPa, the first four flexural mode frequencies compute to , 212.8, 596.0, 1167.9 kHz. These values agree well with measured frequencies 30.6, 194.1, 549.1, and 1080.2 kHz. Scanning and recording the ASD at 1-m increments along the cantilever enables mapping of the eigenmodes presented in the insets of Fig. 1(c). An interesting fact observed in the higher modes is the apparent increase in the of each mode from 20 for the fundamental at 31 kHz to 50 at 1.08 MHz. Braun et al.Braun05 have shown that the distributed mass sensitivity of a liquid-submerged cantilever increases with the mode frequency. For our sensors, an enhanced mass sensitivity is foreseeable at higher modes for detection of concentrated mass, well beyond Hz/fg given by fundamental mode operation only. Indeed this sensitivity should further benefit from the fact that the observed of the cantilever does not degrade for higher harmonics.

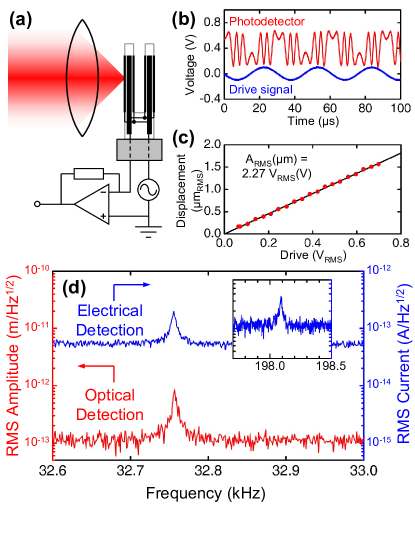
The tuning fork is an assembly of two cantilevers with intrinsic piezoelectric response and proven high sensitivity in AFM measurements. We optically and electrically characterize a commercial unit with a tine length of m, width m, and thickness m. The theoretical spring constant is obtained from N/m, where GPa. The tine displacement is measured by the interferometer with the active beam arm reflecting off the surface of one of the tines as shown in Fig. 2(a).
Positioning the interferometer at the free end of one of the fork tines and driving the fork at resonance with variable excitation voltages allows the calibration of the fork amplitude response. In Fig. 2(b) the photodetector signal is recorded while the fork is subjected to drive signal with mV and Hz (the experimentally determined fundamental frequency).
In Fig. 2(c) we plot measured amplitude vs to obtain the displacement sensitivity from the slope. is related to the piezoelectric strain constant and the surface charge on each electrode by where is the electrode length.Giessibl atomic resolution 2000 Taking a time derivative and replacing the spring constant with the theoretical value, we arrive at an expression for the fork sensitivity
| (1) |
where is the magnitude of the fork’s complex impedance. Setting C/N, k, mm, we find m/V. This agrees well with the experimentally observed value of 2.27 m/V. With the fork electrodes shorted, thermally excited motion is detected optically at the fundamental frequency as shown in Fig. 2(d). The optically detected integrated amplitude is pm. This is in excellent agreement with the expected value from equipartition, pm, using K and the theoretical . Also shown in Fig. 2(d) is the simultaneous piezoelectric current generated by thermally excited motion at the first two harmonics.

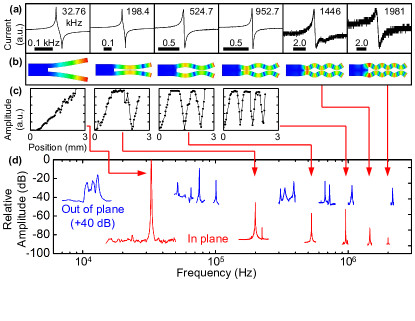
We proceed with identifying the higher eigenmodes of the fork, with both in-plane and out-of-plane amplitude components. Figure 3(d) displays the ASD of these detected modes with the readout point at the free end of the fork. Treating the fork as a cantilever, the in-plane resonance frequencies are computed at 32.2, 201.9, 565.3, 1107.7, 1830.9, and 2735.1 kHz, which approximate well only the first three experimental values. However, finite-element analysis (FEA) of the entire device reproduces the experimental results with better than 5% accuracy [see computed mode shapes in Fig. 3(b)]. We are able to scan the entire 2.4 mm tine and map the first 4 modes at 32.756, 198.1, 528.075, and 958.225 kHz [Fig. 3(c)]. The mode shapes for the resonances at 1453.85 and 2000.42 kHz are inferred as the 5th and 6th symmetric modes. Conductance measurements shown in Fig. 3(a) were carried out with the fork placed in vacuum ( Torr). The frequencies of these resonances match the first 6 in-plane optical values indicating that the piezoelectric coupling is maximized at these modes. Electrical excitation of the out-of-plane modes led to very small amplitudes (in the nm range for driving voltages up to 10 V). This is equivalent to out-of-plane motion 3 orders of magnitude smaller than in-plane modes [see Fig. 3(d)].
A mass sensing experiment was carried out in vacuum by attaching a 120-ng load to one tine of the fork. The first four electrically detected modes experienced frequency shifts of 50, 148, 221, and 305 Hz, indicating over six-fold improvement in mass sensitivity for operation at the fourth mode over the fundamental mode. Compared to Si, the minimum detectable mass with a quartz tuning fork also benefits from a boost in ( in vacuum). An observed dependence of the harmonic frequency shift is currently under investigation.
We conclude that higher oscillatory modes can be used to achieve higher speed and sensitivity for both force and mass sensing applications. The experimental mode shape identification can be used in optimizing sensing tip and mass position within nanoprobe setups.
This work was supported by NSF (Stanford-IBM Center for Probing the Nanoscale and CAREER Program) and ONR (YIP/PECASE). We acknowledge fellowship support from NSF (J.C.R), SBS Foundation (S.-H.S), and the Alfred P. Sloan Foundation (H.C.M). We thank D. Weld and T. Kopley for discussions.
References
- (1) G. Binnig and C. F. Quate, Phys. Rev. Lett. 56, 930 (1986).
- (2) T. R. Albrecht, P. Grütter, D. Horne, and D. Rugar, J. Appl. Phys. 69, 668 (1991).
- (3) F. J. Giessibl, Appl. Phys. Lett. 73, 3956 (1998).
- (4) F. J. Giessibl, Appl. Phys. Lett. 76, 1470 (2000).
- (5) T. D. Rossing, D. A. Russel, and D. E. Brown, Am. J. Phys. 60, 620 (1992).
- (6) U. Dürig, New J. Phys. 2, 5.1 (2000).
- (7) S. Hembacher, F. J. Giessibl, and J. Mannhart, Science 305, 380 (2004).
- (8) S. Liu, J. L. Sun, H. S. Sun, X. J. Tan, S. Shi, J. H. Guo, and J. Zhao, Chin. Phys. Lett. 20, 1928 (2003).
- (9) O. Sahin, C. F. Quate, and O. Solgaard, Phys. Rev. B 69, 165416 (2004).
- (10) S. Sadewasser, G. Villanueva, and J. A. Plaza, Appl. Phys. Lett. 89, 033106 (2006).
- (11) T. Braun, V. Barwich, M. K. Ghatkesar, A. H. Bredekamp, C. Gerber, M. Hegner, and H. P. Lang, Phys. Rev. E 72, 31907 (2005).
- (12) D. Rugar, H. J. Mamin, R. Erlandsson, J. E. Stern, and B. D. Terris, Rev. Sci. Inst. 59, 2337 (1988).
- (13) C. Schonenberger and S. F. Alvarado, Rev. Sci. Inst. 60, 3131 (1989).
- (14) R. Erlandsson, G. M. McClelland, C. M. Mate, and S. Chiang, J. of Vac. Sci. Technol. A 6, 266 (1988).
- (15) N. V. Lavrik and P. G. Datskos, Appl. Phys. Lett. 82, 2697 (2003).
- (16) A. Gupta, D. Akin, and R. Bashir, Appl. Phys. Lett. 84, 1976 (2004).
- (17) D. Sarid, Scanning Force Microscopy (Oxford University Press, New York, 1994).