The Design of a Novel Prismatic Drive for a Three-DOF Parallel-Kinematics Machine
Abstract
The design of a novel prismatic drive is reported in this paper. This transmission is based on Slide-O-Cam, a cam mechanism with multiple rollers mounted on a common translating follower. The design of Slide-O-Cam was reported elsewhere. This drive thus provides pure-rolling motion, thereby reducing the friction of rack-and-pinions and linear drives. Such properties can be used to design new transmissions for parallel-kinematics machines. In this paper, this transmission is optimized to replace ball-screws in Orthoglide, a three-DOF parallel robot optimized for machining applications.
1 Introduction
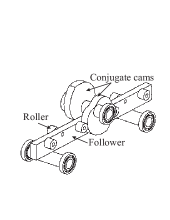
In robotics and mechatronics applications, whereby motion is controlled using a piece of software, the conversion of motion from rotational to translational is usually done by ball screws or linear actuators. Of these alternatives, ball screws are gaining popularity, one of their drawbacks being the high number of moving parts that they comprise, for their functioning relies on a number of balls rolling on grooves machined on a shaft; one more drawback of ball screws is their low load-carrying capacity, stemming from the punctual form of contact by means of which loads are transmitted. Linear bearings solve these drawbacks to some extent, for they can be fabricated with roller bearings, their drawback being that these devices rely on a form of direct-drive motor, which makes them expensive to produce and to maintain. A novel transmission, called Slide-O-Cam, was introduced in [1] (Fig. 2) to transform a rotation into a translation. Slide-O-Cam is composed of four major elements: (i) the frame, (ii) the cam, (iii) the follower and (iv) the rollers. The input axis on which the cam is mounted, the camshaft, is driven at a constant angular velocity. Power is transmitted to the output, the translating follower, which is the roller-carrying slider, by means of pure-rolling contact between cam and roller. The roller comprises two components, the pin and the bearing. The bearing is mounted at one end of the pin, while the other end is press-fit into the roller-carrying slider. Contact between cam and roller thus takes place at the outer surface of the bearing. The mechanism uses two conjugate cam-follower pairs, which alternately take over the motion transmission to ensure a positive action; rollers are driven by the cams, throughout a complete cycle. The main advantage of using a cam-follower mechanism instead of an alternative transmission to transform rotation into translation is that contact through a roller reduces friction, contact stress and wear.
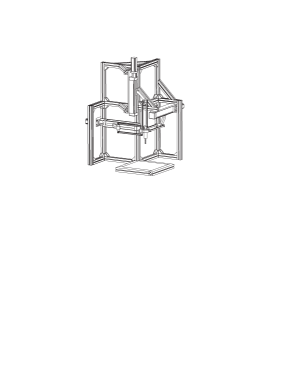
This transmission will be optimized to replace the three ball screws used by the Orthoglide prototype [2]. Orthoglide features three prismatic joints mounted orthogonaly, three identical legs and a mobile platform, which moves in the Cartesian -- space with fixed orientation, as shown in Fig. 2. The motor used to move each axis is SANYO DENKI (ref. P30B08075D) with a constant torque of 1.2 Nm from 0 to 3000 rpm. This property enables the mechanism to move throughout the workspace a 4 kg load with an acceleration of 17 ms-2 and a velocity of 1.3 ms-1. On the ball screws, the pitch is 50 mm per cam turn. The minimum radius of the camshaft is 8.5 mm.
Unlike Lampinen [3], who used a genetic algorithm, we use a deterministic method, while taking into account geometric and machining constraints as outlined in [4]. In section 2, we introduce the relations describing the cam profile and the mechanism kinematics. In Section 3, we derive conditions on the design parameters so as to have a fully convex cam profile, to avoid undercutting, and to have a geometrically feasible mechanism. In Section 4, the pressure angle, a key performance index of cam mechanisms, is studied in order to choose the design parameters that give the best pressure-angle distribution, a compromise being done with the accuracy of the mechanism.
2 Synthesis of the Planar Cam Mechanism
Let the - frame be fixed to the machine and the - frame be attached to the cam, as depicted in Fig. 4. is the origin of both frames, while is the center of the roller and is the contact point between cam and roller.
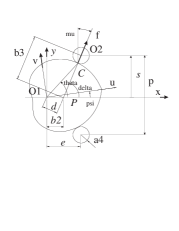
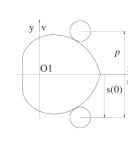
The geometric parameters defining the cam mechanism are illustrated in the same figure. The notation of this figure is based on the general notation introduced in [5], namely, (i) : the pitch, i.e., the distance between the center of two rollers on the same side of the follower; (ii) : distance between the axis of the cam and the line of centers of the rollers; (iii) : radius of the roller bearing, i.e., the radius of the roller; (iv) : angle of rotation of the cam, the input of the mechanism; (v) : position of the center of the roller, i.e, the displacement of the follower, the output of the mechanism; (vi) : pressure angle; (vii) f: force transmitted from the cam to the roller. In this paper, is set to 50 mm, in order to meet the Orthoglide specifications.
The above parameters as well as the contact surface on the cam, are determined by the geometric relations dictated by the Aronhold-Kennedy Theorem in the plane [6]. When the cam makes a complete turn (), the displacement of the roller is equal to , the distance between two rollers on the same side of the roller-carrying slider (). Furthermore, if we consider the initial configuration of the roller as depicted in Fig. 4, the roller is on the lower side of the -axis for , so that we have . Hence, the input-output function is
| (1) |
The expression for the first and second derivatives of with respect to will be needed:
| (2) |
The cam profile is determined by the displacement of the contact point around the cam. The Cartesian coordinates of this point in the - frame take the form [5]
| (3a) | |||||
| (3b) | |||||
with coefficients , and given by
| (4a) | |||||
| (4b) | |||||
| (4c) | |||||
where is the directed angle between the axis of the cam and the translating direction of the follower; is positive in the ccw direction. Considering the orientation adopted for the input angle and for the output , as depicted in Fig. 4, we have
| (5) |
We now introduce the nondimensional design parameter , which will be extensively used:
| (6) |
Thus, from Eqs. (1), (2), (4a-c), (5) and (6), we compute the expressions for coefficients , and as
| (7a) | |||||
| (7b) | |||||
| (7c) | |||||
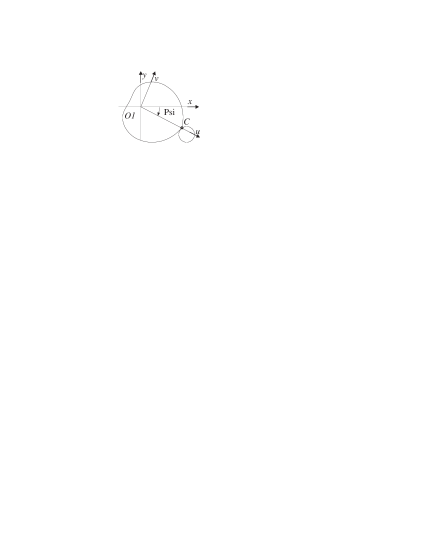
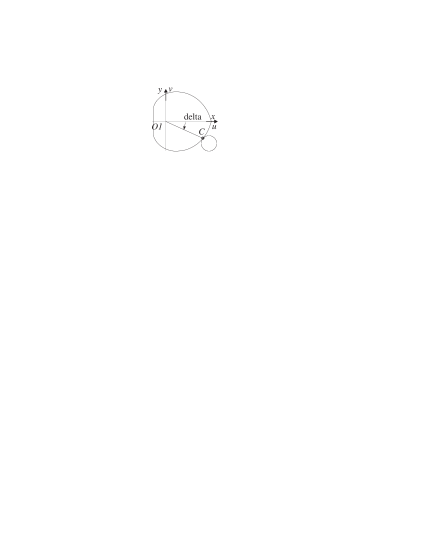
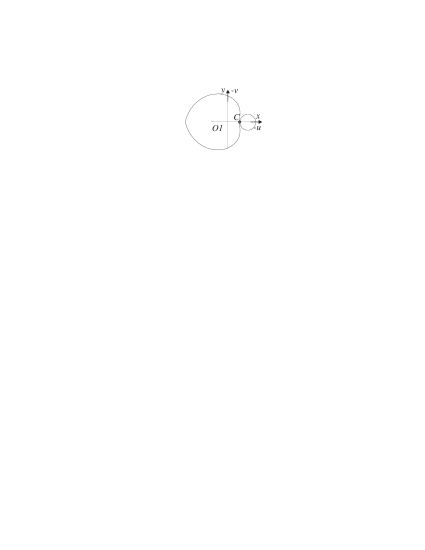
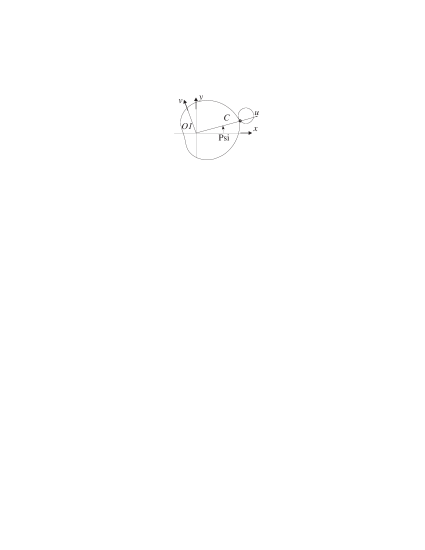
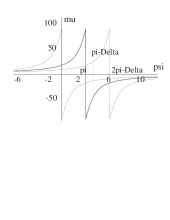
whence a first constraint on , , is derived. An extended angle is introduced [7], so that the cam profile closes. Angle is obtained as the root of the equation . In the case of Slide-O-Cam, is negative, as shown in Fig. 5. Consequently, the cam profile closes within .
2.1 Pitch-Curve Determination
The pitch curve is the trajectory of the center of the roller, distinct from the trajectory of the contact point , which produces the cam profile. The Cartesian coordinates of point in the - frame are , as depicted in Fig. 4. Hence, the Cartesian coordinates of the pitch-curve in the - frame are
| (8a) | |||||
| (8b) | |||||
2.2 Geometric Constraints on the Mechanism
In order to lead to a feasible mechanism, the radius of the roller must satisfy two conditions, as shown in Fig. 6a:
Two consecutive rollers on the same side of the roller-carrying slider must not be in contact. Since is the distance between the center of two consecutive rollers, we have the constraint . Hence the first condition on :
| (9) |
The radius of the shaft on which the cams are mounted must be taken into consideration. Hence, we have the constraint , the second constraint on in terms of the parameter thus being
| (10) |
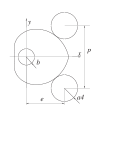
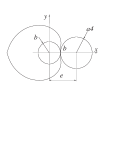
Considering the initial configuration of the roller, as depicted in Fig. 4, the -component of the Cartesian coordinate of the contact point is negative in this configuration, i.e., . Considering the expression for and for parameters and given in Eqs. (3b), (7b & c), respectively, the above relation leads to the condition:
Further, we define and as:
Since , we have,
| (11) |
Hence, . Furthermore, from the constraint on , stated in Eq. (9), we have , whence . Consequently, the constraint leads to the constraint . We rewrite the expression for , by using the trigonometric relation,
which holds only if . Finally, the constraint leads to a constraint on :
| (12) |
2.3 Pressure Angle
The pressure angle is defined as the angle between the common normal at the cam-roller contact point and the velocity of the follower [8], as depicted in Fig. 4, where the presure angle is denoted by . This angle plays an important role in cam design. The smaller , the better the force transmission. In the case of high-speed operations, i.e., angular velocities of cams exceeding 50 rpm, the recommended bounds of the pressure angle are within 30∘. Nevertheless, as it is not always possible to have a pressure angle that remains below 30∘, we adopt the service factor, which is the percentage of the working cycle with a pressure angle within 30∘ [7]. The service angle will be useful to take into consideration these notions in the ensuing discussion, when optimizing the mechanism.
For the case at hand, the expression for the pressure angle is given in [8] as
Considering the expressions for and , and using the parameter given in Eqs. (1), (2a) and (6), respectively, the expression for the pressure angle becomes
| (13) |
We are only interested in the value of the pressure angle with the cam driving the roller, which happens with
| (14) |
Indeed, if we start the motion in the initial configuration depicted in Fig. 5b, with the cam rotating in the ccw direction, the cam begins to drive the roller only when ; and the cam can drive the follower until contact is lost, i.e., when , as shown in Figs. 5c & d.
Nevertheless, as shown in Fig. 8, the conjugate cam can also drive the follower when ; there is therefore a common interval, for , during which two cams can drive the follower. In this interval, the conjugate cam can drive a roller with lower absolute values of the pressure angle. We assume that, when the two cams can drive the rollers, the cam with the lower absolute value of pressure angle effectively drives the follower. Consequently, we are only interested in the value of the pressure angle in the interval,
| (15) |
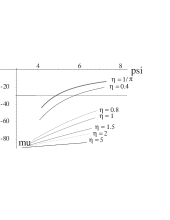
We study here the influence of parameters and on the values of the pressure angle while the cam drives the roller, i.e., with , as explained above.
Influence of parameter : Figure 8 shows the influence of the parameter on the pressure angle, with and being fixed. From these plots we have one result: The lower , the lower .
Influence of the radius of the roller : does not appear in the expression for the pressure angle, but it influences the value of the extended angle , and hence, the plot boundaries of the pressure angle, as shown in Fig. 8.
By computing the value of the extended angle for several values of , we can say that the higher , the lower . Consequently, since the boundaries to plot the pressure angle are and , we can say that when we increase , decreases and the boundaries are translated toward the left, i.e., toward higher absolute values of the pressure angle.
3 Convexity of the Cam Profile and Undercutting
In order to enhance machining accuracy, we need the cam profile to be fully convex. In this section we establish conditions on the design parameters and in order to have a fully convex cam profile. So, we study the sign of the curvature of the cam profile via that of the pitch curve. Furthermore, for cam design in roller-follower mechanisms, we should also consider undercutting. Undercutting occurs when the radius of the roller is greater than or equal to the minimum absolute value of the radius of curvature of the pitch curve. Upon avoiding undercutting, the sign of the curvature of the pitch curve is identical to that of the cam profile.
3.1 Curvature of the Cam Profile
The curvature of any planar parametric curve, in terms of the Cartesian coordinates and , and parameterized with any parameter , is given by [8]:
| (16) |
The sign of in Eq. (16) tells whether the curve is convex or concave at a point: a positive implies a convexity, while a negative implies a concavity at that point. To obtain the curvature of the cam profile for a given roller-follower, we use the Cartesian coordinates of the pitch curve, since obtaining its first and second derivatives leads to simpler expressions as compared with those associated with the cam profile itself. Then, the curvature of the cam profile is derived by a simple geometric relationship between the curvatures of the pitch curve and of the cam profile.
The Cartesian coordinates of the pitch curve were recalled in Eqs. (8a & b), while Eqs. (2a & b) give their first and second derivatives
With the above-mentioned expressions, we can compute the first and second derivatives of the Cartesian coordinates of the pitch curve with respect to the angle of rotation of the cam, :
| (17a) | |||||
| (17b) | |||||
| (17c) | |||||
| (17d) | |||||
By substituting , , along with Eqs. (17a-d), into Eq. (16), the curvature of the pitch curve is obtained as
| (18) |
provided that the denominator never vanishes for any value of , i.e., provided that
| (19) |
Let and be the radii of curvature of both the cam profile and the pitch curve, respectively, and the curvature of the cam profile. Since the curvature is the reciprocal of the radius of curvature, we have and . Furthermore, due to the definition of the pitch curve, it is apparent that
| (20) |
Writing Eq. (20) in terms of and , we obtain the curvature of the cam profile as
| (21) |
with given in Eq. (18). As we saw previously, we want the cam profile to be fully convex, which happens if the pitch curve is fully convex too. We thus find first the convexity condition of the pitch curve.
3.2 Convexity Condition of the Pitch Curve
Considering the expression for in Eq. (18), we have, for every value of , if and , whence the condition on :
| (22) |
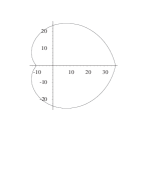
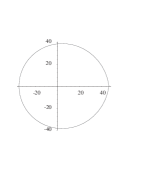
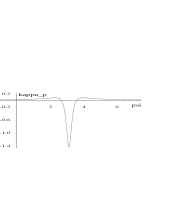
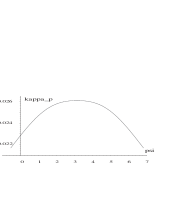
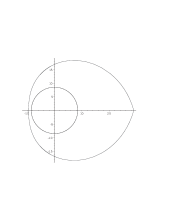
Figure 9 shows pitch curve profiles and their curvatures for two values of .
3.3 Undercutting Avoidance
We assume in this subsection that the pitch curve is fully convex, i.e., and . In order to avoid undercutting, i.e., in order to have both the cam profile and the pitch curve fully convex, we need to be positive. Considering the expression for the curvature of the cam profile of Eq. (21), the condition to avoid undercutting is , whence the condition on the radius of the follower is
Since is positive, this condition can be written as
| (24) |
Expression for : In order to compute the expression for , we need the first derivative of with respect to and its roots. With the condition , the expression for given in Eq. (18) is differentiable for every value of . Thus, we obtain
The roots of are, apparently, and the roots and of the polynomial
Let be the discriminant of the equation , i.e.,
Therefore, the sign of and, consequently, the roots and , depend on the value of . Let be the discriminant of , a quadratic equation in . Hence, , which is positive. The two roots of are and . Thus,
| if | ||||
| if |
We now study the roots of according to the value of .
: , and the polynomial has two roots and , so that has three roots:
| (25a) | |||||
| (25b) | |||||
| (25c) | |||||
: , and the polynomial has no real roots, so that has only one root, .
: , and the polynomial has one double root equal to , so that has one triple root .
To decide whether these roots correspond to minima or maxima, we need to know the sign of the second derivative of with respect to , for the corresponding values of . If the second derivative is negative, the stationary value is a maximum; if positive, a minimum. The expressions for the second derivatives were computed with Maple, for the values of given in Eqs. (25a-c):
If , and , the curvature of the pitch curve has one local minimum for and two maxima, for and . Hence, the value of is
| (26) |
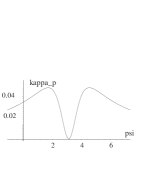
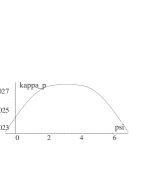
Figure 10a shows a plot of the pitch-curve curvature with and mm. Since is taken equal to the convexity limit , the curvature remains positive and only vanishes for .
If , , the curvature of the pitch curve has a maximum for . Hence, the value of is
| (27) |
Figure 9d shows a plot of the pitch-curve curvature with () and mm.
If , , we cannot tell whether we are in the presence of a maximum or a minimum. We solve this uncertainty graphically, by plotting the curvature of the pitch curve for and mm. Figure 10b reveals that the curvature has a maximum for . The value of this maximum can be obtained by substituting by into either or , expressed in Eqs. (26) and (27), respectively.
In summary, to have a fully convex cam profile, taking the geometric constraints on the mechanism into consideration, parameter must obey the condition given in Eq. (23), i.e. . We combine the condition on to avoid undercutting, as given in Eq. (24), with the geometric constraints on the mechanism, as given in Eqs. (9) and (10), which are, respectively, and :
| (28a) | |||||
| (28b) | |||||
4 Optimization of the Roller Pin
We concluded in previous section that the lowest values of parameters and led to the lowest values of the pressure angle. Nevertheless, we must take into consideration that the smaller the radius of the roller, the bigger the deformation of the roller pin, and hence, a decrease of the stiffness and the accuracy of the mechanism. In this section we formulate and solve an optimization problem to find the best compromise on parameters and to obtain the lowest pressure angle values with an acceptable deformation of the roller pin.
4.1 Minimization of the Elastic Deformation on the Roller Pins
Here we find the expression for the maximum elastic deformation on the pin, which will be minimized under given constraints. Figure 11 displays the free part of the pin, i.e., the part not fixed to the roller-carrying slider, as a cantilever beam, where the load denotes the magnitude of the force f transmitted by the cam. This force is applied at a single point at the end of the pin in the worst loading case. Although the dimensions of the pin are not those of a simple beam, we assume below that the pin can be modelled as such, in order to obtain an explicit formula for its deflection. This assumption was found to be plausible by testing it with FEA [9].
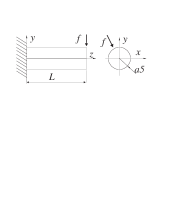
The displacement at the free end of the pin turns out to be
| (29) |
where is the Young modulus and , with denoting the radius of the pin, is the polar moment of inertia of the cross section. Moreover, and are the pin elastic displacements in the - and -directions, respectively, at the free end.
Before proceeding, we prove that the vertical component of the transmitted force is constant, and hence, we will consider only the magnitude of the -component of . Since we assume that the mechanism undergoes a pure-rolling motion, the force exerted by the cam onto the roller, denoted by , passes through the center of the roller, i.e., its line of action passes through points and , as depicted in Fig. 4. With a constant torque provided by the motor, we have , where denotes the distance from the center of the input axis to the line of action of the force f. Moreover, we have . Hence, . Finally, since we obtain the expression for sought:
| (30) |
Since is constant, is also constant throughout one cycle. Consequently we only have to consider the -component of f, and hence, for the minimization problem:
| (31) |
thus being a constant factor. The objective function , to be minimized, is thus defined as
| (32) |
where is the maximum value of throughout one cycle. Since
| (33) |
we obtain
with , a function of , given in Eq. (7c). Moreover, the system operates by means of two conjugate mechanisms, which alternately take over the power transmission. We established in Eq. (15) that when one mechanism is in positive action, is bounded between and , which corresponds to bounded between and with . Moreover, functions and are both unimodal in and in , their common maxima finding themselves at , and . Since is better behaved than , we redefine as
Furthermore, the function attains its global minimum of in , its maximum in the interval , included in , occurring at the larger of the two extremes of the interval, or . It follows that the objective function to be minimized becomes
with and the values of for and , respectively. Using the expression for given in Eq. (7c) and the trigonometric identity
we obtain the expression for :
| (34) |
Hence,
| (35a) | |||||
| (35b) | |||||
Furthermore, since , and , we have , and, consequently, from Eqs. (35a & b), and the objective function to minimize becomes
| (36) |
with given in Eq. (35a) and .
4.2 Geometric Constraints
Two neighboring pins cannot be tangent to each other, as depicted in Fig. 13, and hence the radius of the pin is bounded as
| (37) |
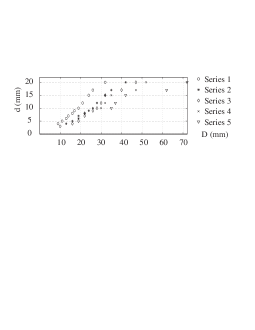
Furthermore, and are not independent. From the SKF catalogue, for example, we have information on bearings available in terms of the outer radius and the inner radius , as shown in Fig. 13. We divide these bearings into five series, from 1 to 5. Hence, each series can be represented by a continuous function. We chose series 2, in which the basic dynamic load rating lies between 844 and N. Furthermore, for series 2, the relation between and can be approximated by a linear function vs. , (in mm). Since and , the above equation leads to
| (38) |

4.3 Results of the Optimization Problem
We solve the foregoing optimization problem with an algorithm implemented Matlab, using mm and mm. One solution is found, corresponding to and mm, with a value of . The algorithm finds the values of and as big as possible considering the constraints. For this solution, constraints (42d & e) are active. Nevertheless, as we saw in subsection 3.3. about the influence of parameters and , we want these parameters to be as small as possible in order to have low pressure-angle values. For the solution found above, the service factor is equal to 0%. Consequently, we must find a compromise between the pressure angle and the roller-pin elastic deformation. Table 1 shows solutions found by the optimization algorithm upon reducing the boundaries of . Each time the algorithm finds the corresponding value of as big as possible, constraint (42d) becomes active. Recorded in this table is also the corresponding maximum elastic deformation of the roller pin (its expression is derived below), the minimum and the maximum absolute values of the pressure angle, and , respectively, and the service factor, as defined in section 2.4. From Eqs. (29) and (31) we have
Using Eqs. (30) and (33), the above equation leads to
Which can be simplified by means of the expression for given in Eq. (35a) as
| (43) |
with , and given in Eqs. (31), (30) and (38), respectively, and . In Table 1 we record the value of with mm, Nm (according to the Orthoglide specifications recalled in section 1) and MPa. We conclude from Table 1 that for this cam profile we cannot find an acceptable compromise between a low deformation of the roller pin, and hence a high stiffness and accuracy of the mechanism, and low pressure-angle values. Indeed, for an acceptable deformation of the roller pin, m, obtained with , the service factor equals 54.68%, which is too low. On the other hand, for an acceptable service factor of 79.43%, obtained with , the deformation of the roller pin is equal to 710.19 m.
| (mm) | (mm) | (m) | (∘) | (∘) | service factor (%) | ||
|---|---|---|---|---|---|---|---|
| 0.69 | 24.99 | 12.50 | 249 | 0.09 | 42.11 | 80.68 | 0 |
| 0.5 | 15.5 | 6.56 | 2968 | 0.50 | 28.59 | 69.81 | 6.85 |
| 0.4 | 10.5 | 3.44 | 32183 | 4.32 | 20.31 | 57.99 | 46.68 |
| 0.39 | 10 | 3.12 | 45490 | 6.07 | 19.46 | 56.42 | 50.68 |
| 0.38 | 9.5 | 2.81 | 66659 | 8.87 | 18.61 | 54.78 | 54.68 |
| 0.37 | 9 | 2.50 | 102171 | 13.63 | 17.75 | 53.04 | 58.69 |
| 0.36 | 8.5 | 2.19 | 165896 | 22.31 | 16.89 | 51.22 | 62.69 |
| 0.35 | 8 | 1.87 | 290765 | 39.71 | 16.03 | 49.31 | 66.70 |
| 0.34 | 7.5 | 1.56 | 566521 | 79.18 | 15.17 | 47.31 | 70.72 |
| 0.33 | 7 | 1.25 | 1.29 106 | 186.06 | 14.31 | 45.21 | 74.73 |
| 6.41 | 0.88 | 4.68 106 | 710.19 | 13.31 | 42.64 | 79.43 |
5 A Non-Coaxial Conjugate-Cam Mechanism
This Section describes a new mechanism, based on Slide-O-Cam, that enables us to decrease considerably the pressure angle while meeting the Orthoglide specifications. This mechanism is composed of three conjugate cams mounted on three parallel shafts, the rollers being placed on one single side of the roller-carrying slider. One motor provides the torque to the central camshaft, this torque then being transmitted to the two other camshafts through a parallelogram mechanism coupling them, whose detailed design is reported in [10]. We denote by 1, 2 and 3 the three cams, as shown in Fig. 14.
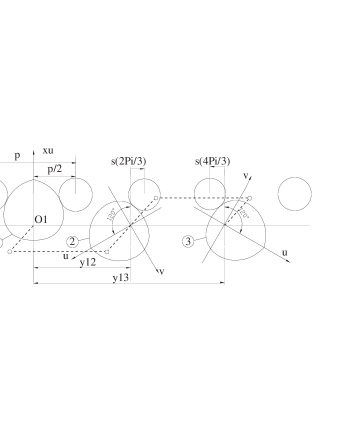
The profile of each cam is described in Section 2. The cams are mounted in such a way that the angle between the -axis of cam 1 and cam 2 is 120∘, and the angle between the -axis of cam 1 and cam 3 is 240∘. According to the configuration of the mechanism depicted in Fig. 14, and denoting by and the distance between the origin of 1 and 2, and between the origin of 1 and 3, respectively, we have
Using the expression of the input-output function given in Eq. (1), we obtain
| (44) |
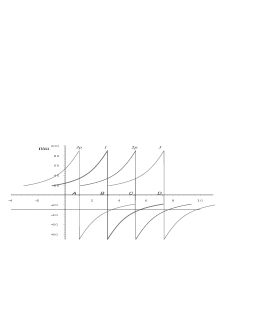
Figure 16 shows the pressure angle variation for each cam vs. where 1, 2 and 3 denote the plot of the pressure angle for cams 1, 2 and 3, respectively. Moreover, cams 2 and 3 are rotated by angles and , respectively, from cam 1. We can also consider that the plot for cam 3 that drives the follower before cam 1 in a previous cycle, refereed to as 3’ in Fig. 16, is a translation of from cam 1. As we saw in Eq. (14), cam 1 can drive the follower within , which corresponds in Fig. 16 to the part of the plot 1 between points and . Consequently, cam 2 can drive the follower within
and cam 3 within
which is equivalent to saying that cam 3 can drive the follower in a previous cycle, within
The above interval corresponds in Fig. 16 to the part of the plot 3’ between points and . Consequently, there is a common part for cams 1 (plot 1) and 3 (plot 3’) during which these two cams can drive the follower, namely, between points and , which corresponds to . Moreover, during this common part, cam 3 has lower absolute pressure angle values than 1, and hence, we consider that only cam 3 drives the follower. Consequently, cam 1 drives the follower only within . These boundaries allow us to have a pressure angle lower than with coaxial conjugate cams, since we do not use anymore the part of the cam profile within , which has high absolute pressure angle values. We can thus obtain a higher service factor for the mechanism. The drive thus design is sketched in Fig. 16.
6 Conclusions
The non-coaxial conjugate-cam mechanism reported here allows us to drive the Orthoglide with prismatic actuators using rotary DC motors. Moreover, the maximum roller-pin deformation derived in eq.(43) is reasonable low. In Table 2, we record the values of , , , , , and the service factor for the non-coaxial conjugate-cam mechanism. The best compromise is to use the non-coaxial conjugate-cam mechanism with , whence the radius of the roller is mm and the roller-pin deformation is m with a good service factor of 88.03%.
| (mm) | (mm) | (m) | (∘) | (∘) | service factor (%) | |
|---|---|---|---|---|---|---|
| 0.5 | 15.5 | 6.56 | 0.26 | 28.59 | 49.41 | 10.49 |
| 0.4 | 10.5 | 3.44 | 2.88 | 20.31 | 37.20 | 70.02 |
| 0.39 | 10 | 3.12 | 4.14 | 19.46 | 35.81 | 76.02 |
| 0.38 | 9.5 | 2.81 | 6.20 | 18.61 | 34.39 | 82.02 |
| 0.37 | 9 | 2.50 | 9.76 | 17.75 | 32.95 | 88.03 |
| 0.36 | 8.5 | 2.19 | 16.39 | 16.89 | 31.48 | 94.04 |
| 0.35 | 8 | 1.87 | 29.89 | 16.03 | 29.98 | 100 |
| 0.34 | 7.5 | 1.56 | 61.07 | 15.17 | 28.47 | 100 |
| 0.33 | 7 | 1.25 | 147.02 | 14.31 | 26.93 | 100 |
| 6.41 | 0.88 | 576.95 | 13.31 | 25.12 | 100 |
References
- [1] [1] González-Palacios, M. A. and Angeles, J., 2000, “The novel design of a pure-rolling transmission to convert rotational into translational motion,” Proc. 2000 ASME Design Engineering Technical Conferences, Baltimore, Sept. 10-13, CD-ROM.
- [2] [2] Chablat, D. and Wenger Ph. 2003, “Architecture Optimization of a 3-DOF Parallel Mechanism for Machining Applications, the Orthoglide,” IEEE Transactions on Robotics and Automation, Vol. 19/3, pp. 403-410, June.
- [3] [3] Lampinen, J., 2003, “Cam shape optimisation by genetic algorithm,” Computer-Aided Design, Vol. 35, pp. 727 -737.
- [4] [4] Bouzakis, K.D., Mitsi, S. and Tsiafis, J., 1997, “Computer-Aided Optimum Design and NC Milling of Planar Cam Mechanims,” Int. J. Math. Tools Manufaet. Vol. 37, No. 8, pp. 1131-1142.
- [5] [5] Gonzáles-Palacios, M. A. and Angeles, J., 1993, Cam Synthesis, Kluwer Academic Publishers B.V., Dordrecht.
- [6] [6] Waldron, K. J. and Kinzel, G. L., 1999, Kinematics, Dynamics, and Design of Machinery, John Wiley & Sons, Inc., New York.
- [7] [7] Lee, M.K., 2001, Design for Manufacturability of Speed-Reduction Cam Mechanisms, M.Eng. Thesis, Dept. of Mechanical Engineering, McGill University, Montreal.
- [8] [8] Angeles, J. and López-Cajún,C., 1991, Optimization of Cam Mechanisms, Kluwer Academic Publishers B.V., Dordrecht.
- [9] [9] Teng, C.P. and Angeles, J., 2004, “An optimality criterion for the structural optimization of machine element,” ASME Journal of Mechanical Design, Accepted for publication.
- [10] [10] Renotte, J. and Angeles, J. “The Design of a Pure-Rolling Ca Mechanism to Convert Rotationnal into Translational Motion,” Internal Report, TR-CIM-03-06, August, 2003.